Introduction
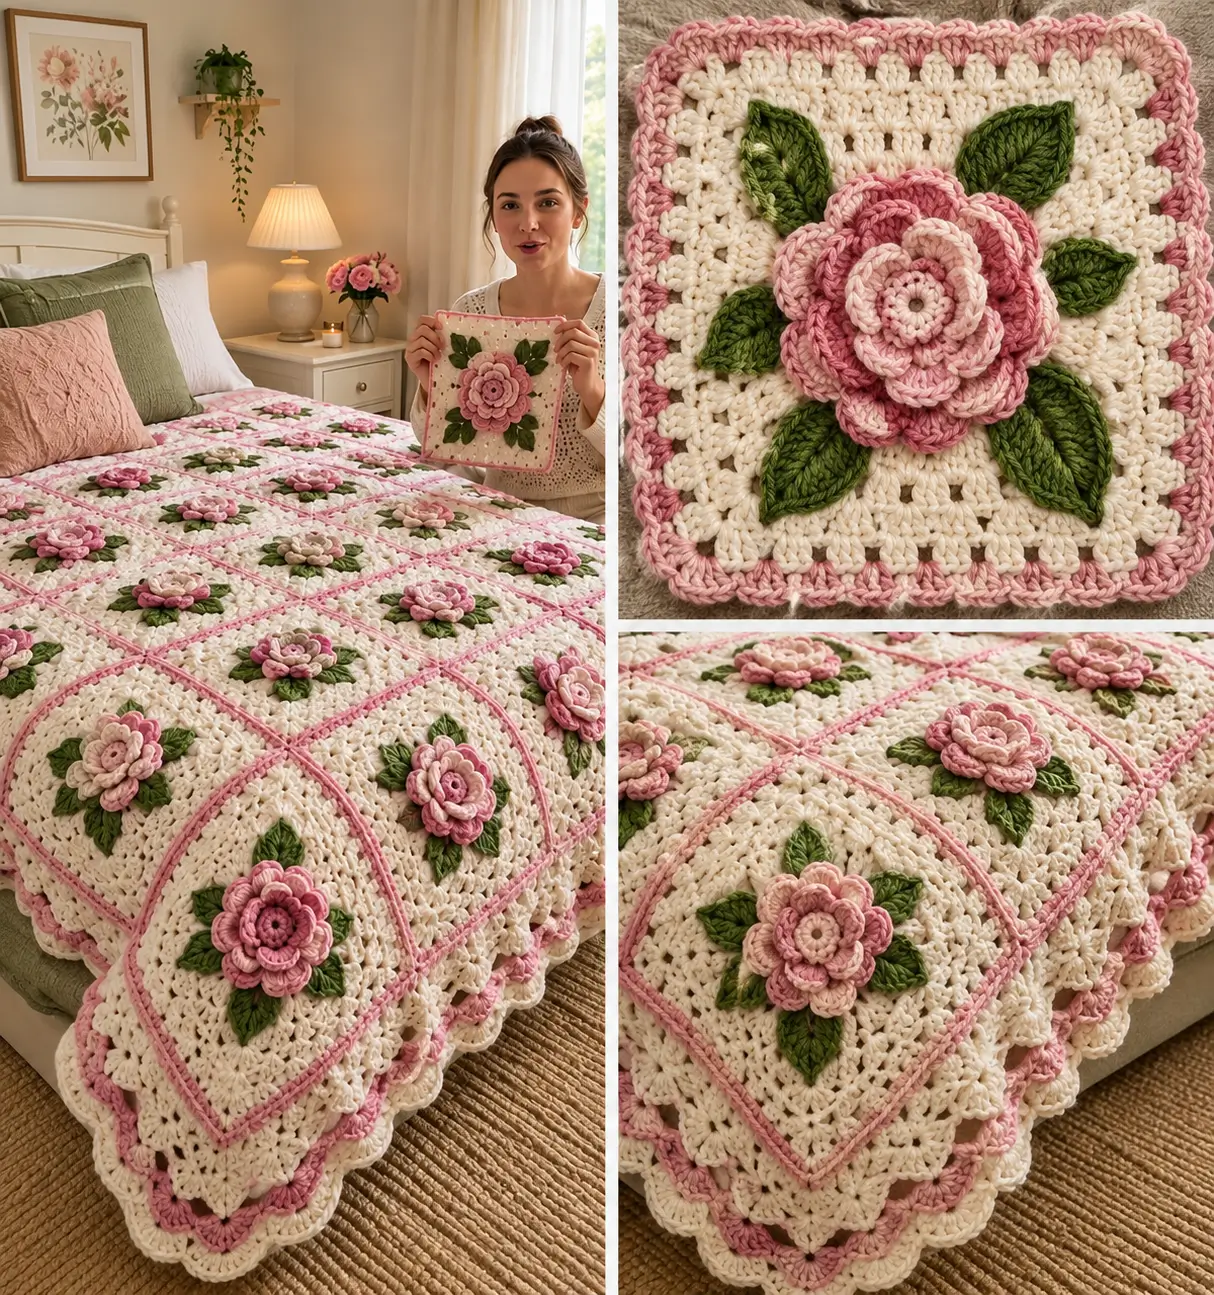
A rose this deep can turn a flat bedspread into a field of ridges if the square beneath it is too soft. This 3D rose granny square bedspread crochet pattern uses DK yarn and a 4 mm hook for a finished cover of approximately 150 × 200 cm. Forty-eight cream squares, layered pink roses, green leaves and a scalloped border form the intermediate construction.
The Design: What Makes This Rose Bedspread Different
The rose occupies most of each square, so the cream background has to carry considerably more weight than a standard flat granny motif. Each flower uses three graduated petal tiers: a tight pale center, a medium pink layer and a broader dusty-pink outer layer. Green leaves spread behind the flower before the motif transitions into a cream square measuring approximately 23–25 cm after blocking. Narrow pink seams remain visible between completed squares, converting the floral field into a strong geometric grid. The outer edge then becomes more open, using cream arches, pink accent stitches and large cream scallops. This pink rose crochet blanket differs from many compact rose granny squares because the individual motifs are intentionally large. One frequent construction error is attaching every rose petal to the square; only the structural base should be secured so the upper layers stay raised.
Project Information at a Glance
| Skill Level | Time | Finished Size | Hook | Best For |
|---|---|---|---|---|
| Intermediate | 50–70 hours | Approx. 150 × 200 cm | 4.0 mm | Bed coverings, floral interiors and heirloom blankets |
Materials and Tools
Yarn
- Warm cream/ivory — DK or light-worsted cotton blend — approximately 1,800–2,200 g — square backgrounds and outer border
- Blush pink — DK/light worsted — approximately 180–220 g — inner rose petals
- Medium rose pink — DK/light worsted — approximately 220–280 g — middle rose petals
- Dusty rose — DK/light worsted — approximately 180–220 g — outer petals and tonal variation
- Soft pink — DK/light worsted — approximately 120–160 g — motif joins and border accent
- Leaf green — DK/light worsted — approximately 250–350 g — leaves
Tools
- 4.0 mm crochet hook
- 3.5 mm hook for firmer roses if required
- Large-eye yarn needle
- Locking stitch markers
- Blocking mats
- Rust-resistant blocking pins
- Scissors
- Measuring tape
Make one complete floral square before purchasing the final yarn quantity. The target measurement is 23–25 cm after blocking, and all finished motifs should stay within approximately 5 mm of that measurement.
Abbreviations
- MR — magic ring
- ch — chain
- sl st — slip stitch
- sc — single crochet
- hdc — half double crochet
- dc — double crochet
- tr — treble crochet
- FLO — front loop only
- BLO — back loop only
- sp — space
- ch-sp — chain space
- RS — right side
- WS — wrong side
When a petal round is worked behind another layer, place the hook into the unused back loops or the specified rear chain spaces rather than piercing the completed petal.
Pattern — Step by Step
Make 48 complete motifs for a six-by-eight layout. Work one test square through the final cream round, block it, then adjust the number of final extension rounds only if required to reach 23–25 cm.
Rose Center — Make 48
Yarn: pale blush pink.
R1: 6 sc in MR (6)
R2: inc × 6 (12)
R3: BLO inc × 12 (24)
Keep the front loops of R2 and R3 accessible. They form attachment points for the first two raised petal layers.
Do not fasten off until the first petal foundation is positioned.
Inner Rose Petals
Yarn: pale blush pink.
Working in the unused front loops of R2, create six petals.
For each petal work:
(sl st, ch 2, hdc, 2 dc, hdc, ch 2, sl st) across 2 front loops.
Repeat six times around.
Fasten off.
Fold these petals upward. The opening at the center should remain visible rather than closing into a dense ball.
Middle Rose Petals
Yarn: medium rose pink.
Join yarn in the unused front loops of R3.
Work 8 petal groups evenly around the 24-loop foundation.
Each middle petal:
sl st in first loop, ch 3, hdc in next loop, 3 dc in next loop, hdc in next loop, ch 3, sl st in next available loop.
Distribute the eight petals evenly rather than forcing every petal across an identical number of loops.
Fasten off.
Outer Rose Foundation
Yarn: dusty rose or medium pink.
Join behind the middle petals around the structural base.
R1: *ch 6, sl st around the base approximately one-eighth of the circumference farther along* × 8.
Join to the first attachment point.
Outer Rose Petals — Make Eight
Into each ch-6 space work:
sc, hdc, 2 dc, 3 tr, 2 dc, hdc, sc.
Repeat in all eight spaces.
Fasten off with a 35 cm tail.
Shape the outer petals almost horizontally. They should spread over the leaves without being sewn flat to them.
Optional Fourth Petal Accent Layer
Use this additional tier only if your rose measures less than approximately 13 cm after three layers.
Create eight ch-7 spaces behind the existing petals.
Into each space work:
sc, hdc, 3 dc, 3 tr, 3 dc, hdc, sc.
Fasten off.
The photographed roses appear dense, so a fourth layer may be useful with fine DK yarn but unnecessary with heavier light-worsted yarn.
Green Leaves — Make Five Per Square
Yarn: leaf green. Make approximately 240 for 48 squares.
Ch 11.
Starting in second ch from hook:
sl st, sc, hdc, dc, 3 tr, dc, hdc, sc.
Work 3 sc in the final chain.
Continue along the opposite side:
sc, hdc, dc, 3 tr, dc, hdc, sc, sl st.
Fasten off with a 20 cm tail.
Fold each leaf slightly along its center line before attachment. Do not block the leaves completely flat.
Leaf Placement
Arrange five leaves around each rose before beginning the cream square.
Suggested positions:
one at approximately 12 o’clock,
one at 2 o’clock,
one at 4–5 o’clock,
one at 7 o’clock,
one at 9–10 o’clock.
Sew only the lower third of each leaf to the rose foundation. Leave the pointed ends free.
Green Squaring Foundation
Yarn: leaf green.
Join behind the rose and leaves.
Create four marked corner spaces around the flower.
Corner group:
2 dc, 2 tr, ch 3, 2 tr, 2 dc.
Between corners, work:
ch 2, 3 dc in the next available foundation space, ch 2, 3 dc in the following space.
Repeat the arrangement on all four sides.
Fasten off green.
Lay the motif down before continuing. The four green corners need to form a flat square foundation behind the rose.
Cream Square — Round 1
Yarn: warm cream.
Join cream in any corner ch-3 space.
R1: (2 dc, ch 2, 2 dc) in the corner; dc evenly across the first side, working into both stitches and chain spaces as required; repeat for all four sides and corners.
Join with sl st.
Cream Square — Round 2
R2: ch 1, sc in every stitch across each side; work (2 sc, ch 2, 2 sc) into each corner.
Join.
Cream Openwork Round
R3: ch 3, *ch 1, skip 1 st, dc in next st* across each side; in each corner work (dc, ch 2, dc).
Join.
Cream Solid Round
R4: ch 1, sc in each dc and every ch-1 space; work (2 sc, ch 2, 2 sc) into each corner.
Join.
Cream Extension Round
R5: ch 3, dc in each sc around; work (2 dc, ch 2, 2 dc) into each corner.
Join.
Second Cream Openwork Round
R6: ch 4, skip 1 st, dc in next st; *ch 1, skip 1, dc in next* across each side. Work (dc, ch 2, dc) into every corner.
Join.
Final Cream Frame
R7: ch 1, sc evenly around; work (2 sc, ch 2, 2 sc) into each corner.
Fasten off.
Measure the square. If it is under 23 cm, repeat one solid dc round and one sc finishing round while maintaining four ch-2 corners.
Blocking the 48 Floral Squares
Pin each motif to a 23–25 cm square template.
Pin the four corners first.
Add one pin at the midpoint of every side.
Do not pin through the rose petals.
Allow the square to dry completely, then lift and reshape each petal layer by hand.
Pink Joining Round
Yarn: soft pink.
Before joining, add one narrow pink round to every blocked square:
R1: sc evenly around the cream square, working (sc, ch 2, sc) into each corner.
Fasten off.
This round creates the visible pink grid lines shown across the photographed bedspread.
Joining the Squares
Arrange 48 motifs as six across by eight down.
Place two squares RS together.
Using pink yarn, slip stitch through corresponding outer loops along the entire side.
Continue across all six squares in a row without cutting yarn between neighboring seams where practical.
Join all horizontal rows first.
Complete the vertical seams afterward.
Keep the slip stitches relaxed. A tight seam will shorten the joined side and create ridges through the blanket.
Bedspread Foundation Border
Yarn: cream.
R1: sc evenly around the complete joined blanket, working 3 sc into each outer corner.
R2: dc around; work (2 dc, ch 2, 2 dc) in each corner.
R3: *dc, ch 1, skip 1* around; maintain ch-2 corner spaces.
R4: sc in every dc and ch-1 space; work (2 sc, ch 2, 2 sc) in each corner.
Pink Border Accent
Change to soft pink.
R5: sc around, working 3 sc into every corner space.
Fasten off pink.
Deep Cream Lace Border
Return to cream.
R6: *ch 5, skip 2 sts, sc in next st* around.
R7: into every ch-5 space work (sc, ch 5, sc).
R8: repeat R7.
R9: into every ch-5 space work (sc, 5 dc, sc).
Fasten off.
Pink Scallop Accent
Yarn: pink.
Join at the center of any cream shell.
Work:
sc, ch 2, 5 dc in the center of the next shell, ch 2, sc.
Repeat around.
At each corner, add an additional chain space if the border begins pulling inward.
Final Cream Scalloped Edge
Yarn: cream.
Into every pink scallop work:
sc, hdc, 3 dc, hdc, sc.
Repeat around the complete bedspread.
Fasten off and weave in all remaining ends.
Matching Floral Pillow or Display Square
Work one rose motif exactly as written above.
Continue adding cream square rounds until the blocked piece measures approximately 42–45 cm.
Add one soft-pink sc border, followed by a cream shell round.
For a pillow cover, crochet a plain 42–45 cm cream back panel or two overlapping envelope panels.
Join the front and back through the outer cream loops, leaving the rose petals completely free.
Assembly
- Finish all forty-eight rose centers and dimensional petal layers before beginning mass production of leaves so color distribution can be checked across the full set.
- Sew five leaves behind every rose, leaving the pointed outer halves free rather than stitching them flat to the background.
- Work the green squaring foundation and cream frame around every flower, then block all forty-eight motifs to the same 23–25 cm template.
- Add one pink outer round to every square only after blocking so the visible joining lines stay equal in width.
- Arrange the motifs in six columns and eight rows. Photograph the full layout before moving the squares for joining.
- Join the horizontal rows with relaxed pink slip-stitch seams, then join the completed rows vertically.
- Lay the joined bedspread flat and correct any seam that shortens one motif edge by more than approximately 5 mm.
- Work the cream foundation border around the full perimeter, followed by the single pink accent round.
- Add the deep cream lace, pink scallop accent and final cream shell edge while checking every corner after each round.
- Spread the completed bedspread flat, lift every rose layer and leaf point by hand, then record the final blocked measurements.
The finished bedspread should show a regular pink-lined square grid beneath forty-eight raised roses, with green leaves clearly visible and a wide cream-and-pink scalloped border lying flat around the perimeter.
7 Technical Tips
- Square size drift: A difference greater than about 5 mm between neighboring motifs creates ripples after joining. Block every square against one reusable 23–25 cm template.
- Rose flattening: Sewing through all outer petals removes most of the dimensional structure. Anchor only the structural flower base at six to eight points and leave the upper petals free.
- Leaf disappearance: A leaf hidden more than two-thirds beneath the outer petals contributes almost no visible green. Keep at least the pointed outer half exposed before sewing the rose foundation.
- Join ridges: Tight pink slip stitches can shorten a 24 cm square side by 1 cm or more. Use relaxed joining loops and compare each seam against an unjoined side.
- Border cupping: Too few chain spaces around the outer corners pull the lace upward. Add one extra ch-5 space at a corner whenever the edge stops lying flat.
- Petal stacking failure: Three layers worked at the same angle collapse into one thick disk. Position inner petals almost upright, middle petals near 45 degrees and outer petals close to horizontal.
- Uneven scallops: A shell count that differs between opposite sides becomes obvious on a bedspread edge. Count complete shell repeats on every side before working the final cream round.
Constructing the Layered Rose
The rose is the heaviest element in each motif, so its attachment structure matters more than ornamental complexity. Published 3D rose squares commonly work successive petals through front loops, back loops or rear foundations. That separates the petal tiers physically and prevents them from occupying the same plane.
The first six petals form the tight center. Eight medium petals widen the flower, while eight broader outer petals create most of the visible diameter.
If the petals become difficult to separate after assembly, use a smaller hook only for the rose. A slightly denser flower holds its shape better without changing the square dimensions.
Keeping the Rose Center Open
The image shows a visible circular center inside each flower rather than a completely closed bud. Do not pull the first petal ring over the magic-ring opening.
After R2, push the first six petals upward but slightly outward. That creates a small central cavity surrounded by the pale-pink tier.
Check the center after adding every subsequent layer. Once the outer tiers are complete, reaching the innermost petals becomes difficult.
Placing the Five Green Leaves
The supplied motif uses more foliage than a typical two-leaf rose square. Five pointed leaves spread around the flower and create a radial transition into the cream background.
Exact symmetry is unnecessary. Place one upper leaf, two side leaves and two lower diagonal leaves, then rotate neighboring motifs slightly across the blanket.
The leaves should remain dimensional but comparatively flat. A heavily padded or folded leaf would increase bulk underneath the rose and interfere with blocking.
Squaring the Circular Flower
The green foundation converts the round flower into four corner zones before cream yarn is introduced. Taller treble stitches belong near the corners, while shorter double crochets fill the sides.
Place four markers before crocheting the first squaring round. Each marked point should sit roughly 90 degrees from the next.
Set the piece down after the green round. If one corner pulls toward the flower, redistribute one side group before adding cream because later rounds will magnify the distortion.
Building the Large Cream Background
The reference gives each flower substantial negative space. That cream area keeps neighboring roses visually separate despite their large diameter.
Alternating solid and openwork rounds adds width without producing an excessively heavy panel. It also creates the lacy vertical and horizontal lines visible behind the raised flowers.
Stop adding cream rounds when the blocked motif reaches the project target. Maintaining consistent size matters more than copying an exact round count when yarn thickness changes.
Creating the Pink Grid
The pink lines between motifs are one of the most identifiable elements in the bedspread. They should remain narrow enough to function as outlines rather than independent bands.
Add one pink round to every square before joining. Then use matching pink yarn for the seams so the two edges and seam visually merge into one line.
Check intersections where four square corners meet. Those points should form small pink crosses without bulky knots or extra layers.
Joining 48 Raised Floral Squares
Large 3D flowers make the physical joining stage slower than joining ordinary flat granny blocks. Stack no more than a few motifs at once because pressure can crease the petals.
Work the horizontal seams with the flower faces turned away from the working surface. Complete all eight rows before beginning the long vertical joins.
After each column is joined, spread the blanket flat. Correct any tightening immediately rather than waiting until the full grid is assembled.
Building the Deep Scalloped Border
The photographed edge is much wider than a single shell round. A cream foundation stabilizes the large joined rectangle before progressively more open lace is added.
Pink appears again inside the border, linking the perimeter to the interior joining grid. The final cream scallops soften that pink line and create the broad rounded edge visible at the foot of the bed.
Do not force the same repeat count around a corner. Corners usually need additional chain space because the border must travel farther around the turn.
Choosing Yarn and Hook Size
Verified rose-square patterns demonstrate considerable material variation. A free Moara Crochet rose square uses DK yarn with a 3.5 mm hook and measures 10 cm, while a current DK cotton Retro Rose square uses a 4 mm hook and measures about 15 cm. A fingering-weight LoveCrafts version uses a 2.5 mm hook and finishes around 9 cm.
This bedspread uses a larger 23–25 cm framed motif, so the 4 mm hook is paired with additional cream extension rounds.
Use cotton or a cotton-acrylic blend where possible. The added stitch definition makes the petals and leaves easier to shape.
Planning Yarn Quantity
Small verified rose motifs illustrate why exact yarn estimates should be treated as project-specific. One 10 cm DK square uses approximately 10 m rose color, 3 m green and 5 m cream, while a 9 cm fingering square uses markedly different yardage because its flower construction is denser.
For this bed-sized version, make one complete 24 cm motif, weave in every tail and weigh it. Multiply that weight by 48 before adding at least 15 percent for joins, border and sampling.
Purchase the pink colors from the same dye lots when possible. Tonal changes are highly visible across repeated flower centers and grid lines.
Adjusting the Bedspread Size
Resizing is best done by changing the number of motifs rather than altering the rose geometry. Five squares across creates a narrower cover, while seven across moves the design toward a larger full or queen-width bedspread.
Add or remove complete rows for length. The final lace border can then be adjusted independently.
Measure the mattress plus the desired side drop, then divide that number by the blocked square size. Use the blocked measurement rather than the fresh off-hook measurement.
Making a Matching Pillow
The square visible in the photograph can be adapted into a 42–45 cm pillow front by continuing the cream frame beyond the standard blanket-motif size.
Keep one central rose rather than combining four blanket squares. The larger field around a single flower gives the cushion a cleaner focal point.
An envelope back is practical because it avoids a zipper directly behind the dimensional rose and allows the insert to be removed before washing.
Finishing Checks
Spread the bedspread on a large flat surface and examine the pink grid first. All horizontal and vertical lines should remain straight without visible gathering.
Inspect the roses from above. Their centers should stay open, middle petals should remain individually readable and outer petals should not cover every green leaf.
Check the perimeter last. The cream lace must lie flat, pink accent shells should remain evenly distributed and every final scallop should project outward instead of curling under the blanket.
Conclusion
Measure the finished bedspread after its final blocking and record the square width, joined field dimensions and border depth separately. Those numbers make the next 3D rose granny square bedspread crochet pattern easier to resize for another mattress. Photograph the blanket from above to check the pink joining grid, then take a lower angle to show the depth of the petals. Save the project to Pinterest and share the finished bedspread on Instagram with #PinkRoseGrannyBedspread. Reshape every rose before photographing it. Would you keep all forty-eight flowers pink, or alternate blush roses with dusty-rose squares?
Sources
- Moara Crochet — Crochet Rose Granny Square: free 3D rose square, DK yarn, 3.5 mm hook, 10 × 10 cm size and published color yardages.
- Ravelry — Rose Granny Square by Roseanna Murray: 10 × 10 cm, sport/DK-compatible construction, 3.5 mm hook and 15–20 m total listed yardage.
- Ravelry — Farmhouse Rose Bedspread: dedicated 3D granny-rose bedspread with border instructions and step-by-step supporting material.
- Cypress Textiles — English Rose Granny Square: dimensional roses, leaves, square framing and flat braid joining.
- Etsy — Retro Rose Granny Square: DK cotton, 4 mm hook and approximately 15 × 15 cm finished square.
- LoveCrafts — 3D Rose Flower Granny Square: fingering yarn, 2.5 mm hook, approximately 9 × 9 cm and individual color yardage specifications.
- Etsy and Pinterest — current 3D rose blanket, bedspread and granny-square competition references.









