Introduction
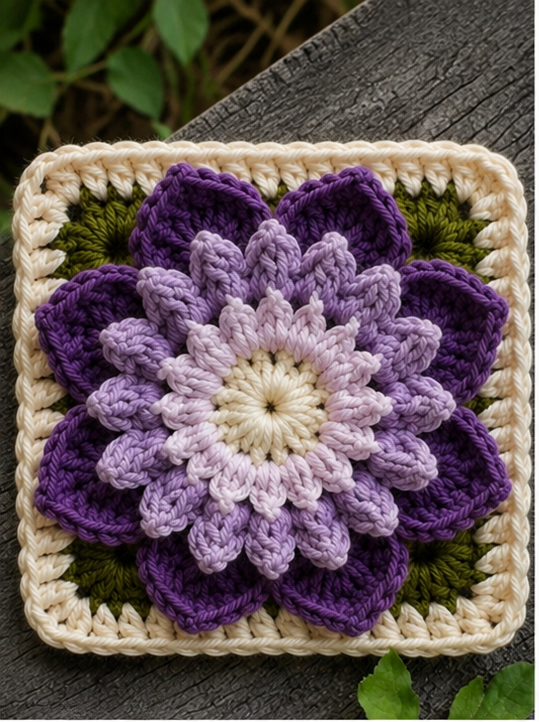
Eight dark-purple petals have to fit inside four square corners without crushing the lavender layers beneath them. This 3D flower granny square crochet pattern uses DK or light-worsted yarn and a 4 mm hook to produce an approximately 17–19 cm block. Three raised petal tiers, green corner foliage and a cream frame make the motif suitable for intermediate blankets, cushions and bags.
The Design: What Makes This Purple Flower Square Different
The flower occupies most of the available square rather than sitting as a small motif in a wide granny border. Twelve pale-lilac inner petals create the tight central ring, followed by twelve longer lavender petals that increase the flower diameter without leaving visible gaps. The final deep-purple tier changes to eight broad petals. That reduction in petal count is structural: fewer outer petals give each one enough width to form the large rounded points visible in the reference. Green stitches are then worked behind the flower, filling the diagonal spaces where a circular bloom has to transition into four corners. A narrow cream frame finishes the purple flower granny square without competing with its center. One common failure is working every petal layer into the same loops; the flower then spreads flat instead of stacking vertically.
Project Information at a Glance
| Skill Level | Time | Finished Size | Hook | Best For |
|---|---|---|---|---|
| Intermediate | 2–3 hours | Approx. 17–19 cm square | 4.0 mm | Blankets, cushions, bags and decorative panels |
Current dimensional flower-square patterns range from about 10 cm with sport yarn to 18–20 cm with heavier yarn and larger hooks, so the finished measurement depends strongly on fiber, hook size and petal density.
Materials and Tools
Yarn
- Cream/ivory — DK or light-worsted cotton blend — approximately 12–16 g — center and square frame
- Pale lilac — matching yarn — approximately 7–10 g — inner petals
- Medium lavender — matching yarn — approximately 8–12 g — middle petals
- Deep purple — matching yarn — approximately 10–15 g — eight outer petals
- Olive green — matching yarn — approximately 5–8 g — foliage and squaring foundation
Tools
- 4.0 mm crochet hook
- Large-eye yarn needle
- Locking stitch marker
- Scissors
- Blocking mat and rust-resistant pins
Cotton and cotton-blend yarns give dimensional flower squares clearer stitch definition and better shape retention than very fuzzy fibers. Work one complete sample before committing yarn to a full blanket.
Abbreviations
- MR — magic ring
- ch — chain
- sl st — slip stitch
- sc — single crochet
- hdc — half double crochet
- dc — double crochet
- tr — treble crochet
- inc — two stitches in one stitch
- FLO — front loop only
- BLO — back loop only
- sp — space
- st — stitch
When a round says to work behind a petal layer, insert the hook into the unused back loop or designated chain space rather than through the petal itself.
Pattern — Step by Step
Cream Flower Center
Yarn: cream.
R1: 6 sc in MR (6)
R2: inc ×6 (12)
R3: sc around (12)
Fasten off cream.
Keep the center flat. A loose center ring produces a visible hole once the surrounding petals pull outward.
Pale-Lilac Inner Petals — Make 12
Join pale lilac to the FLO of any stitch from R3.
Work one petal into each front loop:
(sl st, ch 4, starting in second ch from hook work sc, hdc, 2 dc back down the chain, sl st into the same FLO)
Repeat in every stitch around for 12 narrow petals.
Fasten off.
Fold these petals slightly upward toward the center. They form the tightest and most vertical tier.
Lavender Middle-Petal Foundation
Join medium lavender to the unused BLO of R3.
R4: ch 4, sl st into next BLO; repeat around to form 12 ch-4 spaces.
Join with sl st.
Lavender Middle Petals — Make 12
Into each ch-4 space work:
sc, hdc, 3 dc, hdc, sc
Repeat in all 12 spaces.
Fasten off.
Pull the center of each lavender petal outward while leaving the pale-lilac layer visible between adjacent petals.
Deep-Purple Outer-Petal Foundation
Join deep purple behind the middle layer.
Create eight chain spaces evenly around the flower:
R5: *ch 6, sl st around the base between the next group of lavender petals* ×8.
Distribute the eight loops evenly. Do not allow two neighboring loops to sit directly over the same middle petal.
Deep-Purple Outer Petals — Make 8
Into each ch-6 space work:
sc, hdc, 2 dc, 3 tr, 2 dc, hdc, sc
Repeat eight times.
Fasten off.
Shape each petal into a broad point by pinching its center treble stitches slightly forward. The dark-purple tier should remain behind the lavender layer, not on top of it.
Green Foliage Foundation
Yarn: olive green. Work completely behind the flower.
Join green around the base of one deep-purple petal.
R1: *ch 5, sl st around the base between the next outer petals* ×8.
Join to the first attachment point.
Green Leaf Sections
Work into each ch-5 space:
sc, hdc, 2 dc, tr, 2 dc, hdc, sc.
Repeat around.
The green sections will appear between the dark-purple petals rather than extending far beyond them.
Squaring Round 1
Continue in green.
Identify four opposite spaces for corners, with one green section centered between each corner.
In each corner area work:
2 dc, 2 tr, ch 2, 2 tr, 2 dc.
Across each side work:
ch 2, 3 dc into the next available green space, ch 2.
Repeat around, maintaining four ch-2 corners.
Fasten off green.
Cream Square Frame — Round 1
Join cream in any corner.
R1: ch 3, dc in each stitch and chain space across each side; in every corner ch-2 sp work (2 dc, ch 2, 2 dc).
Join with sl st.
Cream Square Frame — Round 2
R2: ch 1, sc in each dc around; work (2 sc, ch 2, 2 sc) in every corner.
Join.
Cream Square Frame — Round 3
R3: ch 3, dc in every sc; in each corner work (2 dc, ch 2, 2 dc).
Join.
Cream Rounded Edge
R4: ch 1, sc around, working 3 sc into each corner ch-2 space.
Fasten off and weave in all ends on the reverse.
The square should measure approximately 17–19 cm after blocking with DK/light-worsted yarn and a 4 mm hook. Do not flatten the flower while blocking.
Assembly
- Finish and weave in the cream center tail before beginning the petal layers because later rounds restrict access to the middle.
- Shape all twelve pale-lilac petals upward and check that the cream center remains visible as a clean circular disk.
- Pull the twelve lavender petals outward one at a time, keeping the inner lilac tips visible between them.
- Arrange the eight dark-purple petals evenly around the flower so two petals point approximately toward each side of the finished square.
- Move the green filler sections behind the purple layer. Only their pointed tops should remain clearly visible around the outer bloom.
- Identify the four corner locations before beginning the green squaring round and mark them with locking markers.
- Work the first cream round without stretching the green foundation; the corners should turn at approximately 90 degrees.
- Complete all cream frame rounds, then measure opposite sides. Correct any difference greater than about 5 mm before blocking.
- Pin only the cream corners and frame during blocking. Keep pins away from the lavender and purple petal edges.
- After drying, lift each petal layer by hand so the cream center, pale-lilac ring, lavender ring and eight deep-purple petals remain individually visible.
The completed square should lie flat at the cream frame while the flower rises distinctly above the background in three purple petal tiers.
7 Technical Tips
- Petal flattening: Working all three flower tiers through both loops forces them onto one plane. Reserve different loops and rear chain spaces so each layer starts behind the previous one.
- Center hole: A magic ring left wider than approximately 3 mm becomes conspicuous inside the cream disk. Tighten it before working R2 and weave the tail through several center stitches.
- Outer-petal crowding: Eight broad petals need equal spacing around the lavender ring. Mark eight attachment points before crocheting the ch-6 foundation if one side begins to carry more petals.
- Square cupping: Too few stitches between green corners pull the cream frame inward. Lay the work flat after the first cream round and add one side stitch where needed before continuing.
- Corner ruffling: Too many stitches in a ch-2 corner create a raised wave. Keep each standard cream corner to two stitches, ch 2 and two stitches.
- Color layers disappearing: If the lavender petals completely cover the pale-lilac layer, fold the inner petals upward by roughly 30–45 degrees before final blocking.
- Blocking damage: Pinning directly through a raised petal can permanently flatten its curve. Block only the square frame and reshape all flower layers after the base is dry.
Why the Flower Uses Three Petal Sizes
The photographed motif depends on depth more than on complicated background stitches. The pale-lilac petals are narrow and close to the cream center. A second ring extends farther outward, then eight broad purple petals establish the flower’s final diameter.
Current dimensional flower patterns use the same general construction principle: later petals are worked into unused loops, chain spaces or foundations placed behind earlier layers. That method lets each tier occupy its own plane rather than forcing every petal onto one flat round.
Changing petal length matters as much as changing color. Three equal-size purple rings would read as a dense ruffle rather than the graduated flower shown in the image.
Controlling the Eight Deep-Purple Petals
The deepest-purple layer carries fewer petals than the two inner tiers. That gives every outer petal a larger angular section of the circle and provides room for treble stitches to form a broad pointed shape.
Marking the eight foundation positions first prevents drift. If all eight loops are formed by eye while crocheting, the final two petals may become crowded together.
Viewed from above, the dark-purple petals should establish an approximately octagonal flower outline while the cream border remains clearly square.
Building the Green Corner Foliage
The green color performs two jobs. It reads as foliage between the purple petals, but it also creates the structural transition from circular flower to square background.
Keep these sections comparatively flat. Large three-dimensional leaves would increase bulk underneath the already thick outer petals and make the cream frame harder to block.
At the four diagonal points, taller green stitches establish corners. Side sections can remain shorter, allowing the subsequent cream rounds to regularize the final dimensions.
Choosing Yarn and Hook Size
Published dimensional flower squares illustrate a broad material range. Current Ravelry examples include a 15 cm cotton square with a 3.5 mm hook, an 18 cm weight-4 square with a 5 mm hook and smaller 10 cm sport-weight motifs with 2–3 mm hooks.
A 4 mm hook with DK or light-worsted cotton-blend yarn targets the intermediate scale visible in the photograph. It also keeps the large purple petals firm enough to hold their curved edges.
If the flower looks stiff but the square is the correct size, use the 4 mm hook for the frame and move to 4.5 mm only for the three petal layers.
Estimating Yarn for Multiple Squares
Published 3D flower motifs vary significantly in consumption. One 10 cm pattern specifies 35–40 metres, while a more elaborate 10 cm dimensional square lists 100–110 metres. Petal count and layering can therefore affect yarn requirements as much as square dimensions.
For a large project, weigh one completed square after every tail is woven in. Multiply that figure by the planned number of blocks, then add approximately 10–15 percent for joining, border work and swatching.
Buy the deep purple from one dye lot where possible. Tonal variation is particularly noticeable because the outer petals form the darkest continuous ring in every motif.
Using the Square in a Blanket
A 17–19 cm block can be joined into a blanket without adding another border to each individual motif. Arrange finished squares first, then join through the outer cream loops so the dimensional flowers remain untouched.
For a small throw, five squares across produces a field near 85–95 cm before joining and the final border. Six across produces roughly 102–114 cm before additional edging.
Join blocks only after blocking them to one consistent measurement. Differences that appear minor in one motif multiply across several rows.
Using the Square for a Cushion
Four blocks arranged two by two produce a large floral cushion front, while a single motif can be extended with additional cream rounds for a smaller decorative pillow.
Keep raised petals away from seam allowances. The deepest-purple tips should remain at least 1–2 cm inside the finished outer seam so they cannot become trapped while assembling the cushion.
A plain cream back keeps the flower surface as the main feature and reduces bulk compared with placing dimensional flowers on both sides.
Working the Motif in Other Colors
Maintain value contrast even when changing the palette. The center should remain lighter than the outer petals, while the background should separate clearly from both flower and foliage.
A pink version could progress from ivory through blush, dusty rose and burgundy. A blue version could move from cream to powder blue, cornflower and navy while retaining olive or sage green behind the bloom.
Keeping the darkest shade on the eight broad outer petals preserves the same visual hierarchy as the photographed purple motif.
Finishing Checks
Lay the blocked square on a flat surface and inspect the cream perimeter first. All four sides should remain close in length and every corner should lie flat.
Count the visible flower elements next: twelve pale-lilac inner petals, twelve lavender middle petals and eight broad dark-purple outer petals.
Check the green sections last. They should fill the gaps behind the purple flower without extending farther than the cream square border.
Conclusion
Measure the finished block after blocking and record both the square width and flower diameter beside the yarn and hook used. Those two measurements make the motif easier to reproduce consistently across a blanket. Photograph the square from directly above to check eight-petal spacing, then take a low side photograph to confirm that all three flower layers remain raised. Save this 3D flower granny square crochet pattern to Pinterest and share the finished motif on Instagram with #PurpleBloomGrannySquare. Reshape every petal before the final photograph. Would you keep the olive-green corner foliage or change the next square to a softer sage green?
Sources
- Ravelry — 3D Flower Square by Veronika Liachovic: weight-4 yarn, 5 mm hook and approximately 18 cm finished size.
- Ravelry — Balloon Flower Granny Square by Anna Lisek: 3.5 mm hook and approximately 15 cm finished size.
- Ravelry — 3D Flower Granny Square by Hanna Kasatkina: 3 mm hook, 10 cm finished size and 100–110 m published yardage.
- Ravelry — 3D Bright Flower Granny Square: 10 cm finished size and 35–40 m published yardage.
- Hooked by Robin — 3D Petal Granny Square: layered dimensional flower construction and square framing.
- CrochetBits — Triple-Layer Flower: 2024 free dimensional flower pattern with a 7 cm flower diameter.
- Etsy and Pinterest — current dimensional flower granny-square competition and design-interest references.









