Introduction
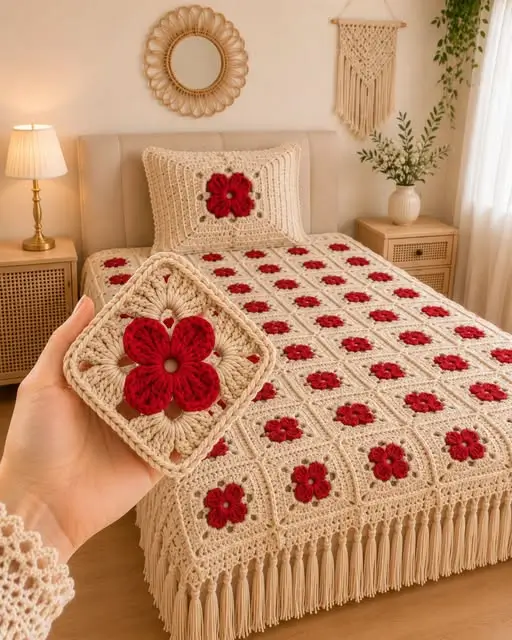
Five red petals have to stay broad enough to read as one flower without pulling the cream square into a pentagon. This red flower granny square bedspread crochet pattern uses DK or light-worsted yarn with a 4 mm hook. Approximately seventy modular squares create a bedspread around 145–155 × 195–205 cm, finished with an open cream border, long tassels and a matching floral pillow.
The Design: What Makes This Flower Bedspread Different
The photographed motif places one large red flower inside a comparatively generous cream square. Five petals create the focal point, while a neutral center avoids the strong black disk used by many traditional poppy designs. Cream stitches spread outward behind the flower before forming four defined corners, allowing the flower to stay circular while the finished block remains square. The red flower crochet square also uses a narrow raised edge around each petal, which gives the bloom more depth without turning it into a heavily layered rose. The full bedspread depends on repetition: cream joins disappear into the background while the red blossoms form a regular grid. A deep lace border and long fringe add vertical length at the foot. One common error is stretching the petal bases while squaring the motif; that converts the flower into five isolated lobes instead of one continuous bloom.
Project Information at a Glance
| Skill Level | Time | Finished Size | Hook | Best For |
|---|---|---|---|---|
| Intermediate | 55–75 hours | Approx. 145–155 × 195–205 cm | 4.0 mm | Bed coverings, guest rooms and floral home decor |
Published poppy-style squares illustrate how strongly yarn changes scale. Current examples range from approximately 6.5 cm in fine cotton to 16 cm in worsted yarn and roughly 18 cm in larger versions. This project extends the cream frame to target an 18–20 cm blocked square. :contentReference[oaicite:16]{index=16}
Materials and Tools
Yarn
- Warm cream — DK/light-worsted cotton or cotton-acrylic — approximately 1,900–2,300 g — square backgrounds, joining, border and tassels
- Deep red — matching DK/light-worsted yarn — approximately 550–700 g — five-petal flowers and pillow flower
- Burgundy or dark red — approximately 80–120 g — optional petal edging and tonal accents
- Light taupe/brown — approximately 50–80 g — small flower-center details
Tools
- 4.0 mm crochet hook
- Large-eye yarn needle
- Locking stitch markers
- Blocking mats
- Rust-resistant pins
- Scissors
- Measuring tape
- Approximately 45 × 45 cm pillow insert if making the matching cushion
A 2024 Ravelry poppy square uses worsted cotton with a 4 mm hook and measures about 5.5 inches, while another current 16 cm square uses a 4.5 mm hook. The 4 mm specification here keeps the cream fabric slightly denser for a bedspread assembled from many blocks. :contentReference[oaicite:17]{index=17}
Abbreviations
- MR — magic ring
- ch — chain
- sl st — slip stitch
- sc — single crochet
- hdc — half double crochet
- dc — double crochet
- tr — treble crochet
- dtr — double treble crochet
- sp — space
- ch-sp — chain space
- RS — right side
- WS — wrong side
When several tall stitches are worked into one space, keep the first and final loops loose enough that the petal can spread without tightening the center.
Pattern — Step by Step
Make one complete block first and block it to 18–20 cm. Repeat the same tension and final-round count for every remaining motif.
Cream Flower Center — Make 70
Yarn: warm cream.
R1: 6 sc in MR (6)
R2: inc ×6 (12)
Fasten off.
Close the magic ring firmly. The photographed flower has a small light center rather than a large open hole.
Center Accent Round
Yarn: taupe or light brown.
Join to any stitch.
R3: *sl st in next st, ch 1* around (12 attachment points)
Fasten off.
The accent should remain mostly hidden once the red petal bases are attached.
Red Petal Foundation
Yarn: deep red.
Join around the cream center.
R1: (sc, inc) ×6 (18)
R2: (2 sc, inc) ×6 (24)
R3: increase evenly to 30 stitches (30)
Mark five equal sections of six stitches each.
These markers define the five petal bases. Check the spacing before crocheting the first petal.
Red Petal One
Work across the first six-stitch section:
sl st in first marked st,
ch 2,
hdc in next st,
2 dc in next st,
2 tr in next st,
2 dc in next st,
hdc in next st,
ch 2,
sl st at the base beside the section.
Turn the petal edge slightly forward with your fingers.
Red Petals Two to Five
Repeat the Petal One sequence across each remaining six-stitch section.
At the end of the fifth petal, sl st to the first petal base.
Fasten off with a 25 cm tail.
All five petals should spread from the center with comparable width. Do not pull the slip stitches between petals tightly.
Optional Petal Edge
Yarn: burgundy or darker red.
Join at the base of any petal.
Work one relaxed sl st around the outer edge of each petal.
At the deepest point between petals, skip the joining stitch rather than compressing the valley.
Fasten off.
Cream Flower-to-Square Foundation
Yarn: warm cream. Work behind the five red petals.
Create 10 attachment spaces evenly around the flower base:
*ch 4, sl st around the structural flower base* ×10.
Join to the first attachment point.
The loops should remain behind the petals and be barely visible from the front.
Cream Squaring Round
Mark four corner positions as evenly as possible around the 10-loop foundation.
At each corner work:
2 dc, 2 tr, ch 2, 2 tr, 2 dc.
Across each side, work 3 dc into each available foundation space with ch 1 between groups.
Adjust one side group if needed so all four sides contain comparable stitch counts.
Cream Square Round 2
R2: ch 3, dc in each stitch and ch-1 space around; work (2 dc, ch 2, 2 dc) into every corner.
Join with sl st.
Cream Openwork Round
R3: ch 3, *ch 1, skip 1 st, dc in next st* across each side; in every corner work (dc, ch 2, dc).
Join.
Cream Solid Round
R4: ch 1, sc into every dc and ch-1 space; work (2 sc, ch 2, 2 sc) into each corner.
Join.
Cream Extension Round
R5: ch 3, dc in each stitch around; work (2 dc, ch 2, 2 dc) in each corner.
Join.
Final Square Round
R6: ch 1, sc around; work 3 sc in every corner space.
Fasten off.
Block to approximately 18–20 cm. If the motif is smaller, add one additional dc round followed by one sc round.
Blocking the Squares
Pin the four cream corners to the target measurement.
Add one pin at the midpoint of each side.
Do not pin through the red petals.
After drying, lift each flower by hand and restore the rounded petal shape.
Arrange the Bedspread
For the photo-matched proportions, arrange approximately seven squares across and ten rows down.
This produces 70 flower motifs.
Lay every block out before joining. Move any square with a noticeably darker red dye variation toward another area of the layout so similar tones are distributed.
Joining the Squares
Yarn: cream.
Hold two blocks WS together.
Insert the hook through corresponding outer loops.
Sl st across the complete side without pulling the seam shorter than the blocked edge.
Join all squares within each horizontal row first.
Join the completed rows vertically afterward.
The photographed seams are low contrast, so cream is preferable to red for the primary joins.
Foundation Border
Yarn: cream.
R1: sc evenly around the complete blanket; work 3 sc in each outer corner.
R2: dc around; work (2 dc, ch 2, 2 dc) in every corner.
R3: *dc, ch 1, skip 1* around; maintain ch-2 corners.
R4: sc in every dc and ch-1 space; work (2 sc, ch 2, 2 sc) into the corners.
Deep Lace Border
R5: *ch 5, skip 2 sts, sc in next st* around.
R6: into each ch-5 space work (sc, ch 5, sc).
R7: repeat R6.
R8: into each loop work (sc, 5 dc, sc).
Fasten off.
Final Shell Edge
Join cream to the center of one shell.
Work:
sc in the next valley,
7 dc in the next shell center,
sc in the following valley.
Repeat around the bedspread.
Add one additional chain or shell at a corner if the edge begins to draw inward.
Cream Tassels — Make Approximately 32–38
Cut 12 strands approximately 28 cm long for each tassel.
Fold the strands in half.
Tie the bundle approximately 2 cm below the fold.
Wrap a separate strand around the neck six to eight times.
Trim each finished tassel to approximately 11–12 cm.
Attach across the foot edge at roughly 10 cm intervals, continuing partway up the sides if matching the photograph closely.
Matching Pillow Front
Make one flower square as written.
Continue adding alternating cream dc and openwork rounds until the piece measures approximately 43–45 cm square.
Keep the same four ch-2 corner positions throughout.
Large Pillow Flower
For a larger central flower, repeat the red petal sequence using eight stitches per petal instead of six.
Work five petals.
Use hdc, dc, tr and dtr stitches through the petal center to increase height.
The target flower diameter is approximately 15–18 cm.
Pillow Back Panels — Make Two
Ch enough stitches to measure approximately 45 cm.
Row 1: dc in fourth ch from hook and across.
Rows 2 onward: ch 3, turn, dc across.
Continue until each panel measures approximately 45 × 28 cm.
Overlap the two panels by 10–12 cm.
Assemble the Pillow
Place the front RS outward.
Layer both back sections behind it with the overlap centered.
Sc around all four sides, working 3 sc in each corner.
Add one decorative shell round if a deeper pillow border is wanted.
Assembly
- Make and block one test flower square to 18–20 cm before beginning the full batch.
- Complete all cream centers and red five-petal flowers, checking that each flower has five equal six-stitch petal sections.
- Work the cream background and square frame around every flower, keeping the red petals completely free from the background stitches.
- Block all motifs to the same template and correct any square that differs from the target by more than 5 mm.
- Arrange approximately seven motifs across and ten down, then photograph the layout before stacking squares for joining.
- Join the horizontal rows with relaxed cream seams, followed by the long vertical joins.
- Spread the joined field flat and repair any seam that produces gathering before beginning the border.
- Work the solid cream foundation rounds, followed by the increasingly open lace rounds and final shell edge.
- Attach the cream tassels at equal intervals and trim them against one 11–12 cm guide.
- Reshape every red flower by hand and record the completed width, length and border depth.
The finished bedspread should form a regular field of raised five-petal red flowers on cream squares, with straight joining lines, a flat lace border and a uniform tassel fringe.
7 Technical Tips
- Five-petal distortion: Unequal petal bases turn the flower off-center. Divide the 30-stitch red foundation into five sections of exactly six stitches before starting the petals.
- Square buckling: A difference greater than approximately 5 mm between blocked motifs becomes visible after several rows are joined. Use one blocking template for every square.
- Petal flattening: Catching the red flower while crocheting the cream foundation pins the petals to the background. Insert the hook only around the rear structural base.
- Join shortening: Tight slip stitches can reduce an 19 cm side by 1 cm or more. Compare each completed joining seam with an unjoined blocked edge.
- Border cupping: Too few ch-5 loops around a corner force the outer edge upward. Add one extra loop at a corner when the border no longer lies flat.
- Tassel variation: A 1 cm length difference is easy to see across a straight bed edge. Trim every tassel against the same 11–12 cm cardboard guide.
- Flower-center opening: A magic ring wider than approximately 3 mm shows clearly beneath the light center. Tighten it before weaving the starting tail through several stitches.
Constructing the Five-Petal Flower
The five-petal geometry is the central difference between this motif and many four-petal poppy squares. The 30-stitch foundation divides cleanly into five groups of six, giving every broad red petal the same working area.
Tall stitches belong near the petal center. Shorter half-double and double crochet stitches taper the sides toward the flower base.
Keep the valleys loose. Pulling the joining slip stitches tightly creates deep gaps between petals and makes the flower appear as five separate pieces.
Keeping the Cream Center Visible
The supplied design uses a pale center rather than the black center associated with many Remembrance poppy squares. That small neutral disk softens the contrast between the red flower and cream bedspread.
Do not allow the first red stitches to cover the complete center. Spread the petal foundation outward after the third red round.
A tiny taupe accent can be added behind the petal bases, but it should remain secondary to the light center.
Turning the Flower into a Square
A five-part flower does not naturally align with four square corners. The rear cream foundation solves that mismatch by creating an independent set of attachment loops.
Mark all four corners before beginning the tall squaring stitches. Do not use the five petal valleys themselves as automatic corner positions.
That separation lets the flower remain visually balanced even though the square uses fourfold symmetry.
Building the Cream Background
The cream field occupies more surface area than the flower. Alternate solid and open rounds so the motif gains width without becoming excessively dense.
The openwork also reproduces the lightly perforated texture visible throughout the bedspread. Each flower remains clearly separated from neighboring blossoms.
Stop adding extension rounds once the blocked square reaches the chosen template. Consistent measurements matter more than identical unblocked dimensions.
Joining a Large Bedspread Grid
Seventy blocks create long cumulative seams. Even a small tension difference can become noticeable across seven squares.
Join short horizontal lines first. Measure each complete row before adding it to the bedspread.
When the ten rows are ready, work the vertical seams with the project spread across a large table or clean floor rather than allowing its weight to hang from the hook.
Making the Lace Border Lie Flat
The image uses a broad open border before the tassel fringe. Begin with solid rounds to stabilize the joined field before introducing chain loops.
Check each new lace round on a flat surface. Ruffling indicates excess circumference, while upward cupping indicates too little.
The shell round should expand outward slightly without creating waves along the straight edges.
Making Consistent Tassels
Cutting each tassel independently is inefficient for a large bedspread. Wrap the cream yarn around a cardboard template and cut an entire batch at once.
Use the same number of strands in every bundle. Twelve strands create enough density to match the substantial fringe visible in the photograph.
Attach all tassels before final trimming, then line them against a ruler or cardboard guide.
Choosing Yarn and Hook Size
Published poppy squares support a broad material range. A 2024 Ravelry design uses worsted cotton, a 4 mm hook and approximately 36 m for a 5.5-inch square, while another 16 cm motif uses worsted yarn with a 4.5 mm hook. :contentReference[oaicite:18]{index=18}
A 4 mm hook with DK or light-worsted cotton blend creates the cleaner openwork and relatively fine flower texture visible in the supplied bedspread.
If the squares become too stiff, move to a 4.5 mm hook for the cream background while keeping the flower at 4 mm.
Planning Yarn Quantity
A verified six-inch poppy afghan square consumes approximately 35.32 m of medium-weight yarn, while a 5.5-inch 2024 poppy square lists approximately 36 m. :contentReference[oaicite:19]{index=19}
The larger framed blocks in this bedspread use substantially more cream yarn because of the extended background. Weigh one completed photo-matched square after blocking, multiply the weight by 70, then add approximately 15 percent for joining, border, tassels and sampling.
Purchase the cream yarn from one dye lot where possible because it covers most of the finished surface.
Adjusting the Finished Size
Resize by changing the number of motifs rather than changing the flower geometry. Six squares across produces a narrower cover, while eight moves the design toward a wider bedspread.
Add or remove complete rows for length. The deep border contributes additional drop after the main grid is assembled.
Measure the mattress first and divide the required width by the blocked motif size before choosing the final layout.
Making the Matching Pillow
The matching pillow repeats one flower at a larger visual scale instead of combining four separate bedspread blocks.
Continue the cream square around a single five-petal motif until the front fits the selected cushion insert. This preserves the centered composition visible in the supplied image.
An envelope back keeps closures away from the raised flower and allows the insert to be removed before washing.
Finishing Checks
Spread the bedspread completely flat and inspect the square grid. Horizontal and vertical seams should remain straight from one edge to the other.
Count five petals on every visible flower and reshape any petal whose outer edge has folded beneath a neighboring stitch.
Check the perimeter last. The lace should lie flat, the final shells should remain evenly spaced and every tassel should finish at approximately the same length.
Conclusion
Measure the bedspread after its final blocking and record the blocked square width, joined field size and border depth separately. Those figures provide the most useful reference when adapting this red flower granny square bedspread crochet pattern to another mattress. Photograph the blanket from above to check motif alignment, then take a lower side image to show the raised petals and tassel fringe. Save the project to Pinterest and share the finished bedspread on Instagram with #RedFlowerGrannyBedspread. Reshape the five petals before photographing each motif. Would you keep the cream flower centers or change the next version to dark burgundy centers?
Sources
- Ravelry — Poppy Flower Granny Square by Alyssia Stacey-Orchard: 2024 pattern, worsted Lion Brand 24/7 Cotton, 4 mm hook, approximately 5.5 inches and 36 m per square. :contentReference[oaicite:20]{index=20}
- Oombawka Design Crochet — Lest We Forget Poppy Afghan Square: 6-inch square, medium-weight yarn, 5.5 mm hook and 35.32 m total yarn use. :contentReference[oaicite:21]{index=21}
- Etsy — current Poppy Granny Square pattern: worsted-weight yarn, 4.5 mm hook and approximately 16 cm finished measurement. :contentReference[oaicite:22]{index=22}
- Ravelry — Poppy Flower Granny Square by Rebecca A. Lang: approximately 5-inch square using red, black and white yarn. :contentReference[oaicite:23]{index=23}
- Bella Coco Crochet — free Poppy and Leaf Pattern published October 2024 with written and video instructions. :contentReference[oaicite:24]{index=24}
- Crafting Happiness — free Remembrance Poppy Flower Square with written and video tutorial. :contentReference[oaicite:25]{index=25}
- Etsy and Pinterest — current poppy granny-square competition and design-interest references. :contentReference[oaicite:26]{index=26}









