Introduction
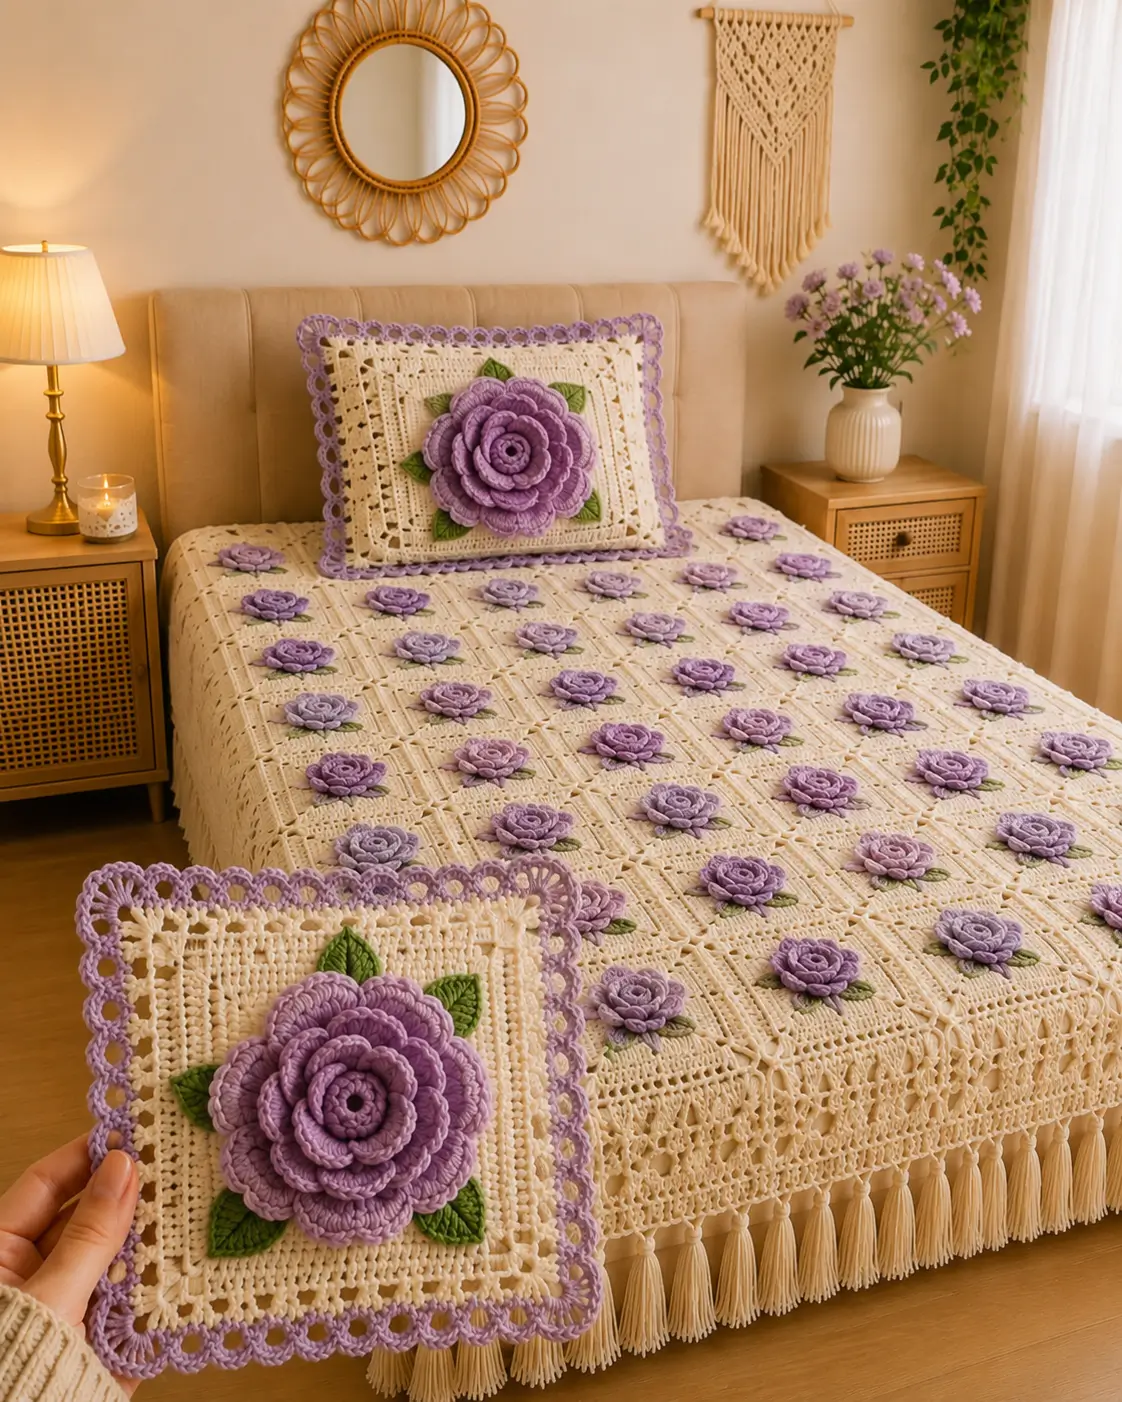
A raised rose bedspread fails if the flowers are beautiful but the squares buckle underneath them. This 3D rose crochet bedspread pattern uses DK or light-worsted yarn and a 4 mm hook to build a cream modular blanket approximately 150 × 200 cm. Forty-eight squares, lavender roses, green leaves, lace edging, tassels and a matching floral pillow form the complete intermediate project.
The Design: What Makes This Rose Bedspread Different
The base is modular because dozens of dimensional flowers create considerable weight. Each cream square is worked flat, blocked first and decorated afterward, allowing the fabric to remain square instead of curling around a heavy rose center. The lavender flowers are assembled in multiple petal layers so their outer rounds spread across the square while the center rises above it. Paired green leaves break the cream-and-lavender color field without covering the geometric stitch pattern underneath. The outer border changes from dense square construction to open lace before finishing with a lavender scalloped round and hanging cream tassels. The matching crochet rose pillow uses the same palette but increases the flower diameter substantially. A common mistake in a lavender rose crochet blanket is sewing every petal flat; only the rose base should be anchored firmly so the upper layers retain depth.
Project Information at a Glance
| Skill Level | Time | Finished Size | Hook | Best For |
|---|---|---|---|---|
| Intermediate | 45–65 hours | Approx. 150 × 200 cm | 4.0 mm | Bed decor, heirloom blankets and floral interiors |
Published modular flower blankets vary considerably in scale. Lion Brand lists one flower blanket at approximately 142 × 173 cm, while other modular flower blankets use 15 cm squares and smaller finished dimensions. The measurements here are sized to reproduce the bed-covering proportions in the reference image.
Materials and Tools
Yarn
- Warm cream — DK/light worsted cotton-acrylic — approximately 2,000–2,400 g — squares, joining, border, pillow and tassels
- Lavender — DK/light worsted — approximately 700–900 g — blanket roses, scalloped border and pillow rose
- Leaf green — DK/light worsted — approximately 250–350 g — leaves
- Optional darker lavender — small quantity — rose centers or tonal variation
Tools
- 4.0 mm crochet hook
- Large-eye yarn needle
- Locking stitch markers
- Blocking mats and rust-resistant pins
- Sharp scissors
- 45 × 45 cm pillow insert
- Optional 3.5 mm hook for firmer flowers
Work one complete test square before buying the full yarn quantity. The target blocked square is approximately 23–25 cm, and all forty-eight blanket motifs need to remain within roughly 5 mm of that measurement for clean joining.
Abbreviations
- MR — magic ring
- ch — chain
- sl st — slip stitch
- sc — single crochet
- hdc — half double crochet
- dc — double crochet
- tr — treble crochet
- sp — space
- ch-sp — chain space
- sk — skip
- RS — right side
- WS — wrong side
For joined rounds, close with a slip stitch into the first full stitch unless the round states otherwise.
Pattern — Step by Step
Block all cream squares before sewing on flowers. The dimensional appliqués make accurate blocking much harder after assembly.
Cream Bedspread Square — Make 48
Yarn: warm cream.
R1: MR, ch 3, 2 dc, ch 2, (3 dc, ch 2) × 3; join. Four 3-dc groups and four corners.
R2: sl st to first corner, ch 3, 2 dc, ch 2, 3 dc in same corner; ch 2; repeat corner group in each remaining corner, with ch 2 between groups.
R3: work (3 dc, ch 2, 3 dc) in each corner; work 3 dc in every side ch-2 sp with ch 2 between groups.
R4: repeat R3, maintaining four square corners.
R5: ch 1, sc in each dc and 2 sc in each ch-2 side space; work (2 sc, ch 2, 2 sc) in each corner.
R6: ch 3, dc in each sc; work (2 dc, ch 2, 2 dc) in each corner.
At this point the motif should lie completely flat. If the corners lift, block before adding the openwork extension.
R7: ch 4, sk 1 st, dc in next st, *ch 1, sk 1, dc in next* across each side; work (dc, ch 2, dc) in each corner.
R8: ch 1, sc in each dc and ch-1 sp; work (2 sc, ch 2, 2 sc) in each corner.
R9: ch 3, *ch 1, sk 1, dc in next st* across; maintain four ch-2 corners.
R10: ch 1, sc evenly around, working (2 sc, ch 2, 2 sc) in every corner.
Fasten off and weave in the ends.
Block each square to approximately 23–25 cm. Pin all four corners first, then adjust the side centers before drying.
Small Dimensional Lavender Rose — Make 48
Yarn: lavender.
R1: 6 sc in MR (6)
R2: 2 sc in each st around (12)
R3: working in FLO, *(sl st, ch 2, 3 hdc, ch 2, sl st) in next st, sl st in next st* × 6.
R4: work behind R3 into unused loops: *(sl st, ch 3, 4 dc, ch 3, sl st) across the next 2 back loops* × 6.
R5: work behind R4 around the posts/base spaces: *(sl st, ch 4, 2 dc, 3 tr, 2 dc, ch 4, sl st)* × 6.
R6: final outer layer: *(sl st, ch 4, 3 dc, 4 tr, 3 dc, ch 4, sl st)* × 6.
Fasten off with a 40 cm sewing tail.
Do not block the flower flat. Shape the innermost petals upward, the middle petals at approximately 45 degrees and the outer petals nearly horizontal.
Green Leaves — Make 96
Yarn: leaf green. Make two per blanket rose.
Ch 10.
Starting in second ch from hook:
sl st, sc, hdc, dc, 2 tr, dc, hdc, sc.
Work 3 sc into the last chain.
Continue along the opposite side:
sc, hdc, dc, 2 tr, dc, hdc, sc, sl st.
Fasten off with a 20 cm sewing tail.
Pinch the leaf lengthwise before attachment to create a shallow center ridge.
Attach Roses to the Squares
Place one rose slightly above the exact center of each cream square.
Position one green leaf at approximately the 4 o’clock position and one near 8 o’clock. Rotate some pairs slightly to prevent the blanket from looking mechanically repeated.
Sew through the solid base of the rose only. Pass the needle through the cream square at six to eight evenly distributed attachment points.
Do not stitch through the upper petal edges.
Joining the 48 Blanket Squares
Arrange the blocked squares in a grid of six motifs across by eight motifs down.
Join using cream yarn and a flat slip-stitch seam from the wrong side:
Step 1: Hold two squares WS together.
Step 2: Insert the hook through corresponding outer loops.
Step 3: Sl st evenly across the full side.
Step 4: Fasten off only at the end of each full horizontal or vertical joining line.
Join all horizontal rows first, then all vertical columns.
Keep the flowers facing away from the work surface while joining so their upper petals are not crushed.
Blanket Foundation Border
Yarn: cream.
R1: sc evenly around the entire joined blanket, placing 3 sc into each blanket corner.
R2: dc in each st around, working (2 dc, ch 2, 2 dc) into each corner.
R3: *dc, ch 1, sk 1* around; maintain ch-2 corner spaces.
R4: sc in each dc and ch-1 sp, with (2 sc, ch 2, 2 sc) in corners.
Open Lace Border
Continue in cream.
R5: ch 5, sk 2 sts, sc in next st; repeat around. Adjust the final repeat by one stitch if required at a corner.
R6: into each ch-5 loop work (sc, ch 5, sc).
R7: repeat R6.
R8: into each ch-5 loop work (sc, 5 dc, sc).
Fasten off.
Lavender Scalloped Edge
Yarn: lavender.
Join to one outer shell.
In each cream shell work:
sc, ch 3, 5 dc in center dc, ch 3, sc.
Repeat around the blanket.
At each corner work one additional shell if needed to allow the border to turn without pulling.
Cream Tassels — Make Approximately 34–40
Cut 10 strands of cream yarn approximately 24 cm long for each tassel.
Fold the bundle in half and tie tightly about 2 cm below the fold.
Wrap a separate yarn strand around the neck six to eight times, knot securely and trim the tassel to approximately 10 cm.
Attach tassels along the foot and lower side edges at intervals of approximately 10–12 cm.
Pillow Front Square
Yarn: cream.
Work the Bedspread Square instructions through R10.
Continue increasing in the established square pattern until the blocked piece measures approximately 45 × 45 cm.
Add two further openwork rounds around the outside.
Pillow Back — Make Two Panels
Yarn: cream.
Ch enough stitches to measure approximately 45 cm.
Row 1: dc in fourth ch from hook and in each ch across.
Rows 2 onward: ch 3, turn, dc across.
Continue until each panel measures approximately 45 × 28 cm.
Overlap the two panels by approximately 10–12 cm to form an envelope closure.
Large Lavender Pillow Rose
Yarn: lavender.
R1: 6 sc in MR (6)
R2: inc × 6 (12)
R3: (sc, inc) × 6 (18)
Petal Layer 1: work six small petal groups across the front loops.
Petal Layer 2: work six medium petals behind Layer 1 using ch 3, dc and tr stitches.
Petal Layer 3: work eight petals behind Layer 2.
Petal Layer 4: work ten broader petals using ch 4, 3 dc, 4 tr, 3 dc, ch 4.
Petal Layer 5: work twelve outer petals using ch 5, 4 dc, 5 tr, 4 dc, ch 5.
Fasten off with a 60 cm sewing tail.
The finished rose should measure approximately 24–28 cm across after hand shaping.
Large Pillow Leaves — Make Four
Ch 16.
Starting in second ch:
sl st, sc, hdc, dc, 4 tr, 2 dc, hdc, sc.
Work 3 sc at the tip and mirror the sequence along the opposite side.
Fasten off with a long sewing tail.
Assemble the Pillow
Pin four green leaves behind the large lavender rose.
Sew the leaves to the cream front first.
Place the rose centrally over the leaf bases and stitch only through its bottom two petal layers.
Layer the two back panels behind the front square with their overlap running horizontally.
Join around all four outer edges using sc.
Lavender Pillow Border
Join lavender yarn to any corner.
Work one round of ch-5 loops around the pillow edge.
Into every loop work:
sc, ch 3, 5 dc, ch 3, sc.
Fasten off and weave in all ends before inserting the pillow form.
Assembly
- Block all forty-eight cream squares to the same dimensions before sewing any flowers onto them.
- Shape the forty-eight lavender roses and pin one to each square, securing only the flower base rather than the free outer petal edges.
- Add two green leaves to every blanket square, checking that they remain visible beyond the lower rose layers.
- Arrange the motifs in six columns by eight rows and photograph the layout before moving anything.
- Join horizontal rows first with flat cream seams, then complete all vertical joins without stretching the square edges.
- Work the cream foundation and lace borders around the entire joined bedspread, checking the corners after every round.
- Add the lavender scalloped edge, keeping the shell count balanced across opposite sides.
- Attach cream tassels at 10–12 cm intervals along the selected lower and side edges and trim them to equal length.
- Assemble the pillow front, back panels, four green leaves and oversized lavender rose, then add the matching lavender border.
- Lay the finished bedspread flat, reshape every rose by hand and trim any tassel that differs from the final 10 cm length.
The completed set should show a regular cream square grid beneath raised lavender roses, with a matching oversized floral pillow and an open lace perimeter framing the bedspread.
7 Technical Tips
- Square distortion: A motif that differs by more than about 5 mm from its neighbors can create a visible ripple after joining. Block all forty-eight squares to one template before assembly.
- Rose flattening: Sewing through every petal removes the three-dimensional structure. Secure only the solid flower base at six to eight points and leave the upper layers free.
- Heavy blanket seams: Tight slip-stitch joins can shorten each square side by 1–2 cm. Keep the joining loops loose enough that the seam lies flat without gathering.
- Lace-border cupping: Too few chain spaces around a corner pull the border inward. Add one extra ch-5 loop at the corner if the blanket edge begins to curve upward.
- Petal crowding: Rose layers that all sit at the same angle form one thick disk. Shape the inner petals upward, middle petals diagonally and final layer almost flat.
- Tassel mismatch: A difference of even 1 cm becomes obvious across a bed edge. Trim every finished tassel against a 10 cm cardboard template.
- Pillow rose sag: An oversized 28 cm flower attached only at its center can droop. Anchor its lower two petal layers at eight to ten points across the pillow front.
Planning the Modular Bedspread Layout
The photograph reads as a repeated square construction rather than one continuously worked blanket. A modular layout is the practical choice because every flower can be positioned and checked before the full bedspread becomes difficult to handle.
Six squares across and eight down produces forty-eight primary floral motifs. At a blocked target near 24 cm per square, the joined field lands near bedspread proportions before the border is added.
Lay every square on the floor before joining. Rotate individual flowers and leaves slightly so the finished surface avoids obvious directional repetition while retaining the ordered grid.
Making the Cream Squares Stay Flat
The cream base needs to carry a raised rose without distorting. That is why the motif alternates denser rounds with open chain-space sections rather than remaining lace from center to edge.
Do not attach the rose before blocking. Moisture and pinning pressure can crush raised petals, while an undecorated square can be pulled accurately to size.
Published modular flower blankets commonly use blocked squares around 15 cm, while rose squares also appear in larger 8-inch formats. The larger 23–25 cm target here is a project adaptation for the bigger bedspread geometry visible in the image.
Building the Layered Lavender Roses
A convincing raised rose depends on several petal diameters. One uniform round produces a flower, but not the nested structure visible across the blanket.
The innermost petals stay narrow and upright. Middle layers gain height through double and treble crochet stitches, then the outer layer broadens enough to overlap the green leaves slightly.
Current free crochet rose patterns also use strip-based or layered construction, showing that dimensional roses can be built through multiple methods. This project uses stacked rounds because they are easier to repeat consistently across forty-eight motifs.
Positioning the Green Leaves
Two leaves per rose are sufficient for the blanket motifs. More foliage would obscure too much of the cream square and make the repeating units visually dense.
Pin the leaves before the rose. Their bases can then disappear underneath the lowest lavender petal layer, creating a cleaner transition.
Rotate the paired leaves slightly between neighboring squares. The color rhythm remains consistent while the bedspread avoids looking like forty-eight identical stamped motifs.
Joining Forty-Eight Floral Squares
Join the undecorated edges rather than sewing directly behind the flowers. A flat slip-stitch seam keeps bulk away from the center motifs and creates a visible geometric structure between them.
Complete one full horizontal row at a time. After six squares are joined, measure the row against the planned width before adding the next one.
If a square edge has stretched during flower attachment, redistribute the joining stitches rather than forcing excess fabric into one corner.
Constructing the Lace Border
The photograph changes texture near the bed edge. Dense modular squares give way to open arches and shell stitches before the tassels begin.
That transition matters structurally as well as visually. A wide dense border would add substantial weight to an already heavy three-dimensional blanket.
Check the blanket on a flat surface after every border round. Lace that begins ruffling has too many stitches; lace that cups upward needs more spacing.
Adding the Lavender Scalloped Trim
The lavender outer line connects the border visually to the roses without requiring another solid band of purple.
Work one scallop into each established cream shell or loop. The edge should form repeated rounded arches with visible cream space between them.
At corners, add space rather than forcing one shell to bend sharply. A slightly larger corner scallop is less noticeable than a puckered border.
Making Consistent Tassels
The tassels create the final vertical detail along the lower bed edge. Their length needs to remain consistent because the blanket itself uses strong geometric repetition.
Cut all strands against one cardboard guide. Building each tassel from the same number of strands keeps the weight balanced across the border.
Attach tassels only after the blanket has been fully blocked and measured. A border that still needs adjustment is harder to correct once dozens of tassels are installed.
Constructing the Matching Rose Pillow
The pillow repeats the blanket language without simply copying one small square. Its central rose is enlarged to roughly 24–28 cm, making it readable from across the room.
Four larger leaves extend beyond the flower and help spread its visual weight across the cream cushion front.
An envelope back avoids placing buttons or a zipper directly behind the dimensional front decoration. It also allows the pillow insert to be removed before washing or reshaping.
Choosing Yarn and Hook Size
Current rose blankets use a wide range of materials and hooks. Published examples include 3 mm hooks for finer rose blankets, 5.5 mm for rose motif squares and around 6 mm for worsted flower blankets. :contentReference[oaicite:15]{index=15}
A 4 mm hook with DK or light-worsted yarn gives the project enough drape for a bedspread while keeping the flowers structured. Cotton-acrylic blends are especially practical where the blanket needs both definition and manageable weight.
If the roses collapse, reduce only the flower hook to 3.5 mm rather than tightening the entire bedspread.
Planning Yarn Quantities
Large blankets consume far more yarn than throws. A standard medium-weight 50 × 60 inch blanket is commonly estimated near 2,000 yards, while full-size bed coverings require more according to size and gauge. :contentReference[oaicite:16]{index=16}
The dimensional flowers also add significant consumption beyond the cream base. Buy lavender from one dye lot because a tonal shift across forty-eight roses will be easy to see.
Make and weigh one complete square with rose and leaves. Multiply that weight by forty-eight, then add at least 15% for joining, borders, pillow and swatching.
Adjusting the Bedspread Size
The modular construction makes resizing simpler than changing the square pattern itself. Add or remove complete rows and columns instead of altering the motif geometry.
For a narrower blanket, use five squares across. For a longer bedspread, add a ninth row before beginning the perimeter border.
Measure the mattress and desired drop first. Then compare those numbers with the blocked square measurement, not the unblocked crochet size.
Finishing Checks
Spread the blanket on a flat surface and inspect all joining lines. No seam should draw one row shorter than the next.
Check the roses from above. Their centers should remain raised, the outer petals should open cleanly and both leaves should still be visible on most motifs.
Inspect the perimeter last. The lace should lie flat, the lavender scallops should remain evenly spaced and the tassel line should finish at one consistent length.
Conclusion
Measure the finished bedspread after its final blocking and record the exact square size, joined field dimensions and border width. Those measurements make another 3D rose crochet bedspread pattern easier to scale for a different mattress. Photograph the finished set from directly above to check square alignment and rose spacing, then take a second image showing the matching pillow. Save the project to Pinterest and share the finished bedspread on Instagram with #LavenderRoseBedspread. Reshape every flower before photographing it. Would you keep all forty-eight roses lavender, or alternate lavender and dusty-pink flowers across the next version?
Sources
- Lion Brand — Flower Garden Blanket: approximately 142 × 173 cm, medium/worsted yarn and 15 cm modular squares.
- Lion Brand — Flower Market Baby Blanket: 15 cm flower squares and intermediate modular construction.
- Ravelry — Embroidered Roses Blanket Square: 8 × 8 inch repeatable square.
- Ravelry — Granny Two-Color Rose Afghan: approximately 97 × 120 cm modular rose blanket.
- Ravelry — Rose Window Crochet Blanket: 53 × 53 inches using finer yarn and 3–3.25 mm hooks.
- Maisie and Ruth — dimensional crochet rose construction using a chain-based petal strip.
- Etsy and Pinterest — current rose blanket competition and search-interest references.









