Introduction
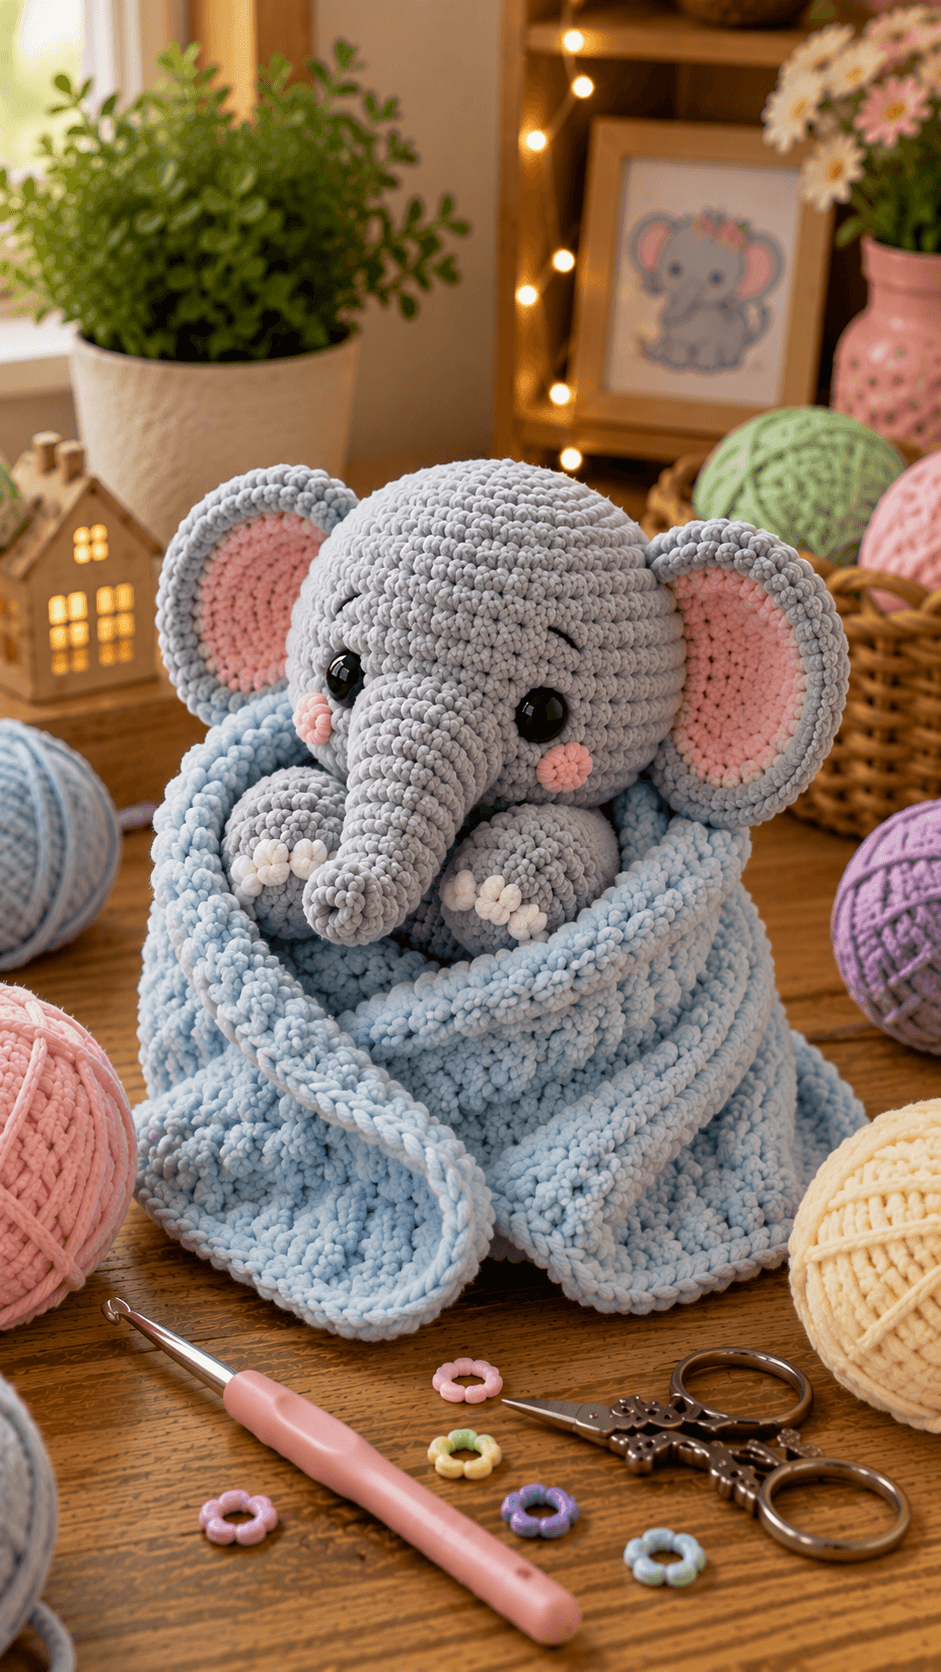
An elephant wrapped in a blanket loses its shape if the ears disappear inside the folds. This elephant blanket amigurumi crochet pattern uses chunky chenille, a 4.5 mm hook and 10–12 mm eyes for a seated elephant approximately 24–28 cm tall. A tapered trunk, oversized pink-lined ears, four padded limbs and a separate powder-blue blanket create the complete intermediate project.
The Design: What Makes This Blanket Elephant Different
The elephant uses a 42-stitch head so the ears and trunk remain visually dominant after the blanket is wrapped around the body. Its torso reaches 36 stitches, producing a smaller pear-shaped core that fits between the front folds. The ears are intentionally large: a 36-stitch gray outer panel surrounds a smaller pink insert, keeping both colors visible from the front. Two short forelegs project above the blanket while the 24-stitch hind feet stabilize the seated pose inside it. The blanket itself is not a traditional lovey centered on an animal head. It is a full square folded upward around a complete plush elephant. This elephant lovey crochet pattern therefore requires careful scale matching. A blanket that is too narrow exposes the torso; one that is too large hides the feet, paws and lower ear edges.
Project Information at a Glance
| Skill Level | Time | Finished Size | Hook | Best For |
|---|---|---|---|---|
| Intermediate | 14–18 hours | Elephant 24–28 cm; blanket 55–65 cm square | 4.5 mm / 5 mm | Nursery display, plush collections and wrapped animal projects |
Materials and Tools
Yarn
- Dove gray — chunky chenille — approximately 160–200 g — head, body, trunk, ears and limbs
- Powder blue — chunky chenille — approximately 280–350 g — blanket
- Blush pink — matching chenille — approximately 25–35 g — inner ears and cheeks
- White — smooth bulky or chenille yarn — approximately 10–15 g — toe bumps
- Black embroidery yarn — small amount — optional eyebrow details
Tools
- 4.5 mm crochet hook for the elephant
- 5.0 mm crochet hook for the blanket
- Two 10–12 mm black safety eyes
- Polyester toy stuffing
- Large-eye yarn needle
- Locking stitch markers
- Dressmaking pins
- Scissors
The blanket and elephant use different hooks because the toy fabric needs dense stuffing coverage while the blanket benefits from slightly more drape. Current commercial lovey patterns also separate the amigurumi and blanket hook sizes.
Abbreviations
- MR — magic ring
- sc — single crochet
- inc — two single crochet stitches in one stitch
- dec — decrease over two stitches
- sl st — slip stitch
- ch — chain
- hdc — half double crochet
- dc — double crochet
- BLO — back loop only
- FLO — front loop only
An invisible decrease is worked through the front loops of the next two stitches before completing both loops together as one single crochet.
Pattern — Step by Step
Work the stuffed parts in continuous spirals unless a section states otherwise. Keep the marker through the first complete stitch and confirm every bracketed count before starting the following round.
Head
Yarn: dove gray.
R1: 6 sc in MR (6)
R2: inc × 6 (12)
R3: (sc, inc) × 6 (18)
R4: (2 sc, inc) × 6 (24)
R5: (3 sc, inc) × 6 (30)
R6: (4 sc, inc) × 6 (36)
R7: (5 sc, inc) × 6 (42)
R8–R13: sc around (42)
R14: (5 sc, dec) × 6 (36)
Insert the safety eyes between R10 and R11, approximately seven visible stitches apart. Check the trunk position before locking the washers.
R15: (4 sc, dec) × 6 (30)
R16: (3 sc, dec) × 6 (24)
R17: (2 sc, dec) × 6 (18)
R18: (sc, dec) × 6 (12)
R19: dec × 6 (6)
Stuff firmly after R14, adding smaller pieces around the safety-eye backs. Keep the lower centre slightly softer for the trunk seam.
Fasten off and close the final six stitches.
Body
Yarn: dove gray.
R1: 6 sc in MR (6)
R2: inc × 6 (12)
R3: (sc, inc) × 6 (18)
R4: (2 sc, inc) × 6 (24)
R5: (3 sc, inc) × 6 (30)
R6: (4 sc, inc) × 6 (36)
R7–R12: sc around (36)
R13: (4 sc, dec) × 6 (30)
R14: sc around (30)
R15: (3 sc, dec) × 6 (24)
R16: sc around (24)
R17: (2 sc, dec) × 6 (18)
R18: (sc, dec) × 6 (12)
R19: dec × 6 (6)
Stuff firmly through the lower torso. The finished body needs to retain its shape after the blue blanket is wrapped around it.
Fasten off and leave a 45 cm sewing tail.
Trunk
Yarn: dove gray. Begin at the tip.
R1: 6 sc in MR (6)
R2–R6: sc around (6)
R7: inc × 6 (12)
R8–R11: sc around (12)
R12: (sc, inc) × 6 (18)
R13–R15: sc around (18)
Stuff the wide base lightly. Leave R1–R6 nearly empty so the tip can angle downward.
Fasten off and leave a 35 cm tail.
Gray Outer Ears — Make Two
Yarn: dove gray.
R1: 6 sc in MR (6)
R2: inc × 6 (12)
R3: (sc, inc) × 6 (18)
R4: (2 sc, inc) × 6 (24)
R5: (3 sc, inc) × 6 (30)
R6: (4 sc, inc) × 6 (36)
Fasten off with a 45 cm sewing tail. Do not stuff.
Pink Inner Ears — Make Two
Yarn: blush pink.
R1: 6 sc in MR (6)
R2: inc × 6 (12)
R3: (sc, inc) × 6 (18)
R4: (2 sc, inc) × 6 (24)
R5: (3 sc, inc) × 6 (30)
Fasten off with a 30 cm tail.
Stretch the pink panels slightly vertically during pinning. Keep an even gray border visible around the outer edge.
Front Paws — Make Two
Yarn: dove gray.
R1: 6 sc in MR (6)
R2: inc × 6 (12)
R3: (sc, inc) × 6 (18)
R4–R7: sc around (18)
R8: (sc, dec) × 6 (12)
R9–R11: sc around (12)
R12: dec × 6 (6)
Stuff the lower paw firmly. Leave the upper section flexible enough to angle forward over the blanket.
Fasten off with a 35 cm tail.
Rear Legs — Make Two
Yarn: dove gray.
R1: 6 sc in MR (6)
R2: inc × 6 (12)
R3: (sc, inc) × 6 (18)
R4: (2 sc, inc) × 6 (24)
R5–R8: sc around (24)
R9: (2 sc, dec) × 6 (18)
R10: (sc, dec) × 6 (12)
R11–R12: sc around (12)
R13: dec × 6 (6)
Stuff firmly and flatten the lower part slightly into a broad foot.
Fasten off and leave a 40 cm sewing tail.
White Toe Bumps — Make Twelve
Yarn: white.
Ch 2. Work 5 hdc into the second chain from the hook. Join with sl st.
Fasten off with a 10 cm sewing tail.
Make three for each front paw and rear foot if you want the complete raised-toe treatment. The reference shows the white details most clearly on the forward-facing limb ends.
Pink Cheeks — Make Two
Yarn: blush pink.
R1: 6 sc in MR (6)
Fasten off and leave a 12 cm tail. Pull each circle sideways while sewing to produce a compact oval.
Powder-Blue Blanket
Yarn: powder blue. Use 5 mm hook. Work in turned rows.
Ch 81.
Row 1: hdc in second ch from hook and each ch across (80)
Row 2: ch 1, turn, hdc across (80)
Rows 3–60: repeat Row 2 (80)
Measure after approximately 45 rows. Continue until the fabric is roughly square, normally 55–65 cm with chunky chenille.
Do not fasten off.
Blanket Border
Ch 1 and work sc evenly around all four edges.
Place approximately 3 sc in each corner so the border turns without pulling.
Work one additional round of sc around the entire blanket.
Fasten off and weave the tail through at least 8–10 cm of stitches.
Optional Raised Blanket Edge
If your blanket lies flatter than the reference, join the blue yarn to the border and work one final round:
R1: hdc around, working 3 hdc into each corner.
Fasten off.
This extra round adds thickness to the visible folds but should not create a rigid edge.
Assembly
- Sew each pink inner panel onto its gray outer ear first, leaving approximately 1–1.5 cm of visible gray around the outer edge.
- Attach the trunk centrally to the lower face. Keep the broad 18-stitch base beneath the eyes and angle the narrow tip downward.
- Sew the two pink cheek circles outside the trunk and slightly below the eye line. Compare both positions from directly in front before finishing either seam.
- Attach both ears across broad sections of the head. Leave their outer halves free so the large pink panels remain open and visible.
- Sew the head to the body. Position it slightly forward, then reinforce the rear neck seam because the ears and trunk increase the load on the join.
- Attach the front paws to the upper body and the two rear legs low on the torso. Test the elephant in a sitting position before tightening the rear-leg seams.
- Sew three small white toe bumps across each visible limb end. Leave a narrow gray gap between adjacent white details.
- Lay the blue blanket flat as a diamond. Place the elephant approximately one-third of the way up from the lower corner rather than exactly in the centre.
- Bring the lower blanket point upward, fold the left and right sides around the body, then turn the upper section behind the elephant to reproduce the layered wrapped structure.
- Use removable ties or a few hidden blue yarn tacks if the display needs to retain the photographed fold arrangement, then reshape the ears, trunk, paws and front blanket edge.
The finished display should show the complete head, both ears, trunk, front paws and portions of the rear feet while several blue blanket layers surround the lower body.
7 Technical Tips
- Blanket swallowing the elephant: A square more than roughly 2.5 times the elephant’s sitting height can hide the paws and lower ears. Test the first major fold before adding extra blanket rows.
- Ear collapse: A 36-stitch chenille ear sewn through only three or four head stitches will rotate backward. Spread each attachment across approximately 5–6 cm.
- Trunk droop: Dense filling inside the six-stitch tip makes it heavy. Leave the first five narrow rounds almost empty and concentrate stuffing near the 18-stitch base.
- Decrease holes: Chenille can reveal stuffing along the head and body shaping rounds. Work every decrease through the front loops of the next two stitches.
- Uneven sitting pose: A rear foot attached 5 mm higher than its partner can rotate the wrapped elephant sideways. Pin both legs and test the figure before closing either seam.
- Blanket edge curling: Too few border stitches pull the square into a shallow bowl. Work one stitch per row end consistently and place three stitches in each corner.
- Hidden face: A front blanket fold rising above the forepaws blocks the trunk silhouette. Keep the highest front edge approximately level with the lower third of the paws.
Shaping the Elephant Head
The head reaches 42 stitches because the reference depends on unusually broad facial proportions. Large ears and a substantial trunk reduce the amount of exposed head fabric, so a smaller sphere would feel crowded.
Hold the maximum width through six rounds. That creates enough height between the crown, safety eyes and trunk attachment.
Stuff the crown firmly. The ears pull sideways once attached, and a loosely filled sphere can flatten between those two seams.
Constructing the Tapered Trunk
The trunk begins with six stitches and expands to eighteen near the face. Working from the tip toward the head gives better control over the taper.
Keep the narrow section flexible. The photographed elephant’s trunk descends between the cheeks before curving slightly toward the front.
After sewing the broad base, add one hidden shaping stitch through the underside if the chenille repeatedly pushes the trunk straight forward.
Making the Oversized Ears
The ears are larger than those used in many compact elephant patterns. Their gray outer circles reach 36 stitches, while the pink centers stop at 30.
Do not stuff either layer. Sew the two flat circles together first and treat them as one finished component during head assembly.
Attach only the inner section of the gray edge. A fully sewn circumference would flatten the ear against the head and eliminate the wide open profile visible above the blanket.
Building the Seated Body
The torso reaches a 36-stitch plateau, one increase stage below the head. This keeps the body narrow enough to wrap while still providing space for four limb seams.
Firm stuffing matters because the blanket places pressure around the torso. A soft body can become compressed into an irregular shape after several hours in a tight wrap.
Keep the upper section slightly softer so the reinforced head seam can settle cleanly against the body.
Positioning the Front Paws
The forepaws need to remain visible after wrapping. Attach them slightly forward on the upper torso instead of directly to the sides.
Leave the lower half of each paw free from the body. That lets the blanket pass underneath without flattening the rounded limb ends.
Before finishing the wrap, pull the two paws forward until they rest just above the upper front blanket fold.
Setting the Rear Feet
The 24-stitch rear feet stabilize the elephant even though the blanket hides much of them. Their attachment position controls whether the head remains upright after wrapping.
Place both low on the torso and slightly forward. The lower sections should project beyond the body enough to remain partly visible.
Test the completed elephant without the blanket first. If it cannot sit independently, correct the legs before relying on folded fabric for support.
Adding the White Toe Details
Raised white toe bumps create more definition than embroidered lines against thick gray chenille. Each small motif uses five half double crochets worked from one center.
Pin three across each visible limb end. Maintain a narrow strip of gray between the white pieces.
Pull the sewing tails only until the motifs lie flat. Excessive tension produces visible dents in the stuffed paw.
Constructing the Blue Blanket
The reference blanket behaves more like a substantial small throw than a classic radial lovey. Straight turned rows create a predictable square that can be folded repeatedly.
Half double crochet provides enough thickness for pronounced folds without creating an overly stiff chenille sheet. The two-round single crochet border stabilizes the edges.
Measure the width after the first ten rows. Chenille gauge differs substantially between brands, so physical size matters more than a fixed row count.
Choosing the Blanket Size
A useful target is roughly twice to two-and-a-half times the elephant’s sitting height. That gives enough material for a bottom fold, two side wraps and an upper rear section.
Stop crocheting when the blanket can wrap around the body while leaving both ears completely free. Extra size is not automatically useful.
If your elephant is 25 cm tall, begin testing the wrap once the blanket reaches about 55 cm across.
Creating the Layered Wrap
Lay the blanket diagonally before placing the elephant. A diamond orientation creates longer points for the front and side folds than a square orientation.
Bring the lower corner up first. The side corners then cross around the torso, while the remaining top fabric rises behind the elephant.
Do not pull the folds tightly. The reference contains visible blue volume between layers rather than a swaddled, compressed body.
Keeping the Blanket in Position
For a removable accessory, leave the folds completely unsecured and arrange them for display. This allows the blanket to be washed or used separately.
For a fixed decorative piece, add three or four hidden blue yarn tacks between overlapping blanket layers. Keep every tack away from the gray elephant fabric.
A permanent stitch through both blanket and elephant changes the project into a single assembled object, so use that method only when removability is not required.
Choosing Eye Size
Elephant patterns currently use different eye diameters according to project scale, from approximately 6 mm in very small amigurumi to around 9 mm and above in larger versions. :contentReference[oaicite:15]{index=15}
For this 42-stitch chenille head, test 10 mm first. Move to 12 mm if the eyes look undersized after the ears and trunk are temporarily pinned.
The eyes should remain visible between the trunk and ear bases without dominating the pink inner-ear panels.
Working with Chunky Chenille
Chenille hides individual stitch loops more than smooth cotton or acrylic. Put the round marker through both loops of the first stitch instead of clipping a loose surface fiber.
Count every 42-stitch head round and every 36-stitch body round. A missed stitch can rotate the decreases and shift the face center.
If the magic ring sheds while tightening, chain two and work the first six single crochet stitches into the second chain from the hook.
Adjusting the Project Size
Current elephant patterns demonstrate substantial size variation, from approximately 15 cm in a 2024 baby-elephant pattern to 36 cm for Esther the Elephant. :contentReference[oaicite:16]{index=16}
Scale this project by changing yarn rather than adding extra increase rounds. Worsted yarn with a smaller amigurumi hook produces a more compact elephant while preserving the written proportions.
Resize the blanket independently after completing the elephant. Its final dimensions need to match the actual sitting height, not a theoretical scale factor.
Planning Yarn Quantity
The blanket consumes more yarn than the elephant because it covers a much larger surface area. Current worsted elephant-lovey patterns already specify around 200 yards for smaller blanket-and-animal combinations. :contentReference[oaicite:17]{index=17}
With chunky chenille, weigh the first ten blanket rows and use that result to estimate the remaining quantity. Keep an additional amount for two border rounds.
Purchase enough blue yarn from one dye lot when possible because a shade change across a large plain blanket is easier to notice than on a small limb.
How This Differs from a Standard Elephant Lovey
Many current elephant lovey designs attach an amigurumi head or partial animal directly to a flat blanket. Nicole Chase’s current Hug Me Elephant Lovey, for example, specifies a blanket around 14 inches with a smaller elephant head and arm span, while Crochet.com’s lovey works the blanket and amigurumi separately before assembly. :contentReference[oaicite:18]{index=18}
This design uses a complete seated elephant and treats the blanket as a wrap rather than a body substitute.
That distinction makes the elephant usable as a standalone plush when the blanket is removed.
Finishing Checks
Set the elephant on a hard surface without the blanket first. Both rear feet should support the torso while the trunk hangs centrally between the cheeks.
Wrap the blue square and check the front silhouette. Both paws, most of the trunk and the complete pink ear interiors should remain visible.
Inspect the folds last. The blanket should form several thick blue layers around the lower elephant without leaning the head to either side.
Conclusion
Measure the elephant’s sitting height before finishing the final blanket rows, then record both dimensions beside the yarn and hook sizes used. That ratio is more useful than copying a fixed blanket measurement when chenille brands change. Photograph the project once with the elephant wrapped and once with the blanket open to document both components. Save this elephant blanket amigurumi crochet pattern to Pinterest and share the finished project on Instagram with #WrappedBabyElephant. Reshape the ears and pull both front paws above the blanket edge before the final photograph. Would you keep the powder-blue wrap shown here or pair the gray elephant with a blush-pink blanket?
Sources
- Nicole Chase — Hug Me Elephant Lovey: approximately 14-inch blanket, 4 mm and 5 mm hooks, worsted-weight yarn. :contentReference[oaicite:19]{index=19}
- Cilla Crochet — Elsie the Elephant Lovey: free elephant lovey pattern published November 2024. :contentReference[oaicite:20]{index=20}
- Crochet.com — Elephant Lovey: blanket and amigurumi sections worked separately with 5 mm and 3.5 mm hooks. :contentReference[oaicite:21]{index=21}
- Etsy — Elephant Lovey Crochet Pattern: approximately 17-inch blanket, around 200 yards worsted yarn, 5.5 mm and 4 mm hooks. :contentReference[oaicite:22]{index=22}
- Jess Huff — Esther the Elephant: approximately 36 cm tall with worsted-weight yarn and a 3.5 mm hook. :contentReference[oaicite:23]{index=23}
- Loops and Love Crochet — Mini Elephant Amigurumi: 2026 elephant measuring approximately 7.5 inches tall. :contentReference[oaicite:24]{index=24}









