Introduction
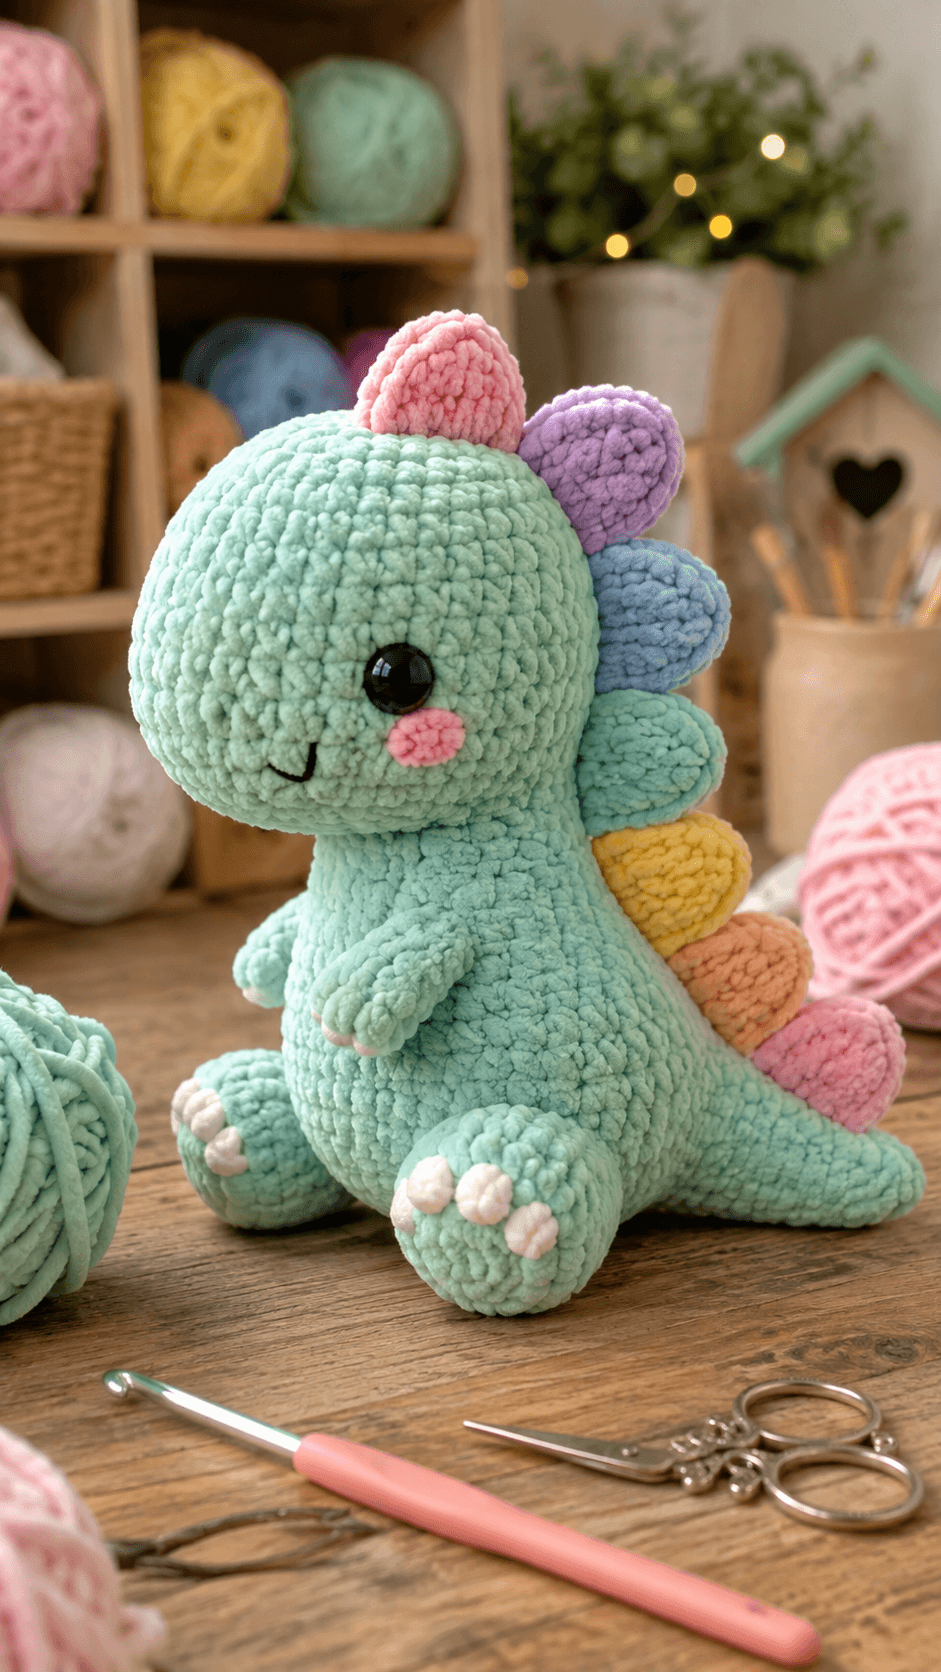
A Stegosaurus loses its silhouette the moment the back plates disappear behind an oversized head. This stegosaurus amigurumi crochet pattern uses chunky chenille, a 4.5 mm hook and 10–12 mm eyes for a seated mint dinosaur approximately 24–27 cm high. Two arms, broad hind feet, a tapered tail and seven rounded pastel plates create the complete intermediate plush.
The Design: What Makes This Pastel Stegosaurus Different
The head reaches a 42-stitch maximum because the photographed dinosaur has a broad juvenile face rather than the small low skull of a realistic Stegosaurus. The body repeats that 42-stitch width but holds it farther down, creating enough mass to support large seated hind legs. A tapered tail extends behind the body and counterbalances the head. Seven separate plates form the most distinctive section. Instead of thin triangles, they are shallow stuffed ovals in pink, lavender, blue, mint, yellow and peach. Their sizes decrease toward the tail so the row follows the back line naturally. Short front arms remain narrow and slightly forward of the body. One common mistake in a pastel dinosaur crochet pattern is making every plate identical; decreasing their height toward the tail gives the row a clearer Stegosaurus profile.
Project Information at a Glance
| Skill Level | Time | Finished Size | Hook | Best For |
|---|---|---|---|---|
| Intermediate | 12–16 hours | 24–27 cm high; 30–34 cm long | 4.5 mm | Dinosaur collections, nursery display and plush markets |
Materials and Tools
Yarn
- Mint green — chunky/plush chenille — approximately 150–190 g — head, body, arms, legs and tail
- Soft pink — matching chenille — approximately 15–20 g — first and final plates plus cheeks
- Lavender — matching chenille — approximately 10–15 g — dorsal plate
- Powder blue — matching chenille — approximately 10–15 g — dorsal plate
- Mint accent — matching chenille — approximately 8–12 g — dorsal plate
- Butter yellow — matching chenille — approximately 8–12 g — dorsal plate
- Soft peach — matching chenille — approximately 8–12 g — dorsal plate
- White — chenille or smooth bulky yarn — approximately 10–15 g — toe bumps
- Black embroidery yarn — small amount — smile
Tools
- 4.5 mm crochet hook
- Two 10–12 mm black safety eyes
- Polyester toy stuffing
- Large-eye yarn needle
- Locking stitch marker
- Dressmaking pins
- Scissors
Chenille stitch definition changes considerably between brands, so complete the first six head rounds before judging the hook. The fabric should bend under stuffing pressure without exposing large gaps.
Abbreviations
- MR — magic ring
- sc — single crochet
- inc — two single crochet stitches in one stitch
- dec — decrease over two stitches
- sl st — slip stitch
- ch — chain
- hdc — half double crochet
- dc — double crochet
- BLO — back loop only
- FLO — front loop only
An invisible decrease is worked through the front loops of the next two stitches before completing those loops together as one single crochet.
Pattern — Step by Step
Work stuffed pieces in continuous spirals unless stated otherwise. Place a marker in the first stitch of each round and confirm every bracketed count before continuing.
Head
Yarn: mint green — 42-stitch large amigurumi plateau.
R1: 6 sc in MR (6)
R2: inc × 6 (12)
R3: (sc, inc) × 6 (18)
R4: (2 sc, inc) × 6 (24)
R5: (3 sc, inc) × 6 (30)
R6: (4 sc, inc) × 6 (36)
R7: (5 sc, inc) × 6 (42)
R8–R13: sc around (42)
R14: (5 sc, dec) × 6 (36)
Insert the 10–12 mm safety eyes between R10 and R11. Leave approximately seven visible stitches between the stems. Lock both washers before the opening narrows further.
R15: (4 sc, dec) × 6 (30)
R16: (3 sc, dec) × 6 (24)
R17: (2 sc, dec) × 6 (18)
R18: (sc, dec) × 6 (12)
R19: dec × 6 (6)
Stuff firmly from R14 onward. Add smaller pieces around the eye washers first, then fill the crown and lower jaw area.
Fasten off. Pass the remaining tail through the six front loops and close the opening.
Body
Yarn: mint green.
R1: 6 sc in MR (6)
R2: inc × 6 (12)
R3: (sc, inc) × 6 (18)
R4: (2 sc, inc) × 6 (24)
R5: (3 sc, inc) × 6 (30)
R6: (4 sc, inc) × 6 (36)
R7: (5 sc, inc) × 6 (42)
R8–R14: sc around (42)
R15: (5 sc, dec) × 6 (36)
R16: sc around (36)
R17: (4 sc, dec) × 6 (30)
R18: (3 sc, dec) × 6 (24)
R19: (2 sc, dec) × 6 (18)
Stuff the lower body firmly. Pack extra filling around the rear base because the tail and plates add weight behind the centre line.
R20: (sc, dec) × 6 (12)
R21: dec × 6 (6)
Fasten off and leave a 45 cm structural tail.
Front Arms — Make Two
Yarn: mint green.
R1: 6 sc in MR (6)
R2: inc × 6 (12)
R3: (sc, inc) × 6 (18)
R4–R6: sc around (18)
R7: (sc, dec) × 6 (12)
R8–R10: sc around (12)
R11: dec × 6 (6)
Stuff the rounded paw end through R6. Leave the upper attachment section comparatively soft.
Fasten off and leave a 30 cm sewing tail.
Back Legs — Make Two
Yarn: mint green.
R1: 6 sc in MR (6)
R2: inc × 6 (12)
R3: (sc, inc) × 6 (18)
R4: (2 sc, inc) × 6 (24)
R5–R8: sc around (24)
R9: (2 sc, dec) × 6 (18)
R10: (sc, dec) × 6 (12)
R11: sc around (12)
R12: dec × 6 (6)
Stuff firmly and flatten each foot slightly so its longest dimension runs from heel to toes.
Fasten off with a 35 cm tail.
Tail
Yarn: mint green. Work from the tail tip toward the body.
R1: 6 sc in MR (6)
R2–R5: sc around (6)
R6: inc × 6 (12)
R7–R9: sc around (12)
R10: (sc, inc) × 6 (18)
R11–R14: sc around (18)
Stuff the 18-stitch base moderately, then reduce the filling gradually toward the six-stitch tip. The tip should remain flexible enough to rest on the table.
Fasten off with a 40 cm sewing tail. Leave the 18-stitch opening unclosed.
Pink Cheek Patches — Make Two
Yarn: soft pink.
R1: 6 sc in MR (6)
Fasten off with a 12 cm tail. Pull each patch sideways while sewing to create a small horizontal oval.
Smile
Yarn: smooth black embroidery yarn.
Embroider a shallow curved smile approximately 2 cm wide below and between the eyes. Keep the curve low enough that the cheek patches remain visually separate from it.
Large Dorsal Plates — Make Two
Colors: pink and lavender.
R1: 6 sc in MR (6)
R2: inc × 6 (12)
R3: (sc, inc) × 6 (18)
R4–R7: sc around (18)
R8: (sc, dec) × 6 (12)
R9: dec × 6 (6)
Add a very thin layer of stuffing across the centre. Flatten the base before attachment.
Fasten off and leave a 30 cm tail.
Medium Dorsal Plates — Make Three
Colors: powder blue, mint and yellow.
R1: 6 sc in MR (6)
R2: inc × 6 (12)
R3: (sc, inc) × 6 (18)
R4–R5: sc around (18)
R6: (sc, dec) × 6 (12)
R7: dec × 6 (6)
Stuff only enough to separate the two sides of the chenille fabric.
Fasten off with a 25 cm tail.
Small Dorsal Plates — Make Two
Colors: peach and pink.
R1: 6 sc in MR (6)
R2: inc × 6 (12)
R3–R5: sc around (12)
R6: dec × 6 (6)
Do not pack firmly. Fasten off and leave a 25 cm attachment tail.
White Toe Bumps — Make Six
Yarn: white. Make three for each hind foot.
Ch 2.
Work 5 hdc into the second chain from the hook. Pull the starting tail to close the centre, slip stitch to the first hdc and fasten off.
Leave a 10 cm sewing tail on each toe.
Optional Front-Claw Detail
The supplied image keeps the front arms plain. Do not add white claws to the front paws unless you want a more detailed variation.
Assembly
- Sew the head to the body first, placing the head slightly forward rather than directly over the body centre. Make two passes around the neck contact area and add one hidden rear anchor stitch.
- Attach the two pink cheek patches below and outside the eyes, then embroider the small curved smile centrally between them.
- Pin the front arms to the upper sides of the body with their rounded ends pointing slightly inward. Spread each seam across approximately 6–8 body stitches.
- Attach the two back legs low on the front sides of the body. Test the dinosaur on a hard surface before tightening the seams so both feet support the seated pose equally.
- Sew three white toe bumps across the front edge of each back foot. Keep approximately one mint stitch visible between neighboring white bumps.
- Attach the open 18-stitch tail to the lower rear body. Angle it downward first, then allow the flexible tip to sweep backward along the table.
- Pin all seven dorsal plates before sewing. Start with the large pink plate near the upper crown, then continue lavender, blue, mint, yellow, peach and the final small pink plate toward the tail.
- Sew each plate through its flattened base using a seam approximately 2–3 cm wide. Leave the rounded outer edge completely free.
- Inspect the plate row from the side. The largest pieces should sit near the head and upper back, while the final two plates decrease toward the tail.
- Set the completed Stegosaurus on a level surface, correct any tail twist or leg-height difference, then weave every structural tail through at least three stitch directions.
The completed dinosaur should sit independently with both large hind feet forward, the tail resting behind the body and seven pastel plates forming an uninterrupted line from crown to tail.
7 Technical Tips
- Head droop: A 42-stitch plush head can pull forward after assembly. Keep the neck seam at least 4–5 cm wide and add one hidden anchor from the rear head into the upper body.
- Plate collapse: Fully stuffing an 18-stitch plate makes it cylindrical rather than flat. Limit the filling to a layer approximately 1–1.5 cm thick at the centre.
- Decrease gaps: Chenille can reveal stuffing at shaping rounds. Work every decrease through the front loops of the following two stitches.
- Foot imbalance: A back leg attached even 5 mm higher than its partner can tip the seated body. Pin both legs and test the dinosaur on a hard surface before completing either seam.
- Tail lift: Dense filling through the six-stitch tail tip makes it project upward. Leave the final 4–5 tip rounds almost empty.
- Plate crowding: Bases sewn less than approximately one stitch apart can overlap and hide the individual colors. Leave a small mint gap between most neighboring plates.
- Eye-placement drift: One eye placed a full round higher changes the head angle visibly. Mark both 10–12 mm eye positions before inserting either washer.
Shaping the Oversized Stegosaurus Head
The head uses a 42-stitch maximum because this stegosaurus amigurumi crochet pattern follows the oversized juvenile proportions visible in the reference. The face is almost spherical, while the muzzle remains part of the same stuffed form rather than becoming a separate snout.
Six plain rounds at maximum width provide enough vertical height for the eyes and cheek placement. Beginning the decreases earlier would make the head flatter and reduce the space available beneath the first dorsal plate.
Stuff in small pieces around the eye washers, then build the crown evenly. Keep the rear upper head firm because the first plate will place additional weight there.
Building the Seated Dinosaur Body
The pear-shaped torso repeats the 42-stitch maximum but holds that width through seven rounds. The lower body therefore carries more visual weight than the neck.
Stuff the base firmly enough to resist compression from the large back legs. A soft lower body can sink between the feet and push the dinosaur backward onto its tail.
The upper body may stay slightly softer. That area needs to accept the head seam and both front-arm attachments without developing hard ridges.
Making the Rainbow Dorsal Plates
Seven padded plates provide the primary visual identity. The photographed row uses rounded shapes rather than narrow triangular spikes, so each part is crocheted as a shallow stuffed oval.
Two large plates establish the height close to the head. Three medium pieces carry the line over the back, and two smaller plates taper the sequence toward the tail.
Arrange the colors before sewing. Pink, lavender and blue belong near the head; yellow, peach and the final pink piece create the warmer tail-end sequence.
Attaching the Plates in a Clean Line
Mark a centre line from the crown down the spine before placing any plate. Chenille makes the underlying round structure difficult to see after multiple pieces are pinned.
Begin with the first and last plates. Add the middle pieces afterward so their spacing can be distributed across the available back length.
Attach only the flattened base of each plate. Sewing halfway up the sides reduces the raised profile and makes the plate look embedded in the body.
Constructing the Long Tail
The tail is worked from a six-stitch tip toward an 18-stitch body opening. That direction makes it easier to keep the tip narrow while building enough circumference for a stable attachment.
Reduce stuffing density as the tail narrows. The photographed tail rests along the surface instead of pointing rigidly backward.
Position the 18-stitch opening low on the rear body. A high attachment makes the tail appear to leave the dinosaur from the middle of its back rather than continue the body line.
Making the Large Hind Feet
The rear feet reach 24 stitches, four increase stages from the initial magic ring. Their larger size supports the seated posture and visually balances the oversized head.
Flatten each stuffed leg before pinning. The underside should contact the table across a broad area rather than one rounded point.
Place the feet slightly forward of the body centre. This moves the visual weight toward the face and lets the tail act as a secondary rear stabilizer.
Adding the White Toes
Three small white bumps appear across each visible hind foot. Separate motifs produce a clearer raised texture than straight embroidered lines in thick chenille.
Pin all three before sewing. Keep their outer edges inside the mint foot outline so the toes do not increase the overall foot width.
Use only enough tension to hold the white pieces flat against their bases. Pulling the sewing yarn tightly can create three visible dents across the foot.
Positioning the Front Arms
The front arms remain much smaller than the hind legs. Their 18-stitch maximum keeps the upper torso open and leaves the dorsal plates as the strongest secondary feature.
Attach the arms slightly below the neck seam. Their rounded tips should point downward and inward rather than straight sideways.
Leave part of each lower arm free. A completely sewn arm loses the raised plush shape visible against the mint torso.
Choosing Eye Size
For this photo-matched scale, 10–12 mm eyes provide a useful starting range. Published super-bulky Stegosaurus patterns use 10 mm eyes, while another recent Stegosaurus pattern specifies 12 mm. Smaller worsted miniatures commonly move down to 6–8 mm.
Hold both sizes against the completed head before fitting the washers. Ten millimetres leaves more mint facial space; 12 mm moves closer to the large glossy-eye proportion in the reference.
If the finished toy is intended for someone for whom detachable plastic hardware is unsuitable, replace the eyes with embroidered black circles.
Working with Plush Chenille
Chenille hides stitch anatomy, particularly through six or seven plain rounds at the same count. Keep the round marker through both top loops rather than clipping a loose outer fiber.
Count the 42-stitch rounds periodically instead of relying only on the marker. An unnoticed missed stitch can rotate the decreases and shift the face centre.
If an adjustable magic ring snaps or sheds while tightening, chain two and work the first six single crochets into the second chain instead.
Adjusting Finished Size
This design can be scaled most cleanly by changing yarn rather than changing the 42-stitch geometry. Use worsted yarn with a 3–3.5 mm hook for a smaller version.
For a substantially larger plush, move to blanket yarn and a matching hook. The plates, feet and tail then grow at the same rate as the head and body.
Do not enlarge only the head. A 48-stitch head paired with the written 42-stitch body would make the dinosaur front-heavy and would require larger legs to maintain the seated stance.
Planning the Pastel Color Sequence
The reference uses cool colors near the crown before moving into warmer plates farther down the back. That gradient can be preserved even when substituting specific yarn shades.
Keep the mint body constant. Change only the plate colors so the outline remains readable when several pieces overlap from a three-quarter viewing angle.
If reducing the row to five plates, remove one mint-toned plate and one warm-toned plate rather than cutting both from the same end.
Keeping the Dinosaur Upright
The body, feet and tail form a three-part support system. The two large feet carry most of the front weight, while the lower tail prevents the stuffed body from tipping backward.
Test the dinosaur before permanently sewing the final plates. Additional plate weight may move the balance point several millimetres toward the rear.
If the toy rocks backward, move the feet forward slightly before adding more stuffing. Overpacking the body changes its shape but does not correct an incorrectly placed base.
Finishing Checks
Set the finished dinosaur on a hard, level surface. Both hind feet should make full contact while the tail touches or nearly touches the table behind the body.
View the head straight from the front. Both eyes need comparable height, the smile should remain centred and the pink cheeks should sit outside the mouth curve.
Inspect the side profile last. All seven plates should remain individually readable, the largest pieces should rise near the head and the final pink plate should decrease naturally toward the tail.
Conclusion
Measure the completed dinosaur from the face to the tail tip and record the height of the largest dorsal plate beside the yarn and hook used. Those two measurements make a second version easier to match when switching chenille brands. Photograph the finished project from the side as well as the front; the side view exposes uneven plate spacing, a high tail seam or feet positioned too far back. Save this stegosaurus amigurumi crochet pattern to Pinterest and share the finished plush on Instagram with #PastelStegosaurusPlush. Shape every dorsal plate before the final photograph. Which plate would you place at the top of the head next time: pink, lavender or blue?
Sources
- The Kindness Company — Cuddly Stegosaurus Amigurumi, free 2024 pattern with sport-weight yarn, 2.2 mm hook, 6 mm eyes, 42-stitch body section and published yarn quantities.
- Sweet Creek Patterns — 2024 Stegosaurus Amigurumi using #6 super-bulky yarn, 4.5/7 mm hooks and 10 mm safety eyes.
- Sweet Softies / Ravelry — Rainbow Stegosaurus, free 2024 design offered in approximately 6-inch and 10-inch versions.
- DIY Fluffies — Brodie the Stegosaurus, free pattern with video tutorial and yarn-weight scaling guidance.
- Pops de Milk — 2026 Crochet Stegosaurus and Mini Crochet Stegosaurus with separate scales, tail detail and multiple size references.
- Ravelry — Stegosaurus Amigurumi by Kein Maker, approximately 19 cm with bulky yarn and a 3.5 mm hook.









