Introduction
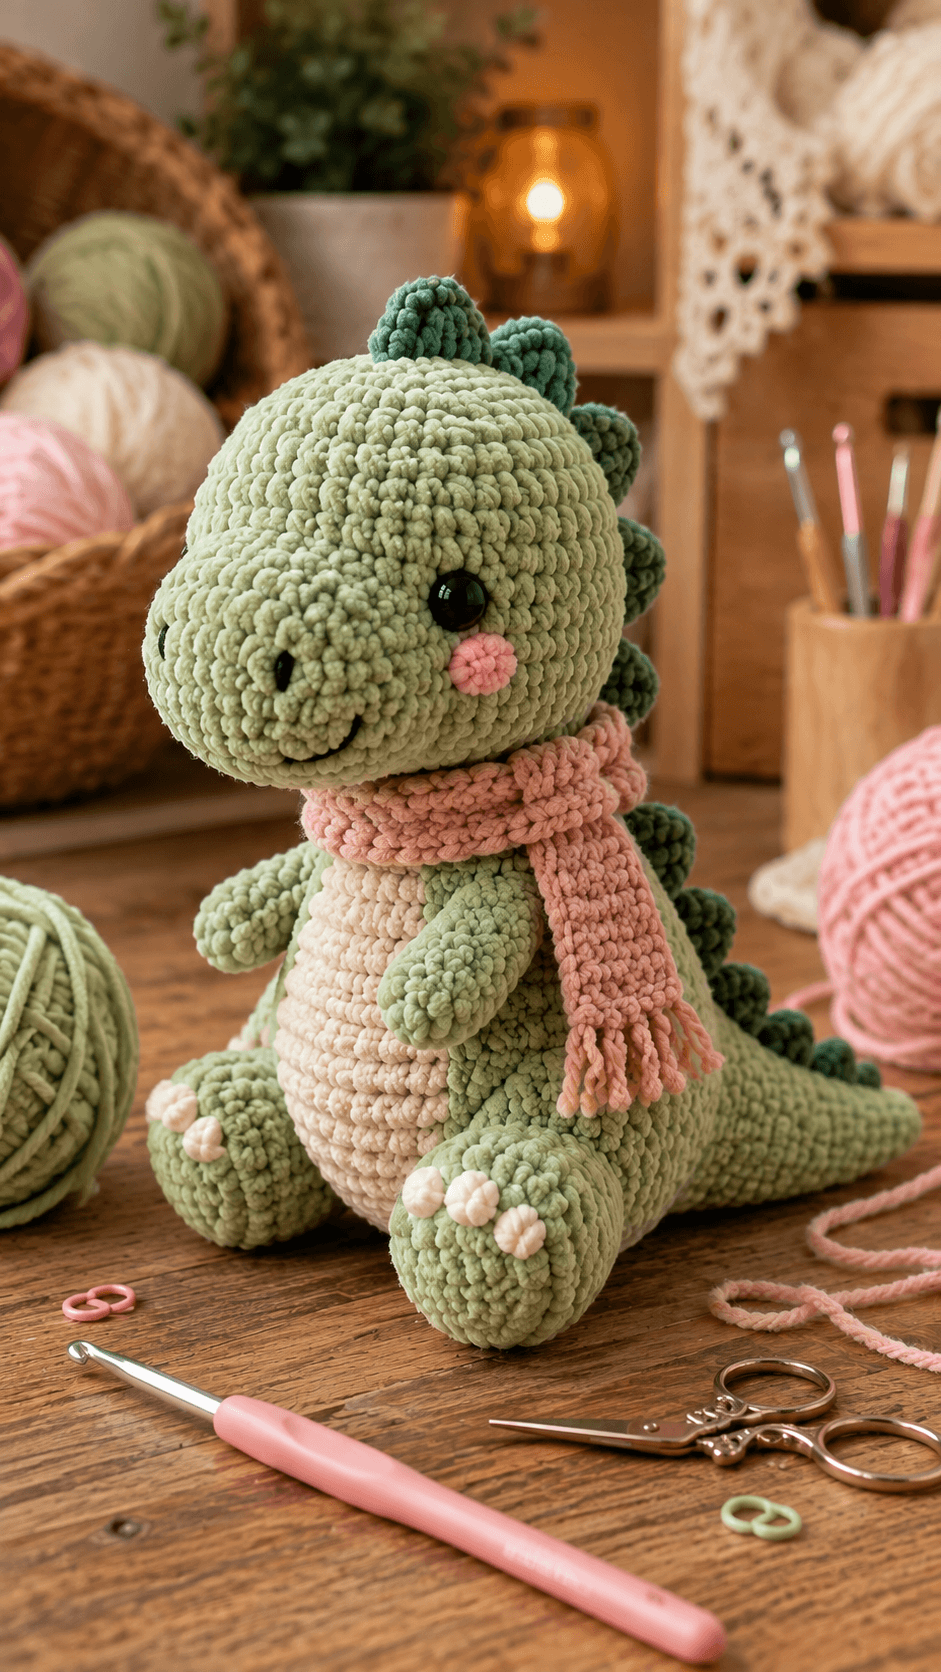
A dinosaur with nine back plates and a scarf has one immediate proportion problem: the neck accessory cannot hide the first plate or swallow the cream chest. This dinosaur amigurumi crochet pattern uses chunky chenille, a 5 mm hook and 12 mm eyes for a seated dinosaur approximately 30–34 cm tall. A long tail, four limbs, cream belly and removable pink scarf complete the intermediate build.
The Design: What Makes This Green Dinosaur Different
The head reaches 36 stitches while the torso expands to 42, creating the large seated body and smaller rounded face visible in the reference. A separate projecting muzzle keeps the profile distinctly dinosaur-like without requiring a long neck. The hind legs are substantially wider than the front arms because they form the seated base, while a tapered tail extends behind the body to counter the visual mass of the head. Nine dark-green dorsal pieces decrease gradually from the crown toward the tail. Unlike conventional stegosaurus blades, these pieces are rounded and compact. The dinosaur with scarf crochet design adds one final structural decision: the dusty-pink scarf crosses the neck below the head but above the cream belly. A common mistake is making that scarf too wide. More than about one-quarter of the chest height will hide the front body and crowd the first dorsal plate.
Project Information at a Glance
| Skill Level | Time | Finished Size | Hook | Best For |
|---|---|---|---|---|
| Intermediate | 13–17 hours | Approx. 30–34 cm seated | 5.0 mm | Dinosaur collections, nursery shelves and large plush displays |
A current DIY Fluffies stegosaurus measures about 22 cm in super-bulky chenille with a 5 mm hook, while larger dinosaur patterns reach roughly 27–32 cm depending on yarn and construction. :contentReference[oaicite:18]{index=18}
Materials and Tools
Yarn
- Sage green — super-bulky/chunky chenille — approximately 180–220 g — head, muzzle, body, arms, legs and tail
- Dark forest green — matching chunky chenille — approximately 45–60 g — dorsal plates
- Warm cream — chunky chenille — approximately 40–50 g — belly panel and toe claws
- Dusty pink — worsted or light chunky yarn — approximately 45–60 g — scarf and cheek patches
- Black smooth embroidery yarn — small amount — nostrils and smile
Tools
- 5.0 mm crochet hook
- Two 12 mm black safety eyes
- Polyester toy stuffing
- Large-eye yarn needle
- Locking stitch marker
- Dressmaking pins
- Scissors
Super-bulky chenille with a 5 mm hook is a published combination for stegosaurus amigurumi, making it a useful technical reference for the plush density in this project. :contentReference[oaicite:19]{index=19}
Abbreviations
- MR — magic ring
- sc — single crochet
- inc — two single crochets in one stitch
- dec — decrease over two stitches
- sl st — slip stitch
- ch — chain
- hdc — half double crochet
- dc — double crochet
- BLO — back loop only
- FLO — front loop only
An invisible decrease is worked through the front loops of the next two stitches before completing those loops together as one single crochet.
Pattern — Step by Step
Work stuffed pieces in continuous spiral rounds unless stated otherwise. Mark the first full stitch of each round and confirm the bracketed total before continuing.
Head
Yarn: sage green.
R1: 6 sc in MR (6)
R2: inc × 6 (12)
R3: (sc, inc) × 6 (18)
R4: (2 sc, inc) × 6 (24)
R5: (3 sc, inc) × 6 (30)
R6: (4 sc, inc) × 6 (36)
R7–R12: sc around (36)
R13: (4 sc, dec) × 6 (30)
Insert the 12 mm safety eyes between R9 and R10, approximately seven visible stitches apart. Check their level from the front before fitting the washers.
R14: (3 sc, dec) × 6 (24)
R15: (2 sc, dec) × 6 (18)
R16: (sc, dec) × 6 (12)
R17: dec × 6 (6)
Stuff firmly after R13, keeping the lower front slightly softer for the muzzle seam.
Fasten off and leave a 35 cm sewing tail.
Muzzle
Yarn: sage green.
R1: 6 sc in MR (6)
R2: inc × 6 (12)
R3: (sc, inc) × 6 (18)
R4: (2 sc, inc) × 6 (24)
R5–R7: sc around (24)
R8: (2 sc, dec) × 6 (18)
R9: sc around (18)
Add a shallow layer of stuffing. Compress the piece vertically to create a broad horizontal snout.
Fasten off and leave a 35 cm tail.
Body
Yarn: sage green.
R1: 6 sc in MR (6)
R2: inc × 6 (12)
R3: (sc, inc) × 6 (18)
R4: (2 sc, inc) × 6 (24)
R5: (3 sc, inc) × 6 (30)
R6: (4 sc, inc) × 6 (36)
R7: (5 sc, inc) × 6 (42)
R8–R14: sc around (42)
R15: (5 sc, dec) × 6 (36)
R16–R17: sc around (36)
R18: (4 sc, dec) × 6 (30)
R19: (3 sc, dec) × 6 (24)
R20: (2 sc, dec) × 6 (18)
Stuff the lower body firmly. Add smaller pieces around the side walls to preserve the pear shape.
R21: (sc, dec) × 6 (12)
R22: dec × 6 (6)
Fasten off and leave a 45 cm structural tail.
Front Arms — Make Two
Yarn: sage green.
R1: 6 sc in MR (6)
R2: inc × 6 (12)
R3: (sc, inc) × 6 (18)
R4–R6: sc around (18)
R7: (sc, dec) × 6 (12)
R8–R11: sc around (12)
R12: dec × 6 (6)
Stuff the lower half lightly. Keep the shoulder end flexible so the arms can angle downward.
Fasten off and leave a 30 cm tail.
Hind Legs — Make Two
Yarn: sage green.
R1: 6 sc in MR (6)
R2: inc × 6 (12)
R3: (sc, inc) × 6 (18)
R4: (2 sc, inc) × 6 (24)
R5: (3 sc, inc) × 6 (30)
R6–R9: sc around (30)
R10: (3 sc, dec) × 6 (24)
R11: (2 sc, dec) × 6 (18)
R12–R13: sc around (18)
R14: (sc, dec) × 6 (12)
R15: dec × 6 (6)
Stuff firmly and compress into a broad seated foot. The front face should remain large enough for three cream toe claws.
Fasten off and leave a 40 cm attachment tail.
Cream Toe Claws — Make Six
Yarn: warm cream. Three for each hind foot.
R1: 6 sc in MR (6)
R2: sc around (6)
Fasten off. Do not stuff.
Flatten each claw and place three across the upper-front curve of each hind foot.
Cream Belly Panel
Yarn: warm cream. Work in rows.
Row 1: ch 3, 2 sc in second ch from hook (2)
Row 2: ch 1, turn, inc × 2 (4)
Row 3: ch 1, turn, inc, 2 sc, inc (6)
Row 4: ch 1, turn, inc, 4 sc, inc (8)
Row 5: ch 1, turn, inc, 6 sc, inc (10)
Row 6: ch 1, turn, inc, 8 sc, inc (12)
Row 7–R11: ch 1, turn, sc across (12)
Row 12: ch 1, turn, dec, 8 sc, dec (10)
Row 13: ch 1, turn, dec, 6 sc, dec (8)
Row 14: ch 1, turn, dec, 4 sc, dec (6)
Fasten off with a 35 cm tail.
Stretch gently into a long oval before pinning to the front torso.
Tail
Yarn: sage green.
R1: 6 sc in MR (6)
R2: inc × 6 (12)
R3: (sc, inc) × 6 (18)
R4: (2 sc, inc) × 6 (24)
R5–R8: sc around (24)
R9: (2 sc, dec) × 6 (18)
R10–R15: sc around (18)
R16: (sc, dec) × 6 (12)
R17–R23: sc around (12)
R24: dec × 6 (6)
R25–R32: sc around (6)
Stuff the 24-stitch base firmly, the 18-stitch section moderately and the narrow final section very lightly.
Fasten off and leave a 45 cm sewing tail.
Large Dorsal Plates — Make Three
Yarn: dark forest green.
R1: 6 sc in MR (6)
R2: inc × 6 (12)
R3: (sc, inc) × 6 (18)
R4–R5: sc around (18)
R6: (sc, dec) × 6 (12)
R7: dec × 6 (6)
Stuff lightly and flatten the attachment end.
Fasten off with a 25 cm tail.
Medium Dorsal Plates — Make Three
Yarn: dark forest green.
R1: 6 sc in MR (6)
R2: inc × 6 (12)
R3–R4: sc around (12)
R5: dec × 6 (6)
Stuff lightly and leave a 20 cm tail.
Small Dorsal Plates — Make Three
Yarn: dark forest green.
R1: 6 sc in MR (6)
R2–R3: sc around (6)
Do not stuff. Fasten off with a 15 cm attachment tail.
Pink Cheek Patches — Make Two
Yarn: dusty pink.
R1: 6 sc in MR (6)
Fasten off with a 12 cm sewing tail.
Nostrils and Smile
Yarn: smooth black embroidery yarn.
Embroider two short nostril stitches near the upper front of the muzzle. Add a shallow curved smile below them, keeping the line approximately 2 cm wide.
Scarf
Yarn: dusty pink. Work in rows.
Ch 9.
Row 1: sc in second ch from hook and across (8)
Rows 2–72: ch 1, turn, sc across (8)
Fasten off.
Target scarf length: approximately 48–55 cm before fringe, depending on the actual neck circumference.
Scarf Fringe
Cut 12 strands approximately 12 cm long.
Fold one strand in half and pull the folded centre through a stitch at the short edge of the scarf. Pass both loose ends through the loop and tighten.
Add six fringe groups to each end, then trim the finished fringe to approximately 4–5 cm.
Assembly
- Sew the muzzle to the lower front of the completed head first. Keep the long axis horizontal and add the nostrils and curved smile before attaching the head to the body.
- Attach the pink cheek patches beside the muzzle and below the eye line. Check both from directly ahead before tightening the final stitches.
- Sew the cream belly panel vertically to the front body, leaving the top edge below the future neck seam and the bottom edge between the hind legs.
- Attach the head to the body with a slight forward tilt. Make two complete passes around the neck contact area to resist the weight of the muzzle and scarf.
- Sew the short front arms to the upper sides of the torso. Position the large hind legs low and forward, then test the dinosaur on a flat surface before completing their seams.
- Attach three cream claws to the front face of each hind foot. Keep approximately one green stitch visible between neighboring claw centres.
- Sew the tail to the lower rear body with the 24-stitch section at the base. Curve it backward and slightly toward the floor while leaving the narrow tip flexible.
- Pin all nine dark-green plates before sewing. Place the three largest from the upper crown through the shoulder area, medium pieces down the back and the smallest pieces along the tail.
- Sew each plate through a broad flattened base so the rounded top stays raised. Keep a visible green body gap between neighboring pieces.
- Wrap the pink scarf around the neck after all structural assembly is complete. Cross one end over the chest, allow the other to fall lower and separate all fringe strands before final inspection.
The finished dinosaur should sit securely on its two large hind feet with the front arms raised, the tail extending behind, the cream belly visible and the scarf resting below the muzzle without hiding the dorsal row.
7 Technical Tips
- Head droop: A 36-stitch chenille head plus stuffed muzzle can pull the neck forward. Spread the head seam across at least 10–12 body stitches and make two complete sewing passes.
- Hind-leg instability: A difference of about 5 mm in leg height can make the seated dinosaur lean. Pin both 30-stitch hind legs and test the figure on a hard surface before finishing either seam.
- Plate rotation: A rounded plate sewn through only two body stitches can twist sideways. Spread each large plate base across approximately 5–6 stitches.
- Decrease holes: Chenille can expose stuffing on head, body and tail shaping rounds. Work every decrease through the front loops of the next two stitches.
- Tail stiffness: Firm stuffing beyond the 12-stitch section prevents the tail tip from curving. Reduce the filling sharply after R16 and leave R24–R32 almost empty.
- Scarf crowding: A scarf wider than roughly 7–8 cm can cover the cream chest and lower muzzle. Keep this version near eight single crochets wide.
- Toe-claw merging: Three cream pieces touching each other become one pale strip. Leave approximately one full green stitch between each claw centre.
Shaping the Rounded Dinosaur Head
The head uses a 36-stitch maximum because the reference has a large juvenile face but an even larger body. Keeping the head one increase stage below the torso preserves that relationship.
The muzzle supplies most of the forward projection. It reaches 24 stitches and then narrows to 18, producing a broad oval without turning the entire head into an elongated dinosaur skull.
Stuff the muzzle separately. A shallow pad of filling is enough; excessive stuffing pushes the front outward and can make the head tip forward after assembly.
Building the Large Seated Body
The torso reaches 42 stitches before holding that circumference for seven rounds. Current larger stegosaurus-style patterns also use broad body sections, and published chenille versions show how much yarn thickness increases the final dimensions. :contentReference[oaicite:20]{index=20}
The lower third needs dense stuffing because it carries the head, scarf, tail and dorsal pieces. Pack around the side walls first, then fill the centre.
Set the body upright before closing. If the base rounds form a hard central bulge, redistribute some stuffing toward the outside wall.
Making the Rounded Back Plates
Classic Stegosaurus is known for upright plates along the back, but the supplied crochet design interprets them as small rounded lobes rather than thin blades. :contentReference[oaicite:21]{index=21}
Use three sizes so the row changes gradually from head to tail. Published stegosaurus patterns likewise use separately attached dorsal components rather than relying on one continuous ridge. :contentReference[oaicite:22]{index=22}
Stuff the largest pieces only lightly. Dense filling turns them into balls; the goal is a raised oval plate with a compressed sewing base.
Planning the Dorsal Row
Begin pinning at the crown and work backward. The largest pieces belong around the top of the head and shoulder region because that is where the reference has the greatest dorsal height.
Move to medium plates across the mid-back and small pieces as the tail narrows. Exact equal spacing is less important than a smooth reduction in scale.
View the row from the front as well. The first plate should rise behind the crown without appearing directly between the eyes.
Constructing the Seated Hind Legs
The hind legs reach 30 stitches, substantially larger than the 18-stitch front arms. This difference is required for the seated silhouette.
Keep the front face broad enough for three cream claws. If the leg is packed into a sphere, the toe pieces rotate downward and become difficult to see.
Attach the hind legs after the belly panel but before the scarf. Their position determines whether the cream panel remains centred between them.
Making the Short Front Arms
The arms remain small because they do not carry the toy’s weight. Their rounded ends sit slightly forward while the shoulder seams follow the side curve of the torso.
Stuff only the lower half. A flexible upper section allows the arm to lie against the body instead of projecting horizontally.
Leave the lower outside edge partly free after sewing. That visible separation helps the arm remain readable against the same-color torso.
Constructing the Cream Belly
The belly is worked flat in rows and reaches 12 stitches at its widest point. That creates a controlled elongated oval that is easier to centre than a circular patch stretched during assembly.
Sew the top edge below the neck. The scarf will overlap part of this region, but several centimetres of cream should remain visible beneath it.
Attach the panel before the limbs. Sewing around a flat patch after the chunky hind legs are installed makes the lower seam harder to control.
Building the Long Tail
The tail decreases from 24 stitches through 18, 12 and 6. Each plateau extends the taper rather than collapsing it into a short cone.
Use the firmest stuffing at the body seam. Reduce the density each time the circumference decreases.
The narrow tip can rest on the table or hover slightly above it. Do not use wire; the flexible chenille tube is sufficient for the gentle curve visible in the image.
Crocheting the Pink Scarf
The accessory is structurally simple but visually dominant. Eight single crochets across produces a narrow strip that can wrap around the neck without covering most of the torso.
Continue until the scarf reaches approximately 48–55 cm or can wrap once around the actual neck with both ends hanging clearly below the chest.
Add fringe after the final fitting. Twelve folded strands give six attachment groups at each end without making the scarf excessively heavy.
Working with Chunky Chenille
A free stegosaurus pattern from DIY Fluffies uses a 5 mm hook for its super-bulky chenille version and measures about 22 cm, while the sport-weight version of the same design is only about 9 cm. :contentReference[oaicite:23]{index=23}
This difference makes yarn choice a more predictable scaling tool than changing stitch counts. Mark the first stitch through both top loops because plush fibers can obscure the round transition.
Count every 42-stitch body round. A hidden missed stitch may not become apparent until the cream belly or hind legs are centred.
Choosing Safety Eyes
Published dinosaur patterns use smaller eyes at smaller scales, including 6 mm in one long-neck design and 10 mm in a current stegosaurus. :contentReference[oaicite:24]{index=24}
The photographed chenille dinosaur is larger and has oversized glossy eyes, so 12 mm is the starting project specification. Test them against the finished 36-stitch head before fitting washers.
For recipients for whom plastic hardware is unsuitable, replace the safety eyes with embroidered black circles.
Adjusting Finished Size
Current dinosaur patterns show a wide size range: approximately 10 cm for sport/DK baby dinosaurs, 22 cm for super-bulky stegosaurus versions and around 27–32 cm for larger amigurumi projects. :contentReference[oaicite:25]{index=25}
For a smaller dinosaur, keep the written stitch counts and switch to worsted yarn with approximately a 3.5–4 mm hook. Use the same yarn family for the plates so they shrink proportionally.
For a larger build, choose thicker blanket yarn before expanding the 42-stitch body. Adding another increase round would also require wider legs, belly panel, tail base and scarf.
Competition and Design Gap
Dinosaur crochet is a crowded marketplace. Current Etsy results include large plush dinosaurs, no-sew bundles and species-specific patterns with thousands of engagement signals. :contentReference[oaicite:26]{index=26}
The supplied design differentiates itself through three linked choices: muted sage coloring, small rounded back plates and a removable dusty-pink scarf. Those details create a softer winter-styled character without changing the underlying dinosaur construction.
For publishing, photograph the scarf both wrapped and removed. That makes the body shaping and plate placement easier for makers to inspect.
Finishing Checks
Place the completed dinosaur on a hard level surface. Both hind feet should contact the table while the tail supplies visual balance rather than acting as a third support point.
View the face straight on. Both eyes need comparable height, the muzzle should remain horizontal and the pink cheek circles should sit outside the snout.
Inspect the back row last. All nine plates should remain individually readable, with the tallest elements toward the head and increasingly smaller pieces extending down the tail.
Conclusion
Measure the finished dinosaur from the seat to the highest head plate, then record the nose-to-tail length and scarf length separately. Those three numbers make another build easier to reproduce when changing chenille brands. Photograph the dinosaur from a three-quarter angle to check muzzle projection, belly alignment, hind-foot level and the full dorsal row. Save this dinosaur amigurumi crochet pattern to Pinterest and share the finished plush on Instagram with #SageScarfDinosaur. Separate the scarf fringe and reshape each dark-green plate before the final photograph. For another version, would you keep the dusty-pink scarf or replace it with a cream scarf and green fringe?
Sources
- DIY Fluffies — Free Dinosaur Crochet Pattern: 9 cm sport-weight and 22 cm super-bulky stegosaurus versions; 5 mm hook for chenille. :contentReference[oaicite:27]{index=27}
- Jess Huff — Crochet Dinosaur: approximately 10.5 inches tall in worsted yarn with a 3.5 mm hook. :contentReference[oaicite:28]{index=28}
- Storyland Amis — Free Stegosaurus Dinosaur Amigurumi: published size and current conventional stegosaurus construction reference. :contentReference[oaicite:29]{index=29}
- The Button Ship — Hello Stegosaurus: separately crocheted and sewn dorsal plates. :contentReference[oaicite:30]{index=30}
- Etsy — current Dinosaur Crochet marketplace: competition across large plush, no-sew and species-specific dinosaur patterns. :contentReference[oaicite:31]{index=31}









