Introduction
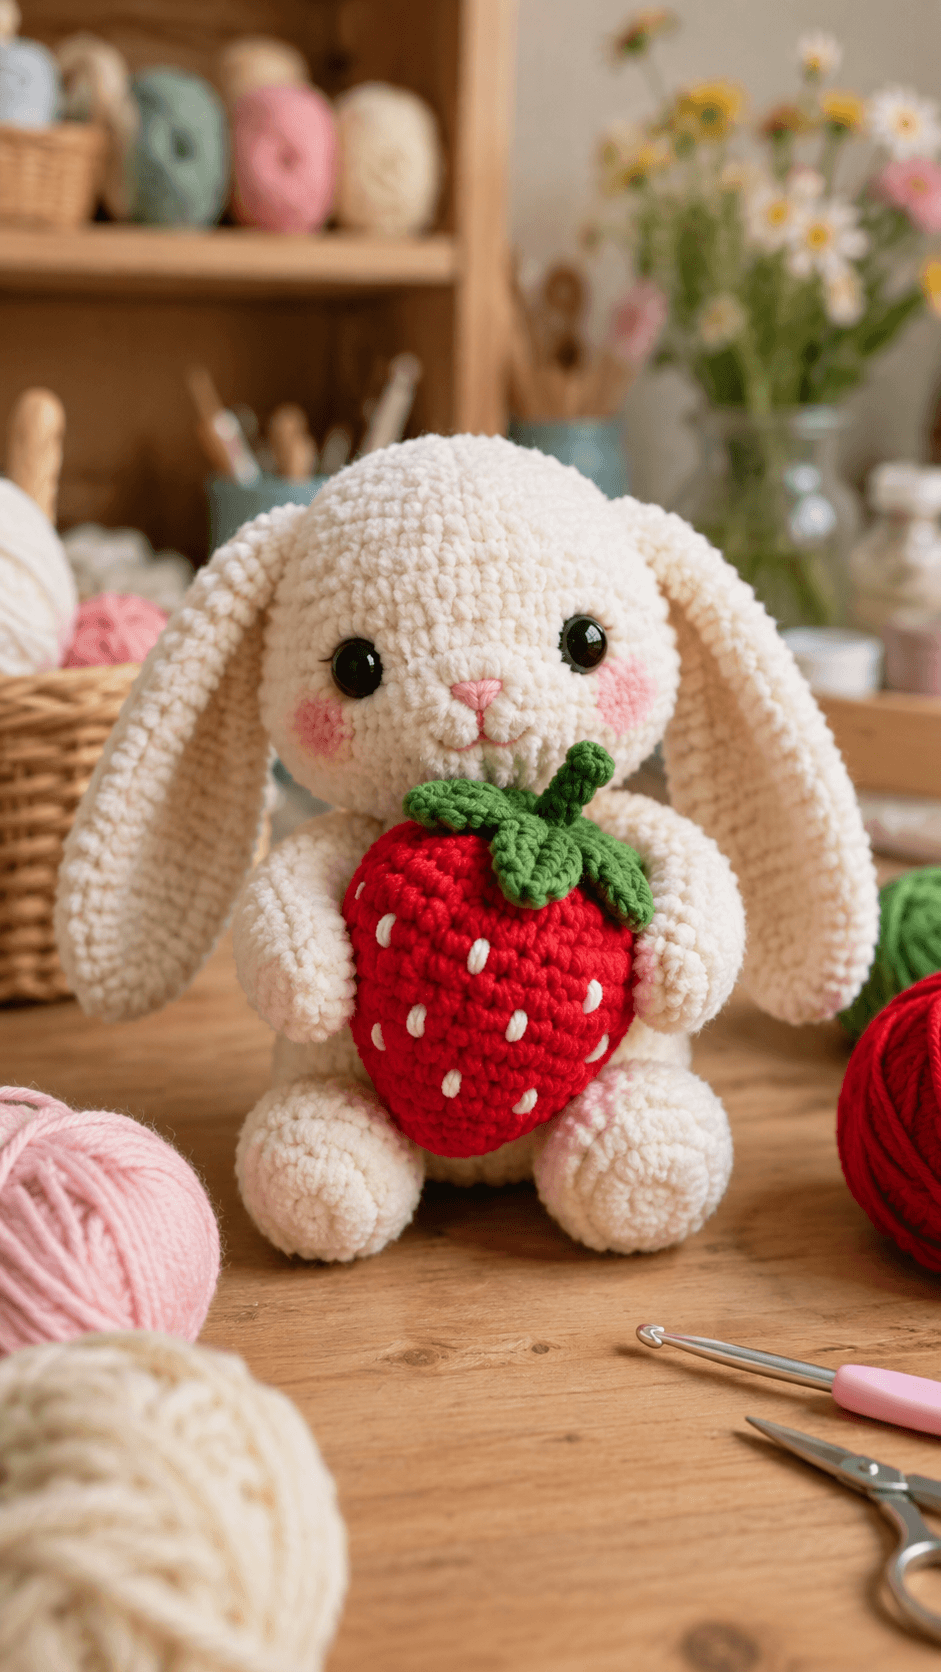
A rabbit holding a strawberry this large needs its arms shaped around the fruit instead of hanging straight beside the body. This bunny amigurumi crochet pattern uses worsted yarn, a 3.5 mm hook and 12 mm safety eyes for a cream rabbit approximately 22–26 cm tall. Long floppy ears, large seated feet, pink cheeks and a stuffed red strawberry create the complete intermediate project.
The Design: What Makes This Strawberry Bunny Different
The head and body both reach 36 stitches, but the head stays round while the torso holds its width longer to support the strawberry. Two ears remain unstuffed and extend almost to the feet, creating the low floppy silhouette visible in the reference. The arms use rounded 18-stitch ends and softer upper sections so they can curve against the fruit instead of projecting forward. The strawberry reaches the same 36-stitch maximum as the body, making it large enough to cover most of the chest. Five leafy sepals sit across its top, while short white embroidered stitches represent seeds. This strawberry bunny crochet pattern also uses oversized rear feet to stabilize the seated pose. One common maker error is attaching the fruit too low; the strawberry top should sit near the bunny’s mouth while its point remains above the feet.
Project Information at a Glance
| Skill Level | Time | Finished Size | Hook | Best For |
|---|---|---|---|---|
| Intermediate | 10–14 hours | Approx. 22–26 cm excluding full ear drop | 3.5 mm | Spring displays, fruit-themed collections and handmade markets |
Materials and Tools
Yarn
- Warm cream — worsted/Aran yarn — approximately 100–120 g — head, body, ears, arms and feet
- Bright strawberry red — worsted/Aran yarn — approximately 45–60 g — strawberry
- Leaf green — worsted yarn — approximately 15–20 g — strawberry top and stem
- Blush pink — yarn scrap — nose and cheeks
- White — yarn scrap — strawberry seeds
- Black embroidery yarn — small amount — mouth
Tools
- 3.5 mm crochet hook
- Two 12 mm black safety eyes
- Polyester toy stuffing
- Large-eye yarn needle
- Locking stitch marker
- Dressmaking pins
- Scissors
Work at a compact amigurumi gauge. The strawberry and bunny should use similar stitch density so the fruit does not appear significantly coarser than the animal holding it.
Abbreviations
- MR — magic ring
- sc — single crochet
- inc — two single crochet stitches in one stitch
- dec — decrease over two stitches
- sl st — slip stitch
- ch — chain
- hdc — half double crochet
- dc — double crochet
- tr — treble crochet
- BLO — back loop only
- FLO — front loop only
An invisible decrease is worked through the front loops of the following two stitches before completing them together as one single crochet.
Pattern — Step by Step
Work all stuffed components in continuous spiral rounds unless a section states otherwise. Keep a marker in the first stitch of every round and confirm each bracketed total before continuing.
Head
Yarn: warm cream.
R1: 6 sc in MR (6)
R2: inc × 6 (12)
R3: (sc, inc) × 6 (18)
R4: (2 sc, inc) × 6 (24)
R5: (3 sc, inc) × 6 (30)
R6: (4 sc, inc) × 6 (36)
R7–R12: sc around (36)
R13: (4 sc, dec) × 6 (30)
Insert the 12 mm safety eyes between R9 and R10 with approximately seven visible stitches between the stems. Check the eye line from the front before locking the washers.
R14: sc around (30)
R15: (3 sc, dec) × 6 (24)
R16: (2 sc, dec) × 6 (18)
R17: (sc, dec) × 6 (12)
R18: dec × 6 (6)
Stuff firmly after R13, placing small pieces around both eye washers before filling the crown.
Fasten off. Leave a 25 cm tail, pass it through the front loops of the final six stitches and close the opening.
Body
Yarn: warm cream.
R1: 6 sc in MR (6)
R2: inc × 6 (12)
R3: (sc, inc) × 6 (18)
R4: (2 sc, inc) × 6 (24)
R5: (3 sc, inc) × 6 (30)
R6: (4 sc, inc) × 6 (36)
R7–R13: sc around (36)
R14: (4 sc, dec) × 6 (30)
R15: sc around (30)
R16: (3 sc, dec) × 6 (24)
R17: (2 sc, dec) × 6 (18)
R18: (sc, dec) × 6 (12)
R19: dec × 6 (6)
Stuff the lower body firmly enough to support the large strawberry. Keep the upper neck section slightly softer so the head seam can settle into the torso.
Fasten off and leave a 45 cm sewing tail.
Floppy Ears — Make Two
Yarn: warm cream.
R1: 6 sc in MR (6)
R2: inc × 6 (12)
R3: (sc, inc) × 6 (18)
R4–R12: sc around (18)
R13: (sc, dec) × 6 (12)
R14–R24: sc around (12)
R25: dec × 6 (6)
Do not stuff. Flatten each ear completely. The broader first section becomes the rounded lower ear, while the narrow final section forms the head attachment.
Fasten off and leave a 40 cm sewing tail.
Front Arms — Make Two
Yarn: warm cream.
R1: 6 sc in MR (6)
R2: inc × 6 (12)
R3: (sc, inc) × 6 (18)
R4–R6: sc around (18)
R7: (sc, dec) × 6 (12)
R8–R12: sc around (12)
R13: dec × 6 (6)
Stuff the hand end firmly through R6. Use only a small amount of stuffing above R8 so each arm can curve around the strawberry.
Fasten off and leave a 35 cm attachment tail.
Back Feet — Make Two
Yarn: warm cream.
R1: 6 sc in MR (6)
R2: inc × 6 (12)
R3: (sc, inc) × 6 (18)
R4: (2 sc, inc) × 6 (24)
R5–R7: sc around (24)
R8: (2 sc, dec) × 6 (18)
R9: (sc, dec) × 6 (12)
R10: dec × 6 (6)
Stuff firmly. Flatten each piece slightly from top to bottom so the foot becomes oval rather than spherical.
Fasten off and leave a 30 cm sewing tail.
Cheek Patches — Make Two
Yarn: blush pink.
R1: 6 sc in MR (6)
Slip stitch to the first stitch and fasten off with a 12 cm tail. Stretch each small circle horizontally while attaching it.
Pink Nose
Yarn: blush pink.
Embroider a small inverted triangle approximately 8–10 mm wide at the centre of the lower face.
Run the yarn several times across the triangle until the crochet stitches beneath are mostly covered.
Muzzle and Mouth
Yarn: warm cream and black embroidery yarn.
Use two short cream surface stitches below the nose to create a subtle divided muzzle.
From the centre of the nose, embroider one vertical black stitch approximately 6 mm long. Add two shallow outward curves to form the mouth.
Strawberry Body
Yarn: strawberry red.
R1: 6 sc in MR (6)
R2: inc × 6 (12)
R3: (sc, inc) × 6 (18)
R4: (2 sc, inc) × 6 (24)
R5: (3 sc, inc) × 6 (30)
R6: (4 sc, inc) × 6 (36)
R7–R10: sc around (36)
R11: (4 sc, dec) × 6 (30)
R12–R13: sc around (30)
R14: (3 sc, dec) × 6 (24)
R15–R16: sc around (24)
R17: (2 sc, dec) × 6 (18)
R18–R19: sc around (18)
R20: (sc, dec) × 6 (12)
Stuff firmly from the widest section downward, concentrating filling along the outer wall rather than only in the centre.
R21: sc around (12)
R22: dec × 6 (6)
Fasten off and leave a 25 cm tail. Pull through the front loops and close the strawberry point.
Large Strawberry Leaves — Make Three
Yarn: leaf green.
Ch 9.
Starting in second ch from hook:
sl st, sc, hdc, dc, dc, hdc, sc, sl st.
Work 3 sc in the final chain and repeat the same sequence down the opposite side.
Fasten off with a 20 cm tail.
Small Strawberry Leaves — Make Two
Yarn: leaf green.
Ch 7.
Starting in second ch from hook:
sl st, sc, hdc, dc, sc, sl st.
Work 3 sc in the final chain and repeat down the opposite side.
Fasten off and leave a 15 cm sewing tail.
Strawberry Stem
Yarn: leaf green.
R1: 6 sc in MR (6)
R2–R6: sc around (6)
Fasten off with a 20 cm tail.
Do not stuff. Bend the final piece slightly after attachment.
White Strawberry Seeds
Yarn: white.
Cut approximately 20 short embroidery strands or work continuously from one longer strand.
Place elongated seed stitches across the red surface, each approximately 5–8 mm long.
Space the seeds in staggered rows rather than vertical columns.
Optional Hidden Tail
The tail is not visible in the supplied front view. Add it only if the bunny will also be displayed without the strawberry blocking the body.
R1: 6 sc in MR (6)
R2: inc × 6 (12)
R3: sc around (12)
R4: dec × 6 (6)
Stuff lightly and fasten off with a 20 cm tail.
Assembly
- Sew the head to the body with two complete passes around the neck contact area. Add one concealed rear anchor stitch so the head does not rotate under the weight of the ears.
- Flatten both ears and attach their narrow ends high on the crown. Spread each ear seam across approximately 6–7 head stitches and let the broad ends hang naturally beside the body.
- Embroider the pink nose, cream muzzle definition and black mouth, then attach the blush cheek patches below and outside the safety eyes.
- Position the two large back feet across the lower front body. Set the bunny on a flat surface before closing the seams so both feet support the seated pose evenly.
- Arrange the three large and two small green leaves around the open top of the strawberry. Sew their inner ends firmly while leaving the pointed outer sections raised.
- Attach the green stem through the centre of the leaf group, then embroider the white seed stitches across the exposed red surface.
- Place the completed strawberry against the bunny chest with its upper leaves just below the mouth and its lower point ending above the feet.
- Sew the strawberry to the body at three hidden points: upper centre, lower centre and one side. These seams carry the fruit weight without flattening the visible front.
- Wrap the two front arms around opposite sides of the strawberry and pin them before sewing. Attach each shoulder first, then add one concealed paw-to-fruit stitch.
- Set the completed bunny upright and check ear length, fruit height, eye level and foot contact before weaving every structural yarn tail through at least three stitch directions.
The completed bunny should sit independently with both long ears hanging beside the body, both paws wrapped around the strawberry and the fruit centred between the face and feet.
7 Technical Tips
- Ear twisting: A floppy ear sewn through fewer than five head stitches can rotate backward. Spread each narrow base across approximately 6–7 crown stitches.
- Head droop: Long ears add weight to both sides of the 36-stitch head. Pack the lower rear head firmly enough that finger pressure compresses it by no more than about 5 mm.
- Decrease holes: Standard decreases can expose white stuffing. Work each reduction through the front loops of the following two stitches.
- Strawberry distortion: Packing all stuffing into the centre produces a hard pear shape with flat sides. Add small pieces around the outer wall first and keep the maximum width near R7–R10.
- Arm separation: Arms attached only at the shoulders can spring away from the fruit. Add one hidden stitch from each paw into the strawberry side after final positioning.
- Uneven feet: A vertical difference of 5 mm between the two foot seams can make the bunny lean. Test the seated figure on a hard surface before permanently tightening either attachment.
- Seed crowding: White stitches closer than roughly 1 cm can read as stripes instead of seeds. Leave visible red fabric between neighboring seed marks.
Shaping the Bunny Head
The face carries most of the expression in this bunny amigurumi crochet pattern. A 36-stitch plateau provides enough width for large black eyes, rounded cheeks and the small central nose while still leaving space for the floppy-ear attachments above.
Six plain rounds at maximum circumference keep the head round rather than pointed. The first decrease stage begins only after the face has enough vertical depth.
Stuff around the safety-eye washers before filling the crown. This reduces empty pockets behind the hardware and keeps both eyes projecting by similar amounts.
Making Long Floppy Ears
The ear begins broad and stays at 18 stitches for nine rounds before narrowing to 12 stitches. That construction creates a substantial lower ear and a smaller attachment end.
Do not add stuffing. The doubled crochet fabric already gives the ear enough weight to fall naturally, and filling would make it tubular.
After sewing, run the fingers along each ear from crown to tip. Flatten any rotational twist rather than pressing a permanent fold into the fabric.
Constructing the Seated Body
The body reaches 36 stitches and maintains that circumference for seven rounds. This gives enough width behind the strawberry to keep the rabbit visible at both sides.
The lower section should be firmer than the neck. Most of the fruit weight transfers into the torso, and a soft lower body can collapse backward.
Before attaching the strawberry, set the completed bunny body and feet on the work surface. Correct any lean before adding the prop.
Making the Oversized Strawberry
The strawberry is intentionally close to the body width. Its upper section expands to 36 stitches, matching the bunny’s maximum torso circumference.
Four plain rounds at maximum width create the broad shoulders of the fruit. Successive reductions then narrow gradually toward the point instead of closing rapidly like a sphere.
Keep the final two rounds relatively firm with stuffing. An empty lower tip can bend sideways once the fruit is attached to the body.
Adding the Strawberry Leaves
Five separate leaves provide more surface variation than one flat star-shaped cap. Three larger leaves establish the main spread, while two shorter leaves fill gaps near the stem.
Attach only their inner sections. The outer half of each leaf should remain slightly raised from the red surface.
Position one large leaf facing forward and the remaining leaves toward both sides. This makes the green cap readable from a straight-on photograph.
Embroidering Strawberry Seeds
The white seed stitches are small but visually important because they separate the strawberry from a generic red heart or oval.
Work the seeds after stuffing. The firm surface makes it easier to maintain consistent 5–8 mm stitch lengths.
Alternate their positions from row to row. A strict grid creates vertical lines that are not present in the photographed fruit.
Positioning the Arms Around the Fruit
Finish and attach the strawberry before permanently sewing the arms. The fruit determines the exact angle each paw needs.
The upper arms begin at the shoulder sides, while the rounded ends curve inward against the fruit. Keep the left and right paws at similar heights.
Do not sew the full length of the arm to the strawberry. One concealed paw stitch is enough to hold the pose while preserving a visible gap near the upper arm.
Controlling Ear and Strawberry Weight
This project carries more external weight than a plain seated bunny. Two long ears pull outward while the strawberry pulls the chest forward.
Firm body stuffing and broad attachment seams are therefore more important than adding extra stitch rounds. Keep both ear seams wide and secure the fruit to the body independently from the arms.
Test the toy after every major assembly stage. A balanced bunny before the strawberry is added is much easier to correct than one already carrying all accessories.
Choosing Yarn and Hook Size
Use a smooth worsted or Aran yarn if you want the visible stitch definition shown in the reference. Extremely fuzzy chenille will soften the seed embroidery and hide the facial stitch placement.
A 3.5 mm hook is the starting specification for the pictured scale. If stuffing appears between stitches, move down by 0.25–0.5 mm without changing the written counts.
Use the same yarn thickness for the strawberry. A heavier red yarn makes the fruit substantially larger and can overpower the rabbit.
Adjusting Finished Size
For a smaller version, keep the stitch totals and switch to DK yarn with a hook around 2.5–3 mm. Select the safety-eye diameter only after completing several head rounds.
For a larger plush, change yarn thickness before adding another six-stitch increase stage. Enlarging the head alone would require proportionally wider feet, arms and strawberry.
Make the bunny body before the fruit when scaling. The strawberry should remain close to the torso width rather than reaching beyond both elbows.
Finishing Checks
Place the completed bunny on a hard surface and check the feet first. Both should contact the table while the body remains vertical.
View the face directly from the front. The safety eyes need comparable height, the pink nose must stay centred and the cheek patches should sit outside the muzzle area.
Inspect the strawberry last. Its leaves should be visible beneath the chin, white seeds should cover the front without forming rows and the lower point must remain above the bunny’s feet.
Conclusion
Measure the completed bunny from the seat to the top of the head, then record the strawberry width and ear length beside the yarn and hook used. Those three measurements make later versions easier to scale because the fruit and ears determine most of the finished silhouette. Photograph the bunny straight from the front to check paw height, strawberry centring and ear balance. Save this bunny amigurumi crochet pattern to Pinterest and share the finished project on Instagram with #StrawberryHugBunny. Reshape the green leaves before the final photograph. Would you keep the bright red strawberry shown here or make the next bunny hold a pink strawberry with cream seeds?
Sources
- The Mary Jay — Bao the Bunny: free 2024 compact bunny pattern.
- Kristi Tullus — Tiny Bunnies: DK construction and small-scale sizing reference.
- Spin a Yarn Crochet — Floppy Ear Bunny: separate long-ear construction reference.
- One Dog Woof — Classic Crochet Bunny: traditional multi-piece floppy bunny construction.
- Ravelry — Chunky Bunny Amigurumi: super-bulky 15 cm bunny scaling reference.
- Etsy — current Crochet Amigurumi Bunny marketplace: competition across floppy, mini and multi-style rabbit patterns.









