Introduction
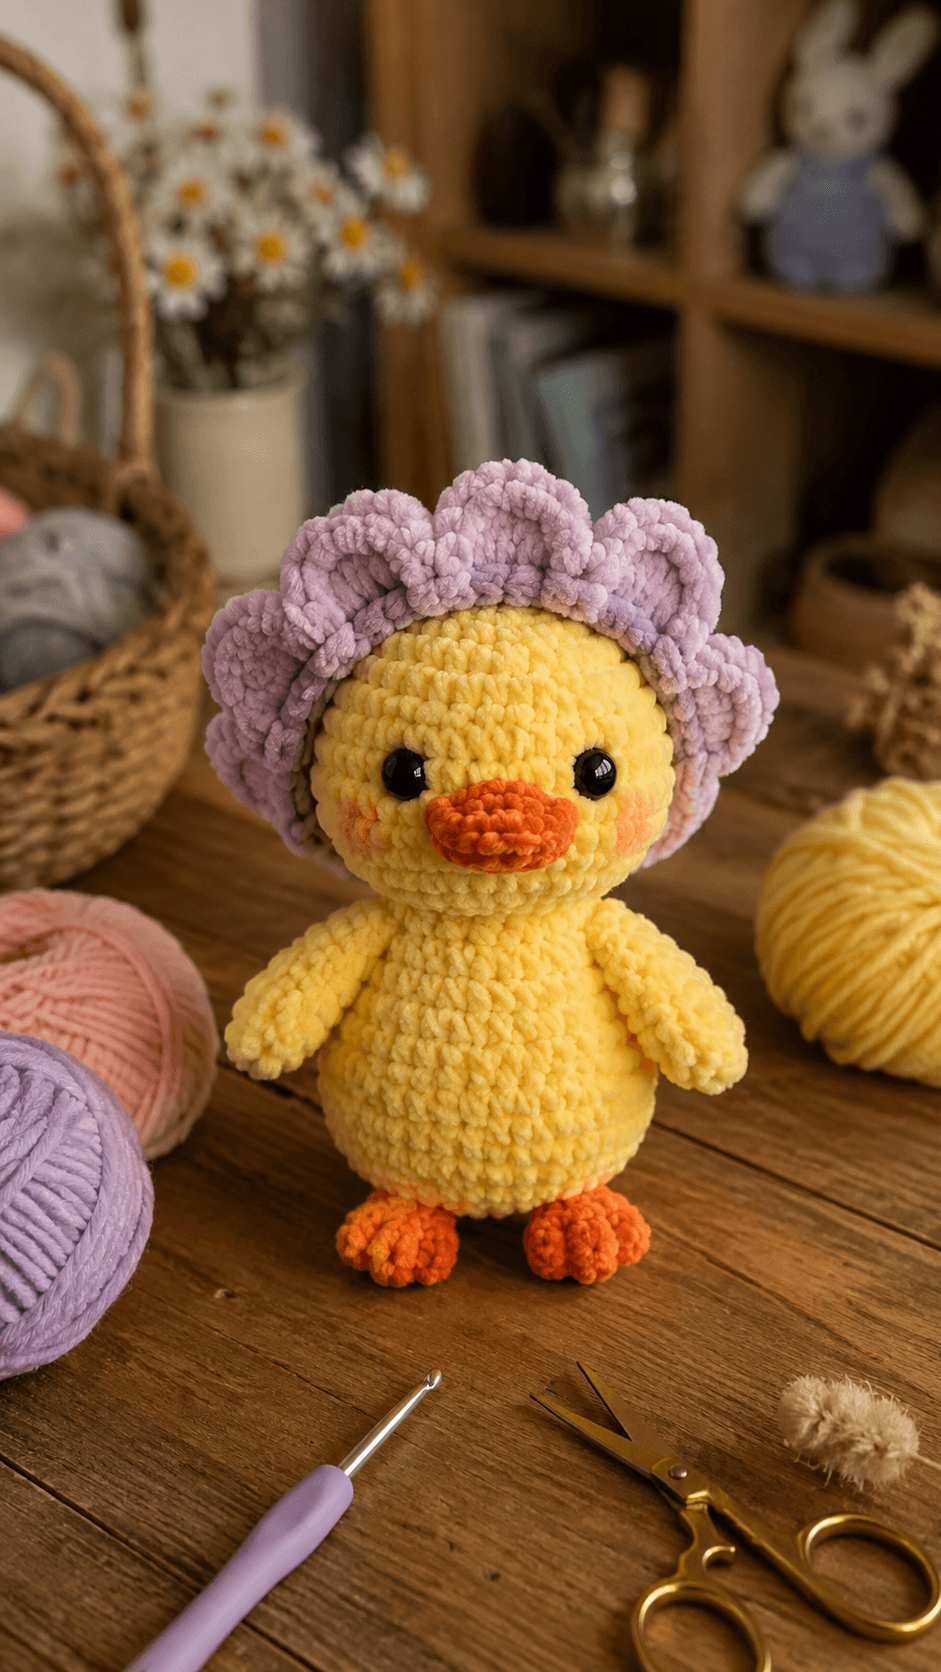
A flower-shaped duck hat has to frame the whole head without pushing the petals across the eyes. This duck amigurumi crochet pattern uses chunky chenille, a 4.5 mm hook and 10–12 mm eyes for a duckling approximately 20–23 cm tall. A broad orange bill, two wings, orange feet, pink cheeks and six lavender crown petals create the complete intermediate plush.
The Design: What Makes This Flower Duck Different
The head reaches 36 stitches, giving the face enough width for a large orange bill while leaving room for a flower ring around the crown. The body also reaches 36 stitches but stays wider through the lower torso, producing the pear shape visible beneath the wings. Six lavender petals form the defining accessory. Each petal is worked as a shallow padded oval and attached around a narrow head band, creating a complete flower silhouette rather than a conventional cap. The wings remain compact so they do not compete with the bonnet, and the orange feet sit directly beneath the rounded body. This flower duck crochet pattern depends heavily on petal position. One common error is attaching the lower side petals too far forward; they should frame the cheeks without covering the safety eyes.
Project Information at a Glance
| Skill Level | Time | Finished Size | Hook | Best For |
|---|---|---|---|---|
| Intermediate | 8–11 hours | Approx. 20–23 cm including petals | 4.5 mm | Spring display, floral plush collections and handmade markets |
Materials and Tools
Yarn
- Butter yellow — chunky chenille — approximately 100–120 g — head, body and wings
- Soft lavender — chunky chenille — approximately 45–60 g — flower bonnet
- Orange — chunky chenille — approximately 20–25 g — bill and feet
- Blush pink — yarn scrap — cheeks
- Black smooth embroidery yarn — optional mouth detail
Tools
- 4.5 mm crochet hook
- Two 10–12 mm black safety eyes
- Polyester toy stuffing
- Large-eye yarn needle
- Locking stitch marker
- Dressmaking pins
- Scissors
Use a dense amigurumi gauge on the yellow sections. Chenille can hide gaps until the piece is stuffed, so check the head after the first 30- and 36-stitch rounds.
Abbreviations
- MR — magic ring
- sc — single crochet
- inc — two single crochet stitches in one stitch
- dec — decrease over two stitches
- sl st — slip stitch
- ch — chain
- hdc — half double crochet
- dc — double crochet
- BLO — back loop only
- FLO — front loop only
An invisible decrease is worked through the front loops of the next two stitches before completing them together as one single crochet.
Pattern — Step by Step
Work all stuffed pieces in continuous spirals unless stated otherwise. Mark the first stitch of every round and verify the bracketed stitch total before continuing.
Head
Yarn: butter yellow.
R1: 6 sc in MR (6)
R2: inc × 6 (12)
R3: (sc, inc) × 6 (18)
R4: (2 sc, inc) × 6 (24)
R5: (3 sc, inc) × 6 (30)
R6: (4 sc, inc) × 6 (36)
R7–R12: sc around (36)
R13: (4 sc, dec) × 6 (30)
Insert the 10–12 mm safety eyes between R9 and R10, approximately seven visible stitches apart. Fit both washers before continuing.
R14: (3 sc, dec) × 6 (24)
R15: (2 sc, dec) × 6 (18)
R16: (sc, dec) × 6 (12)
R17: dec × 6 (6)
Stuff firmly after R13. Keep the front lower section slightly softer where the bill will be sewn.
Fasten off and close the remaining six stitches.
Body
Yarn: butter yellow.
R1: 6 sc in MR (6)
R2: inc × 6 (12)
R3: (sc, inc) × 6 (18)
R4: (2 sc, inc) × 6 (24)
R5: (3 sc, inc) × 6 (30)
R6: (4 sc, inc) × 6 (36)
R7–R12: sc around (36)
R13: (4 sc, dec) × 6 (30)
R14: sc around (30)
R15: (3 sc, dec) × 6 (24)
R16: (2 sc, dec) × 6 (18)
R17: (sc, dec) × 6 (12)
R18: dec × 6 (6)
Stuff firmly through the lower half. Keep the final neck area slightly softer for assembly.
Fasten off and leave a 40 cm sewing tail.
Bill
Yarn: orange. Work around both sides of a foundation chain.
Ch 7.
R1: starting in second ch from hook, 5 sc, 3 sc in last ch; continue along opposite side with 4 sc, inc in final ch (14)
R2: inc, 4 sc, inc × 3, 4 sc, inc × 2 (20)
R3–R4: sc around (20)
Add a very shallow layer of stuffing. Flatten the piece so the long axis remains horizontal.
Fasten off and leave a 30 cm tail.
Wings — Make Two
Yarn: butter yellow.
R1: 6 sc in MR (6)
R2: inc × 6 (12)
R3: (sc, inc) × 6 (18)
R4–R6: sc around (18)
R7: (sc, dec) × 6 (12)
R8–R9: sc around (12)
R10: dec × 6 (6)
Stuff only the rounded lower half. Leave the attachment end flexible.
Fasten off and leave a 30 cm tail.
Feet — Make Two
Yarn: orange.
R1: 6 sc in MR (6)
R2: inc × 6 (12)
R3: (sc, inc) × 6 (18)
R4: sc around (18)
R5: (sc, dec) × 6 (12)
R6: dec × 6 (6)
Stuff lightly and flatten each foot into a short horizontal oval.
Fasten off and leave a 25 cm sewing tail.
Cheek Patches — Make Two
Yarn: blush pink.
R1: 6 sc in MR (6)
Fasten off with a 12 cm tail. Stretch each circle into a low oval during attachment.
Flower Bonnet Band
Yarn: lavender.
Ch 37 and join without twisting.
R1: sc around (36)
R2: sc around (36)
Fasten off and leave a 35 cm sewing tail.
The band should sit around the upper circumference of the head without compressing the yellow fabric.
Large Flower Petals — Make Six
Yarn: lavender.
R1: 6 sc in MR (6)
R2: inc × 6 (12)
R3: (sc, inc) × 6 (18)
R4–R7: sc around (18)
R8: (sc, dec) × 6 (12)
R9–R10: sc around (12)
R11: dec × 6 (6)
Add only a trace of stuffing to the rounded outer half. Flatten the attachment end completely.
Fasten off and leave a 30 cm sewing tail.
Optional Smaller Side Petals — Make Two
Use only if your six main petals leave large gaps around the sides.
R1: 6 sc in MR (6)
R2: inc × 6 (12)
R3–R5: sc around (12)
R6: dec × 6 (6)
Do not stuff. Fasten off with a 20 cm tail.
Optional Pink Blush Embroidery
If you prefer a flatter cheek than the six-stitch circles, use pink yarn to work three short horizontal stitches beneath each eye. Keep the total cheek width near 1.5 cm.
Assembly
- Sew the head to the body with two complete passes around the neck seam. Keep the head vertical and centred over the pear-shaped torso.
- Pin the orange bill between and below the eyes. Its upper edge should stay below the eye stems, and its long axis must remain horizontal.
- Attach the blush cheek patches outside the bill, keeping both at approximately the same vertical height.
- Sew one wing to each side of the upper body. Spread each attachment across approximately 6–8 body stitches and allow the rounded lower ends to angle slightly outward.
- Attach the two orange feet to the lower front body. Set the duck on a hard surface before tightening either seam so both feet contact the table.
- Place the lavender 36-stitch band around the upper head. Position its lower edge above the eye line and tack it in at least six evenly spaced locations.
- Arrange the six large lavender petals around the band before sewing. Place three across the upper crown and three around the left and right sides.
- Attach each petal through its flattened base. Keep the rounded outer portions free so they stand away from the head.
- Check the two lower side petals from the front. Their edges may frame the cheeks but should not overlap either black eye.
- Reshape the bill, feet, wings and petals, then weave all structural tails through several stitch directions before trimming.
The completed duck should stand upright with six lavender petals clearly framing the head, both wings visible and the orange feet projecting beneath the rounded yellow body.
7 Technical Tips
- Petal collapse: Filling an entire 18-stitch petal makes it heavy and causes the bonnet to sag. Add stuffing only to roughly the outer half.
- Eye obstruction: A lower petal attached less than about 1 cm above the eye line can cover the safety eye. Pin every petal before sewing any base permanently.
- Bill curling: More than roughly 5–7 mm of stuffing thickness turns the 20-stitch bill into a tube. Keep the filling layer shallow.
- Decrease gaps: Plush yarn can expose stuffing around the head and body shaping. Work decreases through the front loops of the next two stitches.
- Wing rotation: A wing attached across fewer than five body stitches can twist forward. Spread each seam across approximately 6–8 stitches.
- Uneven stance: Feet differing by even 5 mm in attachment height can make the duck lean. Pin both feet and test the figure on a level surface first.
- Bonnet-band compression: A band pulled more than about 1 cm smaller than the head circumference creates a visible groove. Fit the 36-stitch ring before attaching petals.
Shaping the Round Duck Head
The head is the visual centre of this duck amigurumi crochet pattern. Six increase rounds create a 36-stitch maximum, giving enough diameter for the safety eyes, broad bill and floral band.
Six plain rounds at maximum width keep the forehead tall enough that the lavender petals can start above the eye line. Reducing too early creates a flatter head and forces the bonnet closer to the face.
Stuff around the safety-eye washers first. Add the remaining filling in small pieces so the finished sphere stays balanced rather than bulging at one side.
Constructing the Flower Bonnet
The bonnet is structurally different from a crochet hat. A narrow ring sits around the head, and each individual petal attaches to that ring rather than being worked directly from the duck.
The six main pieces reach 18 stitches before narrowing. That produces enough width for broad rounded petal tips while retaining a small attachment base.
Keep the inner bases relatively flat. A cylindrical attachment forces each petal to project straight outward instead of curving around the head.
Arranging the Six Lavender Petals
Begin with the top centre petal, then place one petal on each side of it. Those three establish the upper flower silhouette.
Add the remaining three lower and side petals afterward. Rotate them until the spacing looks even from directly in front.
The flower ring does not need mathematical symmetry from every angle. It needs a balanced front silhouette with the eyes and bill fully visible.
Making the Broad Orange Bill
The bill is worked around a chain rather than from a magic ring. That construction creates the horizontal oval required for a duck face.
The bill should be wider than the gap between the eye centres. At the same time, it must remain shallow enough that it does not dominate the head profile.
Pin it before sewing. The centre of the foundation chain should align with the vertical midpoint between the two eyes.
Positioning the Wings
Both wings sit relatively high on the pear-shaped body. Their lower ends remain free and project slightly away from the torso.
Stuff the bottom portion only. A completely packed wing becomes rigid and reads more like an arm.
Keep the wing seams below the neck line. If attached too high, they crowd the head and reduce the visible yellow chest.
Balancing the Orange Feet
The feet are small compared with the body. Their role is to establish the bird silhouette without widening the lower figure substantially.
Flatten each stuffed piece horizontally before sewing. Set the duck upright while the feet are still pinned.
Move one foot by a few millimetres if needed rather than relying on extra stuffing to correct the stance later.
Working with Chunky Chenille
Current plush duck tutorials commonly use hooks around 5 mm, while smooth worsted versions generally use smaller hooks around 3.5–4 mm. :contentReference[oaicite:19]{index=19} The 4.5 mm specification here targets dense plush stitches while retaining enough flexibility for the flower petals.
Place the stitch marker through both top loops of the first stitch. Fuzzy chenille can make individual loops difficult to identify after several plain rounds.
Count every 36-stitch plateau round. One missed stitch can shift the face centre and change the final petal-band fit.
Choosing the Eye Size
Published duck patterns demonstrate a wide eye-size range. Small designs may use 6–7 mm eyes, medium versions use around 9 mm and larger worsted ducks can use 15 mm. :contentReference[oaicite:20]{index=20}
For the photographed proportions, start with 10–12 mm and test the pair against the completed head before locking the washers.
The eyes should remain small enough that the lavender petals, orange bill and yellow face stay independently readable.
Adjusting Finished Size
Current duck patterns show how strongly yarn affects finished scale: examples range from roughly 7.5 cm in DK yarn to 23 cm in bulky chenille. :contentReference[oaicite:21]{index=21}
For a smaller version, keep all written stitch totals and switch to DK yarn with a 2.75–3 mm hook. Make the bonnet from the same yarn weight.
For a larger plush, use thicker blanket yarn before adding another increase round. Enlarging the head alone would require wider petals, larger wings and a broader bill.
Planning Yarn Quantities
A published worsted duck uses about 100 g main yarn and 25 g orange, while a current 23 cm bulky duck lists 100 g chenille plus additional accent yarn. :contentReference[oaicite:22]{index=22}
Reserve at least 45–60 g lavender for the flower ring because six stuffed petals use more yarn than a flat hat.
Make one petal before committing to the complete set. Weigh it, multiply that amount by six and add approximately 15% for the band and sewing tails.
Finishing Checks
Stand the duck on a hard surface and inspect the orange feet first. Both should touch the table while the yellow body remains vertical.
View the face directly from the front. The eyes should remain level, the bill must sit horizontally and the lower petals need to stop outside the eye area.
Check the flower ring last. All six main petals should remain individually readable, the top three should form the highest point and the lavender band should not indent the yellow head.
Conclusion
Measure the completed duck from the orange feet to the highest lavender petal, then record the head diameter and bonnet circumference beside the yarn and hook used. Those measurements make a second version easier to reproduce when changing chenille brands. Photograph the finished project straight from the front to check bill alignment, eye height and flower spacing. Save this duck amigurumi crochet pattern to Pinterest and share the finished piece on Instagram with #LavenderFlowerDuck. Shape the six petals outward before the final photograph. Would you keep the lavender flower bonnet shown here or make the next duck with dusty-pink petals?
Sources
- Grace and Yarn — Amigurumi Duck: #4 worsted yarn, 3.5 mm hook, 100 g main yarn, 25 g orange and 15 mm safety eyes. :contentReference[oaicite:23]{index=23}
- DIY Fluffies — Free Duck Crochet Pattern: sport-weight and super-bulky versions with different hooks and eye sizes. :contentReference[oaicite:24]{index=24}
- The Nicole Chase — Daphne the Duck: approximately 6.5 inches tall in #4 worsted yarn with a 4 mm hook. :contentReference[oaicite:25]{index=25}
- Ravelry — Easy Amigurumi Duck: 23 cm bulky chenille duck using 100 g chenille and a 3.5 mm hook. :contentReference[oaicite:26]{index=26}
- Etsy — Duck Amigurumi marketplace: current competition across basic ducks, low-sew designs and removable-outfit patterns. :contentReference[oaicite:27]{index=27}









