Introduction
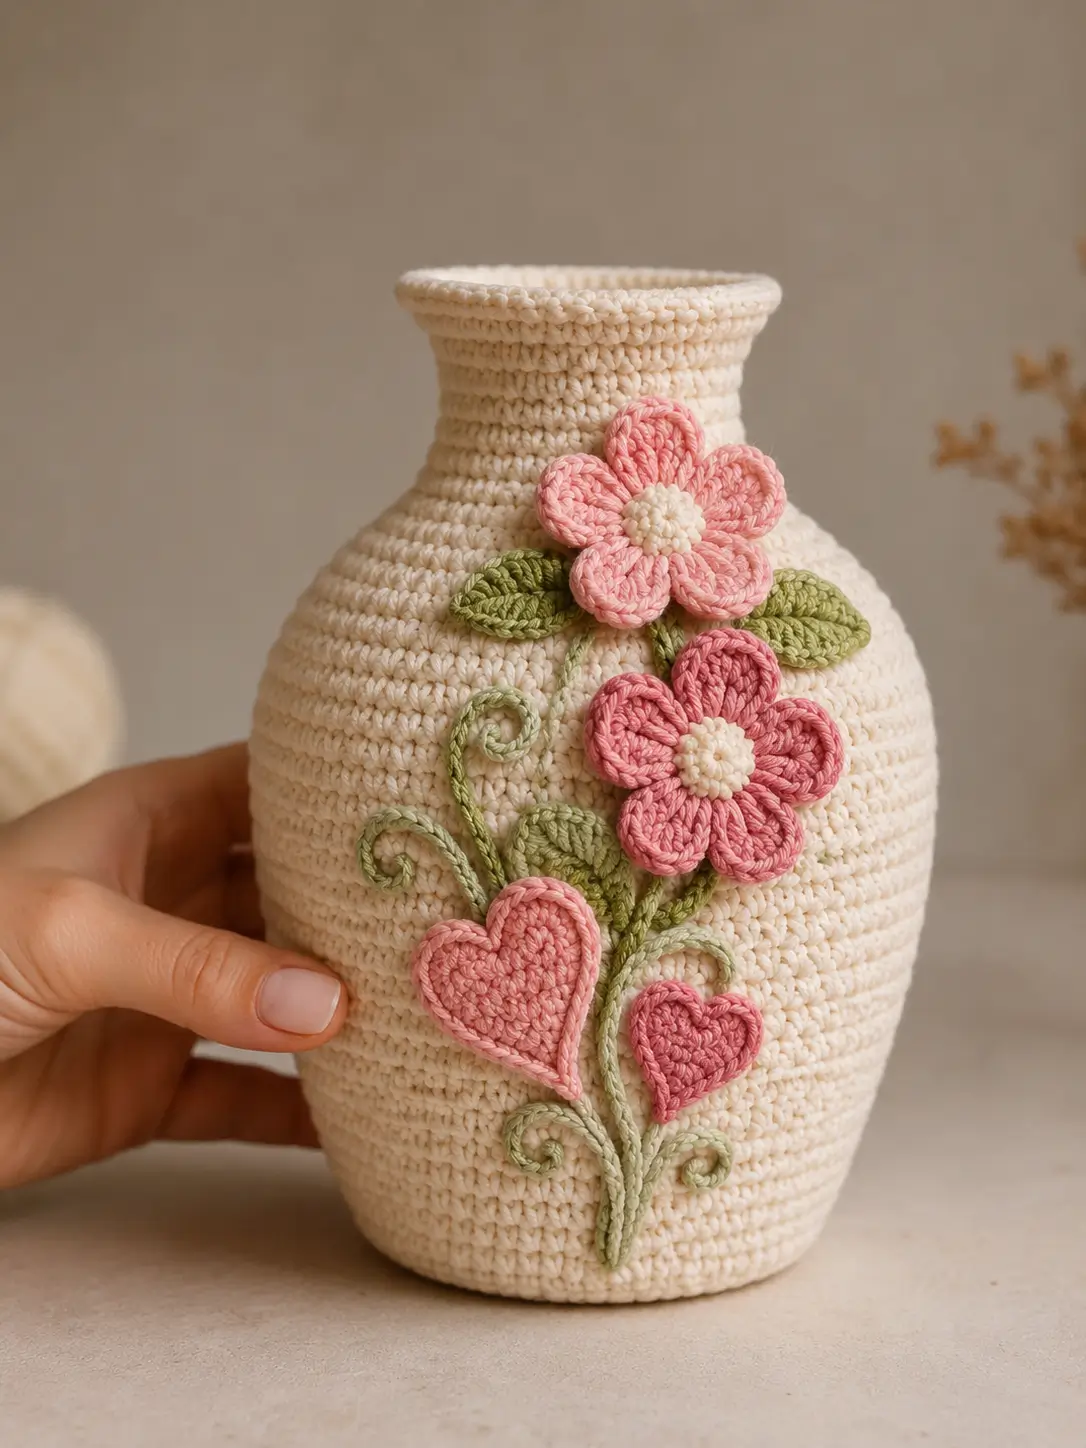
A vase can widen dramatically through its lower body, but its neck must contract without producing six visible corners. This crochet flower vase pattern uses DK cotton, a 3.5 mm hook and staggered shaping to form a rounded vessel approximately 20–23 cm tall. Raised pink flowers, heart motifs, sage leaves and curling stems decorate the front. The project suits intermediate makers comfortable with tight single crochet, appliqué work and structural finishing.
The Design: What Makes This Floral Vase Different
The vessel is built as one continuous shell from the base upward, but the floral work remains separate until the body is finished. That distinction keeps the structural stitch counts clean while letting every leaf, flower and stem be positioned after the vase has taken shape. The broad lower body reaches 60 stitches before narrowing through the shoulders into a 36-stitch neck. A small rim expansion then creates the rolled-looking opening visible in the reference. Two five-petal flowers provide the main color blocks, while two heart motifs bring a second petal geometry into the composition. Sage stems connect the pieces vertically. The decorative crochet vase also uses spiral tendrils to fill empty areas without adding another full flower. One common failure is reducing every shoulder round at identical positions; that creates obvious vertical ridges instead of a smooth bottle profile.
Project Information at a Glance
| Skill Level | Time | Finished Size | Hook | Best For |
|---|---|---|---|---|
| Intermediate | 10–14 hours | Approx. 20–23 cm tall | 3.5 mm | Dry floral display and shelf decor |
Materials and Tools
Yarn
- Warm ivory — DK/light-worsted cotton — approximately 140–180 g — vase body
- Blush pink — DK cotton — approximately 15–20 g — upper flower and large heart
- Dusty rose — DK cotton — approximately 10–15 g — lower flower and small heart
- Sage green — DK cotton — approximately 20–25 g — leaves, stems and tendrils
- Pale cream — DK cotton — approximately 10 g — flower centres
Tools
- 3.5 mm crochet hook
- Yarn needle
- Locking stitch marker
- Dressmaking pins
- Scissors
- Optional rigid inner vase, jar or plastic liner
- Optional removable cardboard or plastic base disc
Use a tightly spun cotton if the vase will stand without a rigid insert. A soft acrylic yarn can reproduce the stitches, but its additional stretch makes the walls more likely to collapse inward around the neck.
Abbreviations
- MR — magic ring
- sc — single crochet
- inc — two single crochet stitches in one stitch
- dec — decrease over two stitches
- sl st — slip stitch
- ch — chain
- hdc — half double crochet
- dc — double crochet
- tr — treble crochet
- BLO — back loop only
- FLO — front loop only
An invisible decrease is worked through the front loops of the following two stitches before completing them together as one single crochet.
Pattern — Step by Step
Work the vase body in a continuous spiral unless a round specifically calls for joining. Mark the first stitch of every round. Shift decrease positions by several stitches between shaping rounds so the shoulder remains visually round.
Vase Base and Lower Body
Yarn: warm ivory — original six-stitch circular construction.
R1: 6 sc in MR (6)
R2: inc × 6 (12)
R3: (sc, inc) × 6 (18)
R4: (2 sc, inc) × 6 (24)
R5: (3 sc, inc) × 6 (30)
R6: (4 sc, inc) × 6 (36)
R7: (5 sc, inc) × 6 (42)
R8: (6 sc, inc) × 6 (48)
R9: (7 sc, inc) × 6 (54)
R10: (8 sc, inc) × 6 (60)
R11: BLO sc around (60)
R12–R22: sc around (60)
The BLO round creates a defined fold between the base and wall. If using a rigid base disc, cut it to fit inside after R10 and insert it before the walls become too tall to reach comfortably.
Vase Shoulder
Continue in warm ivory.
R23: (8 sc, dec) × 6 (54)
R24–R25: sc around (54)
R26: 4 sc, dec, (7 sc, dec) × 5, 3 sc (48)
R27–R28: sc around (48)
R29: (6 sc, dec) × 6 (42)
R30–R31: sc around (42)
R32: 3 sc, dec, (5 sc, dec) × 5, 2 sc (36)
R33–R34: sc around (36)
Keep the fabric upright while working the decreases. Rotate the work periodically and check the silhouette from the side; the shoulder should narrow gradually rather than folding inward at one level.
Vase Neck
Continue in warm ivory.
R35–R43: sc around (36)
If the neck flares outward because of loose tension, switch temporarily to a 3.25 mm hook for R36–R42 rather than removing stitches.
Flared Rim
Continue in warm ivory.
R44: (5 sc, inc) × 6 (42)
R45: sc around (42)
R46: BLO sc around (42)
R47: sc around (42)
Slip stitch into the next stitch and fasten off.
Fold R46–R47 slightly outward along the BLO ridge. Tack the folded rim in four evenly spaced positions if the cotton refuses to retain the rolled edge.
Large Five-Petal Flower — Make Two
Make one in blush pink and one in dusty rose.
R1: 10 sc in MR, join with sl st (10)
For each petal, work into the next two stitches:
Petal: sl st in next st, ch 2, 2 dc in same st, 3 tr in next st, 2 dc in same st, ch 2, sl st in same st.
Repeat the petal sequence five times around the ring.
Fasten off and leave a 35 cm sewing tail.
Block each petal flat with your fingers. The five lobes should remain distinct rather than overlapping into one circular ruffle.
Flower Centres — Make Two
Yarn: pale cream.
R1: 6 sc in MR (6)
R2: inc × 6 (12)
Fasten off and leave a 20 cm tail.
For a slightly raised centre, run the sewing tail around the outer edge after attachment and pull it gently inward before securing.
Large Heart Motif
Yarn: blush pink. Work in rows.
Row 1: ch 2, 2 sc in second ch from hook (2)
Row 2: ch 1, turn, inc × 2 (4)
Row 3: ch 1, turn, inc, 2 sc, inc (6)
Row 4: ch 1, turn, inc, 4 sc, inc (8)
Row 5: ch 1, turn, inc, 6 sc, inc (10)
Row 6: ch 1, turn, sc across (10)
First upper lobe:
Row 7A: ch 1, turn, sc across first 5 sts (5)
Row 8A: ch 1, turn, dec, sc, dec (3)
Row 9A: ch 1, turn, sc3tog (1)
Fasten off. Rejoin at the remaining five stitches.
Row 7B: sc across remaining 5 sts (5)
Row 8B: ch 1, turn, dec, sc, dec (3)
Row 9B: ch 1, turn, sc3tog (1)
Fasten off and weave in the short working ends. Join yarn at the heart point and work one round of sc evenly around the outside, placing 3 sc in the bottom point.
Fasten off and leave a 30 cm attachment tail.
Small Heart Motif
Yarn: dusty rose.
Row 1: ch 2, 2 sc in second ch from hook (2)
Row 2: ch 1, turn, inc × 2 (4)
Row 3: ch 1, turn, inc, 2 sc, inc (6)
Row 4: ch 1, turn, sc across (6)
First lobe:
Row 5A: ch 1, turn, sc across 3 sts (3)
Row 6A: ch 1, turn, sc3tog (1)
Fasten off and repeat across the remaining three stitches.
Work one border round of sc, placing 3 sc in the lower point. Fasten off and leave a 25 cm sewing tail.
Large Leaves — Make Four
Yarn: sage green.
Ch 9.
Starting in second chain from hook:
sl st, sc, hdc, dc, dc, hdc, sc, sl st.
Work 3 sc into the final chain and continue along the opposite side:
sl st, sc, hdc, dc, dc, hdc, sc, sl st.
Fasten off and leave a 20 cm tail.
Small Leaves — Make Two
Yarn: sage green.
Ch 7.
Starting in second chain from hook:
sl st, sc, hdc, dc, sc, sl st.
Work 3 sc into the last chain, then repeat the sequence along the opposite side.
Fasten off and leave a 15 cm attachment tail.
Main Green Stem
Yarn: sage green.
Ch 41. Slip stitch into second chain from hook and across (40).
Fasten off with a 25 cm tail.
Pin the stem from the lower centre of the vase upward toward the large upper flower. Allow it to curve rather than forcing it into a straight vertical line.
Secondary Stem
Yarn: sage green.
Ch 31. Slip stitch into second chain from hook and across (30).
Fasten off and leave a 20 cm tail.
Use this branch to connect the lower heart motif with the dusty-rose flower.
Short Flower Stem
Yarn: sage green.
Ch 20. Slip stitch back across 19 chains.
Fasten off and leave a 15 cm attachment tail.
Spiral Tendrils — Make Four
Yarn: sage green.
Ch 18.
Work 2 sc in second chain from hook and 2 sc in every remaining chain.
The strip will curl automatically.
Fasten off and leave a 15 cm sewing tail. Stretch or compress the coil during pinning to produce different spiral diameters.
Optional Internal Support Sleeve
Use this only when the crochet vase will stand without a rigid jar or ceramic insert.
Cut a flexible plastic canvas rectangle to fit inside the straight lower wall from approximately R12 to R22. Overlap its ends by about 1 cm and stitch them together with strong thread.
For the neck, cut a second narrower section of plastic canvas to fit behind R35–R43. Round the cut corners before inserting so no sharp point pushes through the cotton fabric.
Assembly
- Shape the empty vase first. Press the base flat, round the lower body by hand and check that the neck remains centred over the base before adding any surface decoration.
- Pin the long green stem from near the lower front centre toward the upper-right shoulder. Sew it down with small matching stitches every 1.5–2 cm while preserving a curved line.
- Attach the secondary and short stems so they branch from the main vertical composition. Keep their junctions hidden beneath flowers, leaves or heart motifs where possible.
- Pin the upper blush flower near the transition between shoulder and neck. Sew the flower centre first, then tack each petal near its base while leaving most of the outer edge raised.
- Attach the dusty-rose flower below and slightly to the right of the upper flower. Rotate it so its petals do not form the same horizontal axis as the first flower.
- Sew the large heart motif below the flowers on the left side of the main stem, then position the smaller heart farther right and lower. Keep both pointed ends directed downward.
- Arrange the large leaves around the flower junctions and place the smaller leaves lower on the stems. Sew down the centre ridge of each leaf while leaving the outer edges slightly raised.
- Position the four spiral tendrils in open areas between the motifs. Tack each coil at its beginning, middle and end rather than sewing down every curved stitch.
- Insert the optional support sleeve or rigid inner vessel and reshape the rim. Check that no internal edge creates a visible bump through the ivory crochet.
- Place the vase upright and inspect the front from at least one metre away. Correct any leaning flower, detached leaf edge or visibly straight stem section before weaving in the remaining tails.
The completed vase should stand with a flat base, rounded lower body, centred neck and raised floral arrangement concentrated on the front surface.
7 Technical Tips
- Base cupping: A circular base that rises more than about 5 mm at the edge usually indicates overly tight increases. Move up 0.25 mm in hook size for R6–R10 rather than forcing the finished base flat.
- Shoulder ridges: Repeating every decrease directly above the previous one creates six visible vertical lines. Offset the starting position by 3–4 stitches on alternate decrease rounds.
- Neck collapse: A 36-stitch cotton neck can fold inward if the fabric is loose. If the wall compresses more than approximately 1 cm under its own weight, add an internal sleeve or move down 0.25 mm in hook size.
- Flower distortion: Sewing around the entire outer petal edge removes the raised effect. Attach each petal mainly across its inner 1–1.5 cm and leave the rounded outer section free.
- Leaf rotation: A leaf secured only at its base can twist sideways. Add one hidden stitch through the centre ridge approximately halfway along every large leaf.
- Tendril flattening: Sewing every stitch of a spiral to the vase turns the coil into a wavy line. Anchor each curl at only three points unless a section projects more than about 8 mm from the surface.
- Rim flare: A rolled rim that expands beyond the body by more than about 1 cm looks oversized. Keep R44 at 42 stitches and avoid additional increases unless your neck tension is exceptionally tight.
Shaping the Rounded Vase Body
The lower section needs enough width to support the narrow neck, which is why this crochet flower vase pattern reaches 60 stitches before the walls rise. The first ten rounds create the base diameter. A back-loop round then turns the crochet upward and establishes a clean lower edge.
Do not begin decreasing immediately after the wall rises. Eleven full rounds at 60 stitches create the broad cylindrical-to-oval body visible in the reference. The shoulder reduction sequence begins only after that height has been established.
Check the form before each reduction round. If the body already appears narrow, add one extra 60-stitch plain round rather than changing the decrease count. Height can be adjusted without disturbing the circumference mathematics.
Creating a Smooth Shoulder
The shoulder converts the wide 60-stitch body into the 36-stitch neck. Four separate decrease stages distribute that change vertically rather than collapsing the fabric in one abrupt transition.
Offsetting the decreases matters because single crochet naturally stacks into visible columns. A repeated six-point decrease pattern produces a hexagonal shoulder. Starting alternate shaping rounds several stitches later disperses those structural lines.
Use the hands to shape the vase during construction. Cotton will retain a gentle curve when worked densely, but hard creasing at the shoulder should be avoided before the floral appliqués are attached.
Constructing the Raised Flowers
Each flower uses five separate petal groups worked around a compact ten-stitch centre. Treble crochet forms the longest part of the petal, while double crochet and chains taper the edges back toward the base.
Do not sew every petal completely flat. The image depends on visible relief. Secure the central area and the inner section of each petal, allowing the rounded outer portion to lift several millimetres away from the vase.
The cream centres cover the petal joins and add another layer. Sew them after the pink flowers have already been positioned so their circles remain centred over the final petal arrangement.
Making the Crochet Hearts
The heart motifs introduce a second shape below the flowers. Their lower points follow the same visual direction as the stems, which helps integrate them into the botanical layout rather than making them look like unrelated decorations.
Both hearts are built from the bottom upward. The body widens first, then the upper row divides into two sections so each lobe can narrow separately.
Add the border only after both lobes are complete. The edge round smooths the stepped row ends and sharpens the lower point. Place three single crochet stitches in that point so it does not curl inward.
Building the Leaves
The leaf construction starts with a short chain and works along both sides of it. The foundation chain acts as a centre vein while taller stitches create width through the middle of the leaf.
Use larger leaves around the two main flowers and smaller leaves lower on the composition. Repeating only one leaf size makes every branch appear equally important.
Sew primarily through the centre line. Leaving the outer edge free produces a raised botanical texture and makes the leaf cast a small shadow across the ivory background.
Placing the Stems and Tendrils
The stems provide the underlying composition, so attach them before the flowers. Start with the longest line and build secondary branches from it instead of placing each motif independently.
A slip-stitched chain produces a narrow cord that bends readily. Curve the stem while pinning rather than working a straight vertical strip. Botanical stems rarely follow perfect geometric lines.
The spiral tendrils fill negative space around the hearts and lower leaves. Vary their curl diameter by stretching some coils more than others. Four identical spirals placed at the same angle create an overly repetitive surface.
Keeping a Crochet Vase Upright
A decorative cotton vessel behaves differently from a stuffed amigurumi figure. Its walls have no polyester filling to support them, so stability comes from gauge, fiber choice, shape and optional internal reinforcement.
Dense cotton is preferable when the object is intended to stand independently. A rigid jar, bottle or removable plastic-canvas sleeve can also support the form while leaving the crochet exterior unchanged.
If using a real container inside, measure its widest diameter before beginning. The crochet circumference should fit closely without requiring strong stretching, particularly across the narrowed shoulder and neck.
Using the Vase Safely
Treat an unlined crochet vessel as dry decor. Yarn alone is not a watertight flower container, and repeated moisture can affect the fiber, dyes and drying time.
For fresh flowers, place a waterproof glass or plastic vessel completely inside the crochet shell. The inner container should carry all water and should be removable for cleaning.
Dried stems, artificial flowers and lightweight decorative branches can be placed directly inside when their ends cannot catch or split the crochet stitches.
Adjusting the Finished Size
To create a narrower vase, stop the base increases at 54 stitches and reduce the shoulder proportionally to a 30–36 stitch neck. Keep the number of plain body rounds similar if the goal is to preserve height.
For a larger piece, add one increase round to reach 66 stitches, then extend the body before beginning the shoulder. The floral appliqués should also increase in size or the decoration will appear underscaled against the broader surface.
Changing only the yarn weight is the simplest scaling method. Thicker cotton produces a larger vessel from the same stitch counts, while sport-weight cotton makes a smaller version with finer floral detail.
Finishing Checks
Set the vase on a hard, level surface before hiding the final structural tail. The base should contact the surface across its full circumference without rocking.
View the silhouette from the side. The lower body should remain the widest section, the shoulder should narrow gradually and the neck needs to sit approximately over the base centre.
Inspect the appliqués last. Both five-petal flowers should retain visible relief, each heart point should face downward and the green stems should appear continuous even where they pass beneath leaves and flowers.
Conclusion
Measure the finished vase from the base to the top of the rolled rim and record its widest body circumference beside the yarn and hook used. Photograph the piece from the front next; that view exposes an off-centre neck, uneven shoulder shaping or floral stems that appear disconnected. Save this crochet flower vase pattern to Pinterest and share the finished piece on Instagram with #RaisedFlowerCrochetVase. Keep the flower petals slightly lifted when arranging the final display rather than pressing every appliqué flat. For another vase, would you keep the two heart motifs among the stems or replace them with two additional five-petal flowers?
Sources
- Chabe Patterns — Crochet Mini Vase with Flowers: 100% cotton construction and 8 × 18 cm finished-size reference.
- Atelier Delilah — Crochet Ceramic-Tile-Inspired Flower Vase: 2024 DK cotton vase using a 3 mm hook, 15.5 cm × 11 cm finished dimensions.
- Raffamusa Designs — Crochet Leaf Appliqué: chain-based leaf construction worked along both sides of the foundation chain.
- Etsy — current Crochet Vase Cover Pattern marketplace showing floral, geometric and jar-cover competition.









