Introduction
A raised crochet flower adds weight exactly where a granny square normally needs to remain flat. This crochet flower blanket pattern solves that problem by attaching a three-layer bloom and separate leaves to a structured cream square. Using DK cotton and a 3.5 mm hook, 63 blocked motifs create a large bedspread approximately 154 × 198 cm before the border. The project requires intermediate motif construction, joining and lace-border work.
The Design: What Makes This 3D Flower Bedspread Different
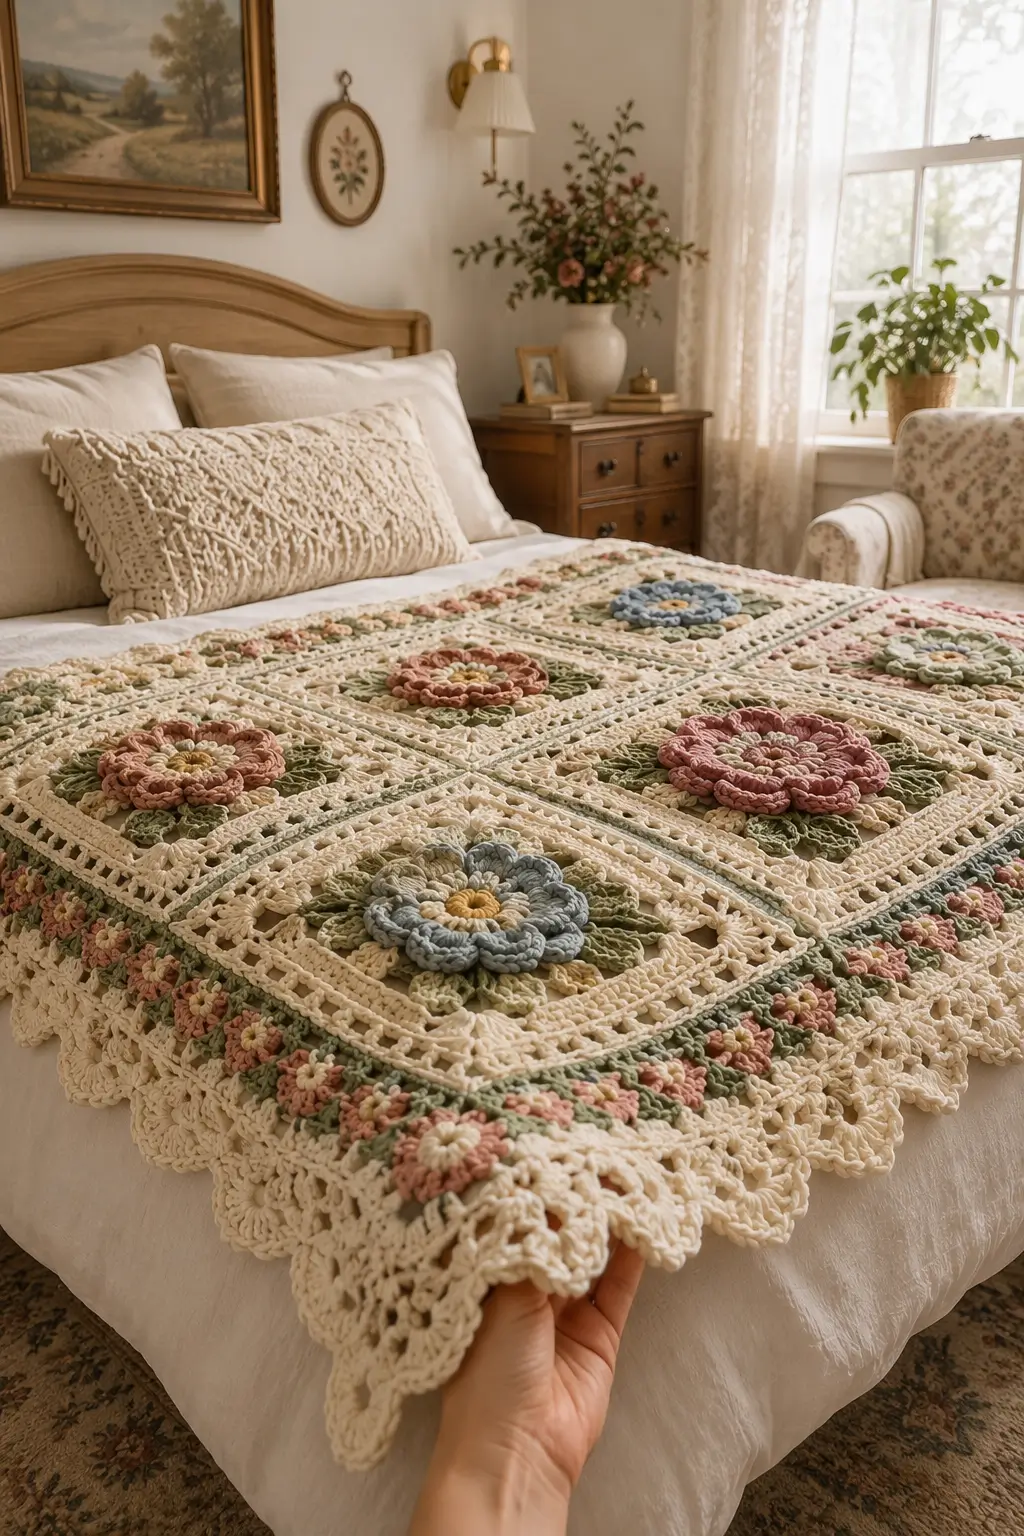
The central flowers are deliberately much larger than standard daisy centres. Three petal layers create the raised profile visible across the bed, while four green leaves distribute visual weight toward the corners. The cream square is worked separately, so its openwork remains flat even when a substantial flower is mounted on top. A muted green flat slip-stitch join outlines every block and turns the seams into part of the design. Flower colors rotate between dusty rose, blush, muted blue, beige and cream rather than following a single-color repeat. The outer treatment changes scale again: tiny flowers form a narrow botanical band before a deep cream scalloped lace edge. One common failure with a 3D flower crochet blanket is attaching every petal edge. That removes the depth and can pull the background square inward.
Project Information at a Glance
| Skill Level | Time | Finished Size | Hook | Best For |
|---|---|---|---|---|
| Intermediate | 70–100 hours | Approx. 174 × 218 cm including border | 3.5 mm | Full-size decorative bedspread |
The size is modular. Sixty-three 22 cm squares arranged seven across and nine long measure approximately 154 × 198 cm before joining allowance and the deep border. Published flower-granny-square patterns demonstrate substantial variation in motif size, so the blocked square measurement rather than the raw round count controls the final dimensions.
Materials and Tools
Yarn
- Warm ivory — DK/light-worsted cotton or cotton blend — approximately 2,000–2,500 g — square backgrounds and outer border
- Dusty rose — DK cotton — approximately 180–220 g — raised flowers
- Blush pink — DK cotton — approximately 160–200 g — raised flowers and small border flowers
- Muted blue — DK cotton — approximately 100–150 g — accent flowers
- Soft beige — DK cotton — approximately 100–150 g — neutral flowers
- Pale yellow/cream — DK cotton — approximately 80–100 g — flower centres
- Sage green — DK cotton — approximately 250–325 g — leaves and joining lines
- Olive green — DK cotton — approximately 150–225 g — secondary leaves and floral-border accents
Tools
- 3.5 mm crochet hook
- Yarn needle
- Locking stitch markers
- Blocking mats
- Rust-resistant blocking pins
- Scissors
- Measuring tape
Make and block one complete sample before buying the full quantity of yarn. Cotton and cotton-blend DK yarns can differ enough in diameter that identical stitch counts produce noticeably different square measurements.
Abbreviations
- MR — magic ring
- sc — single crochet
- hdc — half double crochet
- dc — double crochet
- tr — treble crochet
- sl st — slip stitch
- ch — chain
- sp — space
- st — stitch
- RS — right side
- WS — wrong side
When a decrease is needed in a single-crochet section, work through the front loops of the next two stitches before completing them together.
Pattern — Step by Step
Make one complete sample block first. The target measurement after blocking is 22 × 22 cm. Adjust only the final cream background rounds if your flower proportions already match the reference but the finished square is smaller or larger.
Large Cream Background Square — Make 63
Yarn: warm ivory.
R1: Ch 4 and join to form a ring. Ch 3, 2 dc in ring, ch 2; (3 dc in ring, ch 2) × 3. Join with sl st. You now have 4 three-dc groups and 4 corners.
R2: Sl st to first corner. Ch 3, 2 dc, ch 2, 3 dc in same corner; ch 2. In each remaining corner work (3 dc, ch 2, 3 dc), ch 2. Join.
R3: Sl st to corner. Work (3 dc, ch 2, 3 dc) in corner, ch 2, 3 dc in side ch-2 sp, ch 2. Repeat around, placing (3 dc, ch 2, 3 dc) in every corner. Join.
R4: Work corners as before. Along each side work 3 dc in each ch-2 sp with ch 2 between groups. Join.
R5: Work one full granny round, placing (3 dc, ch 2, 3 dc) in corners and 3 dc in each side space, with ch 2 between groups.
R6: Ch 1, sc in each dc and work 3 sc in every ch-2 side space. In each corner work (2 sc, ch 2, 2 sc). Join.
R7: Ch 4 to count as dc, ch 1; skip 1 st, dc in next st, ch 1. Continue across each side to create an open mesh. In each corner ch-2 sp work (dc, ch 3, dc). Join.
R8: Ch 1, sc in each dc and 2 sc in every ch-1 sp. In each ch-3 corner work (2 sc, ch 2, 2 sc). Join.
R9: Ch 3, dc in each st around. In every corner ch-2 sp work (2 dc, ch 2, 2 dc). Join.
R10: Ch 1, sc in each dc. In every corner work (2 sc, ch 2, 2 sc). Join and fasten off.
Block each square to exactly 22 × 22 cm before adding the flower. Matching the square dimensions now prevents cumulative distortion across a seven-motif row.
Large Flower Centre — Make 63
Yarn: pale cream or soft yellow.
R1: 6 sc in MR (6)
R2: inc × 6 (12)
R3: (sc, inc) × 6 (18)
Join with sl st and leave the working yarn attached for the first petal layer.
Flower Petal Layer 1
Use the selected flower color.
Join flower yarn to any stitch of R3.
Petal repeat: sl st in next st, ch 2, 2 dc in next st, 3 tr in next st, 2 dc in next st, ch 2, sl st in next st.
Repeat six times around the centre. Fasten off.
The petals should overlap slightly at their lower edges but remain individually visible at the rounded tips.
Flower Petal Layer 2
Same flower color or a slightly lighter/darker variation.
Turn the flower over and locate the back loops or spaces behind Layer 1. Join yarn behind the first petal.
Foundation: *ch 5, sl st behind next petal base*; repeat × 6.
Into each ch-5 loop work:
(sc, hdc, 3 dc, 2 tr, 3 dc, hdc, sc)
Repeat in all six loops. Fasten off.
Flower Petal Layer 3
Same flower family.
Join behind Layer 2.
Foundation: *ch 7, sl st behind next Layer-2 petal*; repeat × 6.
Into each ch-7 loop work:
(sc, hdc, 2 dc, 3 tr, 2 dc, hdc, sc)
Repeat six times. Fasten off and weave the short ends behind the centre.
Do not block the finished flower flat. Shape the petals upward and outward with the fingers.
Raised Leaves — Make 252
Four leaves for every main square. Alternate sage and olive green.
Ch 10.
Starting in second ch from hook:
sl st, sc, hdc, dc, 2 tr, dc, hdc, sc, sl st.
Work 3 sc into the final chain and continue down the opposite side:
sl st, sc, hdc, dc, 2 tr, dc, hdc, sc, sl st.
Fasten off and leave a 20 cm sewing tail.
Fold the leaf slightly along the foundation chain so the centre ridge remains raised.
Attach Leaves to Each Square
Place the blocked cream square RS up. Mark its centre with a removable stitch marker.
Arrange four leaves diagonally around the centre, approximately toward the four corners. Their inner ends should overlap beneath the flower while their pointed ends extend beyond the eventual flower perimeter.
Sew through the centre ridge of each leaf only. Leave the outer edges unsewn so the botanical relief remains visible.
Attach the Large Flowers
Centre one completed flower over the four leaf bases.
Sew the flower centre firmly to the cream square. Add six additional hidden stitches through the bases of the innermost petal layer.
Do not stitch around the outside edges of Layers 2 or 3. Those petals need to project from the square.
Suggested Flower Color Distribution
For a 63-square blanket, make:
- 22 dusty-rose flowers
- 16 blush-pink flowers
- 10 muted-blue flowers
- 9 beige/cream flowers
- 6 mixed two-tone flowers
Distribute the blue and neutral motifs through the grid rather than placing them in consecutive rows. The photographed bedspread uses those cooler and quieter colors as interruptions among the pink flowers.
Flat Slip-Stitch Join
Yarn: muted sage green.
Arrange all 63 motifs into seven columns and nine rows before joining. Photograph or number the layout so the color distribution does not change during assembly.
Hold two squares WS together with their corresponding edges aligned. Working through the outer loops of both pieces, slip stitch across the entire edge.
Continue joining squares into horizontal strips of seven. After all nine strips are complete, join the strips vertically using the same method.
Keep the joining yarn on the visible side if you want the green grid to match the reference. Maintain loose slip stitches so the seams remain flat.
Blanket Perimeter Round 1
Yarn: warm ivory.
Join in any outer corner.
Work sc evenly around the blanket perimeter, placing 3 sc in every outer corner. Across each square edge, use the same number of stitches so opposite sides remain balanced.
Join with sl st.
Perimeter Round 2 — Openwork
Ch 4 to count as dc and ch 1. Skip 1 st, dc in next, ch 1. Repeat around.
At each corner work:
(dc, ch 3, dc)
Join.
Perimeter Round 3
Ch 1. Work sc in each dc and 2 sc in each ch-1 sp. In every corner ch-3 sp work 5 sc.
Join and fasten off.
Green Accent Round
Yarn: sage green.
Join in a corner and work one round of hdc around the entire blanket, placing 3 hdc in each corner stitch.
Fasten off.
Mini Border Flowers
Make enough to space approximately one flower every 8–10 cm around the perimeter.
With pale cream:
R1: 6 sc in MR (6)
Change to dusty pink or blush.
Work in each stitch:
(sl st, ch 2, 2 dc, ch 2, sl st)
Repeat six times to make six small petals.
Fasten off and leave a sewing tail.
Mini Border Leaves
Make two per mini flower.
Ch 6.
Starting in second ch: sl st, sc, hdc, sc, sl st.
Work 2 sc in last chain and repeat along the opposite side.
Fasten off.
Attach the Floral Border Band
Pin mini flowers at even intervals around the blanket just outside the green accent round. Add two small leaves beneath each flower.
Sew the flower centres and leaf ridges rather than their full outlines. Keep all decorative pieces clear of the final outer edge.
Deep Cream Lace Border — Round 1
Yarn: warm ivory.
Join behind the floral band.
*sc in next 3 sts, ch 5, skip 3 sts*; repeat around.
Adjust the final repeat slightly at corners so every corner contains one complete ch-5 loop.
Deep Cream Lace Border — Round 2
Sl st to first ch-5 loop.
In every loop work:
(sc, ch 3, 3 dc, ch 3, sc)
At corners work two complete groups into the corner loop.
Deep Cream Lace Border — Round 3
In each ch-3 space work:
(sc, hdc, 3 dc, hdc, sc)
This creates the first scalloped layer.
Deep Cream Lace Border — Round 4
Join behind the centre dc of each previous shell.
*ch 7, sl st behind centre dc of next shell*; repeat around.
Deep Cream Lace Border — Round 5
Into each ch-7 loop work:
(sc, hdc, 2 dc, 3 tr, 2 dc, hdc, sc)
At every outer corner, work one additional ch-7 loop before continuing so the lace can turn without cupping.
Fasten off and weave in the final tail.
Assembly
- Block all 63 cream squares to exactly 22 × 22 cm before adding dimensional pieces; record the measurement after the squares are fully dry.
- Sew four raised leaves to each block, positioning their tips diagonally toward the square corners and keeping their outer edges free.
- Attach one three-layer flower over the leaf bases on every square, securing the centre and inner petal bases while leaving the outer petals raised.
- Arrange the completed motifs in seven columns by nine rows and distribute blue, neutral and pink flowers before joining any edges.
- Join the squares into nine horizontal strips with muted-green flat slip stitches, keeping the visible seam tension looser than the square-edge stitches.
- Connect the nine strips vertically with the same green join and check the blanket diagonals after every second strip.
- Work the three cream perimeter rounds followed by the sage-green accent round around the assembled blanket.
- Sew the miniature pink flowers and their paired leaves evenly around the perimeter to form the narrow floral border band.
- Work all five rounds of the deep cream lace border, adding extra corner space where required so the outer edge lies flat.
- Wet-block only the cream and green structural sections of the finished bedspread, shaping the raised flowers by hand rather than pinning their petals flat.
The completed bedspread should form a rectangular grid with flat structural squares, raised botanical centres and a lace border that hangs without curling under the mattress edge.
7 Technical Tips
- Square-size drift: A difference of only 5 mm per motif can accumulate to more than 3 cm across a seven-square row. Block every square to the same 22 cm measurement before joining.
- Flower puckering: Sewing the full perimeter of all three petal layers pulls the cream square toward the centre. Secure only the flower centre and approximately 1–1.5 cm at the base of each inner petal.
- Raised-flower sag: A heavy flower attached only through its centre can rotate after washing. Add six hidden anchor stitches around the first petal layer, equally spaced around the bloom.
- Join contraction: Tight slip stitches shorten every seam and create ridges between motifs. The completed green join should stretch to the same 22 cm length as the blocked square edge without resistance.
- Leaf rotation: A leaf stitched only through its base can twist beneath the flower. Add one hidden stitch through the centre ridge approximately 3–4 cm from the leaf base.
- Border cupping: A deep lace border without additional corner room pulls the blanket inward. Add one extra ch-7 loop at each outer corner before working the final large shells.
- Weight distortion: Cotton bedspreads can stretch vertically under their own mass. Measure the blanket while it lies flat and store it folded rather than hanging it from one edge.
Building the Large 3D Flower
The flower is the structural focus of this crochet flower blanket pattern, but it is not part of the square’s load-bearing rounds. That separation matters. The cream block stays flat while the flower can use longer treble stitches, overlapping petals and multiple back-loop foundations without pulling the square centre out of plane.
Layer 1 stays comparatively compact. Layer 2 extends beyond it through five-chain foundations, and the seven-chain base for Layer 3 produces the largest petals. Six petals per layer create eighteen visible petal sections without making the bloom excessively crowded.
Shape the completed flower before attachment. Pull Layer 3 outward, allow Layer 2 to remain slightly raised and keep the first layer close to the centre. Flattening all three layers removes most of the relief visible in the reference.
Getting the Leaf Placement Right
Four leaves give every block a diagonal structure underneath the circular flower. Their pointed ends direct the eye toward the square corners and visually connect the rounded centre to the geometric cream frame.
Alternate sage and olive yarn when enough colors are available. A slight difference between the four leaves looks closer to a botanical arrangement than four perfectly identical pieces.
Attach leaves before flowers. This order hides the leaf bases and sewing tails beneath the bloom. Stitch mainly through the centre ridge, leaving enough freedom along the sides for the leaves to lift slightly from the cream background.
Planning the Color Layout
The photographed bedspread does not distribute every color evenly. Pink and dusty rose dominate, while blue and cream flowers appear as cooler interruptions. That uneven balance gives the grid more movement than a strict alternating sequence.
Lay all finished squares on the floor before joining. Position the blue flowers several blocks apart and prevent four identical pink flowers from forming one obvious two-by-two cluster.
Take a photograph of the final layout. Once the motifs are stacked for joining, the image becomes a reliable reference for row order and prevents accidental color swaps.
Working the Open Cream Background
The cream square needs enough visual space around the flower. Dense solid crochet would make a bedspread of this scale much heavier and would reduce the contrast between the raised centre and its frame.
Alternating granny-style rounds with a mesh round creates that spacing. The final solid rounds provide a stable edge for joining, so the decorative slip stitches do not have to pass through fragile chain-only sections.
Do not attach the flower before blocking the square. Raised petals make accurate pin placement difficult and can distort under steam or wet blocking.
Joining the 63 Motifs
A visible green seam works particularly well here because the square background is almost entirely cream. The join becomes a fine grid that divides the large floral motifs without requiring another wide frame.
Join complete rows first. Seven motifs make one horizontal strip, and nine strips form the full bedspread. Check the strip against a tape measure after every seam; an overly tight joining row should be corrected before another square is added.
When the horizontal strips are complete, stack them in final order and join vertically. Keep every square corner aligned at intersections so the green lines cross cleanly rather than stepping sideways.
Building the Miniature Floral Border
The narrow flower band changes the scale of the design before the deep cream lace begins. Large central blooms would be too bulky at the perimeter, so six-petal miniature flowers repeat the color story with less projection.
Space these motifs approximately 8–10 cm apart. Exact spacing can change slightly near corners, but avoid concentrating several flowers into one short section merely to use a fixed count.
Two small green leaves beneath each flower are enough to link the border visually to the large blocks. Keep this band comparatively narrow so it does not compete with the three-layer centre flowers.
Shaping the Deep Scalloped Edge
The outer border in the photograph hangs below the blanket as a substantial lace layer. Five rounds give enough depth to reproduce that effect without extending the bedspread by an excessive amount.
The first mesh round creates attachment spaces. Smaller shells follow, then larger seven-chain arches support the final scallops. This change from small to large spaces produces a gradually opening border.
Corners require extra fabric. Without another arch or additional corner stitches, the finished edge will pull upward and the blanket will no longer lie rectangular when spread across the bed.
Choosing Yarn for a Raised Flower Bedspread
Cotton or a cotton blend gives clear definition to leaf ridges, lace spaces and layered petals. Current flower-granny-square guidance commonly uses cotton, acrylic, wool or blended yarns, with motif size changing according to yarn weight and hook selection. :contentReference[oaicite:15]{index=15}
DK cotton keeps the flower layers defined without producing the bulk of heavier blanket yarn. A 3.5 mm hook also creates a relatively compact fabric, which helps the square support its raised centre.
Buy the cream background yarn in one dye lot when possible. More than half of the visual surface is ivory, so even a small shade change is easier to detect there than among the varied flower colors.
Estimating Yarn for the Full Bedspread
Published granny-square blankets demonstrate that yarn consumption increases substantially once joining material and borders are counted separately. One current example uses 800 g for its squares plus another 210 g for joining alone, although that project uses a different yarn weight and size. :contentReference[oaicite:16]{index=16}
For this much larger raised-flower bedspread, treat the listed quantities as purchasing estimates rather than fixed consumption. Complete one blocked square with its leaves and flower, weigh it on a digital kitchen scale, then multiply that weight by 63.
Add at least the equivalent of several more squares for joining and border work. The deep scalloped edge consumes considerably more yarn than a simple single-crochet finishing round.
Changing the Blanket Size
The modular construction makes resizing primarily a matter of changing the number of squares. A five-by-seven arrangement gives 35 motifs, while six by eight requires 48. Seven by nine uses the 63 blocks specified here.
Keep the individual square at 22 cm if you want the flower-to-frame ratio to remain unchanged. Enlarging each cream background while leaving the flower at the same size creates too much empty space around the central bloom.
For a larger bed, add complete rows or columns before changing the motif. Published granny-square resources likewise scale blankets by altering the number of blocks in the layout. :contentReference[oaicite:17]{index=17}
Blocking Without Flattening the Flowers
Block the individual cream squares before assembly. Once all flowers are attached, full-surface pinning is no longer practical because the raised centres prevent the blanket from sitting completely flat against a blocking mat.
After joining, damp-block the structural grid and border only. Smooth the green seams with the hands and pin the outer cream edge to the target rectangle.
Reshape every flower after the blanket dries. Pull the largest petal layer outward, lift the middle layer slightly and separate any petals that became compressed during handling.
Finishing Checks
Lay the finished bedspread flat and inspect the square intersections first. Every green grid line should meet another seam cleanly at the corners without visible offsets.
Check the flowers from directly above. The raised blooms need similar overall diameters even though their colors vary, and all four leaf tips should remain visible around most motifs.
Examine the perimeter last. The miniature flower band should remain above the scalloped lace, while the final cream shells need to hang freely without curling underneath the blanket.
Conclusion
Measure one fully finished and blocked square before calculating the final bedspread dimensions, then record its weight as well as its width. Those two figures give you the most accurate basis for resizing and yarn purchasing. Photograph the completed grid from directly above to check flower distribution, green seam alignment and border symmetry. Save this crochet flower blanket pattern to Pinterest and share the finished bedspread on Instagram with #RaisedGardenFlowerBlanket. Reshape each outer petal before the final photograph rather than pressing the dimensional flowers flat. For another version, would you keep the muted blue flowers scattered through the pink grid or replace them with soft lavender blooms?
Sources
- Hooked by Robin — 2024 3D Flower Granny Square tutorial and square construction reference.
- Ravelry — 3D Flower Granny Square by Sarah Zimmerman: raised floral afghan-block reference.
- Just Be Crafty — 2026 3D Daisy Flower Granny Square Blanket: 11.5 cm blocked-square and blanket sizing reference.
- Dada’s Place — Primavera Flowers: cotton floral-square construction using a 3.5 mm hook and scalable motif layout.
- Maisie and Ruth — Flat Slip Stitch Seam: decorative granny-square joining method.









