Introduction
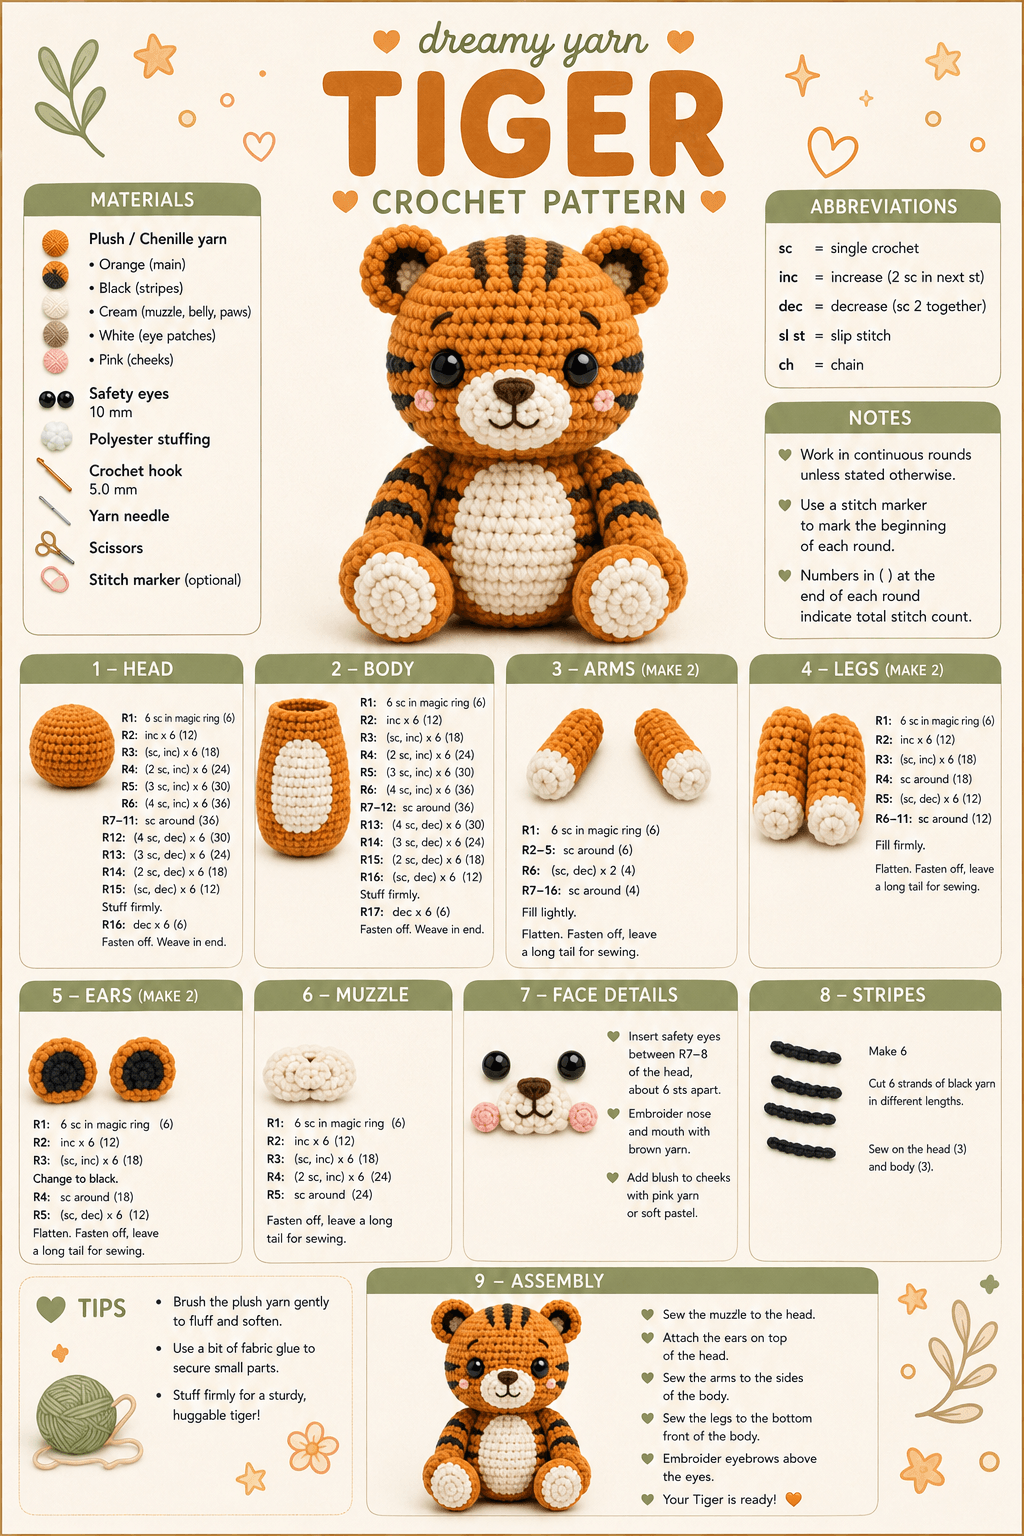
A tiger cub needs its forehead stripes to converge toward the nose rather than run as parallel bands across the skull. This tiger amigurumi crochet pattern uses plush chenille yarn, a 5 mm hook and 10 mm safety eyes to make a sitting tiger approximately 20 cm tall. The intermediate construction includes layered ears, a cream muzzle and belly, paw pads and individually positioned black stripes.
The Design: What Makes This Tiger Cub Different
The head uses a 36-stitch plateau because the face must remain broad enough for the central muzzle and paired cheek stripes without becoming oversized beside the body. Three narrow forehead markings point toward the centre of the face. That arrangement immediately separates this tiger cub crochet pattern from a generic orange cat.
Round ears contain dark inner panels rather than being worked entirely in orange. Cream is repeated on the muzzle, belly and paws, which breaks the orange body into clearly defined anatomical sections. The limbs stay compact so the large front-facing back feet frame the belly instead of hiding it. Stripe placement requires the most control. A common mistake in a crochet tiger with stripes is making every black marking the same width and length. Realistic visual balance comes from mirrored placement, not identical straight bars.
Project Info at a Glance
| Skill Level | Time | Finished Size | Hook | Best For |
|---|---|---|---|---|
| Intermediate | 8–10 hours | Approximately 20 cm seated | 5 mm | Safari collections, animal displays and supervised play |
Materials and Tools
Yarn
- Burnt orange — plush or chenille yarn — approximately 100 g — Himalaya Dolphin Baby, YarnArt Dolce or comparable plush yarn
- Black — matching plush yarn — approximately 15–20 g — for stripes and inner ears
- Cream — matching plush yarn — approximately 20–30 g — for muzzle, belly, eye patches and paw pads
- Dusty pink — plush yarn or smooth matching yarn — less than 5 g — for cheek patches
- Dark brown — smooth yarn or embroidery thread — less than 5 g — for nose and mouth
Tools
- 5 mm crochet hook
- Two 10 mm safety eyes
- Polyester stuffing
- Yarn needle
- Locking stitch marker
- Dressmaking pins
- Scissors
Replace plastic safety eyes with embroidered features when the finished tiger is intended for a child under three.
Abbreviations
- MR — magic ring
- sc — single crochet
- inc — two single crochet stitches in one stitch
- dec — invisible single crochet decrease
- sl st — slip stitch
- ch — chain
- hdc — half double crochet
- BLO — back loop only
- FLO — front loop only
An invisible decrease is worked through the front loops of the next two stitches before both are completed as one single crochet.
Pattern — Step by Step
Work three-dimensional parts in continuous spirals unless a section says otherwise. Move the stitch marker to the first stitch of each new round.
Head
Yarn: burnt orange — Source: original 36-stitch amigurumi construction.
R1: 6 sc in MR (6)
R2: inc ×6 (12)
R3: (sc, inc) ×6 (18)
R4: (2 sc, inc) ×6 (24)
R5: (3 sc, inc) ×6 (30)
R6: (4 sc, inc) ×6 (36)
R7–R14: sc around (36)
Do not install the eye washers yet. The cream eye patches must be positioned first so both safety-eye posts can pass through them and the orange head.
R15: (4 sc, dec) ×6 (30)
R16: (3 sc, dec) ×6 (24)
R17: (2 sc, dec) ×6 (18)
Stuff the upper half firmly, working small pieces around both eye posts after they have been installed.
R18: (sc, dec) ×6 (12)
R19: dec ×6 (6)
Fasten off. Thread through the remaining six front loops, pull closed and weave the tail through the head.
Eye Patches — Make 2
Yarn: cream — Source: standard flat-circle math.
R1: 6 sc in MR (6)
R2: inc ×6 (12)
Fasten off and leave a 20 cm sewing tail.
Flatten each circle into a shallow oval. Pin the patches between head R9 and R12 with approximately six visible orange stitches between their inner edges.
Push one 10 mm safety-eye post through the upper outer half of each cream patch and then through the head between R10 and R11. Fit the washers only after both eyes have been checked from directly in front.
Muzzle
Yarn: cream — Source: standard six-stitch shaping.
R1: 6 sc in MR (6)
R2: inc ×6 (12)
R3: (sc, inc) ×6 (18)
R4: (2 sc, inc) ×6 (24)
R5–R6: sc around (24)
R7: (2 sc, dec) ×6 (18)
Add a shallow layer of stuffing. Fasten off and leave a 30 cm tail.
Pin the muzzle across the centre of the lower face. Its upper edge should overlap the lower inner corners of the cream eye patches without covering either safety eye.
Nose
Yarn: dark brown.
R1: 6 sc in MR (6)
R2: inc ×6 (12)
Fasten off with a 15 cm tail. Fold the circle slightly into a rounded triangle as it is sewn to the upper centre of the muzzle.
Embroider one short vertical dark-brown line below the nose. Add two curved mouth sections measuring approximately 10 mm each.
Cheek Patches — Make 2
Yarn: dusty pink.
R1: 6 sc in MR (6)
R2: inc ×6 (12)
Fasten off and leave a 15 cm tail. Flatten each patch before attaching it outside the muzzle and below the nearest eye.
Outer Ears — Make 2
Yarn: burnt orange.
R1: 6 sc in MR (6)
R2: inc ×6 (12)
R3: (sc, inc) ×6 (18)
R4: (2 sc, inc) ×6 (24)
R5: sc around (24)
R6: (2 sc, dec) ×6 (18)
Do not stuff. Fasten off and leave a 25 cm sewing tail.
Inner Ears — Make 2
Yarn: black.
R1: 6 sc in MR (6)
R2: inc ×6 (12)
R3: (sc, inc) ×6 (18)
Fasten off with a 20 cm tail. Place one black circle against the front of each orange ear, leaving a visible orange border around the outer edge.
Sew the black layer down before attaching the ears to the head. Fold approximately 8 mm at the lower edge of each finished ear inward to create a shallow cup.
Body
Yarn: burnt orange — Source: original 36-stitch medium construction.
R1: 6 sc in MR (6)
R2: inc ×6 (12)
R3: (sc, inc) ×6 (18)
R4: (2 sc, inc) ×6 (24)
R5: (3 sc, inc) ×6 (30)
R6: (4 sc, inc) ×6 (36)
R7–R13: sc around (36)
R14: (4 sc, dec) ×6 (30)
R15: sc around (30)
R16: (3 sc, dec) ×6 (24)
R17: sc around (24)
R18: (2 sc, dec) ×6 (18)
Stuff the lower body firmly enough to form a stable seated base. Keep the upper section slightly softer so it can accept the head seam without bulging.
R19: (sc, dec) ×6 (12)
R20: dec ×6 (6)
Fasten off and close the remaining opening.
Cream Belly Patch
Yarn: cream — work in turned rows.
Ch 7.
Row 1: sc in second ch from hook and across, ch 1, turn (6)
Row 2: inc, 4 sc, inc, ch 1, turn (8)
Row 3: inc, 6 sc, inc, ch 1, turn (10)
Rows 4–8: sc across, ch 1, turn (10)
Row 9: dec, 6 sc, dec, ch 1, turn (8)
Row 10: dec, 4 sc, dec (6)
Fasten off and leave a 30 cm sewing tail. Pin the patch centrally to the body with its narrow upper edge pointing toward the neck.
Sew around the full perimeter without stuffing. Smooth the fabric after every few stitches so the patch remains flat against the curved torso.
Arms / Front Legs — Make 2
Begin with cream for the paw, then change to burnt orange.
R1: 6 sc in MR (6)
R2: inc ×6 (12)
R3: sc around (12)
Change to burnt orange.
R4–R6: sc around (12)
R7: (2 sc, dec) ×3 (9)
R8–R12: sc around (9)
Stuff the paw and lower half lightly. Leave the upper third unstuffed.
Flatten the opening and crochet through both layers with 4 sc. Fasten off and leave a 25 cm sewing tail.
Back Legs — Make 2
Begin with cream for the forward-facing paw pad, then change to burnt orange.
R1: 6 sc in MR (6)
R2: inc ×6 (12)
R3: (sc, inc) ×6 (18)
R4: sc around (18)
Change to burnt orange.
R5–R7: sc around (18)
R8: (sc, dec) ×6 (12)
R9–R12: sc around (12)
Stuff the foot firmly and the upper leg to medium firmness. Flatten the upper opening and crochet through both layers with 6 sc.
Fasten off, leaving a 30 cm attachment tail.
Cream Paw Pads — Make 2
Yarn: cream.
R1: 6 sc in MR (6)
R2: inc ×6 (12)
R3: (sc, inc) ×6 (18)
Fasten off and leave a 20 cm tail. Sew one circle centrally to the front of each back foot.
The visible orange border should remain approximately 5–8 mm wide around each pad.
Forehead Stripes — Make 3
Yarn: black — surface crochet or embroidered chain stitch.
Cut three black strands approximately 30 cm long. Work one central stripe from head R4 toward R8, measuring approximately 30 mm.
Add one stripe to each side. Start those stripes approximately 10 mm outward from the centre stripe and angle their lower ends toward the nose.
Do not pull the black yarn tightly enough to dent the stuffed head.
Side Face Stripes — Make 4
Yarn: black.
Create two markings on each cheek using surface slip stitches or short embroidered chain stitches.
Place the upper pair around head R10–R11 and the lower pair around R12–R13. Each stripe should measure roughly 20–25 mm, with its inner end pointing toward the muzzle.
Arm Stripes — Make 6
Yarn: black.
Add three short stripes to each orange arm after stuffing but before attachment.
Position them around approximately arm R5, R7 and R9. Each marking should cover about one third to one half of the visible arm circumference rather than forming a complete black ring.
Body Side Stripes — Make 4
Yarn: black.
Add two stripes to each side of the body around approximately R10 and R13. Stop every stripe before it reaches the cream belly patch.
Mirror the left and right markings by counting stitches outward from the central belly line.
Tail
Begin with black, then alternate black and burnt orange.
R1: 6 sc in MR (6)
R2: inc ×6 (12)
R3: sc around in black (12)
R4–R5: sc around in burnt orange (12)
R6: sc around in black (12)
R7–R8: sc around in burnt orange (12)
R9: sc around in black (12)
R10–R11: sc around in burnt orange (12)
R12: sc around in black (12)
R13–R15: sc around in burnt orange (12)
Stuff very lightly as the tube grows. Keep the final 3 cm nearly unstuffed so the tail can curve against the body.
Flatten the opening and crochet through both layers with 6 sc. Fasten off and leave a 25 cm sewing tail.
Assembly
- Place the head centrally on the body and sew twice around the neck circumference so the large muzzle cannot pull the head forward.
- Pin both ears near the upper sides of the head and measure from the central forehead stripe to each inner ear edge before sewing.
- Attach the cream eye patches, install the safety eyes, then sew the muzzle centrally beneath them.
- Add the nose, mouth and pink cheek patches before completing the remaining face stripes.
- Sew the arms to opposite sides of the upper body, keeping the three black markings on each arm visible from the front.
- Pin the back legs across the lower front of the torso with both cream paw pads facing forward.
- Place the tiger on a flat surface and adjust the legs until the body remains upright before making permanent attachment stitches.
- Sew the striped tail to the centre-back side of the body and curve it around one hip rather than leaving it projecting directly backward.
- Compare the three forehead stripes, four cheek stripes and paired body markings from directly in front; correct any stripe that crosses the centre line.
- Shape both ears, align the paw pads and weave every structural tail through at least five internal stitches before trimming.
The completed tiger should sit without support with its muzzle centred, forehead stripes converging toward the face and both cream paw pads facing forward.
7 Technical Tips
- Stripe distortion: A black surface stitch pulled too tightly can create a groove across the orange head. Leave approximately 2 mm of movement in each embroidered stripe before weaving the end into the stuffing.
- Forehead asymmetry: A side stripe placed one stitch farther from the centre becomes conspicuous beside the vertical middle marking. Count equal stitches outward from the central stripe before securing the two outer stripes.
- Eye-placement drift: Large round eyes make a one-round height difference visible immediately. Insert both 10 mm eye posts between head R10 and R11 and count approximately six orange stitches between their inner edges.
- Visible decrease bars: Standard decreases can create raised horizontal marks beneath the cheeks. Work front-loop invisible decreases from head R15 through R19.
- Paw-pad rotation: A back leg turned by roughly 10 degrees will point its cream pad toward the floor. Mark the upper centre of each foot before pinning the legs to the body.
- Uneven ear placement: A height difference above 5 mm makes the head appear tilted even when the eyes are level. Measure both ear bases from the middle forehead stripe before sewing.
- Chenille tail failure: A short attachment end can slip through plush stitches after handling. Weave the tail yarn through at least five internal body stitches, reverse direction and pass through three additional stitches before trimming.
Conclusion
Check the black markings before trimming the last yarn ends because stripe direction determines whether the finished face reads clearly as a tiger rather than an orange cat. Place the figure directly in front of you and compare the three forehead stripes, paired cheek markings, ear height and cream paw-pad angles. Crochet the first ear next and use it as the size reference for its matching piece before working the remaining details. Save this tiger amigurumi crochet pattern to Pinterest and share the finished cub on Instagram with #PlushTigerAmigurumi. On this tiger, would you make the forehead stripes longer or keep all three above the eye line?









