Introduction
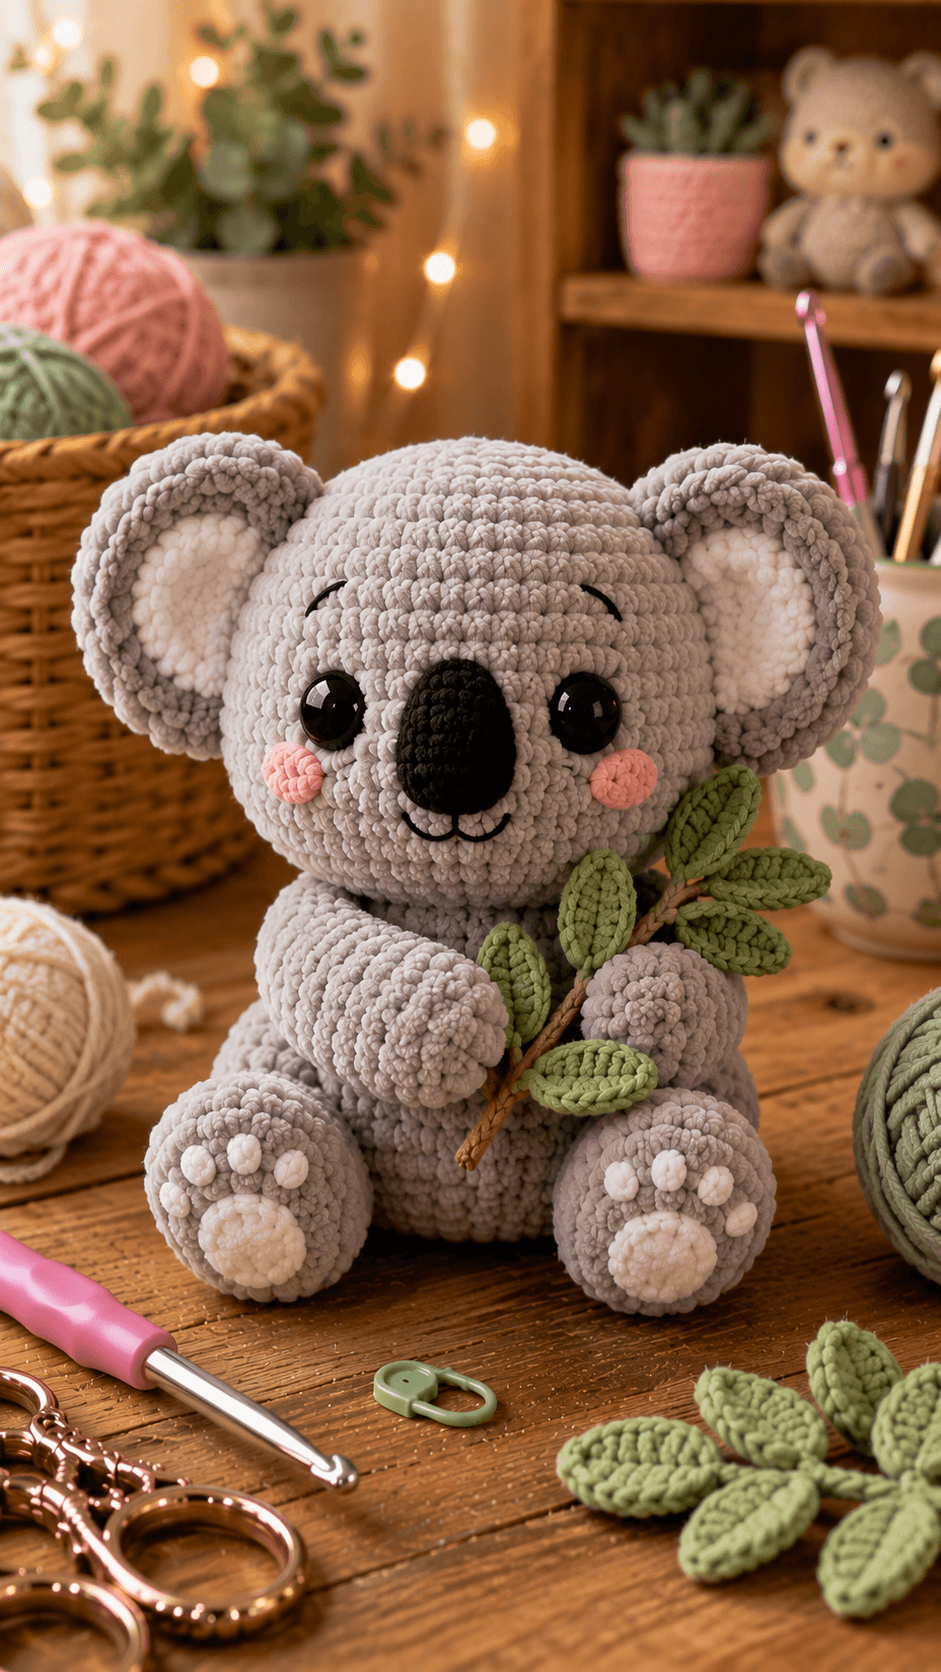
A koala’s ears need almost as much visual width as its head, while the black nose must dominate the centre of the face. This koala amigurumi crochet pattern uses super-bulky chenille, a 5 mm hook and a 42-stitch head for a seated plush about 28 cm tall. The project includes oversized ears, white paw pads and a crocheted eucalyptus branch. Intermediate shaping, appliqué work and sewn assembly are required.
The Design: What Makes This Eucalyptus Koala Different
The head expands to 42 stitches because the oversized ears and large nose need a broad facial base. Its body stops at 36 stitches, producing a narrower torso between the large rear feet. Separate white inner-ear panels preserve a thick gray border, while the arms are long enough to cross toward the centre and hold the eucalyptus stem. The paw details also matter. Small white toe bumps sit above larger white pads instead of using one plain color-change section. That construction gives this plush koala crochet pattern more depth through the feet. A common koala-making error is placing the ears too high. Their inner edges should begin near the upper sides of the head, while most of each circle projects horizontally beyond the skull. The nose stays vertical and noticeably taller than the space between the eyes.
Project Information at a Glance
| Skill Level | Time | Finished Size | Hook | Best For |
|---|---|---|---|---|
| Intermediate | 10–13 hours | Approx. 28 cm seated | 5 mm | Large plush and woodland display figure |
A current chunky koala pattern lists a finished height of approximately 28 cm. Super-bulky chenille koala guidance also documents a 5 mm crochet hook, while published koala patterns use safety eyes up to 18 mm. These measurements provide practical reference points for the scale used here.
Materials and Tools
Yarn
- Soft gray — super-bulky chenille — approximately 120–160 g — head, body, ears and limbs
- White — matching chenille — approximately 25–35 g — inner ears and paw pads
- Black — matching chenille or smooth bulky yarn — approximately 15–20 g — nose
- Sage green — worsted or bulky yarn — approximately 10–15 g — eucalyptus leaves
- Medium brown — worsted yarn scrap — branch stem
- Blush pink — yarn scrap — cheeks
- Black embroidery yarn — eyebrows and mouth
Tools
- 5 mm crochet hook
- Two 18 mm black safety eyes
- Polyester toy stuffing
- Large-eye yarn needle
- Locking stitch marker
- Dressmaking pins
- Scissors
Check the eyes against the completed head before installing the locking washers. Replace plastic eyes with embroidered eyes when the finished plush will be handled by a young child who could detach small components.
Abbreviations
- MR — magic ring
- sc — single crochet
- inc — two single crochet stitches in one stitch
- dec — decrease over two stitches
- sl st — slip stitch
- ch — chain
- hdc — half double crochet
- BLO — back loop only
- FLO — front loop only
An invisible decrease is worked through the front loops of the next two stitches before completing them together as one single crochet.
Pattern — Step by Step
Work in continuous spiral rounds unless a section states otherwise. Mark the first complete stitch of each round and confirm the bracketed stitch total before continuing.
Head
Yarn: soft gray — original six-stitch sphere calculation.
R1: 6 sc in MR (6)
R2: inc × 6 (12)
R3: (sc, inc) × 6 (18)
R4: (2 sc, inc) × 6 (24)
R5: (3 sc, inc) × 6 (30)
R6: (4 sc, inc) × 6 (36)
R7: (5 sc, inc) × 6 (42)
R8–R14: sc around (42)
R15: (5 sc, dec) × 6 (36)
R16: (4 sc, dec) × 6 (30)
Install the 18 mm eyes between R11 and R12 with approximately nine visible stitches between the stems. Lock the washers now and begin stuffing in small sections.
R17: (3 sc, dec) × 6 (24)
R18: (2 sc, dec) × 6 (18)
R19: (sc, dec) × 6 (12)
R20: dec × 6 (6)
Fasten off. Pass a 20 cm tail through the front loops of the final six stitches, pull closed and hide the yarn inside the head.
Body
Yarn: soft gray.
R1: 6 sc in MR (6)
R2: inc × 6 (12)
R3: (sc, inc) × 6 (18)
R4: (2 sc, inc) × 6 (24)
R5: (3 sc, inc) × 6 (30)
R6: (4 sc, inc) × 6 (36)
R7–R12: sc around (36)
R13: (4 sc, dec) × 6 (30)
R14–R15: sc around (30)
R16: (3 sc, dec) × 6 (24)
R17: (2 sc, dec) × 6 (18)
Stuff the lower body firmly enough to support the head. Keep the upper section softer at the neck.
R18: (sc, dec) × 6 (12)
R19: dec × 6 (6)
Fasten off and leave a 45 cm tail for joining the body to the head.
Outer Ears — Make Two
Yarn: soft gray.
R1: 6 sc in MR (6)
R2: inc × 6 (12)
R3: (sc, inc) × 6 (18)
R4: (2 sc, inc) × 6 (24)
R5: (3 sc, inc) × 6 (30)
R6: sc around (30)
Do not stuff. Flatten each piece into a broad circle and pinch the lower edge slightly inward.
Fasten off and leave a 35 cm sewing tail.
White Inner Ears — Make Two
Yarn: white.
R1: 6 sc in MR (6)
R2: inc × 6 (12)
R3: (sc, inc) × 6 (18)
R4: (2 sc, inc) × 6 (24)
Fasten off and leave a 25 cm tail. Sew each white circle onto a gray ear while leaving approximately one gray stitch visible around the outer edge.
Black Nose
Yarn: black.
R1: 6 sc in MR (6)
R2: inc × 6 (12)
R3: (sc, inc) × 6 (18)
R4: (2 sc, inc) × 6 (24)
R5–R7: sc around (24)
R8: (2 sc, dec) × 6 (18)
Stuff lightly. Compress the piece from side to side so it becomes a tall vertical oval instead of a sphere.
Fasten off and leave a 35 cm sewing tail.
Cheek Patches — Make Two
Yarn: blush pink.
R1: 6 sc in MR (6)
R2: inc × 6 (12)
Slip stitch into the next stitch. Fasten off and leave a 15 cm tail. Shape each patch into a horizontal oval during sewing.
Front Arms — Make Two
Yarn: soft gray.
R1: 6 sc in MR (6)
R2: inc × 6 (12)
R3: (sc, inc) × 6 (18)
R4–R6: sc around (18)
R7: (sc, dec) × 6 (12)
R8–R12: sc around (12)
R13: dec × 6 (6)
Stuff through R7 only. Keep the upper section flexible so the arms can wrap around the eucalyptus branch.
Fasten off and leave a 35 cm sewing tail.
Back Legs — Make Two
Yarn: soft gray.
R1: 6 sc in MR (6)
R2: inc × 6 (12)
R3: (sc, inc) × 6 (18)
R4: (2 sc, inc) × 6 (24)
R5–R8: sc around (24)
R9: (2 sc, dec) × 6 (18)
R10: sc around (18)
R11: (sc, dec) × 6 (12)
R12: dec × 6 (6)
Stuff firmly through R8 and flatten each finished leg into a broad forward-facing oval.
Fasten off and leave a 35 cm sewing tail.
Large Paw Pads — Make Four
Yarn: white.
R1: 6 sc in MR (6)
R2: inc × 6 (12)
R3: (sc, inc) × 6 (18)
Fasten off and leave a 20 cm sewing tail. Use two pads on the rear feet and two smaller-looking applications on the hand areas if required by placement.
Toe Pads — Make Twelve
Yarn: white.
R1: 6 sc in MR (6)
Slip stitch into the first stitch and fasten off with a 10–12 cm tail. Make three toe bumps for each visible paw.
Eucalyptus Branch Stem
Yarn: brown. Work in rows.
Row 1: ch 31, sl st in second chain from hook and across (30)
Fasten off. For a thicker stem, crochet a second identical chain strip and sew the two strips together along their long edges.
Eucalyptus Leaves — Make Six
Yarn: sage green.
Ch 8.
Starting in the second chain from the hook: sl st, sc, hdc, 2 hdc, sc, sl st; work 3 sc into the final chain and continue along the opposite side with sl st, sc, 2 hdc, hdc, sc, sl st.
Fasten off and leave a 15 cm attachment tail.
Fold each leaf lightly along the starting chain to create a visible centre ridge.
Assembly
- Centre the head above the body and sew around the neck twice using the 45 cm body tail. Add one hidden stitch at the rear to reduce forward rotation.
- Attach the white inner sections to the gray ears, then sew both completed ears across Head R4–R8. Their outer edges should project substantially beyond the head.
- Position the black nose vertically across Head R11–R15. Add the last pinch of stuffing before closing the lower part of the seam.
- Sew the pink cheek patches below and outside the eyes. Embroider two shallow eyebrows and a short curved mouth below the nose with smooth black yarn.
- Attach the arms across Body R9–R14. Angle both lower ends toward the centre so they can hold the branch.
- Sew the rear legs across Body R4–R9 with their broad faces directed forward. Test the seated balance before tightening either seam.
- Attach one large white pad and three small toe pads to each rear foot. Add matching white details to the visible hand areas where desired.
- Sew three eucalyptus leaves along each side of the brown stem, alternating their angles so the branch does not form two parallel rows.
- Place the branch diagonally across the chest and wrap the arms around it. Tack each arm to the stem with two hidden gray stitches if the branch will remain permanently attached.
- Check the ears, nose, paws and branch from the front and side views, then weave every structural tail through at least three stitch directions.
The completed koala should sit upright on both rear feet with the eucalyptus branch crossing diagonally between the front arms.
7 Technical Tips
- Ear droop: A 30-stitch chenille ear can rotate downward when sewn through too few stitches. Attach each pinched base across at least 8–10 head stitches.
- Head overstuffing: Packing the 42-stitch sphere too firmly pushes the eyes forward and opens gaps between plush stitches. Stop when finger pressure creates an indentation of roughly 5 mm.
- Decrease holes: Conventional decreases can expose filling through chenille yarn. Work every head and body reduction through the front loops of the next two stitches.
- Late eye fitting: An 18 mm washer becomes difficult to reach after the head opening drops below 24 stitches. Lock both eyes before completing Head R17.
- Nose distortion: Heavy stuffing converts the black vertical oval into a ball. Fill it only until the centre projects approximately 2–2.5 cm from the face.
- Leg imbalance: A difference of 5 mm between rear-leg attachment heights can make the koala lean. Pin both legs and test the plush on a hard surface before sewing.
- Branch rotation: Holding the eucalyptus at only one point allows it to pivot out of the arms. Tack the stem at two separated arm-contact points approximately 4–6 cm apart.
Getting the Koala Ears Right
The ears create most of the koala silhouette. Each outer section reaches 30 stitches, which is deliberately large relative to the 42-stitch head. Smaller ears reduce the side width and make the face resemble a conventional bear.
Keep each ear flat and completely unstuffed. The chenille already supplies enough thickness. Sew the white inner circle before attaching the ear to the head so the needle can pass freely through both layers.
Pin both ears at the same time. Their inner bases should sit near the upper sides of the crown, while the outer edges extend almost horizontally. If one ear points upward, shift its lower attachment point down one head round.
Shaping the Large Koala Nose
A large black nose separates a koala from other gray bear-shaped amigurumi. This koala amigurumi crochet pattern therefore gives the nose a 24-stitch maximum rather than relying on a small embroidered triangle.
Pinch the finished piece vertically before sewing. Its upper edge should begin between the eyes and its lower edge should extend toward the mouth. Keep enough gray face visible on both sides so the nose does not touch either eye.
Chenille makes the nose look larger than the stitch count suggests. Remove stuffing if the black piece begins covering the inner corners of the eyes.
White Paw Pad Placement
The photographed koala uses separate white pads rather than plain gray feet. A central 18-stitch pad fills the lower paw while three smaller circles create individual toe bumps above it.
Pin the three toe circles before attaching the large pad. The small pieces should form a shallow arc, not a straight horizontal line. Keep several millimetres of gray visible between the toes and the outer foot edge.
Sewing the pads before attaching the legs to the body gives better needle access and makes it easier to match the left and right arrangements.
Building the Eucalyptus Branch
The branch is the major photo-specific accessory in this chenille koala amigurumi. Six sage-green leaves create enough foliage to read clearly without hiding the torso and paws.
Use a thinner yarn for the leaves when possible. Heavy super-bulky leaves can overpower the arms and make the branch difficult to hold. Worsted or bulky yarn creates flatter leaves with a clearer centre ridge.
Alternate leaf positions along the brown stem. Two or three leaves may overlap slightly, but the branch should still show between them. Leave the lowest several centimetres bare so it can rest between the paws.
Controlling the Seated Shape
The body reaches only 36 stitches while the rear legs reach 24 each. That proportion creates the broad lower stance visible in the photograph.
Do not position the rear legs directly beneath the torso. Move them outward until both white paw pads remain visible from the front. The body should make light contact with the work surface between the feet.
Attach the arms after the rear legs are stable. This order prevents the diagonal branch from influencing the seated balance while the main structural pieces are still loose.
Working with Chenille Yarn
A current free koala guide recommends a 5 mm hook for super-bulky chenille, while published chunky koalas reach around 28 cm using heavier yarn. The 5 mm hook used here is therefore suitable for producing the dense plush fabric required by this scale.
Insert a locking stitch marker through the complete first stitch rather than one fuzzy surface strand. Chenille pile can hide the top loops, particularly through the 36-, 30- and 24-stitch decrease rounds.
If the magic-ring strand begins stripping when tightened, run a smooth scrap yarn through the centre and pull that reinforcing strand instead. Leave it inside the component after stuffing.
Eye and Cheek Placement
The eyes sit relatively close to the nose but remain far enough apart to expose gray yarn on both sides of the black centre piece. Mark both positions with pins before installing either safety eye.
The pink cheek circles sit below the eyes and outside the nose width. Pull each one horizontally while sewing to create a low oval rather than a perfect round patch.
Embroidered eyebrows should curve gently above the eyes. Avoid heavy chenille for these lines; smooth black yarn produces a thinner mark without distorting the gray fabric.
Adjusting Finished Size
Published koala patterns range from approximately 7 cm miniatures through 16.5–21 cm standard designs to chunky versions around 28 cm. The photographed construction sits near the larger end of that range because of its thick chenille and oversized feet.
For a smaller koala, retain the written stitch totals and switch to bulky yarn with a 4–4.5 mm hook. Select eye diameter only after completing the 42-stitch head plateau.
For a larger plush, move to thicker blanket yarn before increasing the head beyond 42 stitches. Another increase round would change the proportions of the ears, nose and facial spacing as well as the overall size.
Finishing Checks
Place the completed koala on a level surface before hiding the final sewing tails. Both rear feet should touch evenly, and the white pads should face forward at matching angles.
View the head directly from the front. The ear widths should be balanced, the black nose must remain on the vertical centre line and both pink cheeks should sit at equal heights.
Inspect the eucalyptus branch last. At least four leaves should remain fully visible from the front while both paws appear to contact the stem.
Conclusion
Measure the finished koala from the seated base to the highest point of the ears and record the result beside the yarn, hook and eye size used. Photograph the face straight on as the next technical check; that view exposes uneven ears, a tilted nose or paw pads rotated away from the viewer. Save this koala amigurumi crochet pattern to Pinterest and share the finished plush on Instagram with #EucalyptusKoalaPlush. Keep the branch diagonal so the leaves remain visible between both arms. For another version, would you retain six eucalyptus leaves or extend the branch with two additional leaves above the right paw?
Sources
- DIY Fluffies — Free Koala Crochet Pattern: super-bulky chenille recommendation with 5 mm hook.
- The Loopy Lamb — Kaya the Koala: 18 mm safety-eye reference.
- Furls Crochet / Storyland Amis — Koala: 16.5 cm finished size, worsted yarn, 4 mm hook and 15 mm eyes.
- Ravelry — Amigurumi Koala by Isabella Gresswell: 21 cm finished-size reference.









