Introduction
An owl’s facial discs have to surround the eyes without merging into one white mask. This owl amigurumi crochet pattern uses super-bulky chenille, a 5 mm hook and two separate 30-stitch face circles to reproduce that structure. The finished owl measures approximately 22–26 cm tall and uses intermediate shaping, surface texture and sewn assembly. Broad wings and a dense lower body also give the figure a stable display base.
The Design: What Makes This Woodland Owl Different
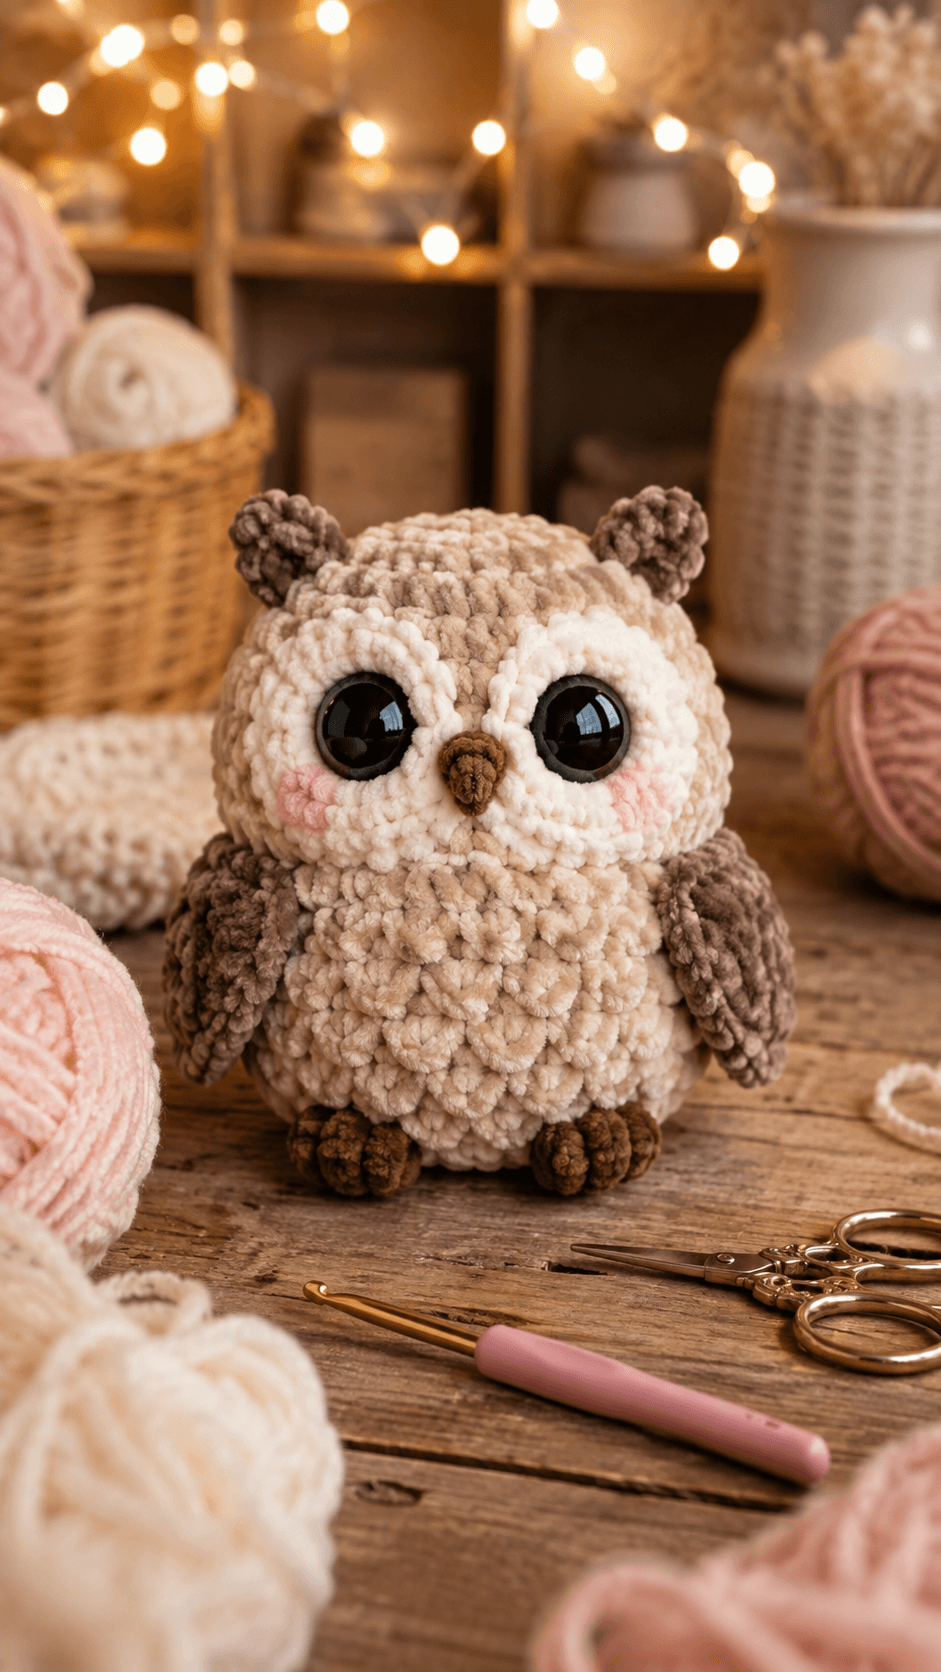
The facial discs dominate the design, so each one reaches 30 stitches while the head itself reaches a 36-stitch plateau. That ratio leaves only a narrow cream border around the eyes and reproduces the enlarged face shown in the photograph. Short taupe ear tufts sit close to the crown rather than extending into pointed horn shapes. The wings use flattened oval forms attached vertically beside the torso, while the feet remain compact so they do not compete with the round body. Another defining feature is the chest. Layered surface loops create a feathered centre without changing the structural body rounds. A frequent mistake in a plush owl crochet pattern is placing the facial discs too far apart. Their inner edges should almost meet beside the beak while both outer edges remain inside the head profile.
Project Information at a Glance
| Skill Level | Time | Finished Size | Hook | Best For |
|---|---|---|---|---|
| Intermediate | 8–11 hours | Approx. 22–26 cm tall | 5 mm | Large woodland plush and display figure |
Materials and Tools
Yarn
- Warm cream — super-bulky chenille/velvet — approximately 100–140 g — head, body and chest
- White — matching chenille — approximately 25–35 g — facial discs
- Taupe brown — matching chenille — approximately 30–40 g — wings, ears, crown and feet
- Dark brown — matching yarn scrap — beak
- Blush pink — matching yarn scrap — cheeks
Tools
- 5 mm crochet hook
- Two 18 mm black safety eyes
- Polyester toy stuffing
- Large-eye yarn needle
- Locking stitch marker
- Dressmaking pins
- Scissors
Test the eye diameter against the completed facial discs before locking the washers. Replace plastic eyes with embroidered eyes when the finished object will be given to a child who may pull or chew detachable components.
Abbreviations
- MR — magic ring
- sc — single crochet
- inc — two single crochet stitches in one stitch
- dec — decrease over two stitches
- sl st — slip stitch
- ch — chain
- hdc — half double crochet
- BLO — back loop only
- FLO — front loop only
An invisible decrease is worked through the front loops of the following two stitches before completing them together as one single crochet.
Pattern — Step by Step
Work in a continuous spiral unless rows or joined rounds are specified. Place a locking marker in the first complete stitch of each round and verify every bracketed stitch total before continuing.
Head
Yarn: warm cream — original six-stitch sphere calculation.
R1: 6 sc in MR (6)
R2: inc × 6 (12)
R3: (sc, inc) × 6 (18)
R4: (2 sc, inc) × 6 (24)
R5: (3 sc, inc) × 6 (30)
R6: (4 sc, inc) × 6 (36)
R7–R13: sc around (36)
R14: (4 sc, dec) × 6 (30)
Pin both completed white facial discs now. Pass each safety-eye stem through its white disc and then through the head between R10 and R11. Leave approximately six visible stitches between the eye stems. Lock the washers before continuing.
R15: (3 sc, dec) × 6 (24)
R16: (2 sc, dec) × 6 (18)
R17: (sc, dec) × 6 (12)
R18: sc around (12)
R19: dec × 6 (6)
Add stuffing gradually after R14. Shape the front around the eye hardware rather than forcing one large piece of stuffing behind both eyes.
Fasten off. Leave a 25 cm tail, pass it through the six front loops and close the opening.
Body
Yarn: warm cream.
R1: 6 sc in MR (6)
R2: inc × 6 (12)
R3: (sc, inc) × 6 (18)
R4: (2 sc, inc) × 6 (24)
R5: (3 sc, inc) × 6 (30)
R6: (4 sc, inc) × 6 (36)
R7–R12: sc around (36)
R13: (4 sc, dec) × 6 (30)
R14: sc around (30)
R15: (3 sc, dec) × 6 (24)
R16: (2 sc, dec) × 6 (18)
Stuff the lower two-thirds firmly. Keep the neck-facing section slightly softer so the head sits against it without a visible ridge.
R17: (sc, dec) × 6 (12)
R18: dec × 6 (6)
Fasten off and leave a 40 cm tail for joining the body to the head.
White Facial Discs — Make Two
Yarn: white.
R1: 6 sc in MR (6)
R2: inc × 6 (12)
R3: (sc, inc) × 6 (18)
R4: (2 sc, inc) × 6 (24)
R5: (3 sc, inc) × 6 (30)
Slip stitch into the next stitch and fasten off with a 35 cm sewing tail.
Keep each disc flat. Stretch it slightly vertically before pinning so the white area frames the eye rather than forming a perfect circle.
Beak
Yarn: dark brown.
R1: 6 sc in MR (6)
R2: sc around (6)
R3: (sc, inc) × 3 (9)
R4: sc around (9)
R5: (sc, dec) × 3 (6)
Add only a tiny pinch of stuffing. Pinch the lower end so the beak tapers into a short point.
Fasten off and leave a 20 cm sewing tail.
Ear Tufts — Make Two
Yarn: taupe brown.
R1: 6 sc in MR (6)
R2: inc × 6 (12)
R3–R4: sc around (12)
R5: (sc, dec) × 4 (8)
R6: sc around (8)
Stuff very lightly. Press each piece into a short rounded oval rather than a pointed cone.
Fasten off and leave a 25 cm tail.
Wings — Make Two
Yarn: taupe brown.
R1: 6 sc in MR (6)
R2: inc × 6 (12)
R3: (sc, inc) × 6 (18)
R4–R7: sc around (18)
R8: (sc, dec) × 6 (12)
R9–R11: sc around (12)
R12: dec × 6 (6)
Stuff only R1–R6. Leave the upper section soft so the wing can flatten along the body.
Fasten off and leave a 30 cm sewing tail.
Feet — Make Two
Yarn: taupe or dark brown.
R1: 6 sc in MR (6)
R2: inc × 6 (12)
R3: (sc, inc) × 6 (18)
R4: sc around (18)
R5: (sc, dec) × 6 (12)
R6: dec × 6 (6)
Stuff to medium firmness. Flatten each piece from top to bottom so the owl rests on a broad base rather than two round balls.
Fasten off and leave a 25 cm sewing tail.
Cheek Patches — Make Two
Yarn: blush pink.
R1: 6 sc in MR (6)
R2: inc × 6 (12)
Slip stitch into the next stitch. Fasten off with a 15 cm tail. Pull the circle gently into a horizontal oval during attachment.
Textured Chest Base
Yarn: warm cream.
R1: 6 sc in MR (6)
R2: inc × 6 (12)
R3: (sc, inc) × 6 (18)
R4: (2 sc, inc) × 6 (24)
Fasten off and leave a 35 cm tail. Stretch the circle vertically before pinning it to the centre of the torso.
Chest Feather Loops
Yarn: warm cream. Work onto the completed chest base.
Join yarn near the lower edge of the chest base. Work the following surface repeat into selected stitches:
Surface repeat: sl st into base, ch 5, sl st into the same base stitch.
Repeat across the lower section in staggered rows, spacing loops approximately one base stitch apart. Work three to four rows of loops and reduce the number of loops toward the upper chest.
Fasten off and hide both yarn tails behind the chest panel.
Assembly
- Pin the head centrally above the body. Sew around the neck twice with the long body tail and add one hidden rear anchor stitch to stop the heavy head rotating forward.
- Position both white facial discs so their inner edges nearly meet between the eyes. Sew around each outer perimeter while leaving the area directly around each safety eye flat.
- Place the brown beak vertically between the lower inner edges of the facial discs. Its top should begin near the eye line and its tapered end should point toward the body.
- Attach the pink cheek patches below and slightly outside the eyes. Keep both patches on the same head round and clear of the beak seam.
- Sew the two taupe ear tufts across Head R3–R6. Leave approximately 6–8 stitches between their inner bases so the head retains a rounded crown.
- Attach one wing to each side across Body R9–R15. Sew only the upper and inner edges so the rounded lower wing remains slightly raised from the torso.
- Sew the two feet across Body R3–R7 at the base. Set the owl on a hard surface and adjust both feet until the body remains vertical before tightening the seams.
- Pin the chest base to the body centre from approximately Body R7 to R14. Sew around its perimeter without trapping the decorative loops beneath the seam.
- Lift and separate the surface feather loops with the yarn needle so they overlap in staggered rows rather than forming one compact cluster.
- Check the owl from the front and both sides, then weave every structural yarn tail through at least three different stitch directions before trimming.
The completed owl should sit upright on both feet with the wings framing the body and the white facial discs remaining fully visible beneath the ear tufts.
7 Technical Tips
- Facial-disc overlap: If the two 30-stitch circles overlap by more than about 1 cm, the central beak disappears between them. Pin both discs and the beak simultaneously before sewing any of the three pieces.
- Head overstuffing: Packing the sphere rigidly pushes the safety-eye washers forward and distorts the white discs. Stop when firm finger pressure produces an indentation of roughly 5 mm.
- Invisible-decrease holes: Plush yarn can separate around standard decreases and reveal filling. Work every head and body reduction through the two front loops while maintaining the same loop height as neighboring stitches.
- Late eye installation: An 18 mm washer becomes difficult to reach after the head opening falls below 24 stitches. Fit both eyes and lock the washers before completing Head R15.
- Wing rotation: Sewing a wing only at its top allows the lower section to swing backward. Anchor each wing along at least 4–5 cm of its inner edge while leaving the outer edge free.
- Foot imbalance: A difference of approximately 5 mm in foot height can make the round owl lean. Pin both feet at the same time and test the figure on a level surface before permanent attachment.
- Chest-loop crowding: Surface loops placed in every stitch create a dense mat instead of layered feathers. Leave roughly one base stitch between neighboring five-chain loops and stagger the next row.
Getting the Owl Face Proportions Right
The facial discs control this owl amigurumi crochet pattern more than any other decorative component. Each white piece reaches 30 stitches against a 36-stitch head, so only a narrow section of the cream head remains visible around the outside. That proportion is intentional.
Place the safety eyes inside the discs before sewing the circles permanently. The black eye rim should remain surrounded by white yarn on all sides. If an 18 mm eye nearly touches the cream head, move the entire disc outward by one stitch rather than shifting the eye stem toward the beak.
Keep the inner disc edges close. A wide cream strip between them changes the expression and reduces the characteristic owl facial-mask effect. The brown beak fills the small remaining vertical gap.
Shaping the Beak
The beak is much smaller than the eyes. Five rounds are enough because increasing its size would compete with the facial discs. Stuff it only enough to hold the tapered shape.
Pin the upper edge between the lower inner sections of the white discs. The point should end above the lower edge of the cheek patches. A beak positioned too low leaves an empty vertical space between the eyes.
Do not flatten the piece completely. A slight projection is useful because it separates the dark brown beak from the surrounding cream and white chenille.
Building the Textured Owl Chest
The photographed owl has a visibly raised central chest rather than one smooth cream torso. A separate 24-stitch base provides a controlled area for surface decoration and prevents loop stitches from changing the structural body count.
Start the feather loops near the lower edge and work upward. Each loop uses five chains secured into the same base stitch. Place subsequent rows slightly higher and between the loops beneath them.
Keep the upper chest less dense. Fewer loops near the neck create a gradual transition into the head instead of one rectangular textured panel.
Wing Position and Shape
Each wing reaches an 18-stitch maximum and then narrows toward its attachment end. This produces a broad lower wing similar to the side shapes in the photograph.
Attach the upper wing near the head-to-body seam and angle its long axis almost vertically. A horizontal wing reads as an extended bird wing rather than the folded resting position shown here.
Leave part of the outer edge unsewn. That slight separation creates a shadow line and prevents the taupe wing from disappearing against the cream torso.
Ear Tuft Placement
The two brown crown pieces are deliberately short and rounded. Realistic long-eared owl tufts would change the silhouette substantially, while the supplied figure uses compact rounded forms.
Place them inside the widest points of the head rather than at the extreme outer edges. Both pieces should remain visible above the white facial discs without extending far beyond the head.
Minimal stuffing is enough. Firm filling creates two cylindrical horns and shifts the character away from the soft rounded style of the photograph.
Working with Chenille Yarn
Super-bulky chenille produces substantial physical size from relatively modest stitch counts. That is why a 36-stitch head can still create a medium-to-large plush when paired with a 5 mm hook.
Use a locking marker through the complete stitch instead of one exposed surface fiber. The plush pile can hide individual top loops, especially during the 30-, 24- and 18-stitch decrease rounds.
If the chenille strand breaks while tightening the magic ring, run a smooth scrap yarn through the starting loop and pull the smooth strand instead. Hide that reinforcement inside the stuffed component.
Controlling Eye Placement
The large eyes are visually dominant, so a difference of one stitch is noticeable. Mark both eye positions with temporary pins before piercing the white discs and head fabric.
Keep the stems on the same head round and count the visible stitches between them. Once both washers are locked, correcting the distance requires removing hardware and can damage chenille fibers.
View the head from directly above before closing it. Both eyes should project the same distance from the curved front surface. Redistribute stuffing when one eye appears farther forward.
Adjusting Finished Size
To make a smaller owl, retain the written stitch counts but change to bulky chenille with a 4–4.5 mm hook. Make the facial discs before selecting the final eye diameter so the black eye does not consume too much of the white area.
For a larger owl, use thicker chenille rather than adding another increase round. Expanding the head to 42 stitches while leaving the facial discs at 30 would create too much exposed cream around the face.
If you intentionally enlarge the head to 42 stitches, enlarge each facial disc to 36 stitches as well. Keep the face-to-head ratio similar across every scale.
Finishing Checks
Place the owl on a hard, level surface before hiding the final tails. Both brown feet should contact the surface while the round body remains vertical rather than leaning toward one wing.
View the face straight on next. The white discs should reach comparable heights, the eye centres should remain level and the brown beak must sit on the vertical centre line.
Inspect the chest last. Pull any trapped loops free with the blunt end of a yarn needle and separate neighboring loops so the central feather texture remains visible.
Conclusion
Measure the completed owl from the bottom of the feet to the highest ear tuft and record that number beside the yarn, hook and eye size used. Photograph the face straight on as the next technical check; this exposes unequal eye placement, asymmetric facial discs or a beak shifted from centre. Save this owl amigurumi crochet pattern to Pinterest and share the completed plush on Instagram with #BigEyeWoodlandOwl. Keep the layered chest loops separated before the final photograph. For another owl, would you retain the cream-and-taupe woodland palette or replace the taupe wings and ears with dusty lavender?
Sources
- Furls Crochet — Amigurumi Owls
- DIY Fluffies — Hootie the Owl
- Ravelry — Olivia the Owl
- Kristi Tullus — Small Owl









