Introduction
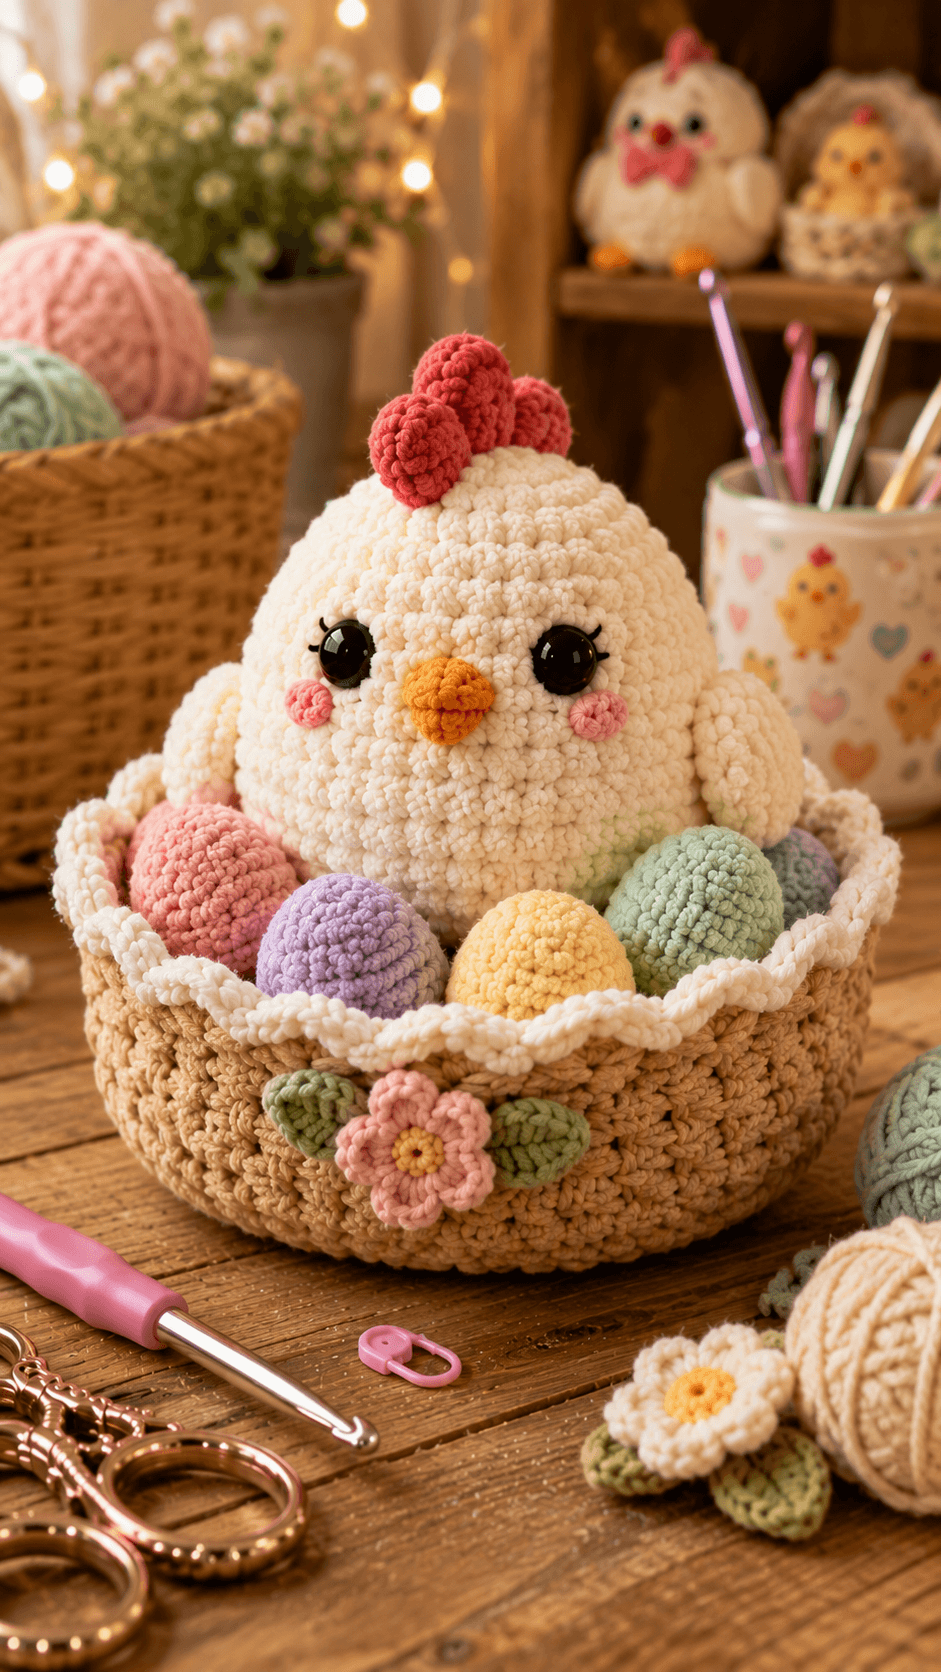
A chick’s comb is not normally taller than its face, but this three-lobed red crest has to remain visible above an oversized plush head. This Easter chick amigurumi crochet pattern uses chunky chenille, a 4.5 mm hook and 12–15 mm eyes to build an approximately 18 cm chick. Five eggs and a flower-trimmed basket turn the intermediate project into one complete Easter display.
The Design: What Makes This Easter Chick Different
The head reaches 42 stitches because the reference chick has a nearly spherical face that dominates the body. Its torso stops at a 36-stitch plateau, keeping enough width for the wings while allowing the lower half to fit inside the basket. Three separately shaped comb lobes create the coral crest instead of one flat appliqué. The small orange beak is deliberately narrow because widening it would compete with the very large eyes. A common mistake in a plush chick crochet pattern is enlarging every component at the same rate. The head, eyes and comb can be exaggerated, but the wings and beak need to remain compact. This crochet Easter chick also differs structurally because the figure is presented inside a separate basket surrounded by five stuffed eggs rather than attached to an eggshell.
Project Info at a Glance
| Skill Level | Time | Finished Size | Hook | Best For |
|---|---|---|---|---|
| Intermediate | 10–13 hours including basket and eggs | Chick about 18 cm; complete display about 22–25 cm | 4.5 mm | Easter display, spring photography and seasonal crochet collections |
Materials and Tools
Yarn
- Warm cream — chunky chenille/plush yarn — approximately 100–120 g — used for the chick and basket edging.
- Coral red — matching chunky or heavy-worsted yarn — approximately 12–15 g — used for the three comb lobes.
- Orange — chunky or doubled DK yarn — approximately 8–10 g — used for the beak.
- Blush pink — chunky or doubled DK yarn — approximately 5 g — used for cheek patches and one egg.
- Tan — DK/light-worsted cotton or firm acrylic — approximately 80–100 g — used for the basket.
- Lavender — DK/light-worsted yarn — approximately 15 g — used for one egg.
- Pale yellow — DK/light-worsted yarn — approximately 15 g — used for one egg and flower center.
- Mint green — DK/light-worsted yarn — approximately 15 g — used for one egg.
- Sage or gray-green — DK/light-worsted yarn — approximately 15 g — used for one egg and leaves.
- Soft pink — DK/light-worsted yarn — approximately 5 g — used for the basket flower.
- Black — embroidery floss — under 1 g — used for eyelashes.
Tools
- 4.5 mm crochet hook for the plush chick
- 3.5 mm crochet hook for basket, eggs and flower details
- 12–15 mm safety eyes
- Polyester stuffing, approximately 80–100 g total
- Yarn needle
- Embroidery needle
- Locking stitch markers
- Dressmaking pins
- Scissors
Use securely embroidered eyes instead of plastic eye fittings when the finished project is intended for a child under three.
Abbreviations
- MR — magic ring
- sc — single crochet
- inc — two single crochet stitches in one stitch
- dec — invisible single crochet decrease
- sl st — slip stitch
- ch — chain
- hdc — half double crochet
- dc — double crochet
- BLO — back loop only
- FLO — front loop only
An invisible decrease is worked through the front loops of the next two stitches before completing a single crochet through both loops.
Pattern — Step by Step
Work the stuffed pieces in a continuous spiral unless the instructions specify a joined round. Place a marker in the first stitch of each round and move it only after checking the final stitch count.
Head
Yarn: warm cream — Source: original six-stitch amigurumi arithmetic.
R1: 6 sc in MR (6)
R2: inc ×6 (12)
R3: (sc, inc) ×6 (18)
R4: (2 sc, inc) ×6 (24)
R5: (3 sc, inc) ×6 (30)
R6: (4 sc, inc) ×6 (36)
R7: (5 sc, inc) ×6 (42)
R8–R13: sc around (42)
R14: (5 sc, dec) ×6 (36)
R15: (4 sc, dec) ×6 (30)
R16: (3 sc, dec) ×6 (24)
R17: (2 sc, dec) ×6 (18)
R18: (sc, dec) ×6 (12)
R19: dec ×6 (6)
Insert the safety eyes between R10 and R11 with approximately nine visible stitches between their posts. Begin stuffing after R14 and place small portions of filling behind each washer before filling the middle of the head.
Fasten off. Leave a 25 cm tail and close the remaining six front loops.
Body
Yarn: warm cream — Source: original medium-body arithmetic.
R1: 6 sc in MR (6)
R2: inc ×6 (12)
R3: (sc, inc) ×6 (18)
R4: (2 sc, inc) ×6 (24)
R5: (3 sc, inc) ×6 (30)
R6: (4 sc, inc) ×6 (36)
R7–R13: sc around (36)
R14: (4 sc, dec) ×6 (30)
R15–R16: sc around (30)
R17: (3 sc, dec) ×6 (24)
R18: sc around (24)
R19: (2 sc, dec) ×6 (18)
R20: (sc, dec) ×6 (12)
R21: dec ×6 (6)
Stuff the lower body firmly enough that it remains upright inside the basket. Keep the final four rounds slightly softer so the head can sit close to the torso.
Fasten off. Leave a 35 cm sewing tail and close the remaining opening.
Wings (Make 2)
Yarn: warm cream — Source: original compact wing arithmetic.
R1: 6 sc in MR (6)
R2: inc ×6 (12)
R3: (sc, inc) ×6 (18)
R4–R6: sc around (18)
R7: (sc, dec) ×6 (12)
R8–R9: sc around (12)
Add stuffing to R1–R5 only. Flatten the upper section so each wing lies close to the body instead of projecting horizontally.
Fasten off. Leave a 25 cm tail on each wing.
Beak
Yarn: orange — Source: original small conical beak construction.
R1: 6 sc in MR (6)
R2: (sc, inc) ×3 (9)
R3: sc around (9)
R4: (2 sc, inc) ×3 (12)
Add a pinch of stuffing only. Flatten the 12-stitch opening slightly from top to bottom.
Fasten off. Leave a 20 cm sewing tail.
Cheek Patches (Make 2)
Yarn: blush pink — Source: standard flat-circle construction.
R1: 6 sc in MR (6)
R2: inc ×6 (12)
Do not stuff. Flatten the circles completely before attachment.
Join with a sl st. Fasten off and leave a 15 cm sewing tail.
Center Comb Lobe
Yarn: coral red — Source: original rounded crest construction.
R1: 6 sc in MR (6)
R2: inc ×6 (12)
R3–R5: sc around (12)
R6: dec ×6 (6)
Stuff lightly. Keep the lower edge round enough to stand vertically when attached.
Fasten off. Leave a 20 cm tail.
Side Comb Lobes (Make 2)
Yarn: coral red.
R1: 6 sc in MR (6)
R2: inc ×6 (12)
R3–R4: sc around (12)
R5: dec ×6 (6)
Add less stuffing than in the center lobe. Flatten each base slightly so the two shorter pieces can angle outward.
Fasten off. Leave a 20 cm tail on each piece.
Eyelashes
Yarn: black embroidery floss.
Make two short eyelashes at the outer corner of each safety eye. Each stitch should extend approximately 4–5 mm from the eye edge and angle slightly upward.
Secure the embroidery inside the head and bury the ends in the stuffing.
Easter Eggs (Make 5)
Yarn: make one each in blush pink, lavender, pale yellow, mint green and sage/gray-green — Source: original six-stitch egg shaping.
R1: 6 sc in MR (6)
R2: inc ×6 (12)
R3: (sc, inc) ×6 (18)
R4: (2 sc, inc) ×6 (24)
R5–R7: sc around (24)
R8: (2 sc, dec) ×6 (18)
R9: sc around (18)
R10: (sc, dec) ×6 (12)
R11: sc around (12)
R12: dec ×6 (6)
Stuff firmly after R9. Add slightly more filling toward R4–R7 and less near R10–R12 so the finished piece develops an egg profile rather than a sphere.
Fasten off. Leave a 15 cm tail and close the remaining six front loops.
Basket Base
Yarn: tan — Source: original flat-circle basket construction.
R1: 6 sc in MR (6)
R2: inc ×6 (12)
R3: (sc, inc) ×6 (18)
R4: (2 sc, inc) ×6 (24)
R5: (3 sc, inc) ×6 (30)
R6: (4 sc, inc) ×6 (36)
R7: (5 sc, inc) ×6 (42)
R8: (6 sc, inc) ×6 (48)
R9: (7 sc, inc) ×6 (54)
R10: (8 sc, inc) ×6 (60)
Lay the base flat before continuing. Its diameter should be large enough for the chick body plus one row of eggs across the front.
Do not fasten off.
Basket Sides
Continue with tan.
R11: BLO sc around (60)
R12–R20: sc around (60)
The BLO round creates the bottom corner. Do not stuff the basket; its walls must remain flexible enough to accept the chick and eggs.
Join with a sl st. Fasten off and weave in the end.
Basket Rim
Yarn: warm cream.
Join cream yarn to any stitch of R20.
R1: sc around (60)
R2: repeat (sl st in next stitch, 4 dc in next stitch, sl st in next stitch) 20 times around.
Push each four-double-crochet group outward after finishing the round. The scallops should remain above the tan wall rather than folding into the basket.
Fasten off and weave the tail into the inside wall.
Basket Flower Center
Yarn: pale yellow.
R1: 6 sc in MR (6)
R2: inc ×6 (12)
Join with a sl st. Fasten off and leave a 15 cm sewing tail.
Basket Flower Petals
Yarn: soft pink.
Join pink yarn to any stitch of the yellow flower center.
Repeat six times: sl st in next center stitch, ch 3, 2 dc in the same stitch, ch 3, sl st in the next stitch.
Spread the six petal sections evenly around the yellow center.
Fasten off. Leave a 20 cm tail for basket attachment.
Basket Leaves (Make 2)
Yarn: sage green — Source: original flat-leaf construction.
Row 1: ch 8
Row 2: starting in second ch from hook: sl st, sc, hdc, dc, dc, hdc, sc; work 2 sc in the final chain, then continue along the opposite side with sc, hdc, dc, dc, hdc, sc, sl st.
Pinch the foundation-chain line gently to form a shallow center vein.
Fasten off. Leave a 15 cm tail on each leaf.
Optional Basket Stabilizer
Yarn: tan.
R1: 6 sc in MR (6)
R2: inc ×6 (12)
R3: (sc, inc) ×6 (18)
R4: (2 sc, inc) ×6 (24)
R5: (3 sc, inc) ×6 (30)
R6: (4 sc, inc) ×6 (36)
R7: (5 sc, inc) ×6 (42)
R8: (6 sc, inc) ×6 (48)
R9: (7 sc, inc) ×6 (54)
R10: (8 sc, inc) ×6 (60)
Insert this second flat disc inside the basket base and sew around its edge when a firmer display bottom is required.
Fasten off. Leave a 40 cm sewing tail.
Assembly
- Center the chick head over the body and pin at four quarter points before sewing through one head stitch and one body stitch at a time.
- Position the orange beak between and slightly below the eye centers, then sew around its complete 12-stitch opening without flattening the pointed front.
- Attach the two pink cheek patches beside the beak, complete the eyelashes and compare both sides of the face before securing the final facial tails.
- Sew the wings to the upper sides of the body around its widest section, keeping both lower tips angled slightly forward.
- Attach the tall center comb lobe to the crown first, then position the two shorter lobes on either side with their upper ends angled outward.
- Place the chick inside the completed basket and anchor the lower body to the center of the basket base with four concealed cream or tan stitches.
- Arrange the five eggs around the front and sides of the chick, varying their heights slightly, then secure each egg to the basket base with two hidden stitches.
- Sew the pink flower to the center front of the tan basket and place one green leaf on each side, angled upward beneath the petals.
- Inspect the cream scalloped rim after the chick and eggs are fixed; tack any scallop that folds inward to the upper tan wall with one hidden stitch.
- Weave every structural tail through at least 4 cm of dense crochet, reverse direction once and trim only after the end retracts below the yarn surface.
The finished display should remain level with the chick centered behind the eggs, all three comb lobes visible and the basket rim holding a circular shape.
7 Technical Tips
- Comb collapse: Overstuffed side lobes push the center crest away from the crown. Fill the center lobe moderately, use roughly half that amount in each side piece and keep all three six-stitch bases flexible.
- Flattened head: A 42-stitch chenille sphere can dent around large safety-eye washers. Add stuffing in pieces smaller than approximately 3 cm and pack the cheek zones before filling the central cavity.
- Visible decrease gaps: Thick chenille opens easily at conventional decreases. Work through the two front loops and keep the working yarn no looser than the adjacent single crochet stitches.
- Incorrect eye timing: Installing large washers after R15 leaves little access through the narrowing head. Fit both eyes after R13 and check the nine-stitch spacing before working R14.
- Leaning chick: Securing the body after the eggs are attached can trap the figure off center. Anchor the chick first with four base stitches, then distribute the five eggs around its center line.
- Soft basket wall: A loose 60-stitch side section collapses beneath the egg weight. Use the smaller 3.5 mm hook and check that the basket wall stands at least 7–8 cm high without support before adding the rim.
- Loose egg attachment: A fixing stitch caught only through surface loops can pull free when the basket is moved. Pass each anchor through the lower 5 mm of the egg, through the basket base and back through a neighboring base stitch.
Conclusion
Set the finished basket on a level surface before trimming the chick’s final anchoring tails because the egg arrangement can shift the visual center several centimeters. Next, photograph the project from the front and three-quarter angle and check that all five pastel eggs remain visible, the flower sits on the basket center line and none of the comb lobes overlap completely. Share the completed Easter chick amigurumi crochet pattern project on Pinterest with a vertical image, then post the chick-and-eggs detail on Instagram using #EasterBasketChick. For this chick specifically, would you keep all five eggs solid pastel colors or add stripes and spots to two of them?









