Introduction
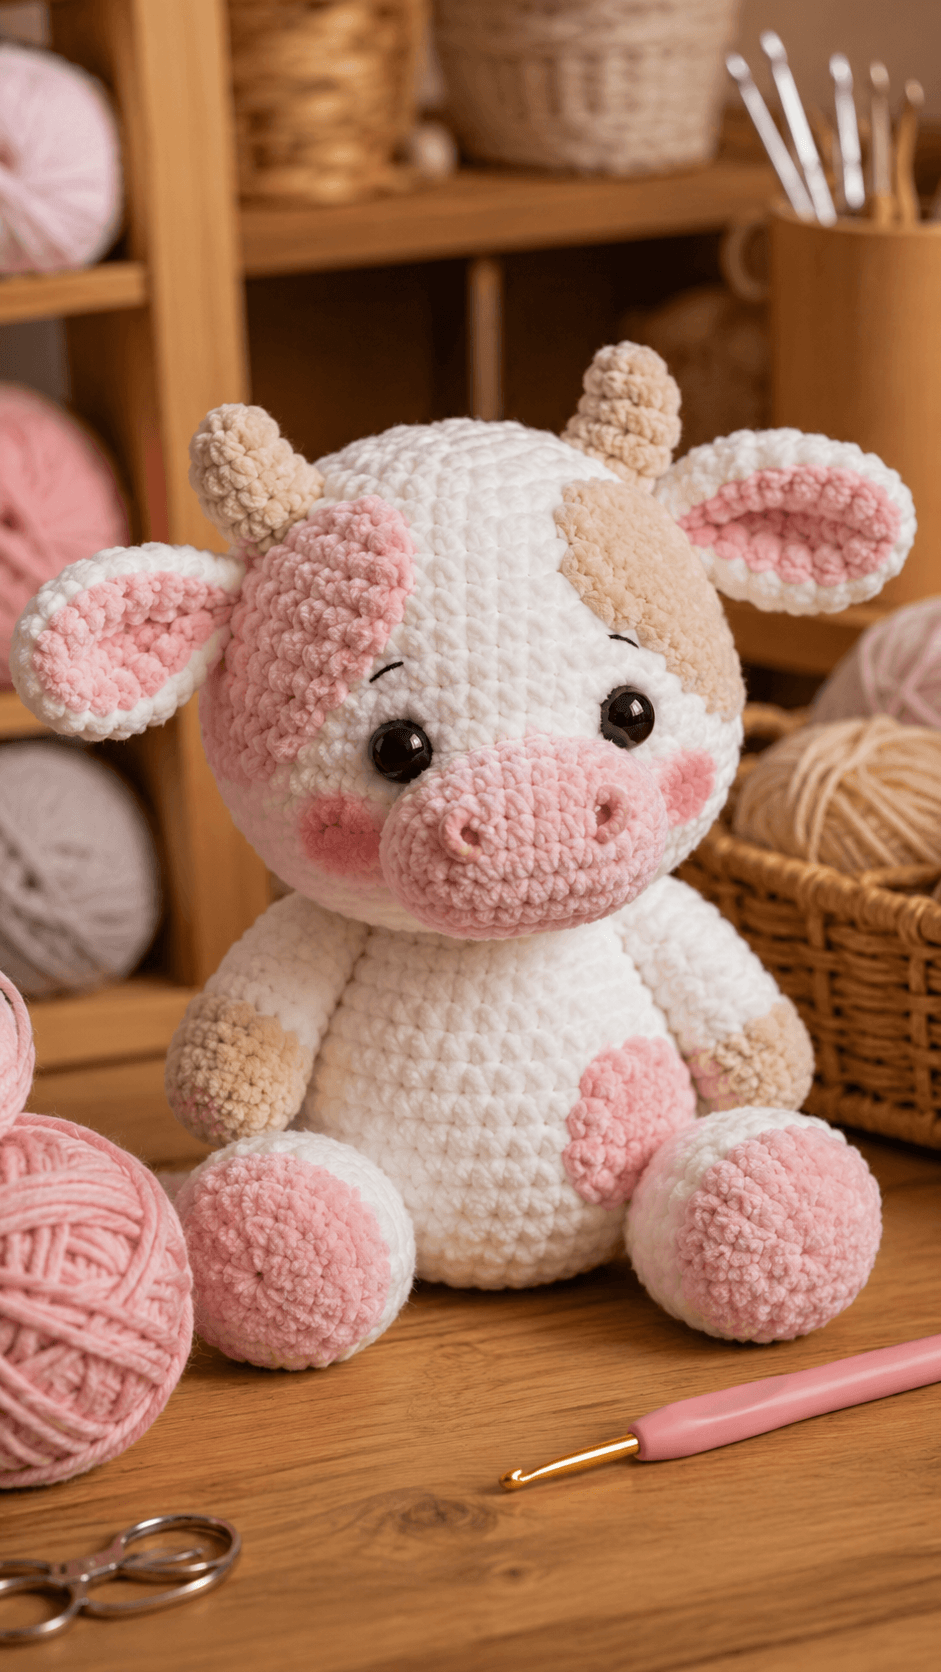
A calf can carry a muzzle almost as wide as the gap between its ears, and this pink oval has to project forward without hiding the lower eye line. This cow amigurumi crochet pattern uses chunky chenille yarn, a 4.5 mm hook and 12–15 mm safety eyes to make a seated figure about 22 cm tall. The intermediate build includes wide ears, short horns, asymmetrical patches and contrasting feet.
The Design: What Makes This Spotted Cow Different
The head expands to 42 stitches because the reference calf has a broad forehead, rounded cheeks and substantial space around the muzzle. Its snout is crocheted separately and attached as a lightly stuffed oval, which gives the plush cow amigurumi a projecting bovine profile without lengthening the entire head. Oversized ears extend horizontally from the sides, while two compact horns sit higher and closer to the center. The pear-shaped body also reaches 42 stitches so it can support the head while retaining a seated silhouette. One common mistake in a spotted calf crochet pattern is repeating identical circular markings. This cow uses an irregular pink patch on one side of the forehead, a biscuit patch around the opposite eye and smaller limb markings. Different shapes prevent the surface decoration from looking mechanically repeated.
Project Info at a Glance
| Skill Level | Time | Finished Size | Hook | Best For |
|---|---|---|---|---|
| Intermediate | 7–9 hours | About 22 cm seated | 4.5 mm | Farm-animal collections, display toys and plush photography |
Materials and Tools
Yarn
- Cream white — chunky chenille/plush yarn — approximately 140–160 g — use a dense yarn that retains visible stitch structure.
- Pale pink — matching chunky yarn — approximately 25–35 g — used for the muzzle, inner ears, cheeks, forehead patch and foot markings.
- Biscuit beige — matching chunky yarn — approximately 20–30 g — used for horns, hoof sections and facial/body patches.
- Black — embroidery floss or smooth DK yarn — under 1 g — used for nostrils and eyebrow lines.
Tools
- 4.5 mm crochet hook
- 12–15 mm safety eyes
- Polyester stuffing, approximately 70–90 g
- Yarn needle
- Embroidery needle
- Locking stitch markers
- Dressmaking pins
- Scissors
For a toy intended for a child under three, substitute securely embroidered eyes for plastic safety-eye fittings.
Abbreviations
- MR — magic ring
- sc — single crochet
- inc — two single crochet stitches in one stitch
- dec — invisible single crochet decrease
- sl st — slip stitch
- ch — chain
- hdc — half double crochet
- dc — double crochet
- BLO — back loop only
- FLO — front loop only
An invisible decrease passes through the front loops of the next two stitches before one single crochet is completed through both loops.
Pattern — Step by Step
Work in a continuous spiral unless a joined round or row is specified. Mark the first stitch and move the marker only after the complete round has been counted.
Head
Yarn: cream white — Source: Standard amigurumi math.
R1: 6 sc in MR (6)
R2: inc ×6 (12)
R3: (sc, inc) ×6 (18)
R4: (2 sc, inc) ×6 (24)
R5: (3 sc, inc) ×6 (30)
R6: (4 sc, inc) ×6 (36)
R7: (5 sc, inc) ×6 (42)
R8–R13: sc around (42)
R14: (5 sc, dec) ×6 (36)
R15: (4 sc, dec) ×6 (30)
R16: (3 sc, dec) ×6 (24)
R17: (2 sc, dec) ×6 (18)
R18: (sc, dec) ×6 (12)
R19: dec ×6 (6)
Insert the safety eyes between R10 and R11 with approximately nine visible stitches between the posts. Begin stuffing after R14 and pack small pieces around the washers before filling the center.
Fasten off. Leave a 25 cm tail and close the six remaining front loops.
Body
Yarn: cream white — Source: Standard amigurumi math.
R1: 6 sc in MR (6)
R2: inc ×6 (12)
R3: (sc, inc) ×6 (18)
R4: (2 sc, inc) ×6 (24)
R5: (3 sc, inc) ×6 (30)
R6: (4 sc, inc) ×6 (36)
R7: (5 sc, inc) ×6 (42)
R8–R14: sc around (42)
R15: (5 sc, dec) ×6 (36)
R16–R17: sc around (36)
R18: (4 sc, dec) ×6 (30)
R19: sc around (30)
R20: (3 sc, dec) ×6 (24)
R21: (2 sc, dec) ×6 (18)
R22: (sc, dec) ×6 (12)
R23: dec ×6 (6)
Stuff R1–R16 firmly. Use less filling in the final rounds so the upper body remains slightly compressible beneath the head.
Fasten off. Leave a 35 cm sewing tail and close the opening.
Muzzle
Yarn: pale pink — Source: original broad-muzzle shaping.
R1: 6 sc in MR (6)
R2: inc ×6 (12)
R3: (sc, inc) ×6 (18)
R4: (2 sc, inc) ×6 (24)
R5: (3 sc, inc) ×6 (30)
R6–R8: sc around (30)
R9: (3 sc, dec) ×6 (24)
Stuff the front two-thirds lightly. Flatten the 24-stitch opening into a horizontal oval approximately twice as wide as it is high.
Fasten off. Leave a 35 cm sewing tail.
Front Legs (Make 2)
Yarn: begin with biscuit beige, then change to cream white.
R1: 6 sc in MR with biscuit beige (6)
R2: inc ×6 (12)
R3: (sc, inc) ×6 (18)
R4–R5: sc around (18)
R6: change to cream, BLO sc around (18)
R7: (sc, dec) ×6 (12)
R8–R15: sc around (12)
Stuff the beige hoof firmly and the lower cream section moderately. Leave R12–R15 lightly filled so the arms can rest against the body.
Fasten off. Leave a 30 cm sewing tail.
Back Legs and Feet (Make 2)
Yarn: begin with pale pink, then change to cream white.
R1: 6 sc in MR with pale pink (6)
R2: inc ×6 (12)
R3: (sc, inc) ×6 (18)
R4: (2 sc, inc) ×6 (24)
R5–R7: sc around (24)
R8: change to cream, BLO sc around (24)
R9: (2 sc, dec) ×6 (18)
R10–R12: sc around (18)
R13: (sc, dec) ×6 (12)
R14: sc around (12)
Pack the pink toe area firmly. Keep the final cream rounds softer so each foot can rotate outward into the seated position.
Fasten off. Leave a 35 cm sewing tail.
Ears (Make 2)
Yarn: pale pink and cream white — Source: original oversized ear construction.
R1: 6 sc in MR with pink (6)
R2: inc ×6 (12)
R3: (sc, inc) ×6 (18)
R4: (2 sc, inc) ×6 (24)
R5: change to cream, (3 sc, inc) ×6 (30)
R6–R7: sc around (30)
R8: (3 sc, dec) ×6 (24)
R9: (2 sc, dec) ×6 (18)
Do not stuff. Flatten the ear horizontally and fold the lower edge inward by approximately 1 cm so the pink center forms a shallow cup.
Fasten off. Leave a 35 cm tail on each ear.
Horns (Make 2)
Yarn: biscuit beige — Source: original rounded horn construction.
R1: 6 sc in MR (6)
R2: inc ×6 (12)
R3–R5: sc around (12)
R6: (sc, dec) ×4 (8)
R7: sc around (8)
R8: dec ×4 (4)
Stuff before R6. Shape each piece as a short rounded horn rather than a pointed cone.
Fasten off. Leave a 25 cm sewing tail.
Cheek Patches (Make 2)
Yarn: pale pink — Source: Standard flat-circle math.
R1: 6 sc in MR (6)
R2: inc ×6 (12)
Do not stuff. Flatten both circles before attachment.
Join with a sl st. Fasten off and leave a 15 cm sewing tail.
Large Biscuit Face Patch
Yarn: biscuit beige — original irregular appliqué.
R1: 6 sc in MR (6)
R2: inc ×6 (12)
R3: (sc, inc) ×6 (18)
R4: (2 sc, inc) ×6 (24)
Replace three evenly spaced sc stitches in R4 with hdc stitches. During pinning, stretch the patch vertically so it curves around the outer side of one eye.
Fasten off. Leave a 25 cm sewing tail.
Large Pink Forehead Patch
Yarn: pale pink.
R1: 6 sc in MR (6)
R2: inc ×6 (12)
R3: (sc, inc) ×6 (18)
R4: sc around (18)
Do not pull this piece into a regular circle. Flatten one edge during sewing so the marking appears irregular beneath the ear and horn area.
Fasten off. Leave a 20 cm tail.
Front-Leg Spots (Make 2)
Yarn: biscuit beige.
R1: 6 sc in MR (6)
R2: inc ×6 (12)
Place each spot on the outer-facing portion of the foreleg rather than directly over the color-change line.
Fasten off. Leave a 15 cm sewing tail.
Side Body Patch
Yarn: pale pink.
R1: 6 sc in MR (6)
R2: inc ×6 (12)
R3: (sc, inc) ×6 (18)
Stretch this patch into a slight oval and place it low on one side of the torso where part of it remains visible behind the front leg.
Fasten off. Leave a 20 cm sewing tail.
Nostrils
Yarn: black embroidery floss or a darker pink yarn.
Make two short vertical stitches near the upper half of the muzzle, each approximately 5 mm long. Leave roughly one-third of the total muzzle width between them.
Secure the thread behind the muzzle and bury the ends inside the stuffing.
Eyebrows
Yarn: black embroidery floss.
Place one shallow curved stitch approximately two crochet rounds above each safety eye. Span three stitches and angle the outer end slightly upward.
Secure the floss inside the head and bury the thread ends.
Assembly
- Center the head directly above the body, pin at four quarter points and sew around the complete attachment area with small mattress stitches.
- Position the pink muzzle beneath the eye centers, keeping its widest dimension horizontal, then sew through the entire 24-stitch attachment edge.
- Add the two nostrils, eyebrows and cheek patches, then pin the biscuit eye patch and pink forehead patch before sewing either marking permanently.
- Attach the front legs to the upper body with approximately four body stitches between their inner edges and both beige hoof sections facing forward.
- Pin the rear legs low on either side of the body, place the cow on a level surface and adjust both pink toe sections until they sit at equal heights.
- Sew the ears to the sides of the head around R7–R10, attaching only the folded lower edge so the broad pink centers remain open.
- Position the horns around R4–R6, keeping them closer to the center line than the ears and leaving approximately 3–4 cm between their bases.
- Attach the two biscuit leg spots and the low pink body patch after all four limbs have been sewn, rotating each appliqué until its outline differs from the others.
- Inspect the head from the front and side, then add a hidden anchoring stitch beneath either horn or ear only when the piece rotates under its own weight.
- Weave every structural yarn tail through at least 4 cm of dense crochet, reverse direction once and trim after the ends retract beneath the plush surface.
The completed cow should remain seated on the lower body and two rear feet while the front legs hang evenly and both oversized ears extend laterally.
7 Technical Tips
- Collapsed muzzle: Packing all nine muzzle rounds firmly turns the broad oval into a ball. Concentrate stuffing in the front two-thirds and leave the 24-stitch sewing edge flexible enough to flatten horizontally.
- Uneven ears: A difference of one crochet round at the attachment point becomes obvious because each ear is nearly as wide as half the head. Pin both lower edges first and measure their centers from the crown before sewing.
- Visible decrease holes: Thick chenille can open around conventional decreases and expose white stuffing. Work each decrease through the two front loops and match its tension to the adjacent single crochet stitches.
- Late eye placement: Installing 12–15 mm washers after R15 leaves limited access inside the 42-stitch head. Fit both eyes after R13 and confirm approximately nine visible stitches between their posts before decreasing.
- Horn tilt: Sewing through only half of the eight-stitch base lets a horn lean toward its nearest ear. Stitch around the complete base and add one concealed anchoring stitch approximately 5 mm toward the crown center.
- Unstable seated position: Permanently attaching one rear foot before locating the second can raise one toe by 5–10 mm. Pin both feet, place the cow on a hard level surface and compare the lower pink edges before sewing.
- Puckered patches: Pulling appliqué stitches tightly compresses the chenille body beneath each marking. Catch one outer loop of the patch and only a shallow strand of the base fabric, then inspect the surface after every four stitches.
Conclusion
Check the muzzle, eye patch and forehead patch together before completing the final surface stitches because all three control the cow’s asymmetric face. Next, place the figure on a level surface and photograph the front, side and three-quarter views before trimming the structural tails. Those angles expose a rotated muzzle, unequal feet or an ear attached higher than its partner. Share the completed cow amigurumi crochet pattern project on Pinterest with a vertical full-body photograph, then post the face detail on Instagram using #PinkSnoutSpottedCow. For this calf specifically, would you keep the mismatched pink and biscuit face patches or repeat the same color on both sides?









