Introduction
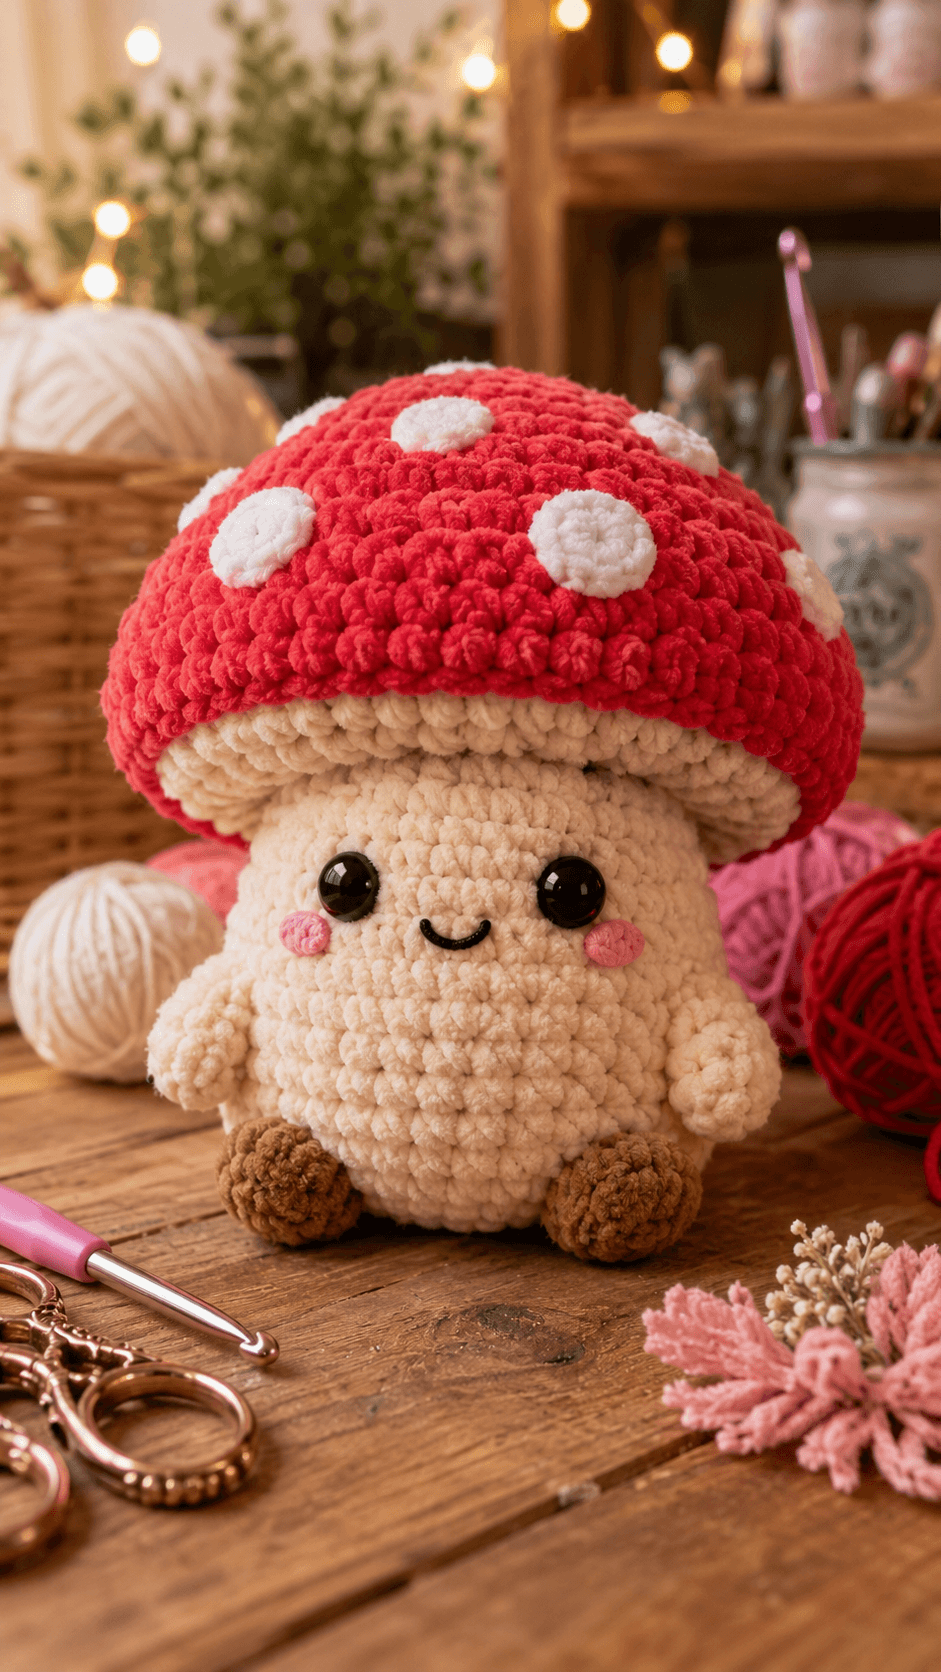
A fly-agaric-style mushroom needs a cap wider than its stem or the red-and-white silhouette disappears. This mushroom amigurumi crochet pattern uses super-bulky chenille, a 5 mm hook and a 48-stitch cap to build a plush approximately 23–27 cm tall. The project includes a cream face, rounded body, short arms, brown feet, pink cheeks and raised white spots. Intermediate shaping and sewn assembly are required.
The Design: What Makes This Toadstool Different
The cap is deliberately much wider than the cream character underneath it. Its red crown reaches 48 stitches and holds that circumference long enough to create the broad dome visible in the reference image. A separate cream underside adds thickness at the cap edge rather than leaving the red fabric hanging directly over the face. The stem character uses a 36-stitch head and 36-stitch body, giving this plush mushroom crochet pattern enough facial width without competing with the cap. Raised white circles are sewn across the red surface in several diameters instead of being embroidered flat. Brown feet create a clear lower boundary beneath the cream body. One frequent mistake with mushroom characters is placing the eyes too close to the cap edge. Leave several cream rounds between the underside and eye line so the face remains readable.
Project Information at a Glance
| Skill Level | Time | Finished Size | Hook | Best For |
|---|---|---|---|---|
| Intermediate | 9–12 hours | Approximately 23–27 cm tall | 5 mm | Large plush display figure |
The final measurement depends strongly on chenille strand diameter and stuffing density. This construction targets the large plush proportions shown in the reference rather than the miniature dimensions common in DK mushroom patterns.
Materials and Tools
Yarn
- Cream/off-white — super-bulky chenille or velvet — approximately 120–160 g — head, body, arms and cap underside
- Bright red — matching chenille — approximately 100–130 g — mushroom cap
- White — matching chenille — approximately 25–35 g — raised cap spots
- Warm brown — matching chenille — approximately 15–20 g — feet
- Pink — matching chenille scrap — cheek patches
- Black smooth yarn or embroidery thread — small amount — smile
Tools
- 5 mm crochet hook
- Two 12–15 mm black safety eyes
- Polyester toy stuffing
- Large-eye yarn needle
- Locking stitch marker
- Dressmaking pins
- Scissors
Check the eye diameter against the completed head before locking the washers. Plastic eyes remain detachable components, so embroidered eyes are the better choice for a toy intended for a child who may pull or chew small pieces.
Abbreviations
- MR — magic ring
- sc — single crochet
- inc — two single crochet stitches in one stitch
- dec — decrease over two stitches
- sl st — slip stitch
- ch — chain
- hdc — half double crochet
- dc — double crochet
- BLO — back loop only
- FLO — front loop only
An invisible decrease is worked through the front loops of the next two stitches before completing them together as one single crochet.
Pattern — Step by Step
Work in continuous spirals unless a section specifies joined rounds. Place a marker through the first full stitch of every round and verify the bracketed total before beginning the next round.
Head / Upper Stem
Yarn: cream — original six-stitch amigurumi calculation.
R1: 6 sc in MR (6)
R2: inc × 6 (12)
R3: (sc, inc) × 6 (18)
R4: (2 sc, inc) × 6 (24)
R5: (3 sc, inc) × 6 (30)
R6: (4 sc, inc) × 6 (36)
R7–R12: sc around (36)
R13: (4 sc, dec) × 6 (30)
Insert the eyes between R9 and R10 with approximately eight visible stitches between the stems. Lock the washers and begin adding stuffing in small sections.
R14: (3 sc, dec) × 6 (24)
R15: (2 sc, dec) × 6 (18)
R16: (sc, dec) × 6 (12)
R17: sc around (12)
R18: dec × 6 (6)
Fasten off. Leave a 30 cm tail for joining to the body if the head and lower stem are made separately.
Body / Lower Stem
Yarn: cream.
R1: 6 sc in MR (6)
R2: inc × 6 (12)
R3: (sc, inc) × 6 (18)
R4: (2 sc, inc) × 6 (24)
R5: (3 sc, inc) × 6 (30)
R6: (4 sc, inc) × 6 (36)
R7–R11: sc around (36)
R12: (4 sc, dec) × 6 (30)
R13: sc around (30)
R14: (3 sc, dec) × 6 (24)
R15: (2 sc, dec) × 6 (18)
Stuff the lower body firmly enough that the figure can stand on its feet, but keep the upper two rounds slightly softer for a clean head attachment.
R16: (sc, dec) × 6 (12)
R17: sc around (12)
R18: dec × 6 (6)
Fasten off and leave a 40 cm tail for structural assembly.
Red Mushroom Cap
Yarn: bright red — original large-dome construction.
R1: 6 sc in MR (6)
R2: inc × 6 (12)
R3: (sc, inc) × 6 (18)
R4: (2 sc, inc) × 6 (24)
R5: (3 sc, inc) × 6 (30)
R6: (4 sc, inc) × 6 (36)
R7: (5 sc, inc) × 6 (42)
R8: (6 sc, inc) × 6 (48)
R9–R13: sc around (48)
R14: (6 sc, dec) × 6 (42)
R15: sc around (42)
R16: (5 sc, dec) × 6 (36)
R17: sc around (36)
Stuff the crown lightly now. Concentrate filling in the centre so the cap forms a dome rather than a thick horizontal disc.
Fasten off and leave a 60 cm tail for joining the underside.
Cream Cap Underside
Yarn: cream.
R1: 6 sc in MR (6)
R2: inc × 6 (12)
R3: (sc, inc) × 6 (18)
R4: (2 sc, inc) × 6 (24)
R5: (3 sc, inc) × 6 (30)
R6: (4 sc, inc) × 6 (36)
R7: (5 sc, inc) × 6 (42)
R8: (6 sc, inc) × 6 (48)
Keep this circle flat. Do not stuff it independently.
Fasten off and leave a 60 cm sewing tail.
Cap Edge Roll
Yarn: cream.
Join cream yarn to the outer edge of the finished underside.
R1: sc around (48)
R2: BLO sc around (48)
R3: sc around (48)
Fasten off and leave a 40 cm tail. Fold R2–R3 slightly inward during assembly so the underside develops the thick rolled edge visible below the red cap.
Large White Cap Spots — Make Three
Yarn: white.
R1: 6 sc in MR (6)
R2: inc × 6 (12)
R3: (sc, inc) × 6 (18)
Slip stitch into the next stitch. Fasten off and leave a 20 cm sewing tail.
Medium White Cap Spots — Make Three
Yarn: white.
R1: 6 sc in MR (6)
R2: inc × 6 (12)
Slip stitch into the next stitch. Fasten off and leave a 15 cm attachment tail.
Small White Cap Spots — Make Two
Yarn: white.
R1: 6 sc in MR (6)
Slip stitch to the first stitch and fasten off with a 12 cm tail.
Arms — Make Two
Yarn: cream.
R1: 6 sc in MR (6)
R2: inc × 6 (12)
R3–R5: sc around (12)
R6: (2 sc, dec) × 3 (9)
R7–R9: sc around (9)
Stuff only the rounded end. Leave the upper three rounds nearly empty so the arm rests against the body.
Flatten the opening and work 4 sc through both layers (4). Fasten off and leave a 25 cm sewing tail.
Brown Feet — Make Two
Yarn: warm brown.
R1: 6 sc in MR (6)
R2: inc × 6 (12)
R3: (sc, inc) × 6 (18)
R4–R5: sc around (18)
R6: (sc, dec) × 6 (12)
R7: sc around (12)
R8: dec × 6 (6)
Stuff to medium firmness and flatten the lower surface so each foot can contact the table.
Fasten off and leave a 30 cm sewing tail.
Cheek Patches — Make Two
Yarn: pink.
R1: 6 sc in MR (6)
R2: inc × 6 (12)
Slip stitch to the next stitch. Fasten off and leave a 15 cm tail. Shape each circle into a shallow horizontal oval during sewing.
Smile
Yarn: smooth black yarn or embroidery thread.
Embroider a curved smile approximately 2.5–3 cm wide between the cheek patches. Anchor the centre of the curve one round below the lower eye line so the mouth remains separated from both eyes.
Assembly
- Join the head to the body with both six-stitch closures centred vertically. Sew around the contact area twice, adding one hidden rear anchor stitch to prevent head rotation.
- Attach the pink cheek patches one to two rounds below the eyes. Keep approximately 2.5–3 cm between their inner edges, then embroider the black curved smile centrally.
- Sew one arm to each side across the upper third of the body. Angle the rounded ends slightly forward so both hands remain visible from the front.
- Attach the two brown feet beneath the lower body. Place the mushroom on a hard surface before tightening the seams so both feet contact the surface equally.
- Pin the cream underside to the 36-stitch opening of the red cap, distributing the larger 48-stitch disc into a shallow overhang rather than pulling it flat.
- Add a moderate amount of stuffing between the red crown and cream underside. Sew the layers together while shaping the red edge downward around the cream roll.
- Centre the completed cap over the head. Attach the underside to the crown of the head with a circular seam spanning approximately 18–24 head stitches.
- Pin all eight white spots before sewing any one permanently. Place the largest circles across the upper and front sections and reserve smaller circles for the curved side areas.
- Sew each spot around its full perimeter without pulling the red cap fabric inward. Keep several areas of uninterrupted red visible between neighboring circles.
- Inspect the cap from the front, both sides and above, then weave every structural yarn tail through at least three stitch directions before trimming.
The completed mushroom should stand or sit level on both brown feet while the red cap remains broader than the cream body from every viewing angle.
7 Technical Tips
- Cap flattening: Stuffing the outer edge heavily turns the dome into a thick disc. Concentrate roughly two-thirds of the cap filling inside the central 20–25 cm area and leave the rim comparatively soft.
- Marker loss: Dense red chenille can hide the start of a 48-stitch round. Count Cap R9, R11 and R13 completely before moving the locking marker.
- Visible decrease gaps: Standard reductions can expose stuffing through plush yarn. Work each decrease through the front loops of the next two stitches and keep the working loop at normal single-crochet height.
- Late eye installation: Large eye washers become difficult to reach after the head opening falls below 24 stitches. Fit and lock both eyes before completing Head R14.
- Uneven foot attachment: A height difference of 5 mm can make the entire mushroom lean under the large cap. Pin both feet and test the figure on a hard surface before permanent sewing.
- Spot crowding: Covering more than about half of the visible red surface weakens the classic red-cap silhouette. Leave at least 1–2 cm of red space between most large spots.
- Cap seam weakness: Attaching the heavy cap through only six or eight head stitches lets it rotate. Distribute the attachment seam across at least 18–24 head stitches around the crown.
Shaping the Mushroom Cap
The cap is the dominant structural element in this mushroom amigurumi crochet pattern. Its 48-stitch circumference needs to remain substantially wider than the 36-stitch face. That difference creates the recognizable overhang and leaves enough surface area for the white spots.
Do not interpret the cap as a simple half-sphere. The outer rounds need a flatter horizontal direction before the edge drops toward the cream underside. Five plain rounds at 48 stitches create that width, while the final reductions begin pulling the rim inward.
Check the cap from table height before attaching it. The centre should rise smoothly, the front rim should extend beyond both eyes, and neither side should collapse toward the head.
Constructing the Cream Underside
The cream underside separates this toadstool amigurumi pattern from a basic red dome sewn directly onto a stem. It acts as a visible shelf beneath the cap and produces the thick pale band shown above the face.
The 48-stitch disc remains flat before assembly. A short three-round cream edge is then folded inward to create additional thickness. Keep the fold loose enough that it follows the entire perimeter rather than forming sharp pleats.
Attach the cap to the head only after the underside has been completed. Sewing through the cream layer gives a more stable contact surface than attaching the red crown directly to the head.
Positioning the White Spots
The reference cap uses spots of different sizes instead of identical evenly spaced circles. Begin with the three largest pieces and establish a triangular distribution across the visible crown. Smaller pieces can then fill open side areas.
Avoid placing spots in straight horizontal rows. Rotate the cap while pinning and compare the spacing from above. Irregular distribution makes the surface look intentional rather than gridded.
Keep the outermost spots away from the exact lower edge. A circle that folds over the rim becomes distorted and can obscure the strong red border above the cream underside.
Face Placement
The eyes sit in the upper half of the cream face but remain clearly below the cap. Approximately eight stitches between the stems produces the close-set expression visible in the reference image.
Place the pink cheeks slightly lower and farther apart than the eyes. Their inner edges should not touch the embroidered smile. A shallow horizontal oval matches the photograph more closely than a round cheek.
The smile needs only one compact curve. Thick chenille is unsuitable for that detail because it creates a heavy black line, so use smooth embroidery yarn that can pass between the plush stitches without distorting them.
Working with Chenille Yarn
Chenille changes mushroom construction because every stitch occupies more physical space than a DK or worsted stitch. A relatively modest 48-stitch cap can therefore produce a broad plush crown without adding multiple extra increase rounds.
Use a locking marker through the entire first stitch rather than clipping a single surface fiber. Feel for both top loops with the hook tip before inserting it, particularly in the red cap where the plush pile can hide stitch boundaries.
If the chenille breaks when tightening a magic ring, thread smooth scrap yarn through the initial loop and use that strand to close the centre. Leave the reinforcement inside the stuffed piece.
Controlling Stuffing Density
The body, feet and cap require different stuffing densities. The lower body should be firm enough to resist the weight of the cap, while the cap rim needs much less filling so it curves downward without becoming rigid.
Press the body with one finger before assembly. A depression of roughly 5 mm that returns gradually indicates sufficient filling for a plush structure. If the stitches spread and expose white fiberfill, remove some stuffing.
The arms need the least filling. Keeping their upper halves soft allows them to lie close to the stem rather than projecting sideways.
Making the Brown Feet Stable
The small brown feet visually anchor the cream character and also help stabilize the oversized cap. Each reaches 18 stitches before reducing, creating enough base area to touch the work surface securely.
Flatten the underside with your fingers after stuffing. Do not sew the feet directly beneath the body centre. Moving them apart creates a wider support footprint and reduces side-to-side rocking.
Test the complete mushroom before hiding the foot tails. If one side rises, loosen that seam and rotate the foot rather than packing additional stuffing into the body.
Adjusting Finished Size
Mushroom patterns can range from only a few centimetres tall in DK cotton to nearly 20 cm in worsted yarn, while blanket-yarn versions become significantly larger from the same general shaping logic. This construction targets approximately 23–27 cm because of the super-bulky chenille and oversized cap.
For a smaller figure, keep the stitch totals and move to bulky yarn with a 4–4.5 mm hook. Select the safety-eye size only after the head reaches its 36-stitch plateau.
For a larger mushroom, use thicker chenille before adding another cap increase round. Expanding beyond 48 stitches changes the cap-to-stem ratio and also requires a larger underside.
Finishing Checks
Place the mushroom on a level surface and examine the red cap from the front. Its left and right edges should extend similar distances beyond the body, while the cream underside remains visible across the full front edge.
View the figure directly from above next. The white spots should be distributed across the cap without forming a straight line or leaving one large undecorated quadrant.
Check the face last. Both eyes need equal clearance beneath the cap, the cheeks should sit at matching heights, and the smile should remain centred between them.
Conclusion
Measure the completed mushroom from the bottoms of the brown feet to the highest point of the red cap and record that figure beside the yarn, hook and eye size used. Photograph the cap directly from above next; that angle exposes uneven spot spacing or a crown that has been stuffed off-centre. Save this mushroom amigurumi crochet pattern to Pinterest and share the finished plush on Instagram with #RedCapMushroomPlush. Keep the cream underside visible when arranging the final display position. For another version, would you keep eight raised white spots or reduce the cap to five larger circles?
Sources
- Amigurumi Arts — Mushroom Amigurumi: DK/light-worsted reference with 2 mm hook, 7 mm safety eyes and documented 36-stitch stem / 48-stitch cap shaping.
- Amigurumi.com — Gloomy Shroom: approximately 19 cm tall × 16 cm wide, worsted/Aran yarn, 2.75 mm hook and 9 mm safety eyes.
- Ravelry — Mushroom Amigurumi by Caitie Moore: DK cotton, 2.75 mm hook and approximately 7–10 cm finished height.
- Ravelry — Mushroom Guy by Stephanie Buckner: current 2024 character-mushroom pattern designed to scale across different yarn weights.









