Introduction
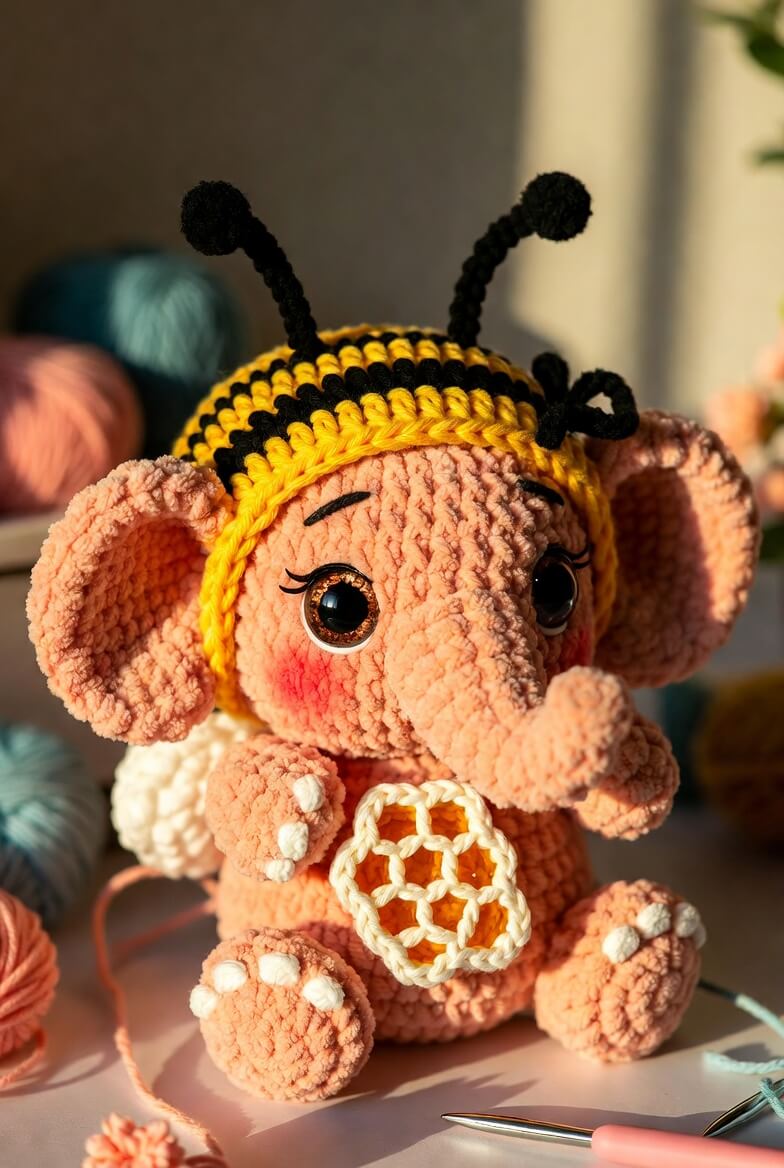
An elephant’s ears cannot sit correctly beneath a bee hood unless the lower edge stops before their attachment seams. This bee elephant amigurumi crochet pattern uses chunky chenille, a 5 mm hook and 18 mm safety eyes to make an approximately 25 cm sitting figure. The advanced-intermediate project includes a curved trunk, striped hood, antennae, wings and honeycomb bag. Its broad feet create a stable base for upright display.
The Design: What Makes Honey the Elephant Different
Honey uses a separate head and body because the large ears, trunk and hood place substantial weight above the neck. A reinforced seam prevents the head from rotating after assembly. The 42-stitch head plateau creates enough width for the eyes and trunk without forcing the ears too far toward the back. Each ear is made from two layers, which keeps its circular edge visible beside the striped hood. The body narrows toward the shoulders but retains a broad lower section for seated balance. In this elephant in bee costume crochet pattern, the hood finishes above the ear seams instead of covering the entire head. A common mistake is mounting the trunk directly between the eyes. That position shortens the forehead and hides the inner eye edges. This chunky elephant amigurumi places the trunk one round below the eyes and shapes its curve during stuffing.
Project Info at a Glance
| Skill Level | Time | Finished Size | Hook | Best For |
|---|---|---|---|---|
| Advanced intermediate | 12–15 hours | Approximately 25 cm seated | 5 mm | Display, photography and themed collections |
Published elephant patterns range from approximately 16 cm to 20 cm when made with smooth or heavy-DK yarn. The larger measurement used here accounts for category 5 chenille, oversized ears and a 42-stitch head plateau.
Materials and Tools
Yarn
- Peach — chunky/category 5 chenille — approximately 120 g — Premier Parfait Chunky, Himalaya Dolphin Baby or an equivalent plush yarn.
- Yellow — chunky/category 5 chenille — approximately 45 g — required for the hood and honeycomb center.
- Black — chunky/category 5 chenille — approximately 25 g — required for hood stripes and antenna tips.
- Cream — DK cotton — approximately 12 g — required for the honeycomb border and bag strap.
- White — chunky chenille or smooth worsted yarn — approximately 10 g — required for wings and toenails.
- Coral embroidery yarn — less than 1 g — required for cheek color when yarn circles are preferred over cosmetic tint.
Tools
- 5 mm crochet hook for chenille components
- 3.5 mm crochet hook for the honeycomb bag and strap
- Two 18 mm safety eyes with amber rims
- Polyester stuffing, approximately 80–100 g
- Blunt yarn needle
- Strong sewing yarn in peach and black
- Locking stitch markers
- Straight pins
- Scissors
Plastic safety eyes are not suitable for children under three. Use embroidered eyes when the finished elephant will be handled by a young child.
Abbreviations
- MR — magic ring
- sc — single crochet
- inc — two single crochet in one stitch
- dec — single crochet two stitches together
- sl st — slip stitch
- ch — chain
- hdc — half double crochet
- dc — double crochet
- BLO — back loop only
- FLO — front loop only
For an invisible decrease, insert the hook through the front loops of the next two stitches and complete one single crochet through both loops.
Pattern — Step by Step
Work all stuffed components in continuous spirals unless instructed otherwise. Mark the first stitch of every round and recount after each increase or decrease round.
Head
Yarn: peach — original photo-based shaping using six-stitch amigurumi expansion.
R1: 6 sc in MR (6)
R2: inc ×6 (12)
R3: (sc, inc) ×6 (18)
R4: (2 sc, inc) ×6 (24)
R5: (3 sc, inc) ×6 (30)
R6: (4 sc, inc) ×6 (36)
R7: (5 sc, inc) ×6 (42)
R8–R13: sc around (42)
R14: (5 sc, dec) ×6 (36)
R15: sc around (36)
R16: (4 sc, dec) ×6 (30)
Insert the 18 mm eyes between R10 and R11 with seven visible stitches between their inner edges. Fit both washers before stuffing the lower head.
R17: (3 sc, dec) ×6 (24)
R18: (2 sc, dec) ×6 (18)
R19: (sc, dec) ×6 (12)
R20: dec ×6 (6)
Stuff in small layers. Keep the forehead rounded and leave a shallow flat area beneath the eyes for the trunk attachment.
Fasten off. Leave a 30 cm tail and close the opening.
Body
Yarn: peach — broad sitting-body construction.
R1: 6 sc in MR (6)
R2: inc ×6 (12)
R3: (sc, inc) ×6 (18)
R4: (2 sc, inc) ×6 (24)
R5: (3 sc, inc) ×6 (30)
R6: (4 sc, inc) ×6 (36)
R7: (5 sc, inc) ×6 (42)
R8–R14: sc around (42)
R15: (5 sc, dec) ×6 (36)
R16–R18: sc around (36)
R19: (4 sc, dec) ×6 (30)
R20: sc around (30)
R21: (3 sc, dec) ×6 (24)
R22: (2 sc, dec) ×6 (18)
R23: (sc, dec) ×6 (12)
R24: dec ×6 (6)
Pack the lower half firmly so the body does not flatten under the head. Keep the final four rounds moderately stuffed for easier neck assembly.
Fasten off. Leave a 35 cm tail for sewing the head.
Trunk
Yarn: peach — tapered and lightly curved.
R1: 6 sc in MR (6)
R2: inc ×6 (12)
R3–R5: sc around (12)
R6: (4 sc, dec) ×2 (10)
R7–R10: sc around (10)
R11: (3 sc, dec) ×2 (8)
R12–R15: sc around (8)
R16: dec ×4 (4)
Stuff the first eight rounds moderately. Add very little stuffing near the tip, then bend the final six rounds upward and hold the curve with two concealed stitches.
Fasten off. Leave a 30 cm sewing tail.
Outer Ears (Make 2)
Yarn: peach — large flat circles.
R1: 6 sc in MR (6)
R2: inc ×6 (12)
R3: (sc, inc) ×6 (18)
R4: (2 sc, inc) ×6 (24)
R5: (3 sc, inc) ×6 (30)
R6: (4 sc, inc) ×6 (36)
R7: sc around (36)
Fasten off. Leave a 35 cm sewing tail on each ear.
Inner Ears (Make 2)
Yarn: a slightly darker peach — flat circles.
R1: 6 sc in MR (6)
R2: inc ×6 (12)
R3: (sc, inc) ×6 (18)
R4: (2 sc, inc) ×6 (24)
R5: (3 sc, inc) ×6 (30)
Fasten off. Leave a 25 cm tail. Sew one inner ear centrally onto each outer ear, leaving the final outer round visible.
Arms (Make 2)
Yarn: peach.
R1: 6 sc in MR (6)
R2: inc ×6 (12)
R3: (sc, inc) ×6 (18)
R4–R6: sc around (18)
R7: (sc, dec) ×6 (12)
R8–R11: sc around (12)
R12: dec ×6 (6)
Stuff the paw firmly and the upper arm lightly. Add three short cream stitches across the front of each paw for nails.
Fasten off. Leave a 25 cm tail.
Back Legs (Make 2)
Yarn: peach — broad seated feet.
R1: 6 sc in MR (6)
R2: inc ×6 (12)
R3: (sc, inc) ×6 (18)
R4: (2 sc, inc) ×6 (24)
R5: BLO sc around (24)
R6–R8: sc around (24)
R9: (2 sc, dec) ×6 (18)
R10–R12: sc around (18)
R13: (sc, dec) ×6 (12)
R14: dec ×6 (6)
Stuff each foot firmly. Embroider three cream toenails over R3–R5, spacing them two stitches apart.
Fasten off. Leave a 30 cm tail.
Cheek Patches (Make 2)
Yarn: coral pink — flat circles.
R1: 6 sc in MR (6)
R2: inc ×6 (12)
Join with a sl st. Fasten off and leave a 15 cm tail. Keep both patches flat and unstuffed.
Tail
Yarn: peach with black tip.
R1: 6 sc in MR (6)
R2–R9: sc around (6)
Change to black.
R10: inc ×6 (12)
R11: sc around (12)
R12: dec ×6 (6)
Fasten off. Leave a 20 cm tail and add only a thin strand of stuffing.
Bee Hood
Yarn: yellow and black — work in joined rounds.
R1: With yellow, 6 sc in MR; join (6)
R2: inc ×6; join (12)
R3: (sc, inc) ×6; join (18)
R4: (2 sc, inc) ×6; join (24)
R5: Change to black, (3 sc, inc) ×6; join (30)
R6: black sc around; join (30)
R7: Change to yellow, (4 sc, inc) ×6; join (36)
R8: yellow sc around; join (36)
R9: Change to black, (5 sc, inc) ×6; join (42)
R10: black sc around; join (42)
R11–R12: Change to yellow, sc around; join (42)
Stop after R12 so the hood remains above the ear attachment line. Test it over the completed head before adding the border.
Join yellow yarn at the front opening and work 36 evenly spaced sc around the lower edge. Fasten off with a 25 cm tail.
Antennae (Make 2)
Yarn: black — use chenille for the tips and smooth black yarn for the stems.
Tip R1: 6 sc in MR (6)
Tip R2: inc ×6 (12)
Tip R3: sc around (12)
Tip R4: dec ×6 (6)
Stuff each tip lightly.
For each stem, ch 14 and sl st back through all 13 chains. Sew the stem to the antenna tip and attach the opposite end to the hood.
Bee Wings (Make 2)
Yarn: white — flat oval panels.
R1: ch 7; starting in second ch, 5 sc, 3 sc in final ch, 4 sc along the opposite side, inc (14)
R2: inc, 4 sc, inc ×3, 4 sc, inc ×2 (20)
R3: sc around (20)
R4: (3 sc, dec) ×4 (16)
Join with a sl st. Fasten off and leave a 25 cm tail. Do not stuff.
Honeycomb Bag Panels (Make 2)
Yarn: yellow DK cotton — six-sided construction.
R1: 6 sc in MR (6)
R2: inc ×6 (12)
R3: (sc, ch 1, sc in the same stitch, sc in next stitch) ×6 (24)
R4: sc to each corner ch-space, work sc, ch 1, sc in every corner; continue around (36)
Fasten off the first panel. Place both panels together and join with cream yarn, working sc through both layers around five sides. Add a thin layer of stuffing, then close the final side.
Honeycomb Surface Lines
Yarn: cream DK cotton.
Embroider six connected hexagonal cells across the front panel. Each cell should measure approximately 2.5 cm across. Keep the cream lines on the surface rather than pulling them deeply into the yellow panel.
Bag Strap
Yarn: cream DK cotton.
Row 1: ch 56, sc in second ch from hook and across (55)
Row 2: ch 1, turn, sl st loosely across (55)
Fasten off. Leave a 20 cm tail at each end.
Hood Bow
Yarn: black.
Row 1: ch 12, sc in second ch from hook and across (11)
Row 2: ch 1, turn, sc across (11)
Row 3: ch 1, turn, sc across (11)
Fasten off. Fold both ends toward the center and wrap black yarn around the middle eight times. Leave a 20 cm tail for attachment.
Assembly
- Pin the head to the body with the eye line centered above the front of the belly. Sew twice around the neck using strong peach yarn.
- Place the trunk one round beneath the eyes. Sew around its open base, then add two hidden stitches to hold the upward tip.
- Attach the layered ears to the sides of the head across R8–R15. Keep each inner edge approximately two stitches behind the nearest eye.
- Sew the cheek patches beside the trunk, keeping their upper edges level with the lower edge of the eyes.
- Position the back legs against the lower sides of the body. Both feet must contact the surface before either seam is completed.
- Attach the arms across the upper body, angling both paws slightly inward. Keep the right arm clear of the bag position.
- Sew the tail to the lower back. Place the bee wings above it with a 2 cm gap between their inner edges.
- Fit the striped hood over the head and tack it behind both ears. Attach the antennae on R4 of the hood and sew the bow beside the right antenna.
- Attach both strap ends to the upper corners of the honeycomb bag. Pass the strap from the left shoulder to the right side of the belly.
- Tack the strap beneath the hood and secure the bag to the body with two concealed stitches.
The completed elephant should remain seated without resting on its trunk, wings or honeycomb bag.
7 Technical Tips
- Round-marker loss: Chenille can hide a marker shorter than 20 mm. Count every 42-stitch head and body round before beginning the next one.
- Forehead distortion: A single dense stuffing clump can push one eye forward. Insert pieces no larger than 2 cm and distribute them around both eye washers.
- Decrease ridges: Standard decreases create visible bars on the lower head. Work each decrease through the front loops and keep the working loop close to the hook shaft.
- Restricted eye access: Installing the washers after R16 leaves an opening of only 30 stitches. Fit both eyes immediately after completing R16.
- Trunk rotation: A trunk attached with fewer than two seam passes can twist sideways. Sew around its base twice and add two anchoring stitches beneath the curve.
- Uneven ear placement: A vertical difference of one round makes the hood appear tilted. Mark the upper and lower attachment points on both sides before pinning either ear.
- Loose bag strap: One attachment pass can pull through the DK fabric. Sew each strap end three times and weave the tail through at least 3 cm of stitches.
Conclusion
Inspect the finished figure from the front and both sides before trimming the assembly tails. The trunk should curve upward without covering either eye, both ears should extend beyond the hood, and the honeycomb bag must finish above the right foot. Record the final eye spacing, hood circumference and antenna length before making a second version because chenille thickness varies between brands. The next step is to photograph the bee elephant amigurumi crochet pattern against a plain background and check whether both wing edges remain visible. Save the project to Pinterest and share the finished elephant on Instagram with #HoneyBeeElephant. Did the hood fit better with its lower edge behind the ears or directly above their seams?









