Introduction
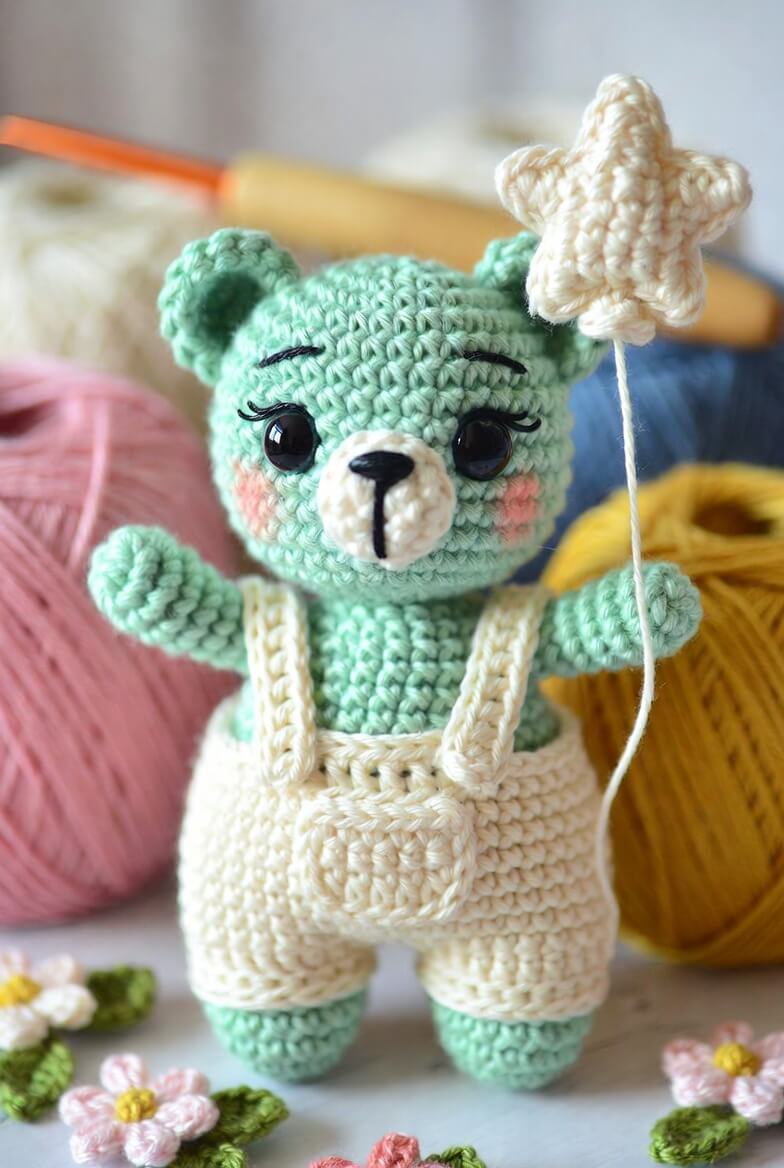
A bear holding a balloon needs one paw rotated inward and the other lifted clear of its ear. This teddy bear amigurumi crochet pattern creates a 23 cm standing figure with cream overalls, a bib pocket and a five-point star balloon. Use DK cotton, a 3.5 mm hook and 12 mm safety eyes. The project suits intermediate makers and provides a stable display figure with removable-looking clothing built directly to size.
The Design: What Makes Minty the Bear Different
Minty uses a broad 36-stitch head because the muzzle, large eyes and embroidered lashes need separate visual space. A narrower crown would push the eyes toward the ear seams and distort the expression. The torso retains its width through the hips, giving the crochet bear in overalls enough support to stand on two cylindrical legs. Each arm has a slight natural curve created by uneven decreases, allowing one paw to hold the balloon cord while the opposite paw points outward. The shorts are formed from two joined leg openings rather than a flat rectangle, so the garment follows the body without bunching between the legs. One frequent error in a dressed teddy bear pattern is attaching the straps before testing the bib height. Short straps compress the shoulders; long ones pull the bib below the stomach. Pinning all clothing sections first avoids both failures.
Project Info at a Glance
| Skill Level | Time | Finished Size | Hook | Best For |
|---|---|---|---|---|
| Intermediate | 8–10 hours | Approximately 23 cm | 3.5 mm | Standing displays, nursery shelves and character collections |
Materials and Tools
Yarn
- Mint green — DK or light-worsted cotton — approximately 55–65 g — Scheepjes Catona, YarnArt Jeans or a comparable smooth yarn.
- Cream — DK or light-worsted cotton — approximately 35–45 g — use for the muzzle, overalls and star.
- Blush pink — DK cotton — under 3 g — use for two cheek patches.
- Black — embroidery thread or split cotton yarn — use for the nose, mouth, eyebrows and eyelashes.
- Cream sewing strand — approximately 35 cm — use as the balloon cord.
Tools
- 3.5 mm crochet hook
- 12 mm safety eyes
- Polyester stuffing
- Blunt tapestry needle
- Locking stitch markers
- Long sewing pins
- Scissors
A published 23 cm bear provides the finished-size benchmark, while comparable cotton bears use small hooks that create compact fabric. The exact yarn consumption changes with cotton density and individual tension.
Abbreviations
- MR — magic ring
- sc — single crochet
- inc — two single crochet stitches in one stitch
- dec — single crochet two stitches together
- sl st — slip stitch
- ch — chain
- hdc — half double crochet
- dc — double crochet
- BLO — back loop only
Work an invisible decrease through the front loops of the next two stitches, then complete them as one single crochet.
Pattern — Step by Step
Work in a continuous spiral unless the section states that rows are turned. Place a marker in the first stitch of every round. The medium-size head and body use a 36-stitch plateau.
Head
Yarn: mint green — Source: standard amigurumi mathematics.
R1: 6 sc in MR (6)
R2: inc ×6 (12)
R3: (sc, inc) ×6 (18)
R4: (2 sc, inc) ×6 (24)
R5: (3 sc, inc) ×6 (30)
R6: (4 sc, inc) ×6 (36)
R7–R13: sc around (36)
R14: (4 sc, dec) ×6 (30)
Insert 12 mm eyes between R10 and R11 with eight visible stitches between the posts. Fit both washers before closing the lower half.
R15: (3 sc, dec) ×6 (24)
R16: (2 sc, dec) ×6 (18)
Stuff the crown firmly. Add small pieces behind the eyes rather than pressing one large piece through the opening.
R17: (sc, dec) ×6 (12)
R18: dec ×6 (6)
Fasten off. Leave a 25 cm tail and close the opening through the front loops.
Body
Yarn: mint green — Source: standard amigurumi mathematics.
R1: 6 sc in MR (6)
R2: inc ×6 (12)
R3: (sc, inc) ×6 (18)
R4: (2 sc, inc) ×6 (24)
R5: (3 sc, inc) ×6 (30)
R6: (4 sc, inc) ×6 (36)
R7–R11: sc around (36)
R12: (4 sc, dec) ×6 (30)
R13–R15: sc around (30)
R16: (3 sc, dec) ×6 (24)
R17: sc around (24)
R18: (2 sc, dec) ×6 (18)
Stuff the lower body firmly, keeping the final two rounds flexible for the neck seam.
R19: (sc, dec) ×6 (12)
R20: dec ×6 (6)
Fasten off. Leave a 30 cm sewing tail.
Arms (Make 2)
Yarn: mint green — Source: standard amigurumi mathematics.
R1: 6 sc in MR (6)
R2: inc ×6 (12)
R3–R5: sc around (12)
R6: (2 sc, dec) ×3 (9)
R7–R12: sc around (9)
R13: (sc, dec) ×3 (6)
Stuff the paw and the first half of the arm. Leave the final four rounds lightly filled so each arm can be angled.
Fasten off. Leave a 25 cm tail on each arm.
Legs (Make 2)
Yarn: mint green — Source: standard amigurumi mathematics.
R1: 6 sc in MR (6)
R2: inc ×6 (12)
R3: (sc, inc) ×6 (18)
R4–R6: sc around (18)
R7: (sc, dec) ×6 (12)
R8–R12: sc around (12)
R13: dec ×6 (6)
Stuff the feet firmly and the upper legs moderately. Compare both lengths before closing.
Fasten off. Leave a 25 cm sewing tail.
Ears (Make 2)
Yarn: mint green — Reference basis: published bear ears commonly form short flattened cups.
R1: 6 sc in MR (6)
R2: inc ×6 (12)
R3: (sc, inc) ×6 (18)
R4–R5: sc around (18)
R6: (sc, dec) ×6 (12)
Do not stuff. Flatten each ear so the opening forms a shallow curve.
Fasten off. Leave a 20 cm sewing tail.
Muzzle
Yarn: cream — Source: standard amigurumi mathematics.
R1: 6 sc in MR (6)
R2: inc ×6 (12)
R3: (sc, inc) ×6 (18)
R4: sc around (18)
Embroider a black triangular nose across three central stitches. Carry one vertical mouth line approximately 2 cm downward from the nose.
Fasten off. Leave a 25 cm tail and add a small amount of stuffing.
Cheek Patches (Make 2)
Yarn: blush pink — Source: standard flat-circle mathematics.
R1: 6 sc in MR (6)
R2: inc ×6 (12)
Join with a sl st. Fasten off and leave a 12 cm sewing tail.
Tail
Yarn: mint green — Source: standard amigurumi mathematics.
R1: 6 sc in MR (6)
R2: inc ×6 (12)
R3–R4: sc around (12)
R5: dec ×6 (6)
Add a small amount of stuffing.
Fasten off. Leave a 15 cm sewing tail.
Overall Leg Openings (Make 2)
Yarn: cream — Source: garment construction fitted to the photographed body.
R1: ch 19, join without twisting, sc around (18)
R2–R5: sc around (18)
Fasten off the first tube. Do not cut the second tube after R5.
Overall Shorts
Yarn: cream.
R6: sc 18 around the second tube, ch 2, sc 18 around the first tube, ch 2 (40)
R7–R10: sc around (40)
R11: (8 sc, dec) ×4 (36)
R12–R14: sc around (36)
Test the shorts around the body before cutting the yarn. The upper edge should sit just below the widest body round.
Fasten off. Weave in the working tail.
Overall Bib
Yarn: cream — work in turned rows.
Ch 15.
Row 1: sc in second ch from hook and across (14)
Rows 2–8: ch 1, turn, sc across (14)
Fasten off. Leave a 30 cm tail and sew the lower edge to the center front of the shorts.
Overall Straps (Make 2)
Yarn: cream — work in turned rows.
Ch 4.
Row 1: sc in second ch from hook and across (3)
Rows 2–20: ch 1, turn, sc across (3)
Measure each strap from the upper bib corner, over the shoulder and down to the shorts. Add or remove rows before sewing.
Fasten off. Leave a 20 cm tail.
Bib Pocket
Yarn: cream — work in turned rows.
Ch 9.
Row 1: sc in second ch from hook and across (8)
Rows 2–5: ch 1, turn, sc across (8)
Row 6: ch 1, turn, dec, 4 sc, dec (6)
Fasten off. Leave a 20 cm tail. Sew the two sides and lower edge to the center of the bib.
Star Panels (Make 2)
Yarn: cream — worked as a joined five-point motif.
R1: 10 sc in MR, join with sl st (10)
R2: repeat the following sequence five times: ch 5, sl st in second ch from hook, sc in next ch, hdc in next ch, dc in next ch, skip 1 stitch of R1, sl st in next stitch
Block both panels flat before joining so all five points align.
Fasten off the first panel. Leave a 35 cm tail on the second.
Balloon Cord
Yarn: cream — use a smooth strand rather than a stuffed tube.
Cut one 35 cm strand. Knot one end securely inside the lower star point before the two panels are joined.
Star Assembly
Place the two star panels with wrong sides together. Whipstitch around four complete points, add a thin layer of stuffing to the center and finish the remaining seam. Keep each point lightly filled so its edges remain defined.
Assembly
- Center the head over the body and sew twice around the neck seam, adding a final pinch of stuffing before closing the last 2 cm.
- Pin the muzzle between head R11 and R15, then sew around its full edge without flattening the center.
- Place each cheek patch beside the lower muzzle and embroider one eyebrow plus two upper lashes above each eye.
- Attach the ears between head R4 and R8, leaving approximately eight stitches between their inner edges.
- Sew the legs to the lower body between R4 and R8, checking that both feet meet a flat surface.
- Pull the overall shorts over the legs and body, then tack the waistband to four evenly spaced body stitches.
- Attach the bib to the shorts, run both straps over the shoulders and sew their back ends approximately six stitches apart.
- Pin the left arm upward and outward; angle the right arm inward so its paw meets the balloon cord.
- Attach the tail at the center back below the overall waistband and tack the cord to the right paw with three small stitches.
- Weave every exposed tail through at least 4 cm of stuffed fabric, reverse direction once and trim after the yarn retracts.
The finished bear should stand on both feet while the star remains above the right ear.
7 Technical Tips
- Round-marker displacement: A missed first stitch rotates the eyes and muzzle away from the body center. Use a locking marker through both loops and verify the stitch count after every increase round.
- Flattened forehead: Insufficient stuffing above the safety eyes creates a visible hollow. Add filling in pieces no larger than 2 cm and pack it toward the crown with the blunt end of the hook.
- Decrease gaps: Conventional decreases may expose white stuffing through mint cotton. Work front-loop invisible decreases and keep each finished loop close to the 3.5 mm hook shaft.
- Incorrect eye timing: Washers become difficult to fit after the head drops below 24 stitches. Install both 12 mm eyes immediately after completing R14.
- Cotton tension variation: Loose stitches make the overalls fit differently from the body. Compare ten single crochet stitches in both colors; their widths should differ by no more than 3 mm.
- Twisted straps: Sewing the first end before checking the back position can rotate a strap. Pin all four strap ends and view the bear from the side before making permanent stitches.
- Weak balloon connection: One pass through the paw can loosen under the star’s weight. Tack the cord with three passes across a 5 mm section, then bury the knot inside the arm.
Conclusion
Check the garment fit and standing balance before trimming any structural sewing tails. The next concrete step is to crochet both overall leg tubes and test them over the completed legs; cotton gauge changes can alter each opening by more than a centimeter. Save this teddy bear amigurumi crochet pattern to Pinterest, then share front, side and back photographs on Instagram with #MintStarBear. Those three views document the strap alignment, tail clearance and balloon angle more accurately than a single image. For this bear, should the star remain directly above the right ear or tilt outward to follow the raised paw?









