Introduction
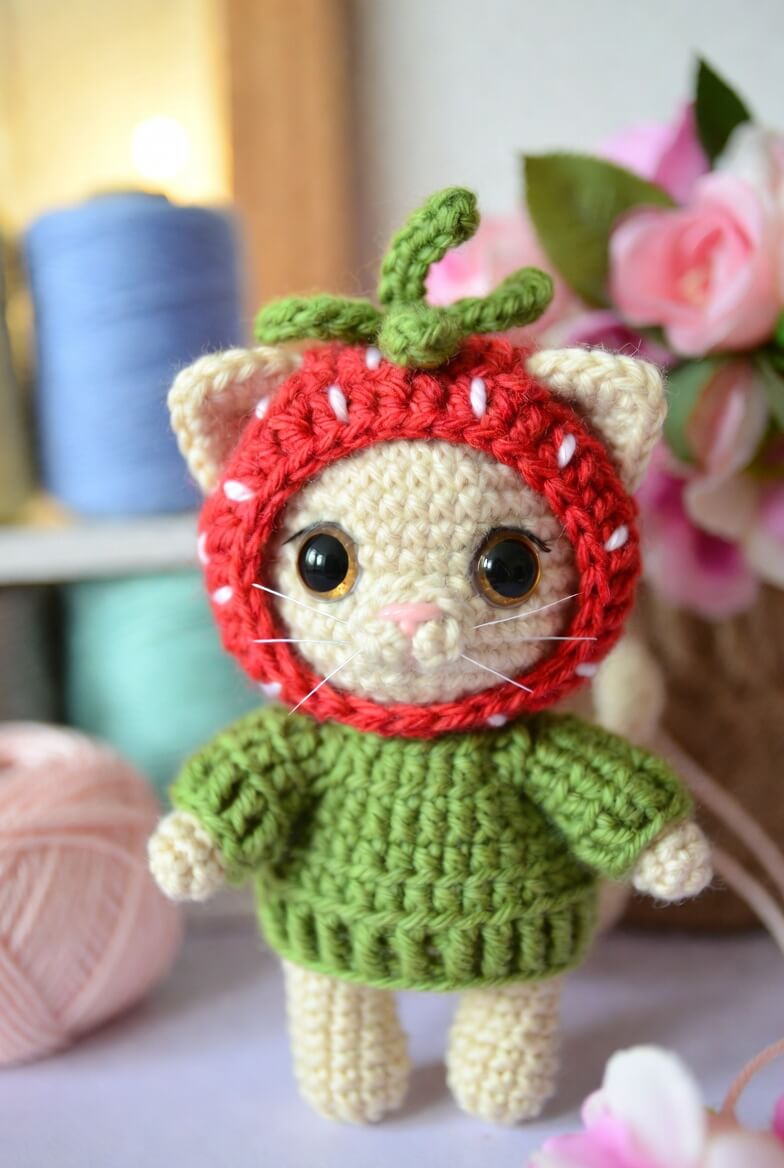
A strawberry hood must expose both cat ears without turning its circular face opening into an oval. This strawberry cat amigurumi crochet pattern uses worsted yarn, a 3.5 mm hook and separately fitted clothing to create a standing figure approximately 20–22 cm tall. The project is intermediate level. Its broad feet support the finished cat, while the removable sweater gives direct access to the neck and arm seams.
The Design: What Makes This Strawberry Cat Different
The head expands to a 42-stitch plateau so the face remains wide enough for 15 mm eyes, a raised muzzle and two exposed ear bases. A separate red hood surrounds the head rather than replacing it, which creates the visible cream forehead and keeps the strawberry costume removable. Five green leaves meet at the crown to cover the hood’s starting point and establish the fruit silhouette. The torso is narrower than the head, but the green sweater adds enough visual width to balance the hood. This crochet cat with strawberry hood also uses straight legs rather than a seated lower body. That construction matches the upright photograph and leaves room for a curved tail at the back. A common mistake in a strawberry costume cat pattern is cutting the face opening too small. The edge then rolls inward and partly covers the eyes.
Project Info at a Glance
| Skill Level | Time | Finished Size | Hook | Best For |
|---|---|---|---|---|
| Intermediate | 10–13 hours | Approximately 20–22 cm | 3.5 mm | Fruit-themed collections, display shelves and handmade market stock |
Measure the completed figure from the bottom of the feet to the highest green leaf. Changes in yarn thickness, hook size and stuffing density will alter the final height.
Materials and Tools
Yarn
- Cream — worsted or aran weight — approximately 70 g — used for the cat, ears, hands and legs
- Strawberry red — worsted or aran weight — approximately 50 g — used for the fitted hood
- Leaf green — worsted or aran weight — approximately 45 g — used for the sweater and strawberry crown
- White — DK or worsted weight — approximately 4 g — used for the strawberry seeds and whiskers
- Pale pink — embroidery yarn — approximately 2 g — used for the nose and inner ears
- Black — embroidery yarn — approximately 1 g — used for the mouth and eyelashes
Tools
- 3.5 mm crochet hook
- 15 mm safety eyes
- Polyester stuffing, approximately 60–75 g
- Yarn needle
- Locking stitch markers
- Dressmaking pins
- Scissors
- Ruler
- Optional clear monofilament for rigid whiskers
Abbreviations
- MR — magic ring
- sc — single crochet
- inc — two single crochet stitches in one stitch
- dec — invisible decrease over two stitches
- sl st — slip stitch
- ch — chain
- hdc — half double crochet
- dc — double crochet
- BLO — back loop only
- FLO — front loop only
Work an invisible decrease through the front loops of the next two stitches, then complete one single crochet through both loops.
Pattern — Step by Step
Work three-dimensional pieces in continuous spirals unless joined rounds or rows are stated. Place a locking marker in the first completed stitch of every round.
Head
Yarn: cream — project-specific six-stitch amigurumi shaping.
R1: 6 sc in MR (6)
R2: inc ×6 (12)
R3: (sc, inc) ×6 (18)
R4: (2 sc, inc) ×6 (24)
R5: (3 sc, inc) ×6 (30)
R6: (4 sc, inc) ×6 (36)
R7: (5 sc, inc) ×6 (42)
R8–R15: sc around (42)
R16: (5 sc, dec) ×6 (36)
R17: sc around (36)
R18: (4 sc, dec) ×6 (30)
R19: sc around (30)
R20: (3 sc, dec) ×6 (24)
R21: (2 sc, dec) ×6 (18)
R22: (sc, dec) ×6 (12)
R23: dec ×6 (6)
R24: draw the yarn through the front loops and close (6)
Insert the eyes between R12 and R13 with eight visible stitches between the posts. Fit both washers before completing R20. Stuff after R18, placing small sections around the eye backs before filling the crown.
Fasten off. Leave a 30 cm tail.
Body
Yarn: cream — project-specific six-stitch shaping.
R1: 6 sc in MR (6)
R2: inc ×6 (12)
R3: (sc, inc) ×6 (18)
R4: (2 sc, inc) ×6 (24)
R5: (3 sc, inc) ×6 (30)
R6: (4 sc, inc) ×6 (36)
R7–R14: sc around (36)
R15: (4 sc, dec) ×6 (30)
R16–R18: sc around (30)
R19: (3 sc, dec) ×6 (24)
R20–R21: sc around (24)
R22: (2 sc, dec) ×6 (18)
R23: sc around (18)
Pack the lower half firmly and leave the upper 2 cm moderately stuffed. Keep the final opening level so the head does not tilt after the hood is added.
Fasten off. Leave a 35 cm tail.
Arms (Make 2)
Yarn: cream — standard amigurumi math.
R1: 6 sc in MR (6)
R2: inc ×6 (12)
R3–R5: sc around (12)
R6: (2 sc, dec) ×3 (9)
R7–R11: sc around (9)
R12: (sc, dec) ×3 (6)
Stuff through R6 only. The upper arm must remain flexible enough to pass through the sweater sleeve.
Flatten the opening and crochet 3 sc through both layers. Fasten off, leaving a 22 cm tail.
Legs (Make 2)
Yarn: cream — straight standing-leg construction.
R1: 6 sc in MR (6)
R2: inc ×6 (12)
R3: (sc, inc) ×6 (18)
R4–R6: sc around (18)
R7: (sc, dec) ×6 (12)
R8–R14: sc around (12)
R15: dec ×6 (6)
Stuff the foot firmly through R7. Continue with moderate filling so the leg remains straight without becoming rigid at the attachment edge.
Fasten off. Leave a 30 cm tail.
Cat Ears (Make 2)
Yarn: cream — triangular pieces worked in rows.
Row 1: ch 2, 2 sc in second ch from hook (2)
Row 2: ch 1, turn, inc in each stitch (4)
Row 3: ch 1, turn, inc, 2 sc, inc (6)
Row 4: ch 1, turn, inc, 4 sc, inc (8)
Row 5: ch 1, turn, inc, 6 sc, inc (10)
Row 6: ch 1, turn, sc across (10)
Work one surface line of pale pink through the center of each ear, stopping 5 mm above the lower edge.
Fasten off. Leave a 25 cm sewing tail.
Muzzle
Yarn: cream — shallow oval construction.
R1: 6 sc in MR (6)
R2: inc ×6 (12)
R3: (sc, inc) ×6 (18)
R4: sc around (18)
R5: (sc, dec) ×6 (12)
Add a small pinch of stuffing. Shape the piece into a horizontal oval before pinning it below the eyes.
Fasten off. Leave a 25 cm tail.
Nose and Mouth
Use pale-pink yarn to embroider a horizontal nose across three muzzle stitches. Add one 10 mm black vertical line beneath the nose, then form two short mouth curves measuring approximately 7 mm each.
Whiskers
Cut six white yarn or monofilament strands measuring 13 cm. Pass three strands through each side of the muzzle, leaving approximately 5 cm exposed. Knot the inner ends together before the muzzle seam is completely closed.
Tail
Yarn: cream — tapered curved tube.
R1: 6 sc in MR (6)
R2: sc around (6)
R3: inc ×6 (12)
R4–R11: sc around (12)
R12: (2 sc, dec) ×3 (9)
R13–R17: sc around (9)
R18: (sc, dec) ×3 (6)
Stuff the base firmly and the final half lightly. Curve the tube while adding filling rather than bending it after closure.
Fasten off. Leave a 30 cm tail.
Green Sweater Body
Yarn: leaf green — worked in joined rounds from the lower edge upward.
R1: ch 37, join with a sl st, taking care not to twist; ch 2, 36 hdc around, join (36)
R2–R5: ch 2, hdc around, join (36)
R6: ch 2, (4 hdc, hdc dec) ×6, join (30)
R7–R10: ch 2, hdc around, join (30)
R11: ch 2, 5 hdc, ch 6, skip 5 stitches, 10 hdc, ch 6, skip 5 stitches, 5 hdc, join (32 including chains)
R12: ch 2, hdc in each stitch and chain around, join (32)
R13: ch 2, (6 hdc, hdc dec) ×4, join (28)
R14–R16: ch 2, hdc around, join (28)
R17: ch 1, BLO sc around, join (28)
R18: ch 1, sc around, join (28)
Test the sweater over the unassembled torso after R10. The arm openings should remain directly opposite each other.
Fasten off. Weave in both ends.
Sweater Sleeves (Make 2)
Yarn: leaf green — joined to the arm openings.
R1: join yarn in the lower corner of an opening, ch 2, work 12 hdc evenly around, join (12)
R2–R4: ch 2, hdc around, join (12)
R5: ch 1, BLO sc around, join (12)
Insert the arm before finishing the attachment seam. The cream hand should extend approximately 2 cm beyond the cuff.
Fasten off. Weave in both tails.
Strawberry Hood
Yarn: strawberry red — fitted hood worked from the crown downward.
R1: 6 sc in MR (6)
R2: inc ×6 (12)
R3: (sc, inc) ×6 (18)
R4: (2 sc, inc) ×6 (24)
R5: (3 sc, inc) ×6 (30)
R6: (4 sc, inc) ×6 (36)
R7: (5 sc, inc) ×6 (42)
R8–R10: sc around (42)
R11: sc in next 5, ch 8, skip 6 stitches, sc in next 20, ch 8, skip 6 stitches, sc in final 5 (44 including chains)
R12: sc in every stitch and chain around (44)
R13–R14: sc around (44)
R15: sc in next 8, ch 28, skip 28 stitches, sc in final 8 (44 including chains)
R16: sc in every stitch and chain around (44)
R17: (9 sc, dec) ×4 (40)
R18: sc around (40)
The two openings formed in R11 accommodate the ears. The 28-chain opening in R15 frames the face. Test the hood before working R17.
Fasten off. Leave a 35 cm tail.
Face-Opening Edging
Yarn: strawberry red — worked directly around the face opening.
Join yarn at the lower center. Ch 1 and work 40 sc evenly around the opening, placing an extra stitch at each upper corner. Join with a sl st (40).
The edge should lie flat against the cream face without covering the lower edges of the eyes.
Fasten off. Weave in the tail.
Strawberry Seeds
Thread white yarn through the hood. Work fourteen vertical surface stitches measuring 6–8 mm each. Space them irregularly but retain at least two red stitches between neighboring seeds.
Strawberry Leaves (Make 5)
Yarn: leaf green — worked in rows.
Row 1: ch 9, sc in second ch from hook, hdc, 3 dc, hdc, sc, sl st (8)
Row 2: work along the opposite side of the foundation chain: sl st, sc, hdc, 3 dc, hdc, sc (8)
Make three leaves with the full chain length. For two shorter leaves, begin with ch 7 and omit one dc from each side.
Fasten off. Leave a 20 cm tail on every leaf.
Leaf Crown Base
Yarn: leaf green — small raised center.
R1: 6 sc in MR (6)
R2: inc ×6 (12)
R3: sc around (12)
R4: dec ×6 (6)
Add a small pinch of stuffing before closing. Arrange the five leaves beneath this piece so they radiate in different directions.
Fasten off. Leave a 20 cm tail.
Assembly
- Pin the head centrally over the body’s 18-stitch opening. Sew around the neck twice and add a final pinch of stuffing before closing the last 2 cm.
- Position the muzzle between head R13 and R17. Complete the nose, mouth and internal whisker knots before closing its final seam.
- Pin the ears between head R4 and R8 with approximately eight crown stitches between their inner corners. Match the left and right angles before sewing.
- Pull the sweater onto the body from the lower opening. Align both armholes with the side seams, then attach the arms through the openings at body R18.
- Sew the two legs across body R3 to R9. Stand the figure on a flat table and compare both foot levels before securing the second leg.
- Attach the tail at the center back between body R7 and R12. Angle the first 3 cm downward, then curve the remaining section toward one side.
- Fit the strawberry hood over the head and guide both ears through their openings. Center the face opening around the muzzle and eyes.
- Tack the lower rear edge of the hood to the neck at four points. Keep the front and side edges removable so the costume can be lifted for cleaning or repair.
- Sew the five leaves around the crown opening, alternating long and short points. Place the stuffed crown base over their inner ends.
- Check the fourteen seed stitches, trim the six whiskers to equal 5 cm lengths and bury every remaining yarn tail through at least 5 cm of stuffed fabric.
The completed strawberry cat should stand on both feet without support from the tail, sweater or hood.
7 Technical Tips
- Marker displacement: Missing the first stitch shifts the head decreases and makes the muzzle appear off-center. Lock the marker into the completed stitch rather than placing it loosely between rounds.
- Neck compression: A neck that collapses by more than 6 mm will let the strawberry crown pull the head backward. Add small pieces of filling around the outer neck wall before completing the head seam.
- Decrease holes: Standard decreases can leave visible gaps beside the eyes and lower body. Work through front loops only and change to a 3.25 mm hook when a hole exceeds 2 mm.
- Late eye fitting: Fifteen-millimetre washers are difficult to install after the head opening drops below 24 stitches. Attach both eyes before beginning head R20.
- Distorted hood opening: A face edge with fewer than 38 stitches may pull into an oval. Count the edging round and add stitches at the two upper corners rather than along the lower chin.
- Misaligned sleeves: Armholes offset by three sweater stitches make one sleeve point backward. Lay the sweater flat after R11 and compare both openings before continuing.
- Uneven whiskers: Freehand trimming can leave one side longer by more than 10 mm. Cut all six strands at 13 cm, attach them first and trim every exposed section to 5 cm after assembly.
Conclusion
Test the strawberry hood before attaching the green crown. Both ears must pass through their openings without folding, and the red face edge should remain at least one stitch away from each eye. Crochet the first ear next and measure its 10-stitch base before making the second; matching base width matters more than matching relaxed height. Save this strawberry cat amigurumi crochet pattern to a Pinterest fruit-crochet board, then share the finished figure on Instagram using #StrawberrySweaterCat. Include the yarn weight, hook size and final standing height in the caption. Did you angle the five crown leaves upward, or spread them flat across the strawberry hood?









