Introduction
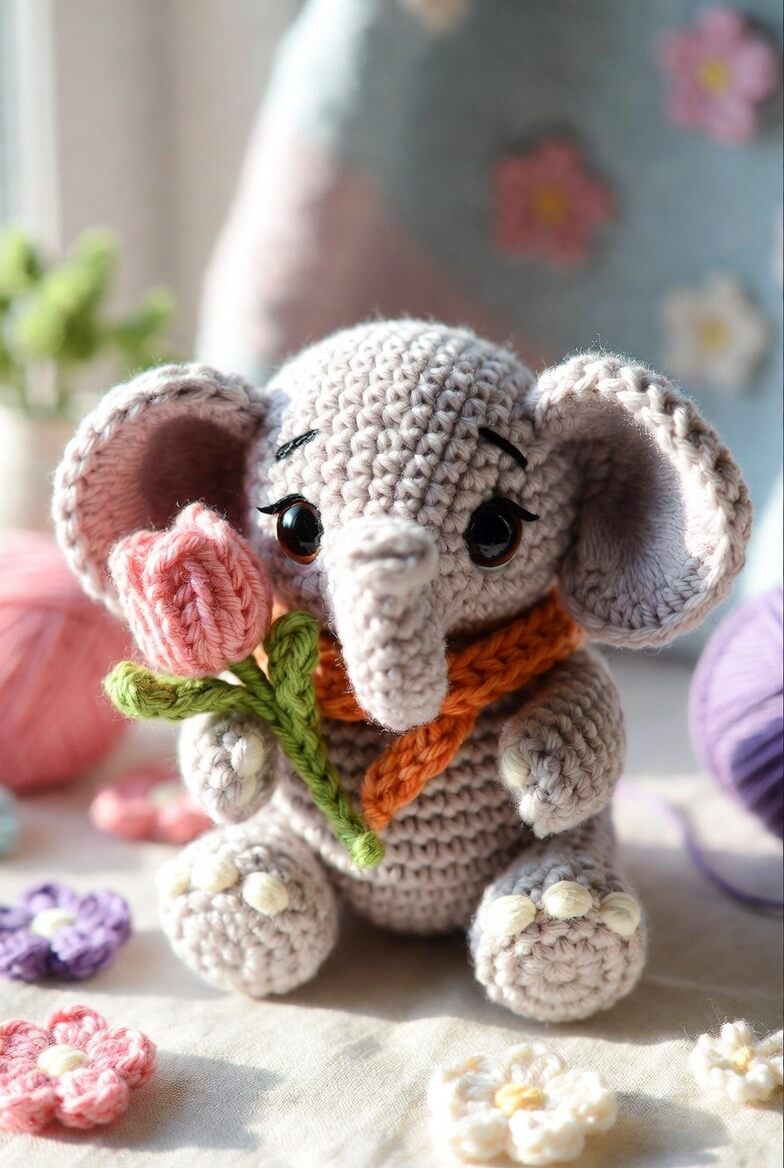
An elephant holding a tulip needs enough trunk clearance for the flower to remain visible between its ears. This elephant amigurumi crochet pattern uses DK cotton, a 3.5 mm hook and 12 mm safety eyes to make a sitting figure approximately 20 cm tall. The intermediate project includes layered ears, four limbs, a neck scarf and a reinforced flower stem suited to a stable spring display.
The Design: What Makes Flora the Elephant Different
Flora uses a 36-stitch head because the oversized ears already add considerable width to the silhouette. A larger head would push the ear edges too far from the body and make the tulip appear undersized. The trunk is worked as a narrow tube that widens toward its base, allowing it to hang between the eyes without covering the flower. Both arms angle inward so the paws meet around the stem, while the back legs form a broad seated base. The elephant holding flower amigurumi also has layered ears with smaller inner panels, a construction that creates depth without stuffing. One frequent mistake in a tulip elephant crochet pattern is positioning the stem directly beneath the trunk. That alignment hides the flower centre. Shift the tulip approximately 1 cm toward one paw, then let the trunk remain on the facial centre line.
Project Info at a Glance
| Skill Level | Time | Finished Size | Hook | Best For |
|---|---|---|---|---|
| Intermediate | 9–11 hours | Approximately 20 cm sitting | 3.5 mm | Spring displays and flower-themed collections |
Materials and Tools
Yarn
- Warm light grey — DK cotton or smooth light worsted — approximately 70–90 g — YarnArt Jeans, Scheepjes Catona or Paintbox Cotton DK.
- Dusty pink — matching yarn weight — approximately 15 g — used for the tulip and optional cheek patches.
- Burnt orange — matching yarn weight — approximately 12 g — used for the scarf.
- Olive green — matching yarn weight — approximately 10 g — used for the stem and leaves.
- Cream — matching yarn weight — approximately 5 g — used for the toenails.
- Black — smooth embroidery yarn — less than 1 g — used for eyebrows and eyelashes.
Tools
- 3.5 mm crochet hook
- 12 mm safety eyes
- Polyester stuffing
- Yarn needle
- Locking stitch markers
- Sewing pins
- One chenille stem or doubled floral wire for a display-only tulip
- Scissors
Omit wire, chenille stems and plastic eyes when the finished elephant is intended for a young child. Use a tightly rolled yarn cord and embroidered eyes instead.
Abbreviations
- MR — magic ring
- sc — single crochet
- inc — two single crochet stitches in one stitch
- dec — invisible decrease over two stitches
- sl st — slip stitch
- ch — chain
- hdc — half double crochet
- dc — double crochet
- BLO — back loop only
- FO — fasten off
Work an invisible decrease through the front loops of the next two stitches before completing one single crochet through both loops.
Pattern — Step by Step
Work the stuffed pieces in continuous spirals unless joined rounds or rows are specified. Move the stitch marker after every completed round.
Head
Yarn: warm light grey — original construction using standard six-stitch amigurumi shaping.
R1: 6 sc in MR (6)
R2: inc × 6 (12)
R3: (sc, inc) × 6 (18)
R4: (2 sc, inc) × 6 (24)
R5: (3 sc, inc) × 6 (30)
R6: (4 sc, inc) × 6 (36)
R7–R14: sc around (36)
Place the safety eyes between R10 and R11, 8 visible stitches apart. Test the trunk between the eye positions before attaching the washers.
R15: (4 sc, dec) × 6 (30)
R16: (3 sc, dec) × 6 (24)
R17: (2 sc, dec) × 6 (18)
Stuff around the eye stems first. Fill the crown firmly without stretching the stitches.
R18: (sc, dec) × 6 (12)
R19: dec × 6 (6)
Fasten off. Thread the tail through the front loops of the remaining six stitches and close the opening.
Body
Yarn: warm light grey — medium 36-stitch body.
R1: 6 sc in MR (6)
R2: inc × 6 (12)
R3: (sc, inc) × 6 (18)
R4: (2 sc, inc) × 6 (24)
R5: (3 sc, inc) × 6 (30)
R6: (4 sc, inc) × 6 (36)
R7–R13: sc around (36)
R14: (4 sc, dec) × 6 (30)
R15–R17: sc around (30)
R18: (3 sc, dec) × 6 (24)
R19–R20: sc around (24)
R21: (2 sc, dec) × 6 (18)
Stuff the lower body firmly so it retains a flat sitting base. Keep the neck area slightly softer.
R22: (sc, dec) × 6 (12)
R23: dec × 6 (6)
Fasten off. Leave a 35 cm tail for attaching the head.
Arms or Front Legs — Make 2
Yarn: warm light grey — shape both paws before attaching them around the flower stem.
R1: 6 sc in MR (6)
R2: inc × 6 (12)
R3–R5: sc around (12)
R6: (sc, dec) × 4 (8)
R7–R11: sc around (8)
Stuff the rounded paw only. Leave the upper section flexible.
R12: flatten and work 4 sc through both layers (4)
Fasten off. Leave a 25 cm tail.
Back Legs — Make 2
Yarn: warm light grey — the 24-stitch foot supplies the seated support.
R1: 6 sc in MR (6)
R2: inc × 6 (12)
R3: (sc, inc) × 6 (18)
R4: (2 sc, inc) × 6 (24)
R5–R6: sc around (24)
R7: (2 sc, dec) × 6 (18)
R8: (sc, dec) × 6 (12)
R9–R11: sc around (12)
Pack the foot firmly and place less stuffing near the attachment edge.
R12: dec × 6 (6)
Fasten off. Leave a 30 cm sewing tail.
Outer Ears — Make 2
Yarn: warm light grey — work flat and do not stuff.
R1: 6 sc in MR (6)
R2: inc × 6 (12)
R3: (sc, inc) × 6 (18)
R4: (2 sc, inc) × 6 (24)
R5: (3 sc, inc) × 6 (30)
R6: (4 sc, inc) × 6 (36)
Fasten off. Leave a 40 cm tail.
Inner Ears — Make 2
Yarn: a paler grey or the main grey yarn.
R1: 6 sc in MR (6)
R2: inc × 6 (12)
R3: (sc, inc) × 6 (18)
R4: (2 sc, inc) × 6 (24)
R5: (3 sc, inc) × 6 (30)
Fasten off. Leave a 30 cm tail.
Centre each inner ear on one outer ear and sew around its edge. Fold 2 cm of the lower ear inward to create the cupped shape.
Trunk
Yarn: warm light grey — comparable elephant patterns begin the trunk with six stitches and expand toward the face.
R1: 6 sc in MR (6)
R2–R4: sc around (6)
R5: (sc, inc) × 3 (9)
R6–R8: sc around (9)
R9: (2 sc, inc) × 3 (12)
R10–R11: sc around (12)
R12: (sc, inc) × 6 (18)
Add a narrow roll of stuffing. Keep the final round flat enough to sit against the face.
Fasten off. Leave a 35 cm sewing tail.
Cheek Patches — Make 2
Yarn: dusty pink. Work flat and omit these patches for a closer match to the low-contrast photograph.
R1: 6 sc in MR (6)
R2: inc × 6 (12)
Fasten off. Leave a 15 cm tail. Place each patch below the outside corner of one eye.
Toenails
Yarn: cream.
Embroider three short oval toenails on each back foot and two on each front paw. Every nail should cover one stitch width and no more than two rounds in height.
Scarf
Yarn: burnt orange — work in turning rows.
Row 1: ch 56; beginning in the second chain, 55 sc (55)
Row 2: ch 1, turn, 55 sc (55)
Row 3: ch 1, turn, 55 hdc (55)
Row 4: ch 1, turn, 55 sc (55)
Fasten off. Weave in both tails. The finished strip should measure approximately 30–32 cm before fitting.
Tulip Flower
Yarn: dusty pink — work from the closed lower point toward the petals.
R1: 6 sc in MR (6)
R2: inc × 6 (12)
R3: (sc, inc) × 6 (18)
R4–R6: sc around (18)
R7: (sc, dec) × 6 (12)
Add a small amount of stuffing. Keep the upper edge soft enough to pinch into petals.
R8: repeat [sl st, 4 dc in next stitch, sl st] four times around to form four raised petal sections.
Fasten off. Leave a 25 cm tail. Pinch each petal inward and tack adjacent lower edges together.
Tulip Stem
Yarn: olive green.
R1: 6 sc in MR (6)
R2–R18: sc around (6)
For a display figure, insert a folded chenille stem that finishes at least 1 cm below each opening. For a child-safe version, fill the tube with a tightly rolled yarn cord.
Fasten off. Leave a 25 cm tail and sew the upper opening beneath the tulip.
Tulip Leaves — Make 2
Yarn: olive green — work around both sides of the foundation chain.
R1: ch 12; starting in the second chain, sl st, sc, 2 hdc, 4 dc, 2 hdc, 3 sc in the final chain; continue along the opposite side with 2 hdc, 4 dc, 2 hdc, sc and sl st.
Fasten off. Leave a 20 cm tail. Fold each leaf slightly along its centre line before attaching it to the stem.
Eyebrows and Eyelashes
Yarn: black embroidery yarn.
Embroider one eyebrow above each eye between head R7 and R8. Add two short lashes at the outer edge of each eye, keeping every lash between 6 and 8 mm long.
Assembly
- Pin the head over the body with the eyes centred above the body’s front midpoint. Sew through one full stitch from each piece.
- Add a final amount of stuffing through the neck gap, then close the remaining seam.
- Position the trunk between the eyes with its upper edge near head R10. Sew around its 18-stitch base.
- Attach the cheek patches below the eyes when using them, then embroider the eyebrows and eyelashes.
- Pin the layered ears between head R4 and R12. Match the upper and lower attachment rounds on both sides.
- Sew the back legs across the lower third of the body and test the sitting angle on a level surface.
- Wrap the scarf around the neck, cross both ends at the front and secure the overlap with two concealed stitches.
- Attach the arms between body R14 and R18, angling both paws toward the intended tulip position.
- Sew the tulip to its stem, attach both leaves and place the stem between the paws approximately 1 cm to one side of the trunk.
- Secure each paw to the stem with one hidden stitch, add the toenails and weave the remaining yarn tails through the stuffed pieces.
The completed elephant measures approximately 20 cm in its seated position when made with the stated yarn and hook.
7 Technical Tips
- Off-centre trunk: A trunk displaced by two stitches makes one eye appear closer to the face centre. Mark the midpoint between the safety eyes before pinning the 18-stitch base.
- Flattened ear cups: Sewing the entire ear surface to the head removes the inward curve. Attach only the folded lower 2 cm and the adjoining side edges.
- Unstable sitting base: Soft back feet can roll beneath the body. Pack rounds 1–6 firmly and keep both finished feet within 3 mm of the same length.
- Visible decrease ridges: Standard decreases may form diagonal bars across the head. Work every decrease through the front loops and keep the working loop below 4 mm.
- Hidden flower centre: A tulip placed directly beneath the trunk loses most of its visible pink area. Shift the stem approximately 1 cm toward the raised paw before sewing.
- Twisted scarf ends: An uneven overlap pulls one end higher than the other. Pin the crossing point 2 cm below the chin and compare both free ends before tacking them.
- Loose stem attachment: One paw stitch can rotate around the six-stitch stem. Add a second concealed stitch 8–10 mm below the first connection.
Conclusion
Place the elephant on a level surface and inspect the trunk, tulip and scarf from directly ahead. The trunk should remain on the facial centre line, while the flower sits slightly to one side and stays clear of both eyes. Check that each ear begins on the same head round and that all six back-foot toenails face forward. Record the finished sitting height, stem length and actual yarn use in the project notes. Save the completed elephant amigurumi crochet pattern to Pinterest, then post front and side photographs on Instagram with #FloraTulipElephant. The next concrete step is to test the flower position with pins. Should Flora hold the tulip beside her trunk or directly below one ear?









