Introduction
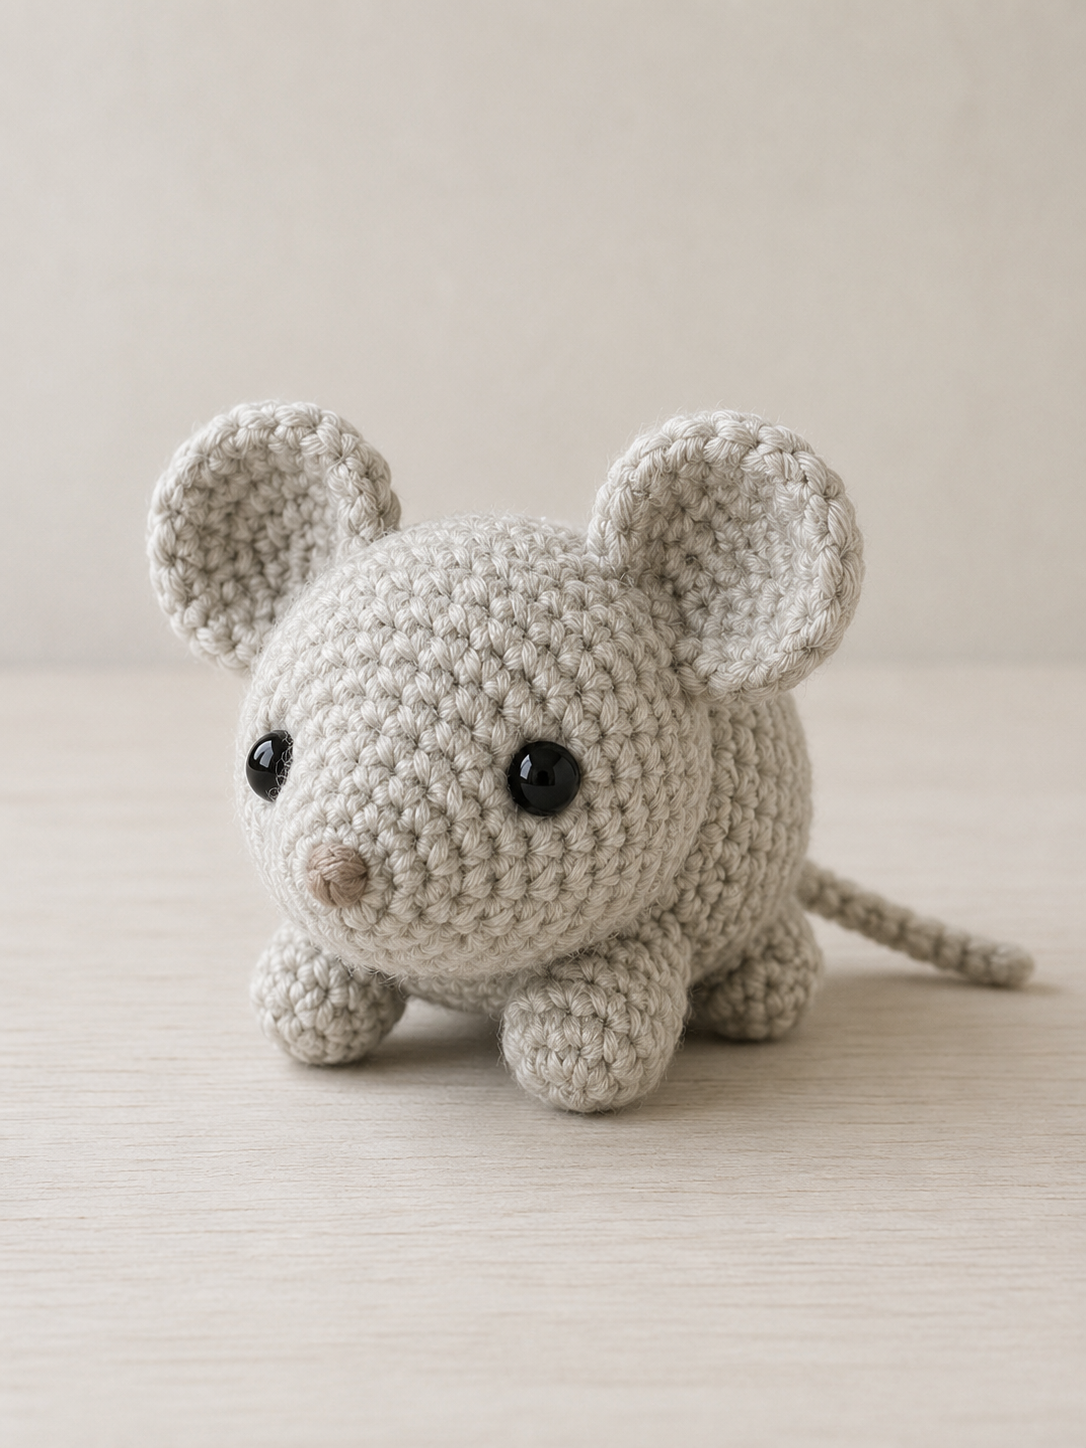
A mouse’s nose must reach beyond its front paws while both oversized ears stay visible from a low viewing angle. This mouse amigurumi crochet pattern controls those proportions with a tapered muzzle, 36-stitch head and four compact legs. Use DK yarn with a 3.5 mm hook to produce an approximately 18 cm figure. The intermediate project creates a stable model for display, nursery styling or pattern photography.
The Design: What Makes This Crouching Mouse Different
The head begins at the back and closes beneath the muzzle attachment, allowing the front surface to remain broad enough for widely spaced eyes. A separate tapered snout produces the projecting profile of a mouse without forcing severe decreases into the main head. Behind it, the oval body stays low and nearly horizontal. Four short legs support that shape at separate contact points rather than hanging from the sides. The large circular ears include a final plain round that draws their rims inward and creates the cupped appearance visible in the photograph. This gray crochet mouse also uses a narrow tubular tail instead of a flat chain. A common mistake in a realistic mouse amigurumi is mounting the ears directly above the eyes. That placement shortens the skull visually. Here, the ears begin behind the eye line and lean outward by approximately 12 degrees.
Project Information at a Glance
| Skill Level | Time | Finished Size | Hook | Best For |
|---|---|---|---|---|
| Intermediate | 6–8 hours | Approximately 18 cm excluding tail | 3.5 mm | Display, nursery styling and photography |
A published DK mouse made with a 3.5 mm hook measures approximately 18 cm and uses about 45 g of its main color. Individual tension, fiber content and stuffing density can change the finished dimensions.
Materials and Tools
Yarn
- Light warm gray — DK or light-worsted weight — 45 g — Stylecraft Special DK, Paintbox Yarns Cotton DK or a comparable smooth yarn
- Pale gray — DK weight — 3 g — optional cheek patches and inner-ear detail
- Medium gray — DK weight — 2 g — nose tip
The 45 g main-color quantity follows a published material specification for an approximately 18 cm DK mouse. Keep a few additional metres available when working at a looser gauge.
Tools
- 3.5 mm crochet hook
- Two 10 mm black safety eyes
- Polyester stuffing
- Yarn needle
- Locking stitch markers
- Ball-head pins
- Scissors
- Flexible measuring tape
Use embroidered eyes instead of plastic components when the finished mouse is intended for a child younger than three years.
Abbreviations
- MR — magic ring
- sc — single crochet
- inc — two single crochets in one stitch
- dec — decrease over two stitches
- sl st — slip stitch
- ch — chain
- BLO — back loop only
- st/sts — stitch/stitches
For an invisible decrease, insert the hook beneath the front loops of the next two stitches, draw up a loop and complete one single crochet.
Pattern — Step by Step
Work in a continuous spiral unless the instructions state otherwise. Move the stitch marker after completing each round.
Head
Yarn: light warm gray — original construction based on standard six-increase amigurumi shaping.
R1: 6 sc in MR (6)
R2: inc ×6 (12)
R3: (sc, inc) ×6 (18)
R4: (2 sc, inc) ×6 (24)
R5: (3 sc, inc) ×6 (30)
R6: (4 sc, inc) ×6 (36)
R7–R13: sc around (36)
R14: (4 sc, dec) ×6 (30)
R15: sc around (30)
R16: (3 sc, dec) ×6 (24)
Insert the eyes between R10 and R11 with ten visible stitches between their inner edges. Pin the muzzle below them before securing the washers.
R17: sc around (24)
R18: (2 sc, dec) ×6 (18)
Stuff the back and crown firmly. Leave the center-front area slightly compressible so the muzzle seam can settle into the head.
R19: (sc, dec) ×6 (12)
R20: dec ×6 (6)
Fasten off. Leave a 35 cm tail and close the opening through the front loops.
Body
Yarn: light warm gray — original horizontal oval construction.
R1: 6 sc in MR (6)
R2: inc ×6 (12)
R3: (sc, inc) ×6 (18)
R4: (2 sc, inc) ×6 (24)
R5: (3 sc, inc) ×6 (30)
R6: (4 sc, inc) ×6 (36)
R7–R14: sc around (36)
R15: (4 sc, dec) ×6 (30)
R16–R17: sc around (30)
R18: (3 sc, dec) ×6 (24)
R19: sc around (24)
R20: (2 sc, dec) ×6 (18)
Stuff the rear half firmly. Add smaller pieces near the neck so the body retains an oval profile instead of becoming spherical.
R21: (sc, dec) ×6 (12)
R22: dec ×6 (6)
Fasten off. Leave a 40 cm tail for attaching the body to the head.
Front Legs — Make 2
Yarn: light warm gray — original short cylindrical construction.
R1: 6 sc in MR (6)
R2: inc ×6 (12)
R3: (sc, inc) ×6 (18)
R4: BLO sc around (18)
R5–R6: sc around (18)
R7: (sc, dec) ×6 (12)
R8–R9: sc around (12)
Stuff the rounded foot firmly. Leave the upper 8 mm unstuffed so the leg can angle beneath the chest.
Flatten the opening and work 6 sc through both layers (6).
Fasten off. Leave a 25 cm sewing tail.
Back Legs — Make 2
Yarn: light warm gray — original broad rear-foot construction.
R1: 6 sc in MR (6)
R2: inc ×6 (12)
R3: (sc, inc) ×6 (18)
R4: (2 sc, inc) ×6 (24)
R5: BLO sc around (24)
R6–R7: sc around (24)
R8: (2 sc, dec) ×6 (18)
R9: (sc, dec) ×6 (12)
R10: sc around (12)
Pack the lower section firmly and shape it into a low oval. Keep the final round empty for a flat attachment seam.
Flatten the opening and work 6 sc through both layers (6).
Fasten off. Leave a 25 cm sewing tail.
Ears — Make 2
Yarn: light warm gray — circular ear shaping follows standard flat-circle math.
R1: 6 sc in MR (6)
R2: inc ×6 (12)
R3: (sc, inc) ×6 (18)
R4: (2 sc, inc) ×6 (24)
R5: (3 sc, inc) ×6 (30)
R6: sc around (30)
Do not stuff. Fold the lower 10 mm of each circle inward and place two stitches through the fold to form a shallow cup.
Fasten off. Leave a 40 cm tail on each ear.
Muzzle
Yarn: light warm gray — original tapered tube construction.
R1: 6 sc in MR (6)
R2: sc around (6)
R3: inc ×6 (12)
R4–R5: sc around (12)
R6: (sc, inc) ×6 (18)
R7–R8: sc around (18)
R9: (2 sc, inc) ×6 (24)
R10: sc around (24)
Stuff R1–R6 firmly with small pieces. Fill the wider base lightly so it can flatten against the head.
Fasten off. Leave a 35 cm sewing tail.
Nose Tip
Yarn: medium gray — original small cap construction.
R1: 6 sc in MR (6)
R2: sc around (6)
Do not stuff.
Fasten off. Leave a 15 cm tail and sew the cap over the first round of the muzzle.
Cheek Patches — Make 2
Yarn: pale gray — optional flat circles.
R1: 6 sc in MR (6)
R2: inc ×6 (12)
Join with a sl st. Do not stuff.
Fasten off. Leave a 15 cm sewing tail. Use the main gray yarn for patches that merge visually with the face.
Tail
Yarn: light warm gray — original narrow tubular construction.
R1: 6 sc in MR (6)
R2–R26: sc around (6)
R27: dec, 4 sc (5)
R28–R31: sc around (5)
Do not fill R1–R12. Add a very narrow strand of stuffing only through the middle section when a fixed curve is required. Leave the final eight rounds empty.
Flatten the opening and work 2 sc through both layers, leaving one stitch unused (2).
Fasten off. Leave a 25 cm sewing tail.
Assembly
- Position the body horizontally behind the head. Attach its narrow end to the lower rear quarter of the head with two passes of sewing yarn.
- Pin the muzzle between the eyes with its upper base approximately one round below the eye line. Align its tip with the facial center marker.
- Sew around the muzzle base, adding the last small piece of stuffing before closing the final 2 cm of the seam.
- Attach the nose cap to the muzzle tip. Place the optional cheek patches below and slightly outside the eyes.
- Pin the two front legs beneath the chest with approximately four body stitches between their inner edges.
- Position the back legs under the rear half of the body. Their widest surfaces should contact the table rather than face outward.
- Set the mouse on a flat board and adjust all four legs until the body clears the surface by approximately 8–10 mm.
- Pin the ears behind the eye line, covering roughly R5–R11 of the head. Tilt each outer edge away from the center by about 12 degrees.
- Attach the tail near the rear center of the body around R10–R12. Direct it backward with a slight curve toward one side.
- Weave every loose end vertically, horizontally and diagonally through the stuffed fabric before trimming it close to the surface.
The completed mouse should stand on four leg surfaces without using its tail or muzzle for support.
7 Technical Tips
- Shifted facial center: Spiral rounds can move the apparent center several stitches to one side. Keep a second marker aligned with the midpoint between the eyes while fitting the muzzle.
- Pointed head closure: Excess fiber beneath the final decrease round produces a raised knot. Stop adding stuffing when the crown compresses by approximately 5 mm under fingertip pressure.
- Visible decrease gaps: Standard decreases can expose white filling along the head and body. Work every decrease through the two front loops only.
- Crossed eye line: Fewer than nine visible stitches between the inner eye edges makes the snout appear too wide. Begin with ten stitches and inspect the head with the muzzle pinned in place.
- Flat ears: Sewing the complete ear perimeter removes the cupped profile. Secure only the folded base and rear third, leaving at least 60 percent of the rim unattached.
- Rocking stance: A leg positioned more than 4 mm above the others creates three-point contact. Pin all four pieces and test the mouse on a hard surface before completing any limb seam.
- Rigid tail base: Stuffing the last eight rounds pushes the tail seam away from the body. Keep that section empty and flatten the attachment across two stitches.
Conclusion
Test the mouse from the front, side and directly above before weaving the final assembly threads. Both ears should sit behind the eyes, the muzzle must follow the center of the forehead, and all four legs should contact the surface without pressure from the tail. Record the yarn brand, hook size and nose-to-rear measurement because a gauge change will alter each sewing position. The next practical step is to crochet both ears during the same session and compare their diameters after every increase round. Save this mouse amigurumi crochet pattern to a Pinterest project board and share the completed figure on Instagram with #GrayCrouchingMouse. Will your mouse have a nearly straight tail like the photographed model or a wider curve beside one back foot?









