Introduction
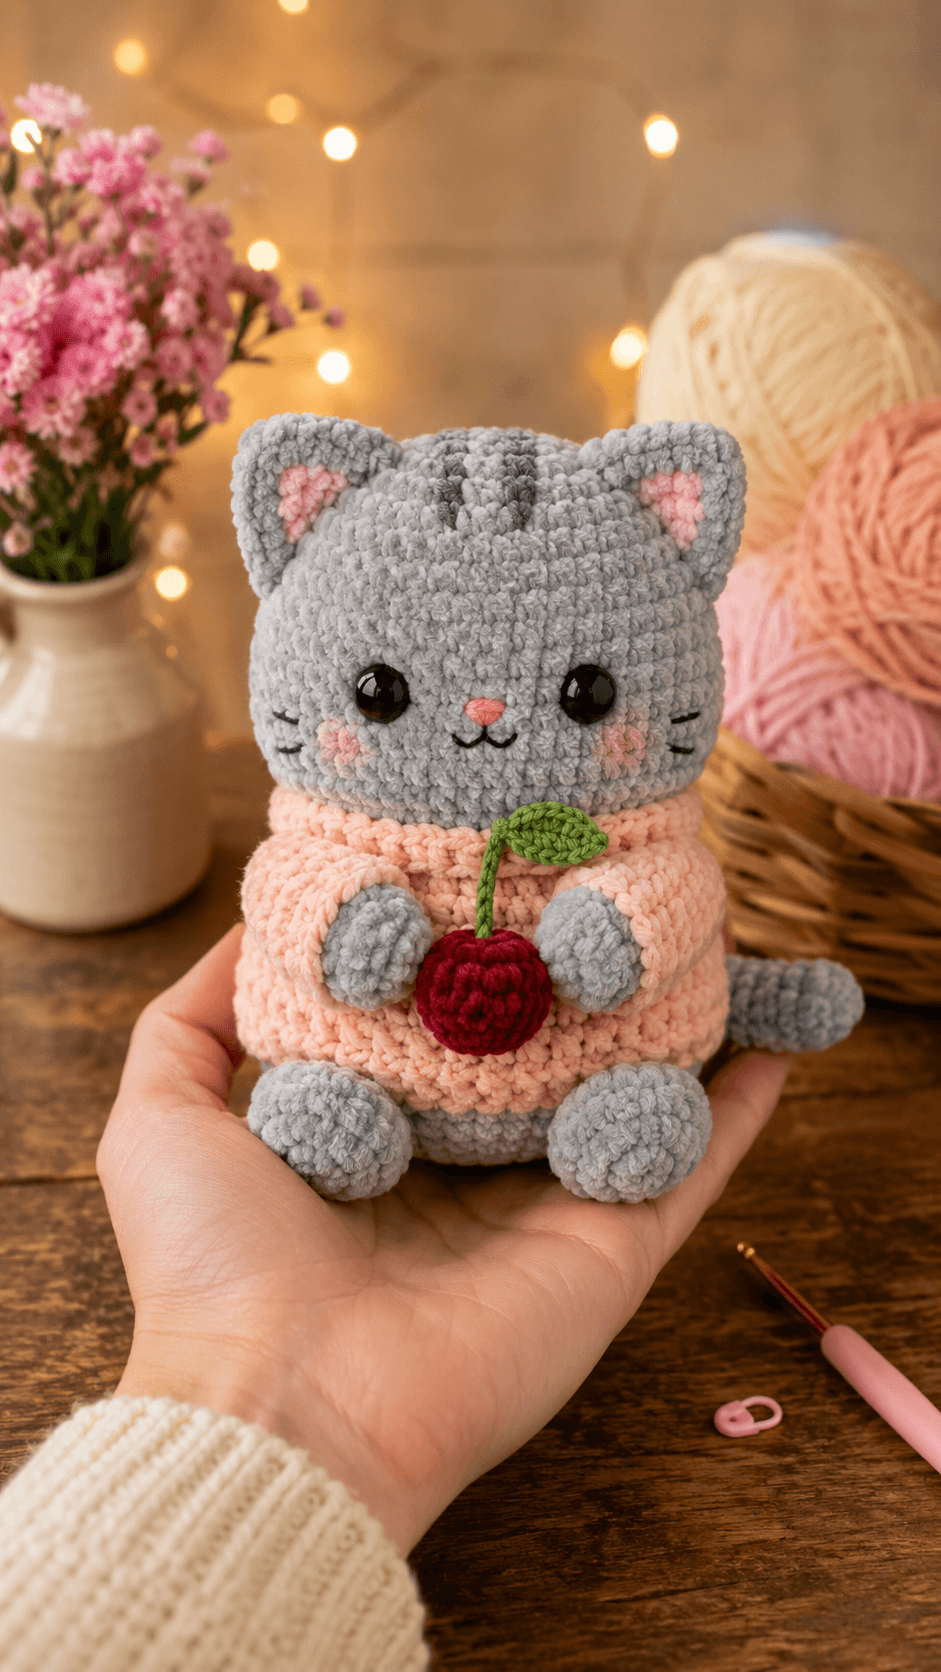
A cat’s triangular ears must remain visible above a head that is almost twice as wide as its neck. This cat amigurumi crochet pattern solves that proportion with a 36-stitch head, compact body and separately attached ears. You will use super-bulky chenille, a 5 mm hook and 12 mm eyes to make an approximately 18 cm sitting cat. The project suits an intermediate maker and works well as stable shelf décor.
The Design: What Makes the Cherry Sweater Cat Different
The head uses a broad spherical structure rather than a narrow oval because a domestic cat reads clearly through ear spacing, cheek width and eye placement. A shortened neck then keeps the sweater collar close to the jaw instead of leaving an exposed gray band. The body expands to 36 stitches at its widest point, giving the seated figure enough depth to support the head and the projecting back legs.
The crochet cat with sweater also uses separate sleeves over gray front paws. That division keeps the clothing readable while preserving the animal’s paw color. Its cherry amigurumi accessory is attached after the arms, so the hands can be positioned around the fruit rather than floating beside it. A common mistake in a plush cat crochet pattern is placing the ears too close together. That creates a bear-like silhouette. Leave approximately eight visible stitches between the inner ear edges.
Project Info at a Glance
| Skill Level | Time | Finished Size | Hook | Best For |
|---|---|---|---|---|
| Intermediate | 6–8 hours | Approximately 18 cm seated | 5 mm | Shelf display, photography props and handmade gifts |
Materials and Tools
Yarn
- Light gray — super-bulky chenille — 60–80 g — Himalaya Dolphin Baby, Premier Parfait Chunky or equivalent.
- Peach — super-bulky chenille — 45–60 g — use the same yarn line as the gray to keep the gauge consistent.
- Pink — super-bulky chenille or smooth worsted yarn — approximately 5 g for cheeks and inner ears.
- Red — super-bulky chenille — approximately 10 g for the cherry.
- Green — worsted cotton or acrylic — approximately 5 g for the stem and leaf.
- Black and dark gray — embroidery yarn — small remnants for the mouth, whiskers and forehead stripes.
Tools
- 5 mm crochet hook
- 12 mm black safety eyes
- Polyester stuffing, approximately 70–90 g
- Tapestry needle with a large chenille-friendly eye
- Locking stitch markers
- Straight pins
- Scissors
- Pink embroidery yarn for the nose
Published cat patterns document 17–18 cm finished heights and 12 mm safety eyes. A 5 mm hook is also a published recommendation for super-bulky chenille. Final size still changes with yarn meterage, stuffing pressure and personal tension.
Abbreviations
- MR — magic ring
- sc — single crochet
- inc — two single crochet stitches in one stitch
- dec — invisible single crochet decrease
- sl st — slip stitch
- ch — chain
- hdc — half double crochet
- dc — double crochet
- BLO — back loop only
For an invisible decrease, insert the hook through the front loops of the next two stitches, yarn over and complete one single crochet through both loops.
Pattern — Step by Step
Work in a continuous spiral unless a joined round or row is specified. Place a marker in the first stitch of every round.
Head
Yarn: light gray — original construction using standard six-stitch amigurumi shaping.
R1: 6 sc in MR (6)
R2: inc ×6 (12)
R3: (sc, inc) ×6 (18)
R4: (2 sc, inc) ×6 (24)
R5: (3 sc, inc) ×6 (30)
R6: (4 sc, inc) ×6 (36)
R7–R13: sc around (36)
Insert the 12 mm eyes between R10 and R11, with seven visible stitches between the posts. The eyes must be fitted before the lower opening becomes too narrow.
R14: (4 sc, dec) ×6 (30)
R15: (3 sc, dec) ×6 (24)
R16: (2 sc, dec) ×6 (18)
Stuff firmly, concentrating filling at the outer cheeks and crown. Keep the lower center slightly softer for attachment.
R17: (sc, dec) ×6 (12)
R18: dec ×6 (6)
Fasten off. Leave a 30 cm tail and close the opening.
Body
Yarn: light gray — original construction using standard six-stitch amigurumi shaping.
R1: 6 sc in MR (6)
R2: inc ×6 (12)
R3: (sc, inc) ×6 (18)
R4: (2 sc, inc) ×6 (24)
R5: (3 sc, inc) ×6 (30)
R6: (4 sc, inc) ×6 (36)
R7–R10: sc around (36)
R11: (4 sc, dec) ×6 (30)
R12–R13: sc around (30)
R14: (3 sc, dec) ×6 (24)
R15: sc around (24)
R16: (2 sc, dec) ×6 (18)
Stuff the lower body firmly enough to resist flattening under the head.
R17: (sc, dec) ×6 (12)
R18: dec ×6 (6)
Fasten off. Leave a 35 cm tail for sewing the head to the body.
Front Legs and Sleeves — Make 2
Yarn: begin with light gray and change to peach.
R1: 6 sc in MR (6)
R2: inc ×6 (12)
R3–R4: sc around (12)
R5: (2 sc, dec) ×3 (9)
Add a small amount of stuffing to the gray paw only. Change to peach.
R6–R12: sc around (9)
R13: (sc, dec) ×3 (6)
Fasten off. Leave a 25 cm tail. Flatten the final round without adding stuffing to the sleeve section.
Back Legs — Make 2
Yarn: light gray.
R1: 6 sc in MR (6)
R2: inc ×6 (12)
R3: (sc, inc) ×6 (18)
R4–R5: sc around (18)
R6: (sc, dec) ×6 (12)
R7: dec ×6 (6)
Stuff before R7. Shape each piece into a shallow oval rather than a ball.
Fasten off. Leave a 25 cm sewing tail.
Outer Ears — Make 2
Yarn: light gray.
R1: 6 sc in MR (6)
R2: (sc, inc) ×3 (9)
R3: (2 sc, inc) ×3 (12)
R4: (3 sc, inc) ×3 (15)
R5: sc around (15)
Fasten off. Leave a 25 cm tail. Do not stuff; flatten each ear into a pointed triangle.
Inner Ears — Make 2
Yarn: pink. Work in rows.
Row 1: ch 5, sc in second ch from hook and across (4)
Row 2: ch 1, turn, dec, 2 sc (3)
Row 3: ch 1, turn, dec, sc (2)
Row 4: ch 1, turn, dec (1)
Fasten off. Leave a 15 cm tail and sew one inner triangle onto each gray ear.
Tail
Yarn: light gray.
R1: 6 sc in MR (6)
R2: inc ×6 (12)
R3–R4: sc around (12)
R5: (2 sc, dec) ×3 (9)
R6–R14: sc around (9)
Stuff the rounded tip and the first half of the tube lightly. Leave the attachment end empty so it can bend beside the body.
Fasten off. Leave a 30 cm tail.
Cheek Patches — Make 2
Yarn: pink.
R1: 6 sc in MR (6)
R2: inc ×6 (12)
Join with sl st. Fasten off and leave a 15 cm sewing tail. Keep each circle flat.
Sweater Body
Yarn: peach. Work from the lower edge upward in joined rounds.
Ch 37 and join with sl st, taking care not to twist the chain.
R1: ch 1, 36 sc, join with sl st (36)
R2–R6: ch 1, 36 sc, join with sl st (36)
R7: ch 1, (4 sc, dec) ×6, join with sl st (30)
R8: ch 1, 30 sc, join with sl st (30)
R9: ch 1, (3 sc, dec) ×6, join with sl st (24)
R10: ch 1, 24 sc BLO, join with sl st (24)
Fasten off and weave in the end. The BLO round forms a defined collar edge.
Cherry
Yarn: red.
R1: 6 sc in MR (6)
R2: inc ×6 (12)
R3: (sc, inc) ×6 (18)
R4–R5: sc around (18)
R6: (sc, dec) ×6 (12)
Stuff firmly enough to hold a round profile.
R7: dec ×6 (6)
Fasten off. Leave a 20 cm tail and close the opening.
Cherry Stem
Yarn: green.
Ch 13. Sl st in second ch from hook and in each remaining chain (12).
Fasten off. Leave a 15 cm tail at both ends. Sew one end into the top of the cherry.
Leaf
Yarn: green. Work on both sides of the foundation chain.
Ch 9.
Side 1: sl st in second ch from hook, sc, hdc, 2 dc, hdc, sc, 3 sc in final ch.
Side 2: working along the unused chain loops, sc, hdc, 2 dc, hdc, sc, sl st.
Fasten off. Leave a 15 cm tail and attach the leaf approximately 2 cm above the cherry.
Assembly
- Pin the head to the narrow end of the body and check that the eyes face directly forward. Sew around the neck twice with gray yarn.
- Pull the sweater over the body from the lower end. Position the collar directly below the head and tack it to the body at four evenly spaced points.
- Sew the pink inner-ear pieces to the gray ears. Place the finished ears between head rounds 3 and 7, leaving approximately eight visible stitches between their inner edges.
- Sew the cheek circles below and slightly outside the eyes. Keep their top edges approximately one round below the eye posts.
- Embroider a pink triangular nose at the center between rounds 12 and 13. Add a short black vertical line, two curved mouth stitches and three whiskers on each side.
- Embroider three dark-gray forehead stripes between the ears. Keep the center stripe one round longer than the side stripes.
- Pin the peach sleeves to the upper body with the gray paws facing inward. Sew the sleeve ends through the sweater and into the body.
- Attach the back legs across the lower front of the body. Place their centers approximately ten stitches apart so the cat rests on both legs.
- Sew the tail to the lower rear side and curve it toward the right or left. Attach the cherry between the front paws, then secure the stem and leaf with green yarn.
- Weave every tail through at least three stitch directions, trim the excess and redistribute the stuffing by rolling the finished figure between both hands.
The completed figure should sit without external support and hold the cherry against the center of the sweater.
7 Technical Tips
- Marker drift: A missing stitch marker can shift the decreases toward one side of the face. Move the marker after every round and recount each shaped round before continuing.
- Loose stuffing: An underfilled head develops a flat crown behind the ears. Add fiberfill until firm thumb pressure creates a temporary dent no deeper than approximately 5 mm.
- Visible decrease ridges: Standard two-loop decreases form raised bars in chenille. Work every decrease through the front loops only and keep the closing yarn-over no tighter than the neighboring single crochet.
- Late eye installation: Waiting until after R16 leaves too little room for the safety-eye washers. Fit both eyes after R13 and compare their height before locking either washer completely.
- Chenille tension gaps: A 5 mm hook can expose stuffing when the yarn is pulled loosely. Test a 12-stitch sample and reduce to 4.5 mm when openings exceed approximately 2 mm.
- Unbalanced pinning: Back legs attached at different heights make the cat lean. Pin both upper leg edges to the same body round and measure ten stitches between their center points.
- Escaping yarn tails: Chenille ends can work loose when woven in one direction. Pass each tail horizontally, vertically and diagonally through the stuffing before trimming it to approximately 5 mm.
Conclusion
Check the final figure from the front, side and rear before trimming the last sewing tails. The ears should form a clear triangular outline, both eyes should sit on one horizontal round and the back legs should contact the surface evenly. Record any hook or tension adjustment beside the pattern before making a second cat. Your next step is to photograph the finished cat against a plain background that separates the gray yarn from the setting. Share the cat amigurumi crochet pattern result on Pinterest and Instagram with #CherrySweaterCat. Which direction did you curve the cat’s tail around the sweater: toward the leaf or away from the cherry?









