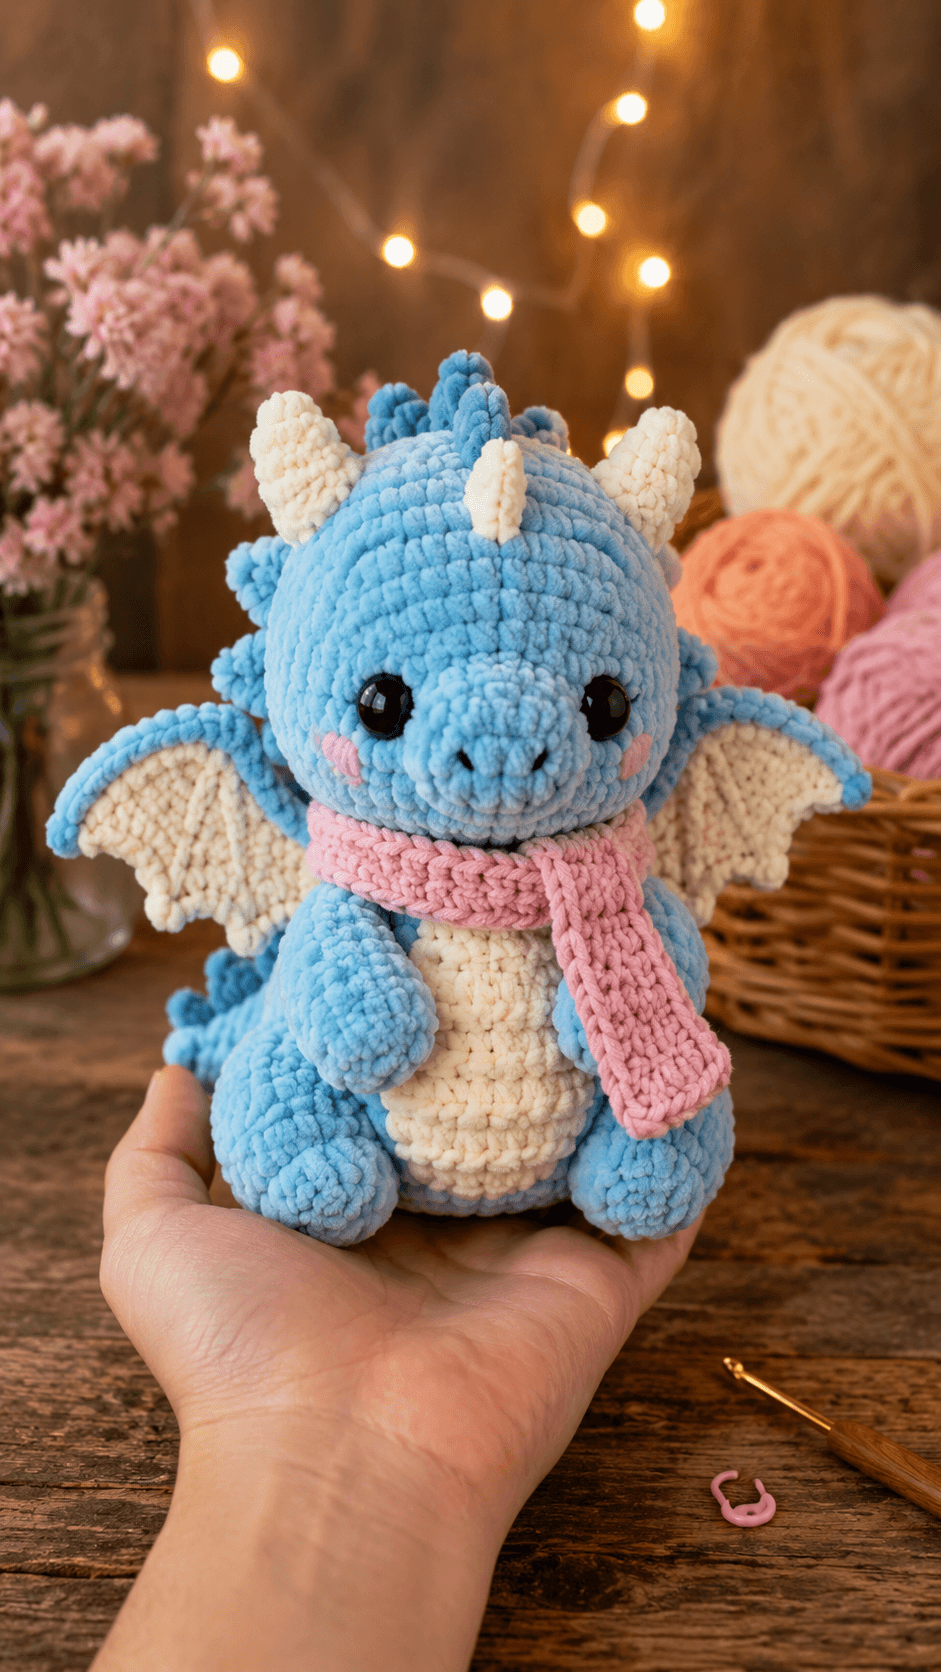
Three horns must sit on one center line or this dragon’s face will look twisted before the wings are attached. This dragon amigurumi crochet pattern uses chunky chenille yarn, a 5 mm hook, and 18–20 mm eyes to produce a sitting figure about 21.5 cm tall. The project suits an intermediate maker and includes a removable scarf that covers the head-to-body seam.
The Design: What Makes This Baby Dragon Different
The head is wider than the body because the photographed dragon depends on a juvenile proportion rather than a long reptilian skull. A separate oval muzzle projects from the face, giving enough space for two embroidered nostrils without flattening the lower head. The broad back legs form a stable three-point base with the body, while the smaller arms remain clear of the cream belly panel. Each wing uses a shallow fabric triangle with a contrasting membrane, so the crochet dragon with wings reads clearly from the front. The most common error in a plush dragon crochet pattern is attaching the wings too high. That pushes the ears outward and makes the head appear narrow. Pin the wing roots below the neck seam, then check the silhouette before sewing.
Project Info at a Glance
| Skill Level | Time | Finished Size | Hook | Best For |
|---|---|---|---|---|
| Intermediate | 8–11 hours | About 21.5 cm sitting | 5 mm | Fantasy nursery display, desk figure, or seasonal gift |
A comparable published plush-dragon pattern reports a 21.5 cm finished height and a 5 mm hook. Actual measurements will change with yarn density and personal tension.
Materials and Tools
Yarn
- Sky blue — chunky chenille yarn — approximately 100 g — Himalaya Dolphin Baby, Premier Parfait Chunky, or a comparable plush yarn
- Cream — chunky chenille yarn — approximately 35–40 g — used for the belly, horns, ears, and wing membranes
- Pale pink — chunky or smooth bulky yarn — approximately 15–20 g — used for the scarf and cheek patches
- Black — smooth cotton or acrylic scrap yarn — used for nostrils and optional eye outlines
Tools
- 5 mm crochet hook
- 18–20 mm safety eyes
- Polyester stuffing
- Yarn needle
- Locking stitch markers
- Long pins
- Scissors
Safety eyes are small components and are not suitable for an item intended for a child who may place the toy in the mouth. Substitute embroidered eyes for that use.
Abbreviations
- MR — magic ring
- sc — single crochet
- inc — two single crochet in one stitch
- dec — single crochet two stitches together
- sl st — slip stitch
- ch — chain
- hdc — half double crochet
- dc — double crochet
- BLO — back loop only
An invisible decrease is worked through the front loops of the next two stitches, reducing bulk on the outer surface.
Pattern — Step by Step
Work the head, body, limbs, muzzle, horns, ears, tail, and cheek patches in continuous spirals unless a section states otherwise. Place a marker in the first stitch of every round.
Head
Yarn: sky blue — original six-stitch amigurumi shaping.
R1: 6 sc in MR (6)
R2: inc ×6 (12)
R3: (1 sc, inc) ×6 (18)
R4: (2 sc, inc) ×6 (24)
R5: (3 sc, inc) ×6 (30)
R6: (4 sc, inc) ×6 (36)
R7–R12: sc around (36)
R13: (4 sc, dec) ×6 (30)
Insert the eyes between R9 and R10, with approximately seven visible stitches between the posts. Fit the washers before adding stuffing.
R14: (3 sc, dec) ×6 (24)
R15: (2 sc, dec) ×6 (18)
Stuff the upper head firmly. Keep the lower edge slightly flexible for assembly.
R16: (1 sc, dec) ×6 (12)
R17: dec ×6 (6)
Fasten off. Close the opening and leave a 35 cm tail.
Body
Yarn: sky blue — original six-stitch amigurumi shaping.
R1: 6 sc in MR (6)
R2: inc ×6 (12)
R3: (1 sc, inc) ×6 (18)
R4: (2 sc, inc) ×6 (24)
R5: (3 sc, inc) ×6 (30)
R6: (4 sc, inc) ×6 (36)
R7–R11: sc around (36)
R12: (4 sc, dec) ×6 (30)
R13–R14: sc around (30)
R15: (3 sc, dec) ×6 (24)
R16–R17: sc around (24)
R18: (2 sc, dec) ×6 (18)
Stuff the lower half until it holds a rounded sitting shape. Add less stuffing at the neck edge.
R19: (1 sc, dec) ×6 (12)
R20: dec ×6 (6)
Fasten off. Close the opening and leave a 35 cm tail.
Muzzle
Yarn: sky blue.
R1: 6 sc in MR (6)
R2: inc ×6 (12)
R3: (1 sc, inc) ×6 (18)
R4–R5: sc around (18)
R6: (1 sc, dec) ×6 (12)
Add a thin layer of stuffing. Flatten the back edge into an oval.
Fasten off. Leave a 30 cm tail. Embroider two black nostrils across R3, spacing them four stitches apart.
Arms (Make 2)
Yarn: sky blue.
R1: 6 sc in MR (6)
R2: inc ×6 (12)
R3–R5: sc around (12)
R6: (1 sc, dec) ×4 (8)
R7–R9: sc around (8)
Stuff the paw and leave the upper arm unstuffed. Flatten the final round.
Fasten off. Leave a 25 cm sewing tail.
Back Legs (Make 2)
Yarn: sky blue.
R1: 6 sc in MR (6)
R2: inc ×6 (12)
R3: (1 sc, inc) ×6 (18)
R4–R6: sc around (18)
R7: (1 sc, dec) ×6 (12)
R8–R9: sc around (12)
R10: dec ×6 (6)
Stuff firmly before R10. The finished leg should remain oval rather than spherical.
Fasten off. Close the opening and leave a 30 cm tail.
Outer Wings (Make 2)
Yarn: sky blue. Work in turning rows.
Row 1: ch 3, sc in second ch from hook and next ch (2)
Row 2: ch 1, turn, inc, 1 sc (3)
Row 3: ch 1, turn, 2 sc, inc (4)
Row 4: ch 1, turn, inc, 2 sc, inc (6)
Row 5: ch 1, turn, sc across (6)
Row 6: ch 1, turn, inc, 4 sc, inc (8)
Row 7: ch 1, turn, sc across (8)
Row 8: ch 1, turn, dec, 4 sc, dec (6)
Row 9: ch 1, turn, sc across (6)
Do not fasten off. Work one round of sc evenly around the wing, placing 3 sc in the outer tip. Fasten off and leave a 35 cm tail.
Wing Membranes (Make 2)
Yarn: cream. Work in turning rows.
Row 1: ch 3, sc in second ch from hook and next ch (2)
Row 2: ch 1, turn, inc, 1 sc (3)
Row 3: ch 1, turn, 2 sc, inc (4)
Row 4: ch 1, turn, inc, 2 sc, inc (6)
Row 5: ch 1, turn, sc across (6)
Row 6: ch 1, turn, dec, 2 sc, dec (4)
Row 7: ch 1, turn, sc across (4)
Fasten off. Leave a 30 cm tail. Pin one membrane inside each blue wing and stitch around the cream edge.
Ears (Make 2)
Yarn: cream.
R1: 6 sc in MR (6)
R2: (1 sc, inc) ×3 (9)
R3: sc around (9)
R4: (2 sc, inc) ×3 (12)
R5: sc around (12)
R6: (2 sc, dec) ×3 (9)
Do not stuff. Flatten the opening, fasten off, and leave a 25 cm tail.
Large Center Horn
Yarn: cream.
R1: 6 sc in MR (6)
R2: sc around (6)
R3: (1 sc, inc) ×3 (9)
R4–R5: sc around (9)
R6: (2 sc, inc) ×3 (12)
Add a small amount of stuffing. Fasten off and leave a 25 cm tail.
Side Horns (Make 2)
Yarn: cream.
R1: 6 sc in MR (6)
R2: sc around (6)
R3: (1 sc, inc) ×3 (9)
R4: sc around (9)
Add a small amount of stuffing. Fasten off and leave a 20 cm tail.
Dorsal Spikes (Make 7)
Yarn: sky blue. Make three large and four small spikes.
Large spike:
R1: 6 sc in MR (6)
R2: sc around (6)
R3: (1 sc, inc) ×3 (9)
R4: sc around (9)
Small spike:
R1: 6 sc in MR (6)
R2–R3: sc around (6)
Do not stuff. Flatten each base, fasten off, and leave a 20 cm tail.
Tail
Yarn: sky blue.
R1: 6 sc in MR (6)
R2–R3: sc around (6)
R4: (1 sc, inc) ×3 (9)
R5–R6: sc around (9)
R7: (2 sc, inc) ×3 (12)
R8–R10: sc around (12)
R11: (3 sc, inc) ×3 (15)
R12–R14: sc around (15)
R15: (3 sc, dec) ×3 (12)
Stuff lightly, leaving the attachment end flat enough to curve against the body.
Fasten off. Leave a 35 cm tail.
Belly Panel
Yarn: cream. Work in turning rows.
Row 1: ch 5, sc in second ch from hook and across (4)
Row 2: ch 1, turn, inc, 2 sc, inc (6)
Row 3: ch 1, turn, inc, 4 sc, inc (8)
Rows 4–8: ch 1, turn, sc across (8)
Row 9: ch 1, turn, dec, 4 sc, dec (6)
Row 10: ch 1, turn, dec, 2 sc, dec (4)
Work sc evenly around the entire panel. Fasten off and leave a 40 cm tail.
Cheek Patches (Make 2)
Yarn: pale pink.
R1: 6 sc in MR (6)
R2: inc ×6 (12)
Slip stitch to the first stitch. Fasten off and leave a 20 cm tail. Flatten each circle before attachment.
Scarf
Yarn: pale pink. Work in turning rows.
Row 1: ch 51, hdc in second ch from hook and across (50)
Rows 2–5: ch 1, turn, hdc across (50)
Fasten off and weave in both tails. The strip should wrap once around the neck with 8–10 cm hanging at each end. Add five more foundation chains when using unusually tight chenille stitches.
Assembly
- Pin the head to the top of the body. Sew around the neck twice, catching one body stitch and one head stitch in each pass.
- Position the cream belly panel from the lower neck to the base of the body. Stitch around its edge without pulling the blue body inward.
- Center the muzzle below the eyes. Its top edge should sit approximately two rounds below the eye line.
- Sew the cheek patches beside the lower outside corners of the eyes. Keep both circles on the same horizontal round.
- Attach the arms at the upper sides of the body, angled slightly forward. Leave a gap of two to three stitches between each arm and the belly panel.
- Sew the back legs to the lower front sides. Place the feet far enough apart for the body to contact the table between them.
- Attach the ears behind the side horns. Sew the large horn on the forehead center line and place the smaller horns symmetrically near the crown.
- Pin the wings below the neck seam. Stitch the upper and inner wing edges to the body while leaving the outer edges free.
- Attach the tail at the lower back, then arrange the seven dorsal spikes from the crown to the tail base. Use the three larger spikes along the back of the head and neck.
- Wrap the scarf around the neck, cross the ends at the front, and pass one end under the other. Weave in every remaining yarn tail.
The completed figure should sit without support and show both wing membranes from the front.
7 Technical Tips
- Marker drift: Chenille stitches can hide the first stitch, shifting the muzzle and horn line by one or two stitches. Move the locking marker after every completed round rather than after several rounds.
- Understuffed head: A soft crown allows the horn bases to collapse inward. Add stuffing until thumb pressure creates a shallow dent that returns to shape within one second.
- Visible decrease bars: Standard decreases create horizontal ridges across plush yarn. Work each decrease through the front loops and keep the hook parallel to the fabric.
- Incorrect eye timing: Installing the washers after R14 leaves too little space for the fingers. Fit both eyes immediately after R13 and check that seven visible stitches separate the posts.
- Loose velvet tension: A 5 mm hook may produce stuffing gaps when the crocheter’s loops are tall. Test a 12-stitch tube and change to 4.5 mm when gaps exceed 2 mm.
- Unbalanced pinning: Sewing one leg before positioning the second can make the dragon lean. Pin both legs and the tail at the same time, then test the figure on a flat table.
- Escaping yarn tails: A short woven tail can pull free from slippery chenille. Pass each tail through at least 5 cm of stuffing, reverse direction, and bury another 5 cm before trimming.
Conclusion
Check the finished dragon from the front, side, and back before trimming the final sewing tails. The eye line should remain level, the center horn should align with the muzzle, and both cream wing membranes should remain visible. Photograph the figure beside a ruler to record the effect of your yarn and tension, then label those measurements in your project notes. Save the dragon amigurumi crochet pattern to Pinterest and share the finished blue version on Instagram with #BlueScarfDragon. For the next variation, select one controlled change: longer horns, a darker wing membrane, or a striped scarf. Which spine arrangement gives your dragon the clearest silhouette: seven short spikes or five larger ones?









