Introduction
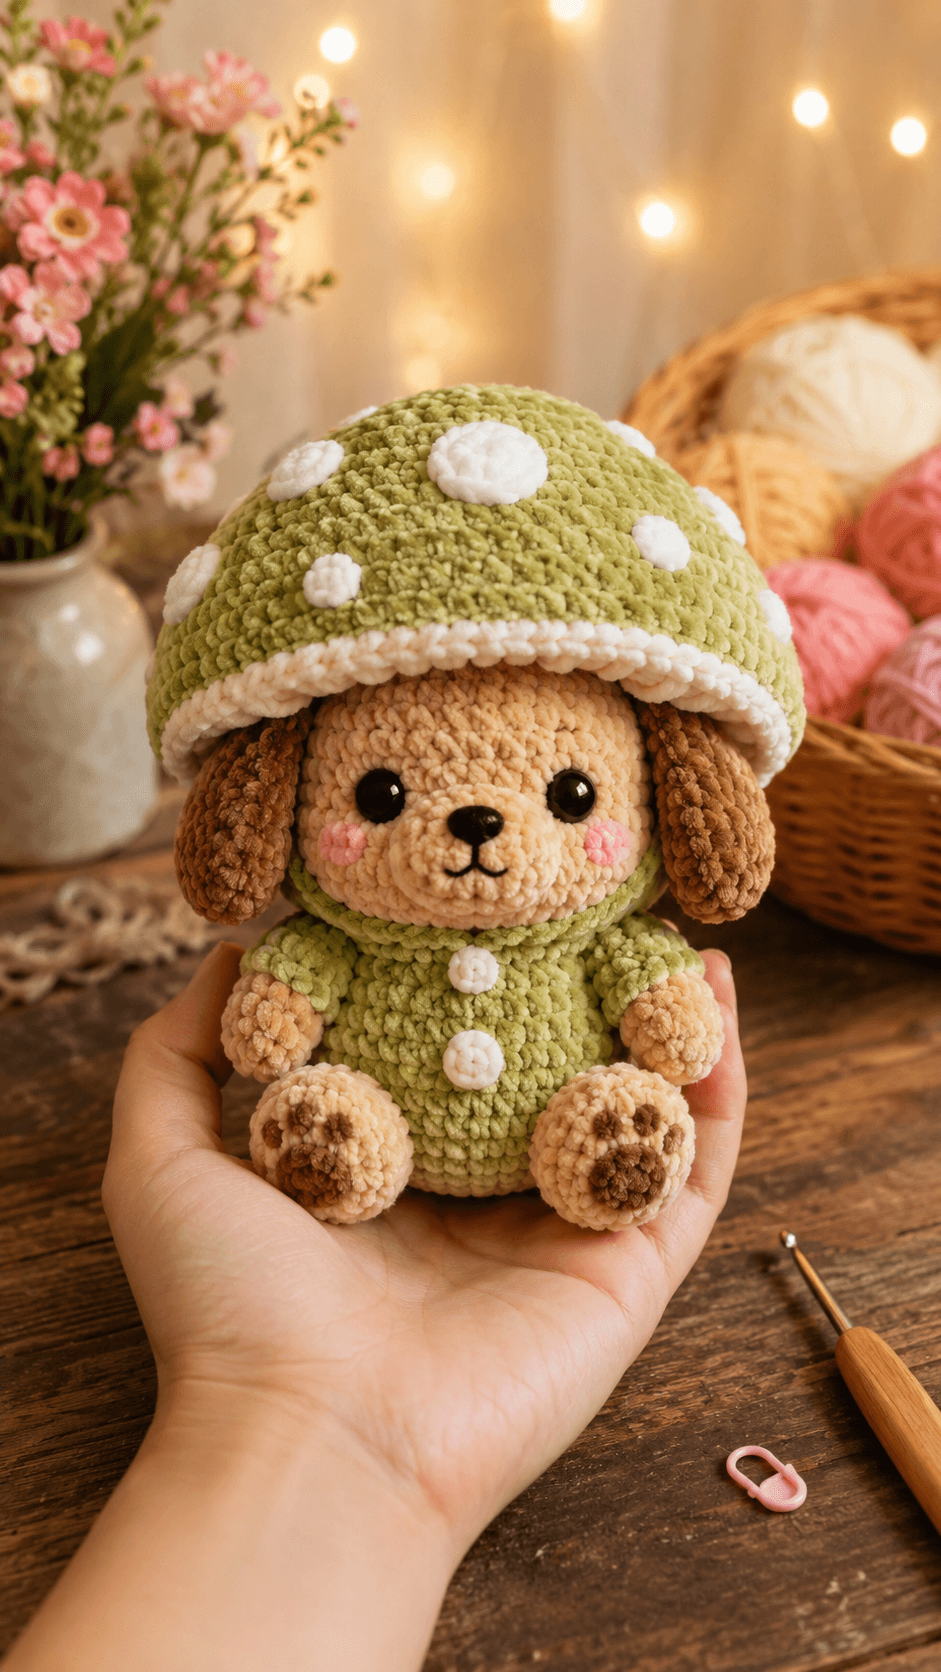
A mushroom puppy fails when its cap covers the eyes instead of framing the ears. This mushroom puppy amigurumi free crochet pattern uses chunky chenille, a 4 mm hook, 12 mm safety eyes, and a fitted spotted hood to create an approximately 20 cm seated figure. The intermediate project combines stable puppy shaping with a removable-looking costume that is sewn in place for display or controlled handling.
The Design: What Makes the Mushroom Puppy Different
The mushroom cap reaches a 42-stitch plateau, making it wider than the 36-stitch puppy head without forcing the opening over the face. A separate cream underside forms the cap rim and gives the long ears a defined exit point. The body remains compact, with short legs attached low enough to support the figure’s weight. Each foot receives five raised pads rather than embroidered marks because chenille can conceal flat surface stitching. The crochet mushroom dog pattern also uses a separate muzzle to preserve the projecting canine profile beneath the deep hood. One frequent construction error is sewing the ears to the cap instead of the head. That makes the costume carry their weight and can distort the rim. In this puppy amigurumi pattern, both ears attach securely to the head before the mushroom hood is fitted around them.
Project Info at a Glance
| Skill Level | Time | Finished Size | Hook | Best For |
|---|---|---|---|---|
| Intermediate | 8–10 hours | Approximately 20 cm seated | 4 mm | Woodland displays, seasonal shelves, costume collections |
Materials and Tools
Yarn
- Sage green — category 5 chunky chenille — approximately 65 g — Premier Parfait Chunky or Himalaya Dolphin Baby
- Peach beige — category 5 chunky chenille — approximately 45 g — for the head, muzzle, arms, feet, and tail
- Medium brown — category 5 chunky chenille — approximately 25 g — for the ears and paw pads
- Cream white — category 5 chunky chenille — approximately 20 g — for the cap underside, spots, and buttons
- Blush pink — DK cotton or split chenille strand — approximately 2 g — for the cheeks
- Black — cotton yarn or embroidery thread — approximately 1 g — for the nose and mouth
Tools
- 4 mm crochet hook
- Two 12 mm safety eyes
- Polyester stuffing
- Yarn needle with a large eye
- Locking stitch markers
- Straight pins
- Scissors
- Optional plastic canvas circle — 8 cm diameter for extra cap support
Safety eyes and small sewn components are unsuitable for children under three. Replace them with securely embroidered features when removable plastic parts present a risk.
Abbreviations
- MR — magic ring
- sc — single crochet
- inc — two single crochets in one stitch
- dec — single crochet decrease
- sl st — slip stitch
- ch — chain
- BLO — back loop only
- FLO — front loop only
- hdc — half double crochet
Make an invisible decrease by inserting the hook through the front loops of the next two stitches, drawing up one loop through both, and completing one single crochet.
Pattern — Step by Step
Work in a continuous spiral unless a section states otherwise. Place the marker in the first stitch of every new round.
Head
Yarn: peach beige — original six-stitch amigurumi shaping.
R1: 6 sc in MR (6)
R2: inc ×6 (12)
R3: (1 sc, inc) ×6 (18)
R4: (2 sc, inc) ×6 (24)
R5: (3 sc, inc) ×6 (30)
R6: (4 sc, inc) ×6 (36)
R7–R13: sc around (36)
R14: (4 sc, dec) ×6 (30)
R15: (3 sc, dec) ×6 (24)
Insert the safety eyes between R10 and R11 with eight visible stitches between their inner edges. Check the mushroom-cap opening before locking the washers.
R16: (2 sc, dec) ×6 (18)
R17: (1 sc, dec) ×6 (12)
R18: dec ×6 (6)
Stuff firmly, adding smaller pieces around the eye stems. Fasten off and close the opening.
Body
Yarn: sage green.
R1: 6 sc in MR (6)
R2: inc ×6 (12)
R3: (1 sc, inc) ×6 (18)
R4: (2 sc, inc) ×6 (24)
R5: (3 sc, inc) ×6 (30)
R6: (4 sc, inc) ×6 (36)
R7–R13: sc around (36)
R14: (4 sc, dec) ×6 (30)
R15–R16: sc around (30)
R17: (3 sc, dec) ×6 (24)
R18: sc around (24)
R19: (2 sc, dec) ×6 (18)
Stuff the lower half firmly. Keep the final 2 cm slightly softer so the neck seam can be shaped.
R20: (1 sc, dec) ×6 (12)
R21: dec ×6 (6)
Fasten off. Leave a 35 cm tail for attaching the head.
Arms (Make 2)
Begin with peach beige and change to sage green.
R1: 6 sc in MR (6)
R2: inc ×6 (12)
R3–R4: sc around (12)
R5: (2 sc, dec) ×3 (9)
R6: change to sage green, sc around (9)
R7–R10: sc around (9)
Stuff the paw firmly and the upper arm lightly. Flatten the opening.
Fasten off. Leave a 20 cm sewing tail.
Legs and Feet (Make 2)
Yarn: peach beige.
R1: 6 sc in MR (6)
R2: inc ×6 (12)
R3: (1 sc, inc) ×6 (18)
R4–R6: sc around (18)
R7: (1 sc, dec) ×6 (12)
R8–R9: sc around (12)
Stuff each foot firmly at the toe and lightly at the open edge.
Fasten off. Leave a 25 cm sewing tail.
Large Paw Pads (Make 2)
Yarn: medium brown.
R1: 6 sc in MR (6)
R2: inc ×6 (12)
Join with a sl st. Fasten off and leave a 12 cm tail.
Small Toe Pads (Make 8)
Yarn: medium brown.
R1: 6 sc in MR (6)
Join with a sl st. Fasten off and leave a 10 cm tail. Each foot receives one large center pad and four small toe pads.
Floppy Ears (Make 2)
Yarn: medium brown.
R1: 6 sc in MR (6)
R2: inc ×6 (12)
R3: (1 sc, inc) ×6 (18)
R4–R8: sc around (18)
R9: (1 sc, dec) ×6 (12)
R10–R12: sc around (12)
R13: (2 sc, dec) ×3 (9)
R14–R15: sc around (9)
Do not stuff. Flatten the ear and work 4 sc through both layers.
Fasten off. Leave a 25 cm tail.
Muzzle
Yarn: peach beige.
R1: 6 sc in MR (6)
R2: inc ×6 (12)
R3: (1 sc, inc) ×6 (18)
R4–R5: sc around (18)
R6: (1 sc, dec) ×6 (12)
Stuff lightly. The finished muzzle should project approximately 2.5 cm without covering the lower eye edges.
Fasten off. Leave a 25 cm tail.
Nose
Yarn: black.
R1: 6 sc in MR (6)
R2: inc ×6 (12)
R3: sc around (12)
R4: dec ×6 (6)
Add a small amount of stuffing. Fasten off and leave a 15 cm tail.
Cheek Patches (Make 2)
Yarn: blush pink.
R1: 6 sc in MR (6)
R2: inc ×6 (12)
Join with a sl st. Fasten off and leave a 12 cm tail.
Optional Tail
Yarn: peach beige.
R1: 6 sc in MR (6)
R2: (1 sc, inc) ×3 (9)
R3–R5: sc around (9)
R6: (1 sc, dec) ×3 (6)
R7–R9: sc around (6)
Stuff only the first four rounds. Bend the unstuffed section slightly before attachment.
Fasten off. Leave a 20 cm tail.
Mushroom Cap Top
Yarn: sage green. This large part uses a 42-stitch plateau.
R1: 6 sc in MR (6)
R2: inc ×6 (12)
R3: (1 sc, inc) ×6 (18)
R4: (2 sc, inc) ×6 (24)
R5: (3 sc, inc) ×6 (30)
R6: (4 sc, inc) ×6 (36)
R7: (5 sc, inc) ×6 (42)
R8–R10: sc around (42)
R11: (5 sc, dec) ×6 (36)
R12: (4 sc, dec) ×6 (30)
R13: (3 sc, dec) ×6 (24)
R14: sc around (24)
Do not close. The 24-stitch edge becomes the face opening. Stuff the upper dome lightly enough to retain a broad cap rather than a ball shape.
Fasten off. Leave a 40 cm tail.
Cap Underside and Rim
Yarn: cream white.
R1: 6 sc in MR (6)
R2: inc ×6 (12)
R3: (1 sc, inc) ×6 (18)
R4: (2 sc, inc) ×6 (24)
R5: (3 sc, inc) ×6 (30)
R6: (4 sc, inc) ×6 (36)
R7: (5 sc, inc) ×6 (42)
Place the cream circle beneath the green cap with the wrong sides together. Join the outer edges by working 42 sc through both layers.
Fasten off. Cut a centered opening in a plastic canvas circle when extra support is used, then place it between the layers before completing the final 8 stitches.
Cap Opening Band
Yarn: cream white.
Join yarn to the 24-stitch opening left at the base of the green cap.
R1: sc around (24)
R2: (2 sc, dec) ×6 (18)
R3: sc around (18)
Fasten off. Leave a 30 cm tail. This band sits around the crown behind the ears rather than beneath the puppy’s chin.
Large Mushroom Spots (Make 3)
Yarn: cream white.
R1: 6 sc in MR (6)
R2: inc ×6 (12)
R3: (1 sc, inc) ×6 (18)
Join with a sl st. Fasten off and leave a 15 cm tail.
Medium Mushroom Spots (Make 3)
Yarn: cream white.
R1: 6 sc in MR (6)
R2: inc ×6 (12)
Join with a sl st. Fasten off and leave a 12 cm tail.
Small Mushroom Spots (Make 3)
Yarn: cream white.
R1: 6 sc in MR (6)
Join with a sl st. Fasten off and leave a 10 cm tail.
Costume Buttons (Make 2)
Yarn: cream white.
R1: 6 sc in MR (6)
R2: inc ×6 (12)
Join with a sl st. Fasten off and leave a 12 cm tail.
Shoulder Collar
Yarn: sage green. Work in rows.
Row 1: ch 25
Row 2: starting in the second ch from the hook, 24 sc (24)
Row 3: ch 1, turn, 24 sc (24)
Fasten off and leave a 30 cm tail. The strip should fit around the neck without overlapping the muzzle.
Assembly
- Sew the head to the body with the eyes facing directly forward. Add small stuffing pieces around the neck until the head remains upright without a visible gap.
- Attach the ears to the head between R6 and R9. Leave approximately 15 stitches between their front edges and angle each ear downward.
- Place the muzzle between the eyes, covering roughly R10 through R14. Add a final pinch of stuffing before closing the seam.
- Sew the nose to the muzzle. Embroider a 10 mm vertical line below it, then form two curved mouth lines measuring approximately 7 mm each.
- Attach the cheek patches beside the muzzle. Position their upper edges level with the lower third of the safety eyes.
- Fit the mushroom cap over the crown and pull each ear outside the cream opening band. Sew the band to the head with small stitches placed behind the ears and across the back.
- Arrange the nine cap spots asymmetrically. Keep at least 2 cm between the large circles so the green surface remains visible.
- Sew the arms to the upper body between R15 and R18 of the torso. Attach the legs across body R5 to R9 with the toes angled upward.
- Add one large pad and four toe pads to each foot. Sew the cream buttons down the center of the green body and attach the collar around the neck seam.
- Attach the optional tail to the back between body R7 and R10. Weave every remaining tail through four internal stitch paths before trimming.
The finished puppy should sit on both feet and its lower body while the mushroom cap remains centered above the eyes.
7 Technical Tips
- Marker loss: Chenille can conceal the first stitch after only one round. Use a locking marker with a contrasting color and count every completed increase round before continuing.
- Loose head stuffing: A soft area wider than 2 cm behind either eye can let the washer shift. Pack small pieces around both eye stems before filling the center of the head.
- Visible decrease bars: Standard decreases create pale horizontal gaps in chenille. Work through the front loops only and avoid stretching the completed decrease with the hook shaft.
- Incorrect eye timing: The washers cannot be added after R16 closes the head. Test the 18-stitch cap opening around the crown before permanently locking the eyes.
- Cap collapse: Stuffing pressed into one central lump creates a pointed cap instead of a mushroom dome. Spread a layer no thicker than 2 cm across the full upper surface.
- Rotated muzzle: A muzzle sewn without reference pins can shift 5 mm toward one eye. Pin its top, bottom, and both sides before making the first attachment stitch.
- Loose paw pads: Chenille ends woven in a single direction can pull free through handling. Change direction at least four times inside each stuffed foot before trimming the tail.
Conclusion
The finished proportions depend on a 36-stitch puppy head beneath a 42-stitch cap, with the cream opening kept behind the eyes and around the ear bases. Check the seated balance before securing the legs, then add one concealed stitch beneath each arm when the limbs rotate forward. Photograph the figure from slightly below cap level so the spots, ears, muzzle, buttons, and paw pads remain visible. Save the project to Pinterest and post the completed version on Instagram using #MushroomPuppyPattern. The next concrete step is to crochet the head and cap before any smaller parts, since their fitted circumferences control the remaining assembly. Will your puppy’s cap use irregular forest spots or the evenly spaced nine-spot layout shown here?









