Introduction
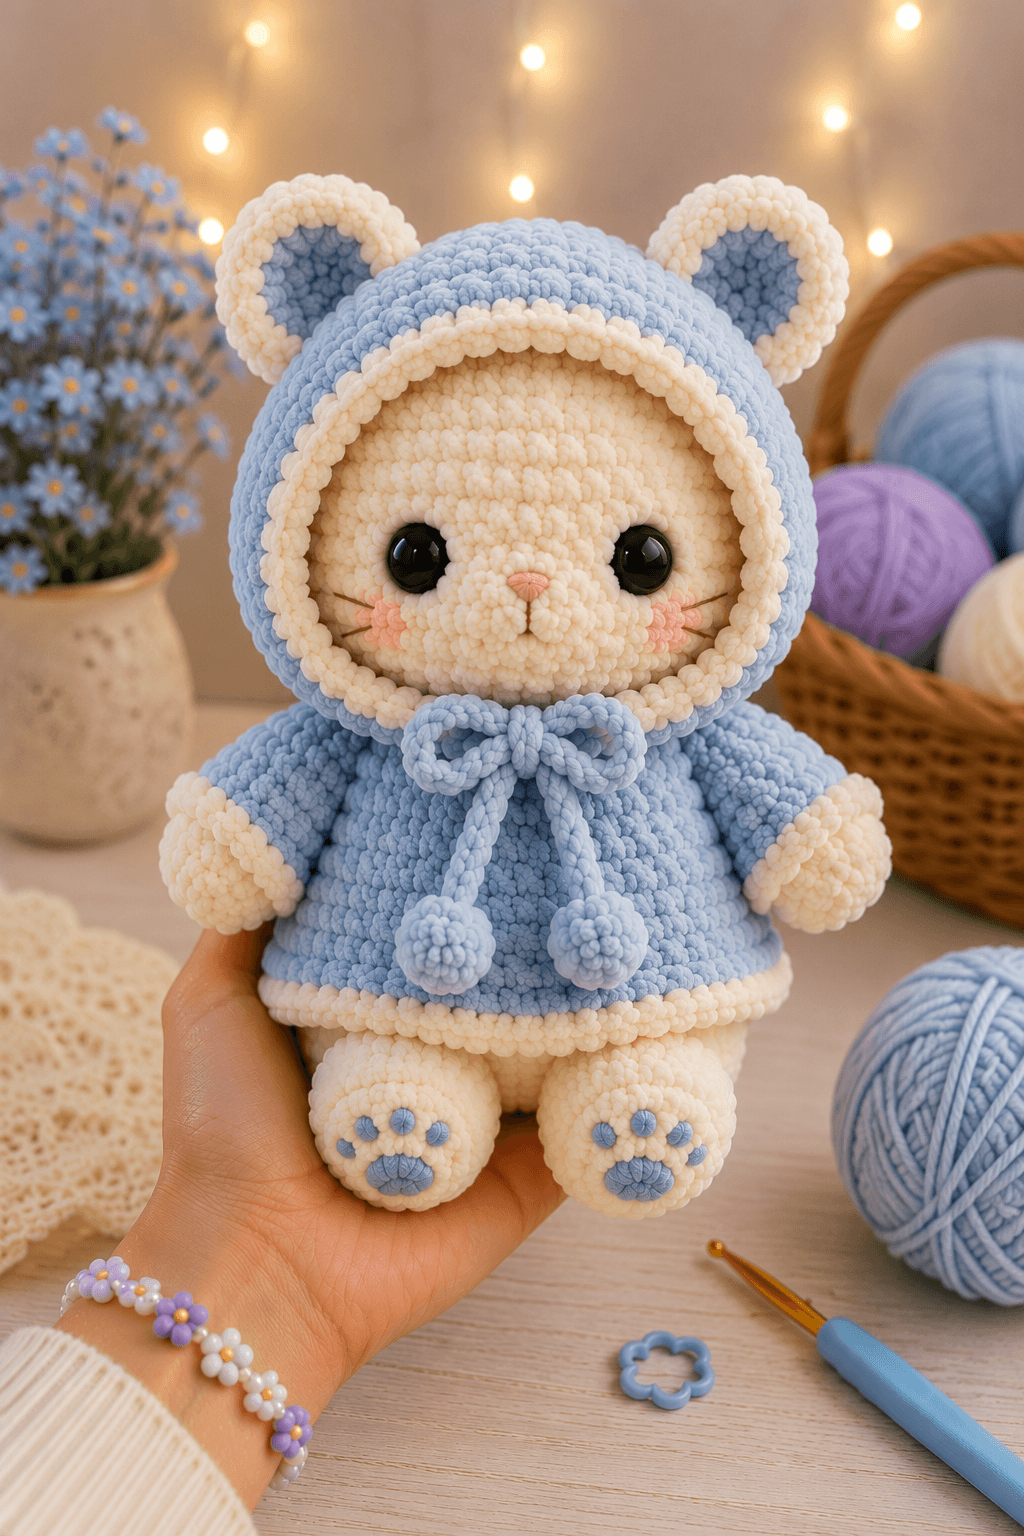
A cat inside a bear hood needs a circular face opening that exposes the whiskers without sliding below the chin. This cat in bear costume amigurumi pattern uses super-bulky chenille, a 4.5 mm hook and 18 mm eyes to make a sitting plush approximately 25 cm tall. The intermediate project includes a fitted hood, layered bear ears, cream cuffs, embroidered paw pads and pompom-ended ties.
The Design: What Makes the Blue Bear Costume Different
The cat head reaches a 36-stitch plateau, while the hood expands from a 42-stitch face opening to a 48-stitch outer shell. That difference leaves room for the chenille fabric and stuffing without pressing the hood into the eyes. The costume body also reaches 36 stitches, but its shorter plateau creates a compact seated torso rather than a second sphere. Round bear ears use separate cream outer circles and blue inner circles. Their doubled construction helps them remain open instead of folding against the crown. Cream cuffs and a removable hem band divide the arms and torso into readable costume sections. One frequent error is tightening the face-opening chain until the lower edge cuts across the cheeks. This bear hood cat crochet pattern controls that edge with two plain rounds before the hood expands toward the back.
Project Info at a Glance
| Skill Level | Time | Finished Size | Hook | Best For |
|---|---|---|---|---|
| Intermediate | 10–14 hours | Approximately 25 cm sitting | 4.5 mm | Display, collections and supervised play |
Materials and Tools
Yarn
- Powder blue — super-bulky chenille, weight 6 — approximately 150–180 g — use for the hood, torso, sleeves, inner ears, bow, ties and paw embroidery.
- Cream — super-bulky chenille, weight 6 — approximately 120–150 g — use for the cat head, muzzle, paws, legs, outer ears, hood border, cuffs and sweater hem.
- Blush pink — smooth cotton or fine plush yarn — approximately 3–5 g — use for the nose and cheek patches.
- Brown — embroidery yarn — less than 1 g — use for the whiskers and mouth.
Tools
- 4.5 mm crochet hook
- Two 18 mm black safety eyes
- Polyester stuffing, approximately 180–220 g
- Large-eye yarn needle
- Locking stitch markers
- Rust-resistant pins
- Flexible measuring tape
- Scissors
Plastic safety eyes are not suitable for children under three. Use tightly embroidered eyes when the finished plush will be handled by an infant or toddler.
Abbreviations
- MR — magic ring
- sc — single crochet
- inc — two single crochets in one stitch
- dec — single-crochet decrease
- sl st — slip stitch
- ch — chain
- BLO — back loop only
- FLO — front loop only
- hdc — half double crochet
Work an invisible decrease through the front loops of the next two stitches to reduce the opening that can expose stuffing.
Pattern — Step by Step
Work in a continuous spiral unless a section is identified as a row. Place a marker in the first stitch of every round.
Cat Head
Yarn: cream — original shaping based on standard six-stitch amigurumi math.
R1: 6 sc in MR (6)
R2: inc ×6 (12)
R3: (1 sc, inc) ×6 (18)
R4: (2 sc, inc) ×6 (24)
R5: (3 sc, inc) ×6 (30)
R6: (4 sc, inc) ×6 (36)
R7–R12: sc around (36)
Insert the eyes between R9 and R10 with seven visible stitches between their inner edges. Place the hood opening over the unfinished head before locking the washers.
R13: (4 sc, dec) ×6 (30)
R14: (3 sc, dec) ×6 (24)
R15: (2 sc, dec) ×6 (18)
Stuff firmly around the eye posts. Keep the lower center moderately soft so the muzzle can sit flat.
R16: (1 sc, dec) ×6 (12)
R17: dec ×6 (6)
Fasten off. Leave a 15 cm tail, pass it through the remaining front loops and close the opening.
Cat Muzzle
Yarn: cream.
R1: 6 sc in MR (6)
R2: inc ×6 (12)
R3: (1 sc, inc) ×6 (18)
R4: sc around (18)
R5: (1 sc, dec) ×6 (12)
Add a shallow layer of stuffing. Embroider a pink triangular nose across two stitches and add one short brown mouth line below it.
Fasten off. Leave a 25 cm sewing tail.
Cheek Patches — Make Two
Yarn: blush pink.
R1: 6 sc in MR (6)
R2: inc ×6 (12)
Fasten off. Leave a 15 cm tail and keep each circle flat.
Costume Body
Yarn: powder blue.
R1: 6 sc in MR (6)
R2: inc ×6 (12)
R3: (1 sc, inc) ×6 (18)
R4: (2 sc, inc) ×6 (24)
R5: (3 sc, inc) ×6 (30)
R6: (4 sc, inc) ×6 (36)
R7–R11: sc around (36)
R12: (4 sc, dec) ×6 (30)
R13–R14: sc around (30)
R15: (3 sc, dec) ×6 (24)
R16: sc around (24)
R17: (2 sc, dec) ×6 (18)
Pack the lower body firmly. Add smaller pieces near the upper sides to maintain a round shoulder line.
R18: (1 sc, dec) ×6 (12)
Fasten off. Leave a 35 cm tail for attaching the body to the head.
Arms — Make Two
Yarn: begin in cream and change to powder blue.
R1: 6 sc in MR (6)
R2: inc ×6 (12)
R3: (1 sc, inc) ×6 (18)
R4–R5: sc around (18)
R6: (1 sc, dec) ×6 (12)
R7: change to powder blue, sc around (12)
R8–R11: sc around (12)
Stuff the cream paw firmly and add a small amount of stuffing to the sleeve.
R12: (2 sc, dec) ×3 (9)
Flatten the opening and crochet 4 sc through both layers.
Fasten off. Leave a 25 cm sewing tail.
Cream Cuffs — Make Two
Yarn: cream.
Ch 13 and join with a sl st without twisting the chain.
R1: sc in each chain around (12)
R2: sc around (12)
Fasten off. Leave a 20 cm tail. Slide one cuff over each arm color-change line and stitch it in place.
Back Legs — Make Two
Yarn: cream.
R1: 6 sc in MR (6)
R2: inc ×6 (12)
R3: (1 sc, inc) ×6 (18)
R4: (2 sc, inc) ×6 (24)
R5–R7: sc around (24)
R8: (2 sc, dec) ×6 (18)
R9–R11: sc around (18)
R12: (1 sc, dec) ×6 (12)
R13–R14: sc around (12)
Pack the foot firmly and leave the upper two rounds flexible for seated positioning.
Flatten the opening and crochet 6 sc through both layers.
Fasten off. Leave a 30 cm sewing tail.
Large Paw Pads — Make Two
Yarn: powder blue.
R1: 6 sc in MR (6)
R2: inc ×6 (12)
Fasten off. Leave a 15 cm tail and flatten each pad before sewing.
Toe Pads — Make Six
Yarn: powder blue.
R1: 6 sc in MR (6)
Fasten off. Leave a 10 cm tail. Make three toe pads for each back foot.
Bear Hood
Yarn: powder blue. Begin at the face opening and work toward the rear crown.
Ch 43 and join with a sl st in the first chain, taking care not to twist the ring.
R1: sc in each chain around (42)
R2: sc around (42)
R3: (6 sc, inc) ×6 (48)
R4–R8: sc around (48)
R9: (6 sc, dec) ×6 (42)
R10: (5 sc, dec) ×6 (36)
R11: (4 sc, dec) ×6 (30)
R12: (3 sc, dec) ×6 (24)
Place the hood over the completed cat head. Add small pieces of stuffing only if the rear shell collapses; the hood should not become a second solid head.
R13: (2 sc, dec) ×6 (18)
R14: (1 sc, dec) ×6 (12)
R15: dec ×6 (6)
Fasten off. Leave a 15 cm tail and close the rear opening through the front loops.
Cream Hood Border
Yarn: cream.
Join the yarn at the center bottom of the 42-stitch face opening.
R1: sc evenly around the opening (42)
R2: sc around (42)
Fasten off. Leave a 25 cm tail for anchoring the border beneath the chin.
Outer Bear Ears — Make Two
Yarn: cream.
R1: 6 sc in MR (6)
R2: inc ×6 (12)
R3: (1 sc, inc) ×6 (18)
R4: (2 sc, inc) ×6 (24)
R5: sc around (24)
Fasten off. Leave a 30 cm sewing tail.
Inner Bear Ears — Make Two
Yarn: powder blue.
R1: 6 sc in MR (6)
R2: inc ×6 (12)
R3: (1 sc, inc) ×6 (18)
Fasten off. Leave a 20 cm tail. Sew one blue circle to each cream ear while retaining a cream border.
Sweater Hem Band
Yarn: cream.
Ch 37 and join with a sl st without twisting the chain.
R1: sc in each chain around (36)
R2: sc around (36)
Fasten off. Leave a 30 cm tail. Position the band around the lower body, directly above the leg seams.
Neck Tie
Yarn: powder blue.
Ch 71, leaving a 20 cm starting tail.
Row 1: sl st in the second chain from the hook and in every chain across (70)
Fasten off with a second 20 cm tail.
Tie Pompoms — Make Two
Yarn: powder blue.
R1: 6 sc in MR (6)
R2: inc ×6 (12)
R3: sc around (12)
R4: dec ×6 (6)
Add a small amount of stuffing.
Fasten off. Leave a 15 cm tail and attach one pompom to each end of the neck tie.
Assembly
- Center the cat head over the body opening and sew twice around the 12-stitch neck seam.
- Attach the muzzle below the eyes, then place one cheek patch on each side and embroider three whiskers extending toward the hood opening.
- Sew the back legs to matching rounds on the lower body, keeping both foot surfaces directed forward.
- Attach the large paw pads and three toe pads to each foot before sewing the arms to the upper torso.
- Slide the cream cuffs over the arm color changes and stitch through the cuff, arm and sleeve fabric at four evenly spaced points.
- Fit the hood over the cat head and center the cream border around both eyes, cheeks and the lower muzzle.
- Anchor the hood at the crown, chin and both side points using blue yarn passed into the cat head.
- Sew the layered bear ears to the upper sides of the hood with their inner circles facing slightly forward.
- Position the cream hem band around the lower torso, then stitch it to the body without catching the back legs.
- Wrap the neck tie below the hood border, form a centered bow, attach both pompoms and hide every structural tail inside a stuffed section.
The completed plush should sit without hand support while the hood border remains equally spaced around both eyes.
7 Technical Tips
- Face-opening distortion: A starting ring below 42 stitches can compress the cheeks. Measure the opening at approximately 11–12 cm across before beginning the hood increases.
- Marker drift: Losing the first stitch rotates the rear decrease line toward one ear. Count all 48 stitches after each hood plateau round.
- Overstuffed hood: Dense filling makes the costume crown larger than the cat head. Use no stuffing near the face and add only a thin layer behind the upper rear seam.
- Visible decrease holes: Standard decreases can expose white stuffing through blue chenille. Work each decrease through the front loops and tighten the following single crochet.
- Collapsed bear ears: Sewing only the lower edge allows the round ears to fold backward. Attach the bottom third of each ear and add one hidden stitch at its rear midpoint.
- Uneven paw embroidery: Toe pads placed more than one stitch apart produce an unbalanced footprint. Pin all six toe circles before attaching the first one.
- Loose costume trim: A hem band with more than 36 stitches will flare below the torso. Test the band around the stuffed body before completing its joining seam.
Conclusion
Inspect the hood from the front and both sides before trimming the final attachment tails. The cream border should frame the cheeks without touching the eyes, and both bear ears should show equal amounts of blue inner fabric. Record the finished face-opening circumference, hook size and chenille brand before making another color version. Save this cat in bear costume amigurumi pattern to a Pinterest project board and share the completed plush on Instagram with #BlueBearCostumeCat. A lavender, sage or brown costume can use the same stitch counts. Would you keep the paw pads blue or change them to match the cat’s pink nose?
Technical Sources
- Ribblr: Bear Cat Crochet Pattern
- Amigurumi News: Cat With Bear Hat
- Gathered: Free Amigurumi Cat Pattern
- Amigurumis Crochet: Plush Mini Cat
- Etsy: Kitty in Bear Suit Pattern









