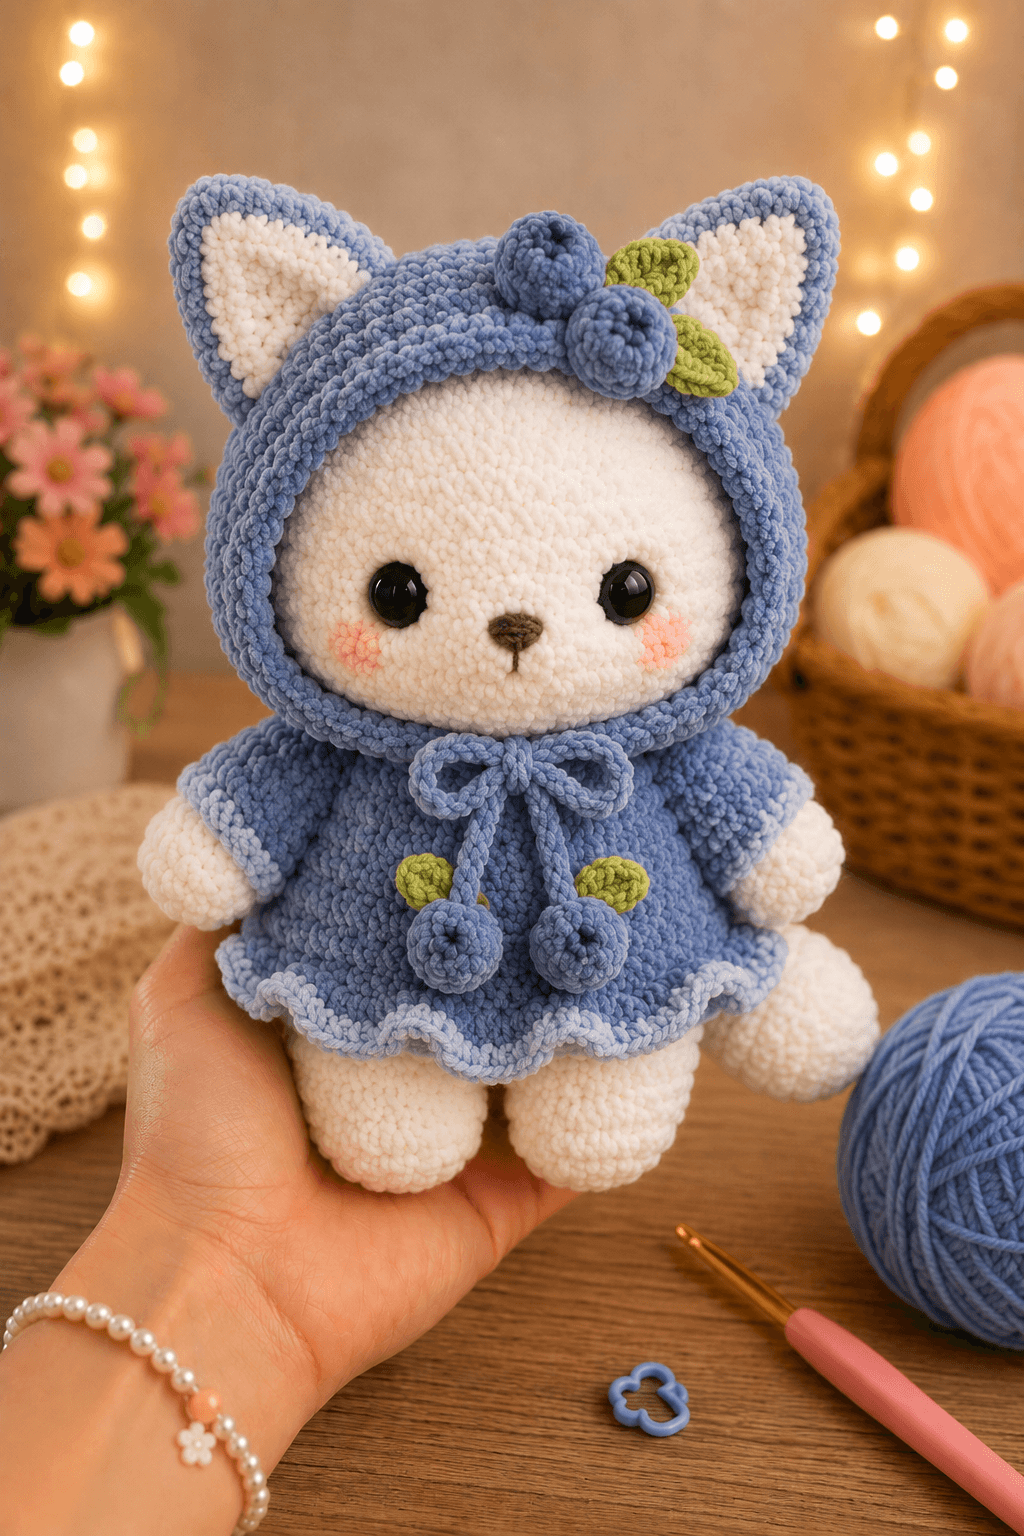
Cat ears must remain pointed after a padded hood is pulled over them. This blueberry hooded cat amigurumi solves that structural problem with separate costume ears, a close-fitting face opening and a stable 42-stitch head. You will use super-bulky velvet yarn, a 3.5 mm hook and 18 mm safety eyes to make an approximately 28 cm intermediate-level figure that can sit unsupported on a display shelf.
The Design: What Makes Bluebell Different
The head is wider than the body because the hood needs room to frame the white face without covering the eyes. A 42-stitch head supplies that width, while a 36-stitch body keeps the lower silhouette compact. Separate pointed ears are sewn to the hood rather than pushed through it; this prevents the velvet fabric from stretching around openings. The cape begins at the neckline and expands through controlled increases, giving the blueberry crochet doll a level hem when seated. One frequent mistake is attaching the hood before placing the eyes. That shifts the visible face opening and makes otherwise even eyes appear crooked. This velvet cat crochet pattern therefore completes the facial placement first, followed by the hood, berries and leaves. The resulting plush kitten amigurumi has clear cat anatomy beneath a removable-looking costume.
Project Info at a Glance
| Skill Level | Time | Finished Size | Hook | Best For |
|---|---|---|---|---|
| Intermediate | 8–11 hours | About 28 cm seated | 3.5 mm | Nursery display, seasonal decor and photography props |
Materials and Tools
Yarn
- Dusty blueberry blue — category 6 chenille — approximately 170 g — Himalaya Dolphin Baby or similar 100 g/120 m velvet yarn
- Warm white — category 6 chenille — approximately 120 g — matching velvet yarn
- Olive green — category 6 chenille — approximately 12 g — for leaves
- Pale blue — category 6 chenille — approximately 8 g — for the cape edging
- Brown — DK cotton — less than 2 g — for the embroidered nose and mouth
- Pink — DK cotton or embroidery thread — less than 2 g — for cheek stitches
Tools
- 3.5 mm crochet hook
- 18 mm black safety eyes
- Polyester stuffing, approximately 180–220 g
- Yarn needle with an eye large enough for chenille
- Locking stitch markers
- Long sewing pins
- Scissors
Himalaya lists Dolphin Baby as a 100 g, 120 m chenille yarn. A current velvet-cat pattern recommends a 3.5 mm hook for bulky velvet yarn. Sources: Himalaya Dolphin Baby specifications and Molly the Cat material guide.
Abbreviations
- MR — magic ring
- sc — single crochet
- inc — two single crochets in one stitch
- dec — single-crochet decrease
- sl st — slip stitch
- ch — chain
- hdc — half double crochet
- dc — double crochet
- BLO — back loop only
- FLO — front loop only
An invisible decrease is worked through the front loops of the next two stitches before completing one single crochet.
Pattern — Step by Step
Work in a continuous spiral unless a section states otherwise. Place a marker in the first stitch of every round.
Head
Yarn: warm white — original shaping based on standard six-stitch amigurumi math.
R1: 6 sc in MR (6)
R2: inc ×6 (12)
R3: (1 sc, inc) ×6 (18)
R4: (2 sc, inc) ×6 (24)
R5: (3 sc, inc) ×6 (30)
R6: (4 sc, inc) ×6 (36)
R7: (5 sc, inc) ×6 (42)
R8–R15: sc around (42)
Insert 18 mm safety eyes between R11 and R12, with nine visible stitches between the posts. Confirm that both washers are locked before stuffing.
R16: (5 sc, dec) ×6 (36)
R17: (4 sc, dec) ×6 (30)
R18: (3 sc, dec) ×6 (24)
Stuff the forehead and cheeks firmly. Keep the neck opening slightly softer.
R19: (2 sc, dec) ×6 (18)
R20: (1 sc, dec) ×6 (12)
R21: dec ×6 (6)
Fasten off. Leave a 20 cm tail, thread it through the remaining front loops and close the opening.
Muzzle
Yarn: warm white — adapted from the round muzzle construction used in published cat patterns.
R1: 6 sc in MR (6)
R2: inc ×6 (12)
R3: sc around (12)
Fasten off. Leave a 25 cm tail. Add a small amount of stuffing and sew the muzzle between R12 and R16 of the head.
Body
Yarn: warm white — original shaping based on standard six-stitch amigurumi math.
R1: 6 sc in MR (6)
R2: inc ×6 (12)
R3: (1 sc, inc) ×6 (18)
R4: (2 sc, inc) ×6 (24)
R5: (3 sc, inc) ×6 (30)
R6: (4 sc, inc) ×6 (36)
R7–R12: sc around (36)
R13: (4 sc, dec) ×6 (30)
R14–R15: sc around (30)
R16: (3 sc, dec) ×6 (24)
R17–R18: sc around (24)
R19: (2 sc, dec) ×6 (18)
Stuff the lower body firmly enough to hold a seated shape.
R20: (1 sc, dec) ×6 (12)
Fasten off. Leave a 35 cm tail for attaching the body to the head.
Front Legs and Paws — Make 2
Begin with warm white and change to blueberry blue.
R1: 6 sc in MR (6)
R2: inc ×6 (12)
R3–R4: sc around (12)
R5: (1 sc, dec) ×4 (8)
Change to blueberry blue. Stuff the white paw firmly and leave the upper arm lightly filled.
R6–R10: sc around (8)
R11: dec ×4 (4)
Fasten off. Leave a 25 cm tail and flatten the top before sewing.
Back Legs — Make 2
Yarn: warm white.
R1: 6 sc in MR (6)
R2: inc ×6 (12)
R3: (1 sc, inc) ×6 (18)
R4–R6: sc around (18)
R7: (1 sc, dec) ×6 (12)
R8–R10: sc around (12)
Stuff the foot firmly and the upper leg moderately.
R11: dec ×6 (6)
Fasten off. Leave a 30 cm tail for sewing.
Cat Ears — Make 2
Yarn: warm white. The triangular shaping is designed for a rounded chenille head.
R1: 6 sc in MR (6)
R2: sc around (6)
R3: (1 sc, inc) ×3 (9)
R4: sc around (9)
R5: (2 sc, inc) ×3 (12)
R6: sc around (12)
Fasten off. Leave a 30 cm tail. Flatten each ear without stuffing.
Inner Ear Panels — Make 2
Yarn: warm white or pale blush DK yarn; worked in rows.
Row 1: ch 5, sc in second ch from hook and across (4)
Row 2: ch 1, turn, dec, 2 sc (3)
Row 3: ch 1, turn, dec, 1 sc (2)
Row 4: ch 1, turn, dec (1)
Fasten off. Leave a 15 cm tail and stitch one panel to the front of each ear.
Tail
Yarn: warm white.
R1: 6 sc in MR (6)
R2: inc ×6 (12)
R3–R4: sc around (12)
R5: (1 sc, dec) ×4 (8)
R6–R16: sc around (8)
Stuff the first six rounds. Leave the remaining length flexible so the tail curves beside the body.
Fasten off. Leave a 30 cm tail.
Cheek Patches — Make 2
Yarn: pink DK cotton.
R1: 6 sc in MR (6)
R2: inc ×6 (12)
Fasten off. Leave a 15 cm tail. Flatten each circle before placing it below and slightly outside the eye.
Hood
Yarn: blueberry blue. Test the opening around the completed face before fastening off.
R1: 6 sc in MR (6)
R2: inc ×6 (12)
R3: (1 sc, inc) ×6 (18)
R4: (2 sc, inc) ×6 (24)
R5: (3 sc, inc) ×6 (30)
R6: (4 sc, inc) ×6 (36)
R7: (5 sc, inc) ×6 (42)
R8: (6 sc, inc) ×6 (48)
R9–R12: sc around (48)
R13: sc 34, leave the remaining 14 stitches unworked; ch 1 and turn (34)
R14–R18: sc across, ch 1 and turn (34)
R19: sc across (34)
Fasten off. Leave a 35 cm tail. Place the hood around the head and join its lower corners beneath the chin with six small whipstitches.
Hood Ears — Make 2
Begin with warm white, then add blueberry blue around the edge.
Row 1: ch 9, sc in second ch from hook and across (8)
Row 2: ch 1, turn, dec, 4 sc, dec (6)
Row 3: ch 1, turn, dec, 2 sc, dec (4)
Row 4: ch 1, turn, dec ×2 (2)
Row 5: ch 1, turn, dec (1)
Change to blueberry blue.
Edging: sc evenly around all three sides, placing 3 sc in the top point.
Fasten off. Leave a 30 cm tail for attaching the ears to the hood.
Cape and Scalloped Skirt
Yarn: blueberry blue. Work in joined rows from the neck downward.
Row 1: ch 25, sc in second ch from hook and across (24)
Row 2: ch 1, turn, (3 sc, inc) ×6 (30)
Row 3: ch 1, turn, sc across (30)
Row 4: ch 1, turn, (4 sc, inc) ×6 (36)
Row 5: ch 1, turn, sc across (36)
Row 6: ch 1, turn, (5 sc, inc) ×6 (42)
Row 7: ch 1, turn, sc across (42)
Row 8: ch 1, turn, (6 sc, inc) ×6 (48)
Row 9: ch 1, turn, sc across (48)
Row 10: ch 1, turn, (7 sc, inc) ×6 (54)
Row 11–R12: ch 1, turn, sc across (54)
Change to pale blue for the edging.
Edging: (sl st in next stitch, 5 dc in next stitch, sl st in next stitch) repeat across the lower edge.
Fasten off. Leave a 30 cm tail. Wrap the cape around the body and close the short back seam.
Neck Ties — Make 2
Yarn: blueberry blue.
Ch 36. Sl st in the second chain from the hook and in each remaining chain (35).
Fasten off. Leave a 20 cm tail and attach one tie to each front corner of the cape.
Blueberries — Make 5
Yarn: blueberry blue.
R1: 6 sc in MR (6)
R2: inc ×6 (12)
R3–R4: sc around (12)
Add a pea-sized amount of stuffing.
R5: dec ×6 (6)
Fasten off. Leave a 20 cm tail. Close the opening and use one small stitch to indent the berry center.
Leaves — Make 4
Yarn: olive green; worked around both sides of a foundation chain.
Ch 7. Starting in the second chain from the hook, work sl st, sc, hdc, dc, hdc, 3 sc in the last chain. Continue on the opposite side with hdc, dc, hdc, sc, sl st.
Fasten off. Leave a 20 cm tail for sewing.
Assembly
- Center the body beneath the head and pin the 12-stitch neck opening across the lower head between R18 and R20.
- Sew the body to the head twice around the seam, adding a small amount of stuffing before closing the final section.
- Attach the white cat ears to the upper head between R4 and R8, keeping approximately eight stitches between their inner edges.
- Sew the muzzle below the eyes, embroider a compact brown triangular nose and add one vertical mouth stitch.
- Attach the cheek patches below the outer halves of the eyes, or replace them with six short pink embroidery stitches per side.
- Position the back legs at the lower front of the body and sew through both the leg edge and body fabric for a stable seated base.
- Attach the front legs at the body sides with the white paws angled slightly inward; sew the tail to the rear-right side.
- Fit the hood over the head, sew its lower corners beneath the chin and attach the blue-edged hood ears directly above the cat ears.
- Wrap the cape around the torso, close the back seam and attach both neck ties. Sew one blueberry to the end of each tie.
- Arrange three blueberries and two leaves above the right side of the face opening, then place the remaining two leaves near the lower cape decorations.
The completed figure should sit level with the tail resting beside the right back leg.
7 Technical Tips
- Stitch-marker drift: Chenille can hide the first stitch and shift the face by one or two stitches per round. Move a locking marker after completing the first stitch, not before working it.
- Underfilled cheeks: A hollow area below the eyes makes the 42-stitch head collapse inward. Add stuffing in pieces no larger than 3 cm and pack it behind the muzzle before closing R18.
- Visible decrease gaps: Standard decreases can expose stuffing along the lower head. Work every head and body decrease through the front loops only.
- Late eye placement: Safety-eye washers cannot be fitted after the head is closed. Install the 18 mm eyes between R11 and R12 before beginning R16.
- Loose velvet tension: A hook larger than 3.5 mm may create openings between stitches in this yarn class. Make a 12-stitch test cup and reject the gauge when white stuffing is visible under normal room light.
- Unpinned limbs: Back legs sewn at different heights will make the cat lean. Pin both legs so their lowest points align within 2 mm before taking the first permanent stitch.
- Short woven tails: Cut chenille ends can shed out of shallow seams. Weave each structural tail through at least 5 cm of filled fabric, reverse direction and bury the trimmed end.
Conclusion
The finished cat depends on three measurements: a 42-stitch head, nine visible stitches between the eye posts and an approximately 24-stitch cape neckline. Check those points before attaching the costume. Your next step is to crochet the head and hood first, then test the opening before committing yarn to the cape. Save the completed blueberry hooded cat amigurumi to a dedicated Pinterest crochet board and post a front-and-side view on Instagram with #BluebellBlueberryCat. Side photographs reveal whether the hood ears, body and back legs share the same center line. Which detail will you alter first: the number of blueberries on the hood or the width of the pale-blue scalloped border?









