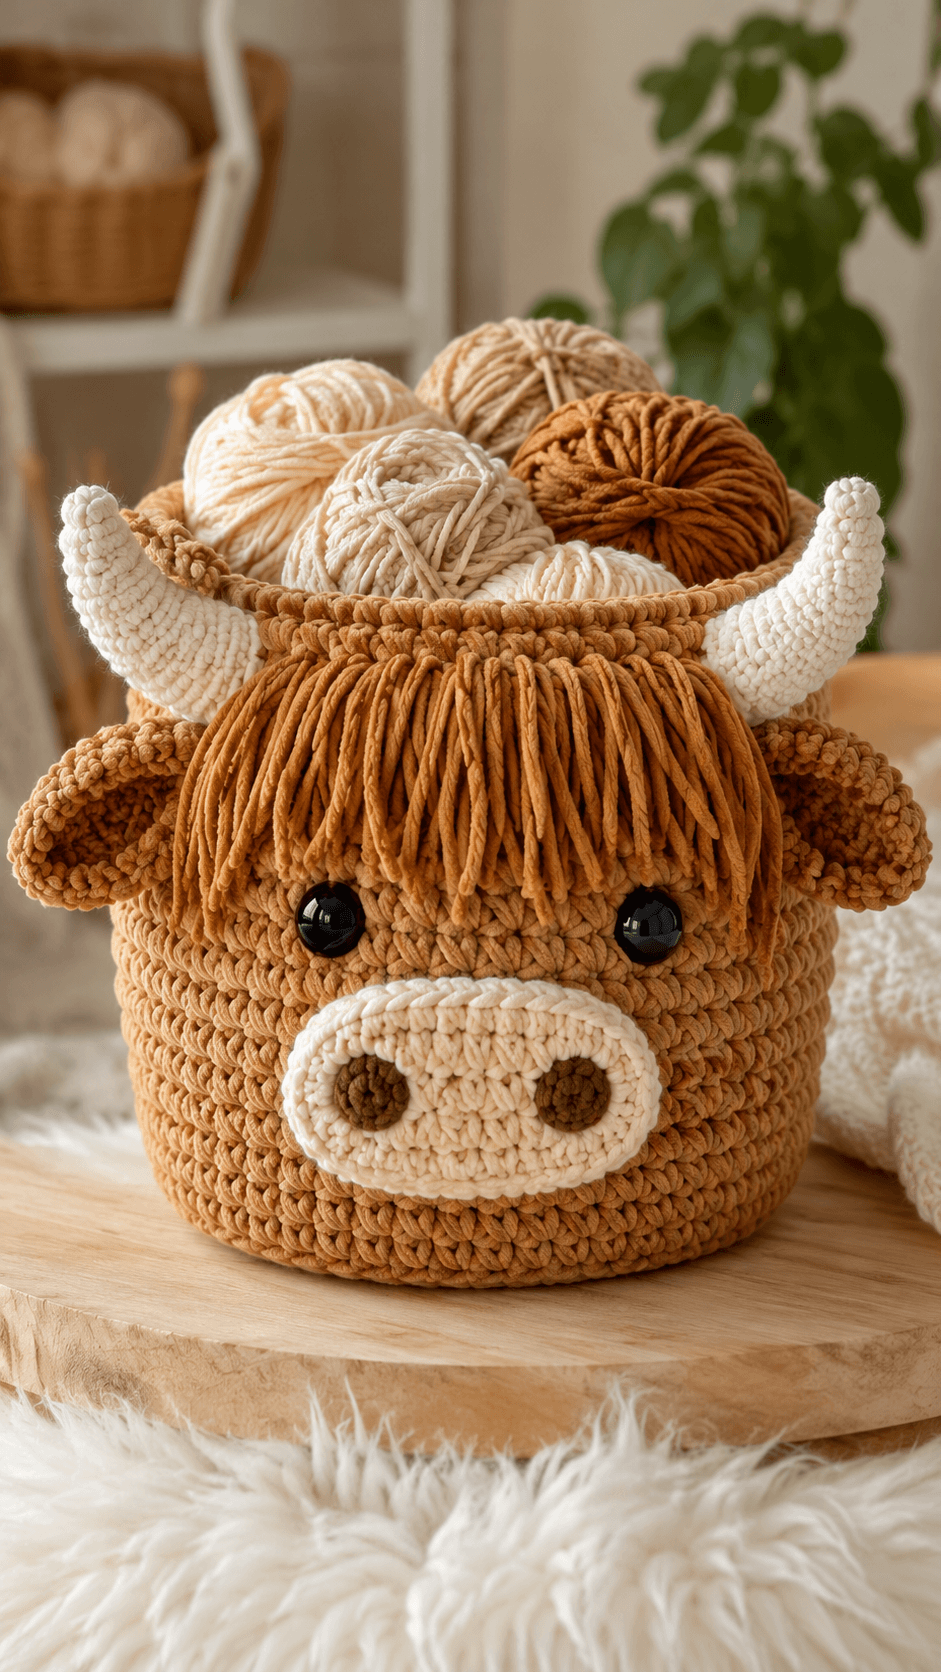
Highland cows wear their fringe over the eyes, so the rim has to carry hair without collapsing into the basket opening. This highland cow crochet basket pattern uses worsted-weight yarn or sturdy basket yarn, a 6.5 mm hook for the container, a 3.5 mm hook for the face pieces, and finishes at roughly 23 cm tall. Skill level: intermediate. It solves one practical problem fast: soft storage that still reads clearly as a cow.
The Design: What Makes This Highland Cow Different
A Highland cow basket works only when the animal features stay readable after the top is left open. That changes the build immediately. The body cannot taper like a plush toy, because the side walls need vertical support for storage. The horns also sit near rim level rather than near a stuffed forehead, which keeps the silhouette wide and recognisable from the front. Then there is the fringe. On a standard cow amigurumi, hair is decorative. On a crochet cow storage basket, the fringe has to be dense enough to cover the join line between rim and face area without dropping into the opening. Ears need a flatter mount as well, otherwise they fold backward once the basket is loaded. A common mistake is placing the snout too low. That leaves too much blank space under the eyes and the face stops reading as a Highland cow basket crochet design.
Project Info at a Glance
| Skill Level | Time | Finished Size | Hook | Best For |
|---|---|---|---|---|
| Intermediate | 6–8 hours | Approx. 23 cm tall x 30.5 cm wide | 6.5 mm + 3.5 mm | Yarn storage, nursery shelf basket, gift basket base |
Materials and Tools
Yarn
- Caramel brown — worsted weight or basket yarn — approx. 320 g — Lion Brand Re-Up, Hoooked Zpagetti, or similar sturdy cotton blend
- Cream — worsted weight — approx. 35 g — for snout and horns
- Tan — worsted weight — approx. 20 g — for inner ears and shading
- Dark brown — worsted weight — approx. 10 g — for nostrils
- Hair fringe yarn — smooth cotton or acrylic in rust brown — approx. 35 g
Tools
- Hook 6.5 mm for basket body and rim
- Hook 3.5 mm for snout, ears, and horns
- Safety eyes 18–20 mm
- Stuffing for snout and horns
- Tapestry needle
- Stitch markers
- Sharp scissors
Abbreviations
MR = magic ring, sc = single crochet, inc = increase, dec = decrease, sl st = slip stitch, ch = chain, BLO = back loop only.
Invisible decrease joins two front loops into one stitch and reduces bulk on visible shaping rounds.
Pattern — Step by Step
Work in a continuous spiral unless noted. Use a marker at the first stitch of every round.
Basket Body / Head Base (Make 1)
Yarn: caramel brown — standard basket math adapted to verified finished size
R1: 6 sc in MR (6)
R2: inc x6 (12)
R3: (sc, inc) x6 (18)
R4: (2 sc, inc) x6 (24)
R5: (3 sc, inc) x6 (30)
R6: (4 sc, inc) x6 (36)
R7: (5 sc, inc) x6 (42)
R8: (6 sc, inc) x6 (48)
R9: (7 sc, inc) x6 (54)
R10: (8 sc, inc) x6 (60)
R11: (9 sc, inc) x6 (66)
R12: (10 sc, inc) x6 (72)
R13: BLO sc around (72)
R14-R29: sc around (72)
R30: sl st around loosely (72)
The flat base and straight walls create the storage shape. Do not stuff.
Fasten off. Weave tail inside.
Top Rim Reinforcement (Make 1)
Yarn: caramel brown — standard reinforcement edging
Join yarn to any stitch on top edge.
R1: sc around through both loops (72)
R2: reverse sc or sl st around loosely (72)
This extra rim round reduces collapse when yarn skeins sit inside the basket.
Fasten off. Leave 12 cm tail.
Snout (Make 1)
Yarn: cream — standard oval snout shaping
Ch 8.
R1: sc in 2nd ch from hook, 5 sc, 3 sc in last ch, working on opposite side 5 sc, 2 sc in last ch (16)
R2: inc, 5 sc, inc x3, 5 sc, inc x2 (22)
R3: sc, inc, 5 sc, (sc, inc) x3, 5 sc, (sc, inc) x2 (28)
R4: 28 sc (28)
R5: sc around (28)
Lightly stuff before closing against the face.
Fasten off. Leave 35 cm tail.
Nostrils (Make 2)
Yarn: dark brown — standard amigurumi circle
R1: 6 sc in MR (6)
R2: inc x6 (12)
R3: sc around (12)
Fasten off. Leave 18 cm tail.
Cheek Patches (Make 2)
Yarn: cream — flat circle
R1: 6 sc in MR (6)
R2: inc x6 (12)
R3: (sc, inc) x6 (18)
Sl st to close.
Fasten off. Leave 15 cm tail.
Ears (Make 2)
Yarn: caramel brown outer, tan inner — proportional shaping checked against comparable Highland cow ear construction
Outer ear:
R1: 6 sc in MR (6)
R2: inc x6 (12)
R3: (sc, inc) x6 (18)
R4-R5: sc around (18)
Flatten and sc through both sides across 9 sts.
Fasten off. Leave 25 cm tail.
Inner ear:
R1: 6 sc in MR (6)
R2: inc x6 (12)
R3: (sc, inc) x6 (18)
Fasten off. Sew to outer ear center.
Horns (Make 2)
Yarn: cream — proportional shaping checked against comparable Highland cow horn construction
R1: 6 sc in MR (6)
R2: sc around (6)
R3: (2 sc, inc) x2 (8)
R4-R5: sc around (8)
R6: (3 sc, inc) x2 (10)
R7-R9: sc around (10)
Stuff lightly. Bend slightly before sewing so the horn points outward and up.
Fasten off. Leave 30 cm tail.
Fringe Hair (Make 1 section)
Yarn: rust brown — custom fringe based on photo observation
Cut 34 strands at 18 cm each.
Attach one strand in each of 17 front rim stitches using a lark’s head knot.
Attach a second layer in the row directly behind the first across another 17 stitches.
Trim fringe to about 8 cm after attachment.
The second row is what creates the forward-heavy Highland cow brow.
Arms / Front Legs (Make 2)
Yarn: caramel brown — decorative support legs
R1: 6 sc in MR (6)
R2: inc x6 (12)
R3-R5: sc around (12)
Flatten and sc through both sides across 6 sts.
Do not overstuff. These are face-side accents, not load-bearing parts.
Fasten off. Leave 20 cm tail.
Back Legs (Make 2)
Yarn: caramel brown — optional stabilising accents
R1: 6 sc in MR (6)
R2: inc x6 (12)
R3-R4: sc around (12)
Flatten and sc through both sides across 6 sts.
Fasten off. Leave 20 cm tail.
Tail (Make 1)
Yarn: caramel brown
Ch 11.
Row 1: sl st in 2nd ch from hook and in each ch across (10)
Add 3 short fringe strands to tail end.
Fasten off. Leave 18 cm tail.
Assembly
- Block the basket body lightly by hand so the base sits flat and the side walls stand vertical.
- Sew the snout centered on the lower front, leaving roughly 5 rounds between the base and the snout bottom edge.
- Sew the nostrils onto the snout, spacing them 4 stitches apart.
- Insert the safety eyes above the snout before backing washers are fixed, placing them about 12 stitches apart.
- Sew the cheek patches slightly below and outside the eye line if a softer face outline is wanted.
- Sew the ears to the side walls at rim level, angled slightly forward.
- Sew the horns just above the ears and one round below the reinforced rim top.
- Latch and trim the fringe so it drops over the eye line but stays clear of the basket opening center.
- Sew the front legs low on the body front and the back legs on the lower side seams for balance.
- Attach the tail at the center back, steam-shape the face if needed, and load the basket to test wall stability.
The piece is complete when the rim remains open under light yarn or nursery-item load.
7 Technical Tips
- Mark every increase round on the basket base. Missing one increase segment throws the circle off by 6 stitches and the wall transition will ripple.
- Stuff the snout lightly, not firmly. Overfilling pushes the oval outward and makes the nostrils tilt upward instead of sitting flat on the face.
- Use invisible decreases only on visible shaped parts. Standard decreases leave stacked bulk that shows clearly on cream horns and the front edge of the snout.
- Install eyes before the fringe goes on. Once hair is knotted across the brow, it becomes harder to confirm a 12-stitch spacing and level placement.
- Keep fringe strands close in thickness to the body yarn. Thin strands look sparse, while oversized strands drag forward and narrow the usable opening.
- Pin horns and ears before sewing and view the basket from directly ahead. A difference of even 1 round in horn height makes the face read crooked immediately.
- Weave every tail at least 5 cm through internal wall stitches. Short tail weaving on a storage basket fails faster because the sides flex during use.
Conclusion
This highland cow crochet basket pattern turns a standard round container into a storage piece with a readable animal profile and a practical open rim. The sizing, hooks, and yarn choices keep the walls stable while the snout, horns, ears, and fringe carry the character. Next step: swatch the body yarn with the 6.5 mm hook and check whether the fabric stands without gaps before starting the base. Share the finished basket on Pinterest and Instagram with the tag #HighlandCowBasketPattern. One question matters on this build: did your fringe stay above the eye line once the basket was filled?









