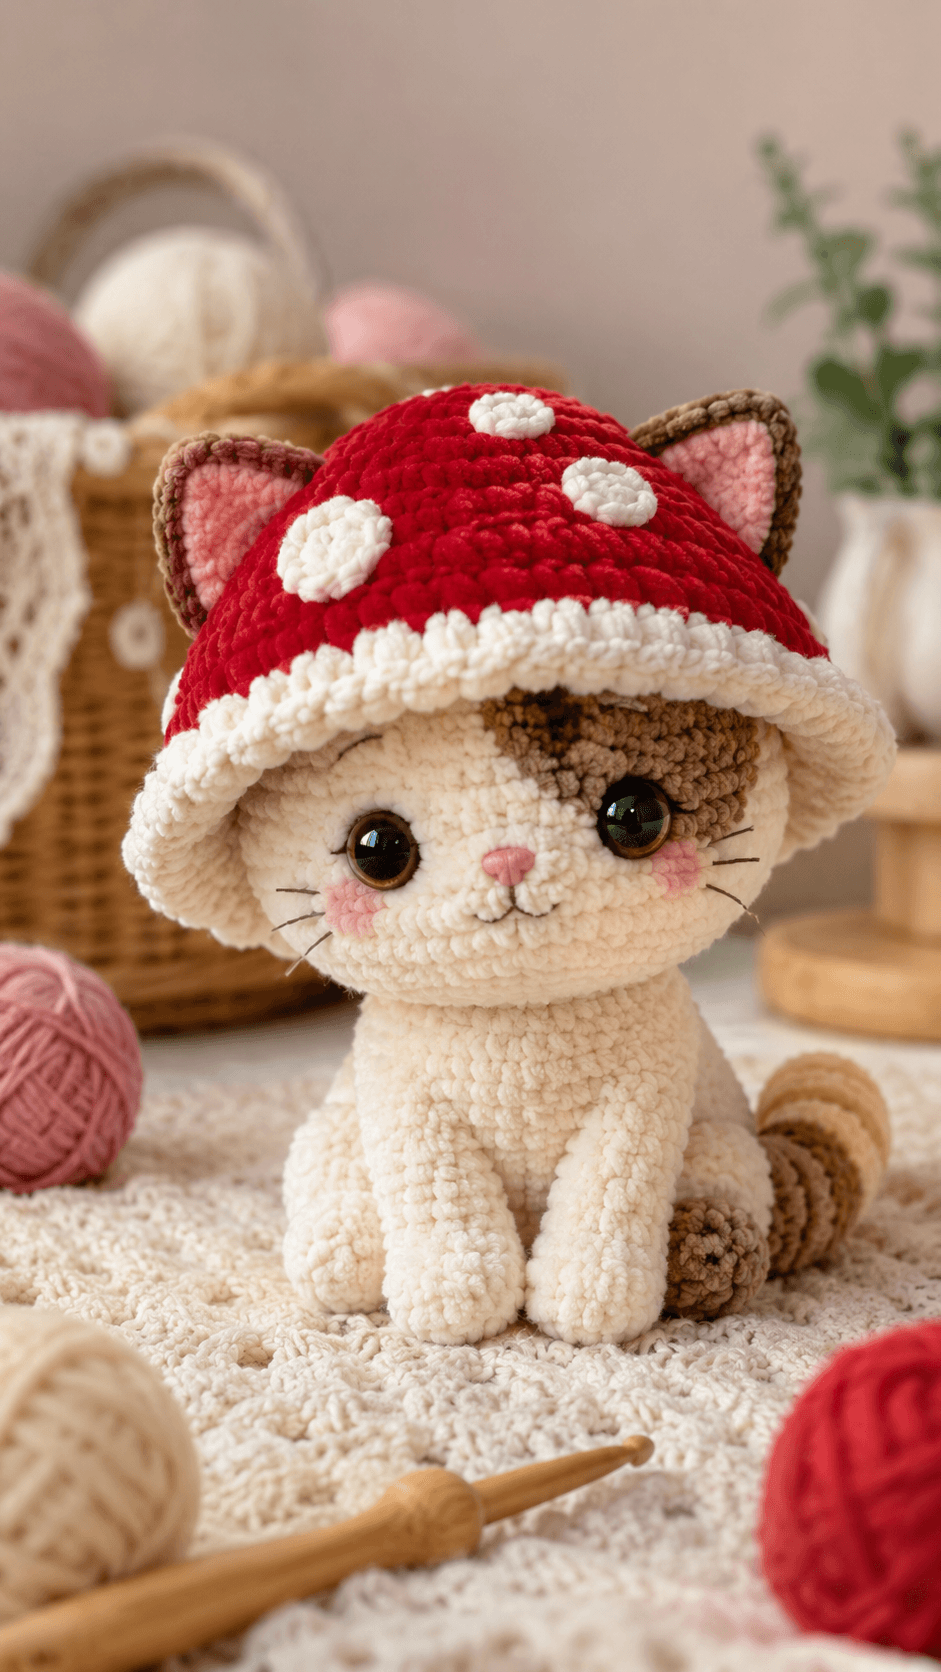
A mushroom cat only works if the cap reads wider than the head and the ears still break the silhouette. This mushroom cat amigurumi crochet pattern builds that balance first, then shapes a seated plush with a rounded face, low front paws, striped tail, blush cheeks, and a soft red toadstool hat. The finished piece works as shelf decor, a gift plush, or a themed nursery crochet project with a clear woodland look.
The Design: What Makes This Mushroom Cat Different
This design depends on silhouette control more than stitch novelty. The cat body stays narrow and upright so the mushroom cap can feel oversized without making the whole piece collapse visually. The face is wide, low, and soft, with the eyes placed far enough apart to keep the expression calm instead of sharp. One patch of darker facial color changes the entire character. That marking must sit off-center and high enough to frame one eye without covering the muzzle. The ears are inserted into the cap line rather than sitting fully outside it, which keeps the mushroom shape intact. The striped tail matters too. Without it, the piece starts reading as a generic plush under a hat instead of a cat with a woodland theme.
Project Info at a Glance
| Skill Level | Time | Finished Size | Hook | Best For |
|---|---|---|---|---|
| Intermediate | 5–7 hours | Approx. 22 cm tall | 4.5 mm | Shelf decor, gift plush, woodland display |
Materials and Tools
Yarn
- Cream — chunky chenille or velvet yarn — main head, body, legs, and muzzle area
- Light brown — chunky chenille or velvet yarn — face patch, ear edging, and tail stripes
- Pink — small scrap amount — inner ears, nose, and cheek circles
- Red — chunky chenille or velvet yarn — mushroom cap
- White — chunky chenille or velvet yarn — mushroom brim and spots
- Black or dark brown — small scrap amount — whiskers and mouth detail
Tools
- Hook 4.5 mm
- 14 mm safety eyes
- Stuffing
- Tapestry needle
- Stitch markers
- Embroidery needle for whiskers and mouth shaping
Abbreviations
MR = magic ring
sc = single crochet
inc = 2 sc in same stitch
dec = invisible decrease
sl st = slip stitch
ch = chain
BLO = back loop only
Invisible decrease is worked through the front loops of the next two stitches so the shaping line stays compact and less visible on plush yarn.
Pattern — Step by Step
Continuous spiral unless noted.
Head
Yarn: cream
R1: 6 sc in MR (6)
R2: inc x6 (12)
R3: (1 sc, inc) x6 (18)
R4: (2 sc, inc) x6 (24)
R5: (3 sc, inc) x6 (30)
R6: (4 sc, inc) x6 (36)
R7: (5 sc, inc) x6 (42)
R8–R15: sc around (42)
R16: (5 sc, dec) x6 (36)
R17: (4 sc, dec) x6 (30)
Insert safety eyes between R11 and R12, about 8 stitches apart. Begin stuffing.
R18: (3 sc, dec) x6 (24)
R19: (2 sc, dec) x6 (18)
R20: (1 sc, dec) x6 (12)
R21: dec x6 (6)
Fasten off. Close opening. Leave a tail for shaping if needed.
Body
Yarn: cream
R1: 6 sc in MR (6)
R2: inc x6 (12)
R3: (1 sc, inc) x6 (18)
R4: (2 sc, inc) x6 (24)
R5: (3 sc, inc) x6 (30)
R6–R11: sc around (30)
R12: (3 sc, dec) x6 (24)
R13: sc around (24)
R14: (2 sc, dec) x6 (18)
Stuff firmly.
R15: sc around (18)
Fasten off. Leave a long tail for sewing.
Front Legs (Make 2)
Yarn: cream
R1: 6 sc in MR (6)
R2: inc x6 (12)
R3–R5: sc around (12)
R6: (1 sc, dec) x4 (8)
R7–R11: sc around (8)
Stuff lower half only.
Flatten top and sc through both layers across 4 stitches.
Fasten off. Leave a long tail.
Back Legs (Make 2)
Yarn: cream
R1: 6 sc in MR (6)
R2: inc x6 (12)
R3: (1 sc, inc) x6 (18)
R4–R5: sc around (18)
R6: (1 sc, dec) x6 (12)
R7–R9: sc around (12)
Stuff firmly at the paw end.
Flatten top and sc through both layers across 6 stitches.
Fasten off. Leave a long tail.
Ears Outer (Make 2)
Yarn: light brown
R1: 6 sc in MR (6)
R2: inc x6 (12)
R3: (1 sc, inc) x6 (18)
R4: sc around (18)
Fasten off. Leave a long tail.
Ears Inner (Make 2)
Yarn: pink
R1: 6 sc in MR (6)
R2: inc x6 (12)
R3: (1 sc, inc) x6 (18)
Fasten off. Sew each inner ear onto one outer ear piece. Fold slightly before attaching.
Face Patch
Yarn: light brown
Ch 7.
R1: starting in 2nd ch from hook, 5 sc, 3 sc in last ch, working on opposite side 4 sc, inc in last st (14)
R2: inc, 4 sc, inc x3, 4 sc, inc x2 (20)
R3: (1 sc, inc), 4 sc, (1 sc, inc) x3, 4 sc, (1 sc, inc) x2 (26)
R4: sc around (26)
Fasten off. Leave a tail for sewing.
Do not overstuff. This piece should sit mostly flat against the head.
Cheek Patches (Make 2)
Yarn: pink
R1: 6 sc in MR (6)
R2: inc x6 (12)
Sl st to first stitch.
Fasten off. Leave tails for sewing.
Tail
Yarn: cream, then light brown stripe sections
R1: 6 sc in MR (6)
R2: inc x6 (12)
R3–R4: sc around (12)
Change to light brown.
R5–R6: sc around (12)
Change to cream.
R7–R8: sc around (12)
Change to light brown.
R9–R10: sc around (12)
Change to cream.
R11–R14: sc around (12)
Stuff lightly so the tail curves.
Flatten top and sc through both layers across 6 stitches.
Fasten off. Leave a long tail.
Mushroom Cap Top
Yarn: red
R1: 6 sc in MR (6)
R2: inc x6 (12)
R3: (1 sc, inc) x6 (18)
R4: (2 sc, inc) x6 (24)
R5: (3 sc, inc) x6 (30)
R6: (4 sc, inc) x6 (36)
R7: (5 sc, inc) x6 (42)
R8: (6 sc, inc) x6 (48)
R9: (7 sc, inc) x6 (54)
R10–R13: sc around (54)
R14: BLO sc around (54)
R15: sc around (54)
Fasten off. Leave a long tail.
Mushroom Brim / Underside
Yarn: white
R1: 6 sc in MR (6)
R2: inc x6 (12)
R3: (1 sc, inc) x6 (18)
R4: (2 sc, inc) x6 (24)
R5: (3 sc, inc) x6 (30)
R6: (4 sc, inc) x6 (36)
R7: (5 sc, inc) x6 (42)
R8: (6 sc, inc) x6 (48)
R9: (7 sc, inc) x6 (54)
R10: BLO sc around (54)
R11: (8 sc, inc) x6 (60)
R12: sc around (60)
Fasten off. Leave a long tail.
Mushroom Spots (Make 4)
Yarn: white
Large spot:
R1: 6 sc in MR (6)
R2: inc x6 (12)
R3: sc around (12)
Fasten off.
Small spots, make 3:
R1: 6 sc in MR (6)
R2: inc x6 (12)
Fasten off.
Nose and Face Embroidery
Yarn: pink and black
Embroider a small pink triangular nose centered low between the eyes.
Add a short white or black split mouth below the nose.
Sew cheek patches below the eyes.
Add three whisker stitches on each side of the face.
Assembly
- Sew the head to the body with the face centered over the narrow front of the torso.
- Attach the front legs close together on the lower front body so the cat sits upright.
- Sew the back legs to the lower sides, angled forward for a seated pose.
- Attach the tail at the lower back, curving it around one side.
- Sew the face patch high on one side of the head so it frames one eye without crossing the muzzle center.
- Attach the cheeks, then embroider the nose, mouth, and whiskers.
- Sew the ears near the top sides of the head.
- Join the mushroom brim to the cap top, leaving space to fit over the head like a hat.
- Sew the white spots onto the red cap with one large spot at the front-left and smaller spots spaced upward.
- Place the hat over the head and tack it lightly behind the ears and at two side points so the brim tilts downward.
The finished toy should sit upright with the mushroom brim low over the forehead and the tail visible from the side.
7 Technical Tips
- Keep the mushroom cap wider than the head by at least one full increase round. A narrow cap looks like a bonnet instead of a toadstool top.
- Place the eyes before attaching the face patch. That lets you test how much of one eye the patch should frame without blocking the expression.
- Sew the brim after shaping the cap top, not before. A flat join line makes the hat look stiff and removes the soft downward curve.
- Use light stuffing in the tail. Overstuffed striped tails stand straight out and break the calm seated pose.
- Attach the ears slightly under the hat line rather than fully above it. That keeps the cat silhouette readable even with the oversized cap.
- Keep the cheeks small, around 12 stitches each. Larger blush circles crowd the muzzle and compete with the eye highlights.
- Tack the hat at only a few anchor points. Fully sewing the brim down flattens the edge and makes the mushroom shape less convincing.
Conclusion
This mushroom cat amigurumi crochet pattern works because the hat, face patch, ears, and seated body all support the same silhouette. The cap gives the theme, but the eye spacing, narrow torso, and striped tail are what keep the character readable as a cat. Build the head first, test the face patch position before sewing, and shape the brim last so the mushroom curve stays soft. Share one front photo and one side-angle photo on Pinterest and Instagram to show both the cap shape and tail stripes. Hashtag: #MushroomCatPattern. Did your cat look better with the brim centered or tilted slightly over the patched eye?









