Introduction
A watermelon placemat fails at the rind first; one uneven green round turns the fruit oval. This watermelon crochet placemat uses cotton yarn, a 4.0 mm hook, joined rounds, and simple embroidered seeds to build a flat table mat in the large placemat range seen in public listings. It suits an intermediate beginner and works well when a summer table needs a washable cotton layer.
The Design: What Makes Watermelon Different
The structure depends on proportion, not novelty. The red field must dominate or the piece reads as a target instead of fruit. The white band has to stay narrow; published watermelon coaster patterns keep that contrast line tight for a reason. The green rind also needs enough width to stabilize the edge, especially on larger mats where the final round controls flatness.
A second decision is seed handling. Most published versions embroider seeds after the base is complete rather than crocheting color changes into the round. That reduces bulk and keeps the red center cleaner. A common mistake with a crochet fruit placemat is spacing seeds too evenly. Realistic placement benefits from slight irregularity. Another frequent error is using acrylic where absorbency matters; cotton performs better for coasters and table mats.
Project Info at a Glance
| Skill Level | Time | Finished Size | Hook | Best For |
|---|---|---|---|---|
| Easy–Intermediate | 2.5–4 hrs | 13.5–15 in / 34–38 cm target | 4.0 mm | summer table decor, picnic settings, themed kitchen accessories |
Materials and Tools
Yarn
- Red / watermelon flesh — cotton, DK to worsted — approx. 55–70 g — Lily Sugar’n Cream or similar cotton suggested
- White / pith — cotton — approx. 8–12 g — matching cotton in solid white
- Green / rind — cotton — approx. 20–30 g — matching cotton in medium or hot green
- Black / seeds — cotton — small scrap amount
Tools
- Hook 4.0 mm
- Tapestry needle
- Stitch markers
- Scissors
- Steam or spray blocking tools
Abbreviations
MR = magic ring
ch = chain
sc = single crochet
dc = double crochet
inc = increase
sl st = slip stitch
st = stitch
Use an invisible join only at the final edge if a sharper finish is needed. Invisible decrease is not part of this flat placemat build.
Pattern — Step by Step
Construction note: This is a flat placemat, so it is worked in joined rounds, not a continuous spiral. The round math follows standard +6 circle expansion.
Red Center (Make 1)
Yarn: red
R1: 6 dc in MR. sl st to first dc. (6)
R2: ch 2, inc in each st around. sl st to first dc. (12)
R3: ch 2, [dc, inc] x6. sl st to first dc. (18)
R4: ch 2, [2 dc, inc] x6. sl st to first dc. (24)
R5: ch 2, [3 dc, inc] x6. sl st to first dc. (30)
R6: ch 2, [4 dc, inc] x6. sl st to first dc. (36)
R7: ch 2, [5 dc, inc] x6. sl st to first dc. (42)
R8: ch 2, [6 dc, inc] x6. sl st to first dc. (48)
R9: ch 2, [7 dc, inc] x6. sl st to first dc. (54)
R10: ch 2, [8 dc, inc] x6. sl st to first dc. (60)
R11: ch 2, [9 dc, inc] x6. sl st to first dc. (66)
R12: ch 2, [10 dc, inc] x6. sl st to first dc. (72)
R13: ch 2, [11 dc, inc] x6. sl st to first dc. (78)
R14: ch 2, [12 dc, inc] x6. sl st to first dc. (84)
R15: ch 2, [13 dc, inc] x6. sl st to first dc. (90)
R16: ch 2, [14 dc, inc] x6. sl st to first dc. (96)
R17: ch 2, [15 dc, inc] x6. sl st to first dc. (102)
R18: ch 2, [16 dc, inc] x6. sl st to first dc. (108)
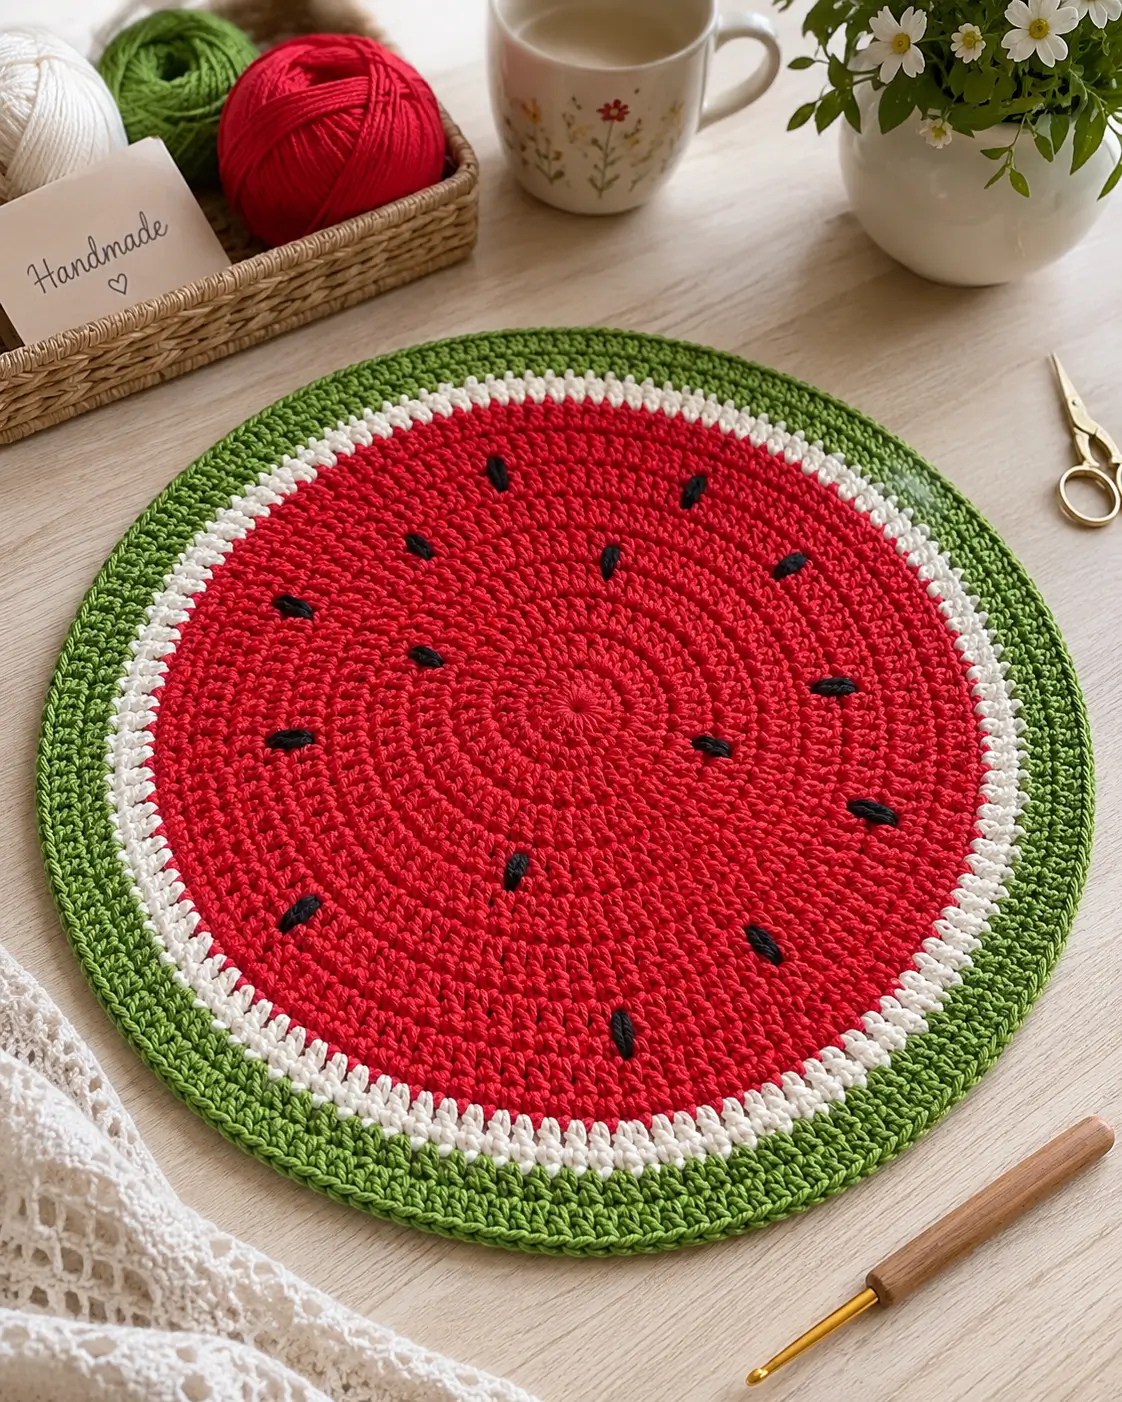
The photo shows a dominant red field. Stop after R18 for a placemat proportion close to the image.
Fasten off red.
White Pith Ring (Make 1)
Yarn: white
Join white in any stitch.
R19: ch 1, [17 sc, inc] x6. sl st to first sc. (114)
R20: ch 1, sc in each st around. sl st to first sc. (114)
Keep this white band narrow. A wide white ring reads more like citrus than watermelon.
Fasten off white.
Green Rind Ring (Make 1)
Yarn: green
Join green in any stitch.
R21: ch 1, [18 sc, inc] x6. sl st to first sc. (120)
R22: ch 1, sc in each st around. sl st to first sc. (120)
R23: ch 1, [19 sc, inc] x6. sl st to first sc. (126)
R24: ch 1, sc in each st around. sl st to first sc. (126)
If the edge ripples, replace R23 with plain sc around. If it cups, keep R23 as written and block after finishing.
Fasten off. Leave a 15 cm tail.
Seed Embroidery (Make 12–16)
Yarn: black
Thread black yarn on a tapestry needle.
Place elongated satin-style seed stitches in the red section only. Work each seed over roughly 2 dc rows and angle them slightly toward the outer edge. Scatter them in three loose rings rather than one perfect circle.
Suggested placement:
- 4 seeds between R6–R9
- 5 seeds between R10–R13
- 5 to 7 seeds between R14–R17
Fasten off on the back after each seed or carry short floats only when the reverse side will not show.
Optional Edge Refinement (Make 1)
Yarn: green
Join green to any stitch on R24.
R25: reverse sc or sl st loosely around. (126)
Skip this round if the placemat already lies flat. The photographed piece has a clean edge, not a heavily corded border.
Fasten off. Leave a 12 cm tail.
Assembly
- Weave in the red center tail on the back, following stitch columns to avoid lumps.
- Weave in the white join tail before seed embroidery starts.
- Weave in the green rind tails, keeping the edge flexible.
- Lay the placemat flat and mark six equal wedge sections with removable markers.
- Add the first seed in each wedge, placing them at mixed distances from the center.
- Fill gaps with secondary seeds, avoiding straight radial lines.
- Turn the work over and trim all black tails close after secure weaving.
- Lightly spray the placemat or steam it from above without pressing the iron onto the stitches.
- Shape the outer green rounds by hand until the circle reads even.
- Let it dry fully on a flat surface.
The finished piece should sit flat, with a narrow white band and a broader green rind.
7 Technical Tips
- Mark every sixth increase point. Losing one increase in a 120-stitch round creates a visible flat spot by the time the green rind closes.
- Do not overstuff anything. This is a placemat, not a plush. Extra yarn tails trapped at the center can create the same dome effect as overfilling.
- Keep the white ring to 2 rounds. More than that shifts the color ratio and weakens the watermelon read from across the table.
- Check diameter after R18. At that point, decide whether the red center is large enough before adding pith and rind.
- Embroidery placement matters more than seed count. Twelve uneven seeds usually look better than sixteen evenly spaced ones.
- Make each seed about 1 to 1.5 cm long. Longer stitches start to resemble petals instead of seeds.
- Watch tension on the switch from dc to sc. A tight sc white band can pull the circle inward and start cupping.
- Compensate by going up half a hook size for the white and green only if your stitches tighten during color changes.
- Pin the outer edge before blocking. Use at least eight points around the circle so the rind does not drift into an oval.
- Measure opposite sides. A difference larger than 1 cm is visible on a round fruit motif.
- Use cotton, not plush yarn. Velvet or chenille hides the seed embroidery and blurs the edge between flesh, pith, and rind.
- Weave tails along color-matched rows for at least 5 cm. Short tail weaving in a flat mat often works loose after washing.
- Do not knot seed tails in one cluster at the center back. That creates a hard bump under cups or plates.
Conclusion
This watermelon crochet placemat works because the proportions stay controlled: a large red center, a restrained white pith line, a stable green rind, and seed embroidery added last. The next step is practical. Crochet one sample, measure it after blocking, then adjust the final green increase round only if your cotton and tension change the diameter. Share the finished mat on Pinterest and Instagram with a process photo, not just the final flat lay. Use #WatermelonCrochetPlacemat. One question remains useful for makers comparing versions: did your rind stay flatter with two green rounds or three?









