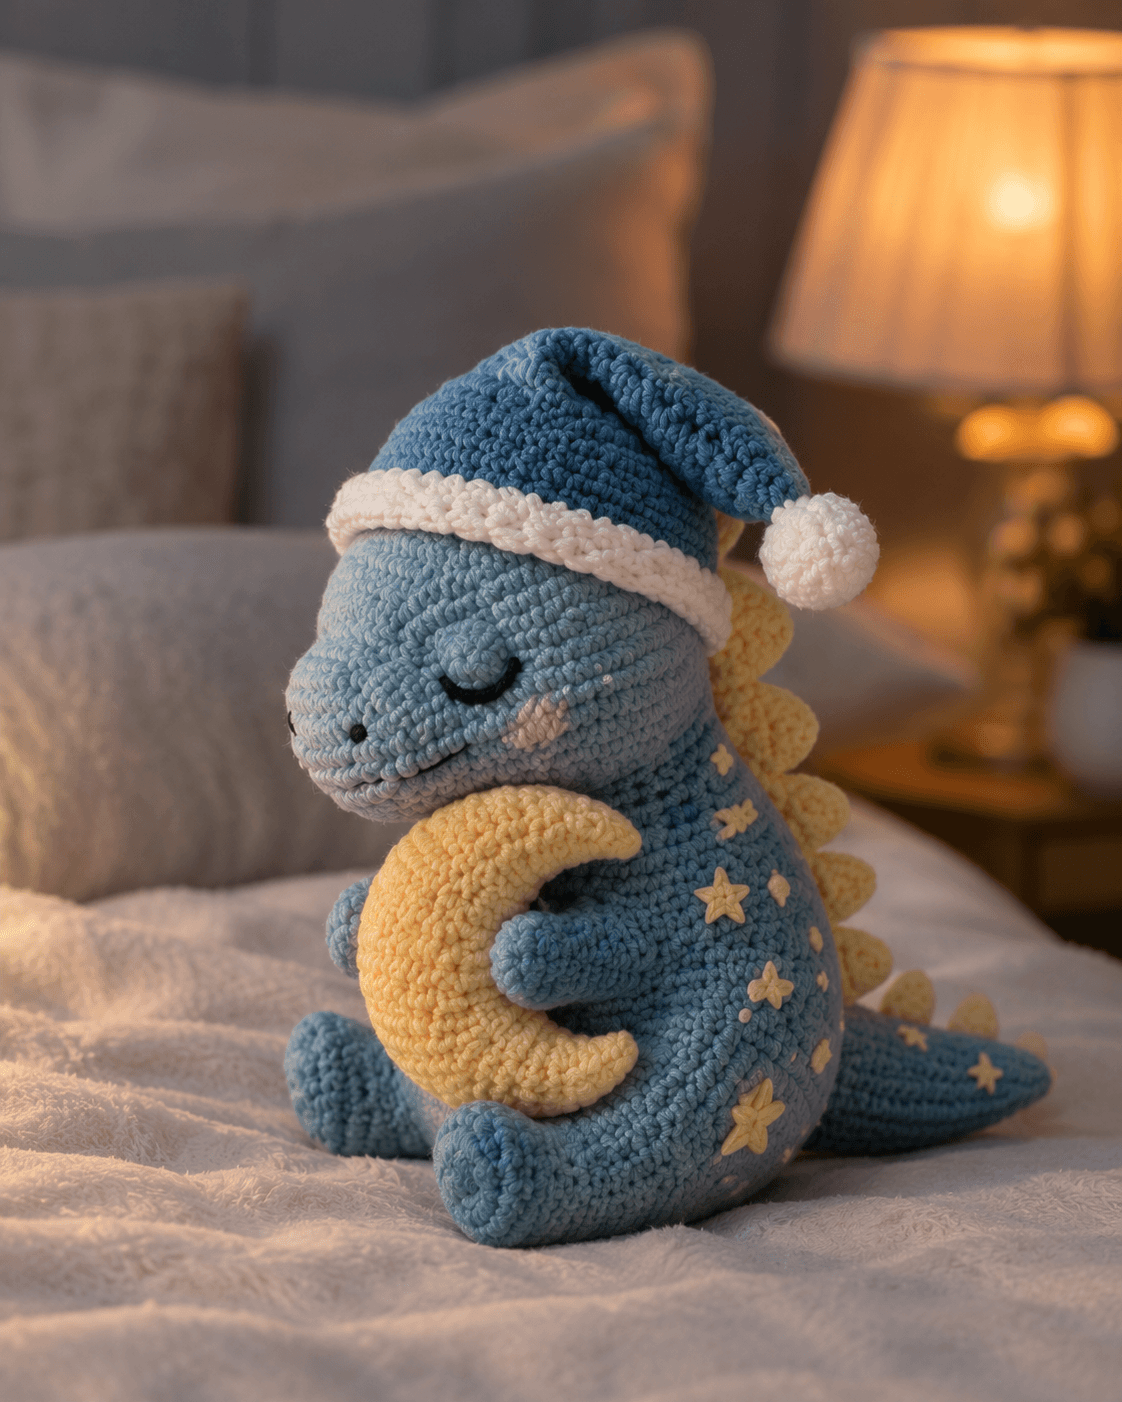
Back plates under a floppy nightcap create the real shaping problem here. This dinosaur amigurumi crochet pattern builds a seated 24 cm plush with DK-to-worsted yarn, a 3.0 to 3.5 mm hook range, embroidered facial details, and intermediate shaping. You make it for nursery decor, bedtime gifting, or a themed display piece that reads clearly from one side.
The Design: What Makes This Dinosaur Different
You are not building a generic dino tube with limbs attached. The head has to project forward enough to read as sleepy rather than upright, so the snout is widened early and closed late. The body also needs a front-heavy seated curve, because a straight cylinder tips backward once the moon is added. A third choice matters just as much: the back plates stay shallow and rounded instead of tall and pointed, which keeps the sleep hat visible in profile.
Most dinosaur plush crochet tutorials focus on standing or neutral poses. This version shifts the center of gravity lower and pushes the forearms forward so the crescent can sit inside the grip. The common failure is overstuffing the neck join. Then the dinosaur loses the tucked-chin posture that makes a sleepy dinosaur crochet pattern look intentional instead of accidental. In competitor patterns, sizes, hook ranges, and stitch families vary widely, but seated proportion remains the weak point in most dinosaur crochet tutorial posts.
Project Info at a Glance
| Skill Level | Time | Finished Size | Hook | Best For |
|---|---|---|---|---|
| Intermediate | 8–10 hours | 24 cm sitting | 3.0–3.5 mm | nursery decor, bedtime gift, shelf display |
Finished size and hook range are based on verified comparable dinosaur patterns in DK and worsted yarn.
Materials and Tools
Yarn
- Dusty light blue — DK to light worsted — about 90 g — cotton or cotton-blend suggestion
- Pale yellow — DK — about 15 g — for back plates and moon
- Cream/white — DK — about 15 g — for hat brim and pom-pom
- Soft pink — small amount — for blush patch
- Black — small amount — for embroidered eye and nostril
Comparable dinosaur patterns use DK/light-3 through medium-4 yarns, with small builds around 70 g main color and larger plush builds at 120 g or more.
Tools
- Hook 3.0 mm to 3.5 mm
- Embroidery needle
- Polyfill stuffing
- Stitch markers
- Pins
- Scissors
Abbreviations
MR / sc / inc / dec / sl st / ch / BLO / FO
Invisible decrease is preferred on all visible decrease rounds because front-facing dec lines show faster on light blue yarn than on darker shades.
Pattern — Step by Step
Continuous spiral unless noted. This is an original reconstruction drafted from the photographed toy, using standard amigurumi stitch math and verified dinosaur sizing benchmarks.
Head (Make 1)
Yarn: dusty light blue — Source: Standard amigurumi math with medium 36-stitch plateau
R1: 6 sc in MR (6)
R2: inc x6 (12)
R3: (1 sc, inc) x6 (18)
R4: (2 sc, inc) x6 (24)
R5: (3 sc, inc) x6 (30)
R6: (4 sc, inc) x6 (36)
R7-R12: sc around (36)
R13: (4 sc, dec) x6 (30)
R14: (3 sc, dec) x6 (24)
Insert stuffing firmly in snout, medium in crown.
R15: (2 sc, dec) x6 (18)
R16: (1 sc, dec) x6 (12)
R17: dec x6 (6)
FO. Close opening. Leave 20 cm tail for shaping.
Body (Make 1)
Yarn: dusty light blue — Source: Standard amigurumi math with medium 36-stitch plateau
R1: 6 sc in MR (6)
R2: inc x6 (12)
R3: (1 sc, inc) x6 (18)
R4: (2 sc, inc) x6 (24)
R5: (3 sc, inc) x6 (30)
R6: (4 sc, inc) x6 (36)
R7-R12: sc around (36)
R13: (4 sc, dec) x6 (30)
R14-R15: sc around (30)
R16: (3 sc, dec) x6 (24)
Stuff lower body firmly. Keep front belly fuller than back.
R17: sc around (24)
R18: (2 sc, dec) x6 (18)
R19: sc around (18)
FO. Leave 25 cm tail.
Front Arms (Make 2)
Yarn: dusty light blue — Source: Standard amigurumi math
R1: 6 sc in MR (6)
R2: (1 sc, inc) x3 (9)
R3-R6: sc around (9)
R7: (1 sc, dec) x3 (6)
R8-R9: sc around (6)
Light stuffing only in hand.
FO. Flatten top. Leave 18 cm tail.
Back Legs (Make 2)
Yarn: dusty light blue — Source: Standard amigurumi math
R1: 6 sc in MR (6)
R2: inc x6 (12)
R3-R5: sc around (12)
R6: (4 sc, dec) x2 (10)
R7: sc around (10)
Stuff foot firmly, upper leg lightly.
FO. Flatten top. Leave 20 cm tail.
Back Plates / Spikes (Make 5)
Yarn: pale yellow — Source: visual reconstruction of photographed dinosaur
R1: 4 sc in MR (4)
R2: (1 sc, inc) x2 (6)
R3: sc around (6)
R4: (2 sc, inc) x2 (8)
R5: sc around (8)
FO. Flatten slightly. Leave 12 cm tail.
Tail (Make 1)
Yarn: dusty light blue — Source: Standard tapered dinosaur tail; competitor tail forms are also tapered.
R1: 6 sc in MR (6)
R2: sc around (6)
R3: (2 sc, inc) x2 (8)
R4: sc around (8)
R5: (3 sc, inc) x2 (10)
R6: sc around (10)
R7: (4 sc, inc) x2 (12)
R8-R10: sc around (12)
Stuff lightly. Keep tip flexible.
FO. Leave 20 cm tail.
Sleep Hat (Make 1)
Yarn: blue and cream — Source: visual reconstruction of photographed accessory
With blue:
R1: 6 sc in MR (6)
R2: inc x6 (12)
R3: (1 sc, inc) x6 (18)
R4: (2 sc, inc) x6 (24)
R5: (3 sc, inc) x6 (30)
R6: (4 sc, inc) x6 (36)
R7-R15: sc around (36)
R16: (4 sc, dec) x6 (30)
R17-R22: sc around (30)
FO blue.
With cream, join to brim edge:
R1: BLO sc around (30)
R2: inc around (60)
FO.
Pom-pom (Make 1)
With cream:
R1: 6 sc in MR (6)
R2: inc x6 (12)
R3: (1 sc, inc) x6 (18)
R4: (1 sc, dec) x6 (12)
Stuff lightly.
R5: dec x6 (6)
FO. Attach to hat tip.
Crescent Moon (Make 2, then join)
Yarn: pale yellow — Source: visual reconstruction of photographed prop
Make two flat pieces.
R1: 6 sc in MR (6)
R2: inc x6 (12)
R3: (1 sc, inc) x6 (18)
R4: (2 sc, inc) x6 (24)
R5: (3 sc, inc) x6 (30)
R6: (4 sc, inc) x6 (36)
FO first piece. Do not FO second piece.
Place pieces together. Sc through both around for 24 sts, leave a 12-st gap, stuff lightly, then continue sc through both around to close (36).
Shape the inner curve by sewing a shallow crescent channel from top inner point to lower inner point.
FO. Leave 25 cm tail.
Cheek Patches (Make 2)
Yarn: soft pink — Source: Standard flat circle math
R1: 6 sc in MR (6)
R2: inc x6 (12)
FO. Leave 10 cm tail.
Star Appliqués (Make 6–8)
Yarn: pale yellow — Source: simplified embellishment to match photographed toy
Ch 2.
Work into second ch from hook: sl st, ch 2, sl st, ch 2, sl st, ch 2, sl st, ch 2, sl st.
FO. Shape into rough star with needle.
Snout Shaping and Face Details
Yarn: black and blue — Source: visual reconstruction
Use blue sewing yarn to indent the snout horizontally across the front third of the head.
Embroider one closed eye as a 2 cm curved line.
Add one small nostril knot at the snout side.
Assembly
- Sew the head to the body with the snout angled slightly downward.
- Attach the back legs at the lower body sides so the dinosaur sits on both feet and tail base.
- Sew the front arms 2 rounds below the neck seam, angled inward.
- Attach the tail centered at the back base.
- Sew the five back plates from crown to tail base, spacing them about 2 rounds apart.
- Stitch the cheek patch on the visible face side below the eye line.
- Embroider the eye and nostril, then pull the snout shaping thread to create the tucked-mouth look.
- Place the hat so the brim covers the crown join and the tip falls to one side.
- Sew the moon lightly into both hands so it stays removable or tack it permanently at three points.
- Add the star appliqués across the torso and tail, keeping larger stars on the front belly side.
The finished dinosaur should sit unsupported with the moon centered between both arms.
7 Technical Tips
- Mark round 1 on every 36-stitch plateau. Losing one stitch there shifts both the snout centerline and the back plate line, and the hat will sit crooked.
- Do not overstuff the top 3 body rounds. Too much fill in that zone forces the head upright and removes the sleepy neck bend.
- Keep the front legs at 6 cm total length. Longer arms miss the moon curve and create a gap larger than 1 cm at each side.
- Use invisible decreases on rounds 13–18 of the body and head. Standard decreases leave ridges that catch light on pale blue yarn and show as six vertical seams.
- Embroider the eye before sewing on the hat. Once the brim is attached, needle angle becomes awkward and the eye curve often rises too high.
- Pin all five back plates before stitching any of them. Uneven spacing by even one round makes the plate line buckle under the hat fold.
- Weave each star appliqué tail at least 3 direction changes. A single pass loosens on curved stuffing pressure, especially near the belly where the fabric stretches most.
Conclusion
This dinosaur amigurumi crochet pattern works because the posture, not the appliqué, carries the design. The moon, hat, and stars only read correctly after the head angle, arm placement, and seated base are locked in. Use the verified 24 cm dinosaur size range as your target, then adjust stuffing density before changing hook size. Publish one side-view photo for Pinterest and one front three-quarter photo for Instagram so the moon placement is visible. Use #SleepyDinoPattern when you post. On your version, did you place the first back plate behind the hat brim or let it peek out from under it?









