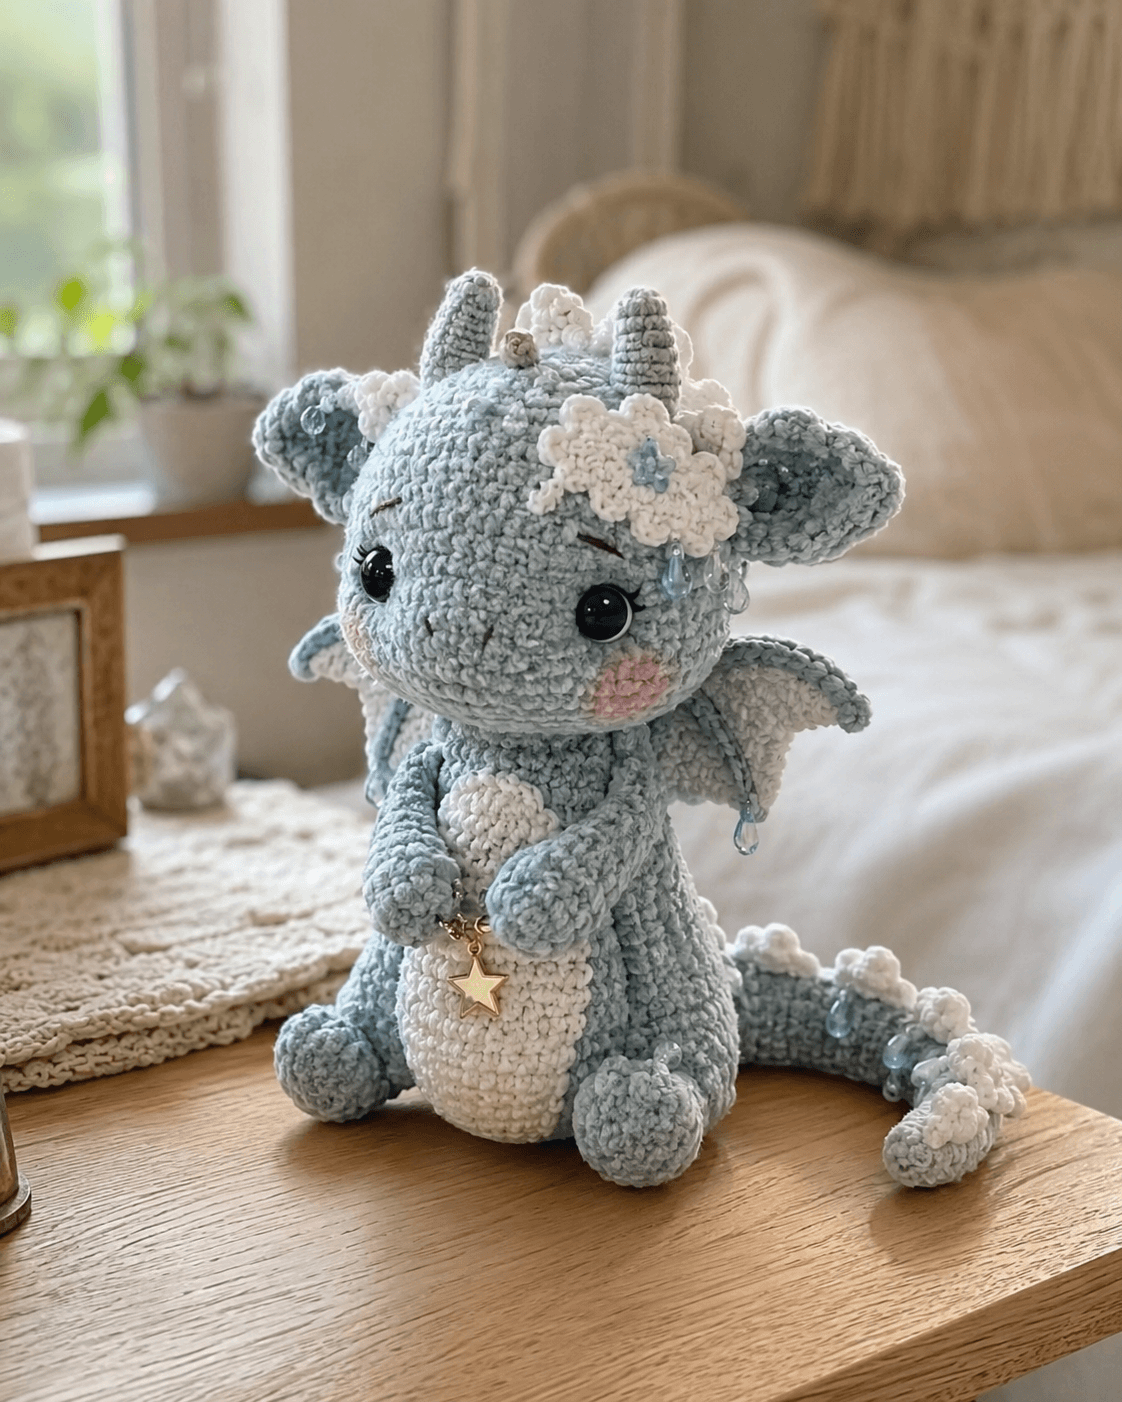
Snowflake clusters change the head balance before the horns do. This snow blossom dragon amigurumi crochet pattern uses pale blue plush yarn, a white belly panel, small wings, floral cloud accents, and bead details to build a seated dragon with a rounded face and winter-themed crown. It suits an intermediate maker who wants a decorative plush with stable posture, soft proportions, and surface embellishments that stay readable from the front and side.
The Design: What Makes Snow Blossom Dragon Different
The crown is the main structural feature here. Snow-blossom motifs sit across the forehead and between the horns, so they must add height without swallowing the face. The second choice is the body proportion. A short neck and deep seated base keep the large head from pulling the dragon forward, which matters more in plush yarn than in smooth cotton. The third choice is the tail treatment. Raised cloud bumps and hanging bead drops make the tail part of the visual story rather than a simple counterweight.
The snout stays broad and low. That keeps the dragon soft instead of severe. Many makers overbuild the horn area and lose the floral placement, or they attach the wings too low and compress the silhouette from the back. In stronger versions, the snow details frame the upper head while the belly panel and small wings keep the body easy to read. This character depends on spacing, restraint, and clean layering.
Project Info at a Glance
| Skill Level | Time | Finished Size | Hook | Best For |
|---|---|---|---|---|
| Intermediate | 8–12 hours | Approx. 24–28 cm seated | 4.0 mm | Winter decor, shelf display, gift make |
Materials and Tools
Yarn
- Pale blue — plush or velvet-weight — about 120 g — main body color
- White — plush or velvet-weight — about 50 g — belly, wings, cloud accents
- Light pink — small amount — cheek patches
- Gray — small amount — horn tips if desired
- Brown or dark taupe embroidery thread — small amount — brows and nostrils
- Clear or pale blue teardrop beads — small set — hanging frost details
- Metal star charm — 1 piece — front accessory
Tools
- Hook 4.0 mm
- Safety eyes 14 mm
- Polyester stuffing
- Tapestry needle
- Stitch markers
- Pins
- Strong sewing thread for beads and charm
Abbreviations
MR / sc / inc / dec / sl st / ch / BLO / hdc / dc
Use invisible decrease wherever the plush yarn allows it. That keeps the head and body shaping cleaner and reduces deep notches across the pale surface.
Pattern — Step by Step
Continuous spiral unless noted.
Head (Make 1)
Yarn: pale blue
R1: 6 sc in MR (6)
R2: inc x6 (12)
R3: (sc, inc) x6 (18)
R4: (2 sc, inc) x6 (24)
R5: (3 sc, inc) x6 (30)
R6: (4 sc, inc) x6 (36)
R7–R12: sc around (36)
Place safety eyes between R8 and R9, 8 sts apart. Embroider short brows above the eyes and two small nostrils low on the snout.
R13: (4 sc, dec) x6 (30)
R14: sc around (30)
R15: (3 sc, dec) x6 (24)
R16: (2 sc, dec) x6 (18)
Stuff firmly through the cheeks and lower front of the head.
R17: (sc, dec) x6 (12)
R18: dec x6 (6)
Fasten off. Leave a 25 cm tail.
Snout (Make 1)
Yarn: pale blue
Ch 6.
Rnd 1: starting in 2nd ch from hook, 4 sc, 3 sc in last ch; rotate, 3 sc, inc in last st (12)
Rnd 2: inc, 3 sc, 3 inc, 3 sc, 2 inc (18)
Rnd 3: sc around (18)
Rnd 4: (2 sc, dec) x4, 2 sc (14)
Lightly stuff. Fasten off. Leave a 20 cm tail.
Body (Make 1)
Yarn: pale blue
R1: 6 sc in MR (6)
R2: inc x6 (12)
R3: (sc, inc) x6 (18)
R4: (2 sc, inc) x6 (24)
R5: (3 sc, inc) x6 (30)
R6: (4 sc, inc) x6 (36)
R7–R11: sc around (36)
R12: (4 sc, dec) x6 (30)
R13–R14: sc around (30)
R15: (3 sc, dec) x6 (24)
R16–R17: sc around (24)
R18: (2 sc, dec) x6 (18)
R19: sc around (18)
R20: (sc, dec) x6 (12)
Stuff the lower body firmly so the plush can sit without leaning.
Fasten off. Leave a 30 cm tail.
Belly Panel (Make 1)
Yarn: white
Ch 8.
Row 1: starting in 2nd ch from hook, 6 sc, 3 sc in last ch; rotate, 5 sc, inc in last st (16)
Row 2: inc, 5 sc, 3 inc, 5 sc, 2 inc (22)
Row 3: sc around (22)
Row 4: inc, 9 sc, 2 inc, 9 sc, inc (26)
Row 5–6: sc around (26)
Fasten off. Leave a 35 cm tail.
Front Legs (Make 2)
Yarn: pale blue
R1: 6 sc in MR (6)
R2: inc x6 (12)
R3–R4: sc around (12)
R5: (4 sc, dec) x2 (10)
R6–R10: sc around (10)
Stuff the paws lightly. Fasten off. Leave a 20 cm tail.
Back Legs (Make 2)
Yarn: pale blue
R1: 6 sc in MR (6)
R2: inc x6 (12)
R3: (sc, inc) x6 (18)
R4–R5: sc around (18)
R6: (sc, dec) x6 (12)
R7–R8: sc around (12)
Stuff the foot and base well. Fasten off. Leave a 25 cm tail.
Ears (Make 2)
Yarn: pale blue
R1: 6 sc in MR (6)
R2: (sc, inc) x3 (9)
R3: (2 sc, inc) x3 (12)
R4: sc around (12)
Flatten slightly. Fasten off. Leave a 15 cm tail.
Horns (Make 2)
Yarn: pale blue or pale blue with gray tip
R1: 6 sc in MR (6)
R2: sc around (6)
R3: (sc, inc) x3 (9)
R4–R6: sc around (9)
Stuff lightly. Fasten off. Leave a 15 cm tail.
Wings (Make 2)
Yarn: pale blue frame, white membrane
With pale blue, ch 7.
Row 1: starting in 2nd ch from hook, 6 sc (6)
Row 2: ch 1, turn, inc, 4 sc, inc (8)
Row 3: ch 1, turn, inc, 6 sc, inc (10)
Row 4: ch 1, turn, inc, 8 sc, inc (12)
Row 5: ch 1, turn, sc across (12)
Row 6: ch 1, turn, dec, 8 sc, dec (10)
Row 7: ch 1, turn, sc across (10)
Fasten off frame. With white, fill the inner wing with stitched membrane lines or a sewn insert. Leave a 20 cm tail for attachment.
Tail (Make 1)
Yarn: pale blue
R1: 6 sc in MR (6)
R2: sc around (6)
R3: inc x6 (12)
R4–R5: sc around (12)
R6: (sc, inc) x6 (18)
R7–R11: sc around (18)
R12: (2 sc, inc) x6 (24)
R13–R18: sc around (24)
Stuff lightly so the tail can curve outward. Fasten off. Leave a 30 cm tail.
Cloud Bumps (Make 10)
Yarn: white
R1: 6 sc in MR (6)
R2: sc around (6)
Flatten slightly. Fasten off. Leave a 10 cm tail.
Cheek Patches (Make 2)
Yarn: light pink
R1: 6 sc in MR (6)
R2: inc x6 (12)
Fasten off. Leave a 12 cm tail.
Snow Blossom Motifs (Make 4)
Yarn: white
With white, ch 5 and join to form a ring.
Petal round: (sl st into ring, ch 3, 2 dc into ring, ch 3, sl st into ring) x5
Fasten off. Leave a tail for sewing. Add a small pale blue bead at the center if desired.
Frost Drop Dangles (Make 6)
Materials: strong sewing thread and pale blue teardrop beads
Cut 6 lengths of strong thread. Thread one bead per length and knot securely for hanging drops beneath blossoms, wings, or tail bumps.
Front Cloud Puff (Make 1)
Yarn: white
R1: 6 sc in MR (6)
R2: inc x6 (12)
R3: sc around (12)
Stuff lightly. Fasten off. Leave a 15 cm tail.
Assembly
- Sew the snout to the lower front of the head, centered beneath the eyes.
- Attach the head to the top of the body with the face angled slightly downward.
- Sew the belly panel from the underside of the snout down the center front of the body.
- Attach the front legs so the paws meet near the center front when posed inward.
- Sew the back legs low and wide to support the seated shape.
- Attach the ears slightly behind the eye line and the horns on top of the head with even spacing.
- Sew the wings to the upper back, keeping both top edges level.
- Attach the tail at the back center and curve it outward to one side.
- Sew the cloud bumps along the head crown and down the tail, spacing them evenly.
- Add the cheek patches, front cloud puff, snow blossom motifs, bead dangles, and star charm. Keep the heaviest embellishments near the head center and the middle section of the tail.
The finished piece should sit on the back legs and tail base without external support.
7 Technical Tips
- Pin every blossom before sewing. The failure mode is crown drift, where one side gains more volume and the face no longer reads as centered.
- Keep the horn spacing equal within 4 mm. A wider gap on one side becomes obvious because the floral trim follows the horn line.
- Do not overstuff the snout. Too much filling pushes the eyes outward and reduces the soft front profile.
- Place wing tops at the same height before stitching. Even a small mismatch makes one wing look dropped in back view.
- Anchor every bead with strong thread and a double knot. Decorative drops loosen faster than sewn yarn parts because they swing with handling.
- Stuff the lower body more firmly than the chest. A soft base makes the dragon collapse backward once the head and tail are attached.
- Weave embellishment tails through at least 3 cm of interior stitches. Short anchors slip out more easily in plush yarn because the stitch grip is lower than in cotton.
Conclusion
This snow blossom dragon amigurumi crochet pattern depends on controlled layering. The broad snout, compact wings, floral snow crown, cloud tail bumps, and hanging frost drops work together without crowding the body outline. Follow the stitch counts closely, pin the crown before sewing, and check the plush from the front after each major attachment. Then photograph the finished piece in soft light so the pale textures and bead details stay visible. Share it on Pinterest and Instagram with #SnowBlossomDragonPattern. Did you cluster your blossom motifs around the forehead, or carry more of them back toward the horns?









