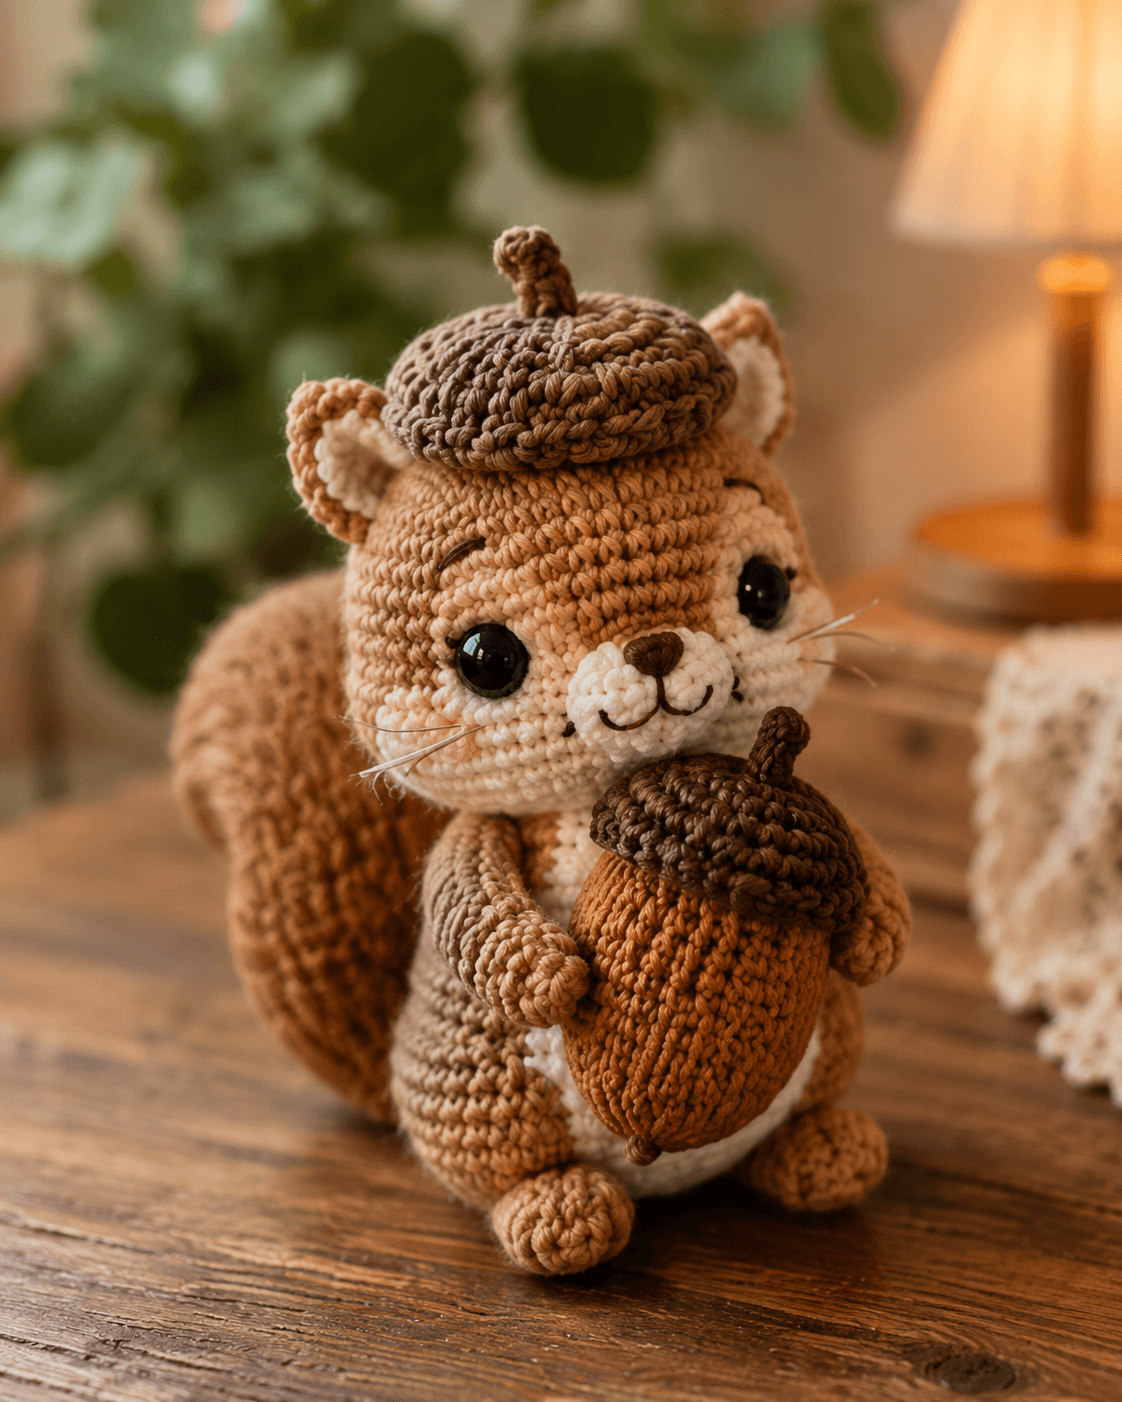
A squirrel looks wrong the moment its tail loses the argument with the acorn. This squirrel amigurumi crochet pattern fixes that first. You will make a seated woodland squirrel with DK-weight yarn, a 2.5 to 3.0 mm hook, large safety eyes, and two acorn accessories: one worn, one held. The build suits an intermediate maker who wants a shelf piece, fall decor item, or market sample with a clear seasonal read.
The Design: What Makes This Squirrel Different
The photo pushes three decisions that separate this build from a generic forest animal. First, the head is oversized and almost spherical, while the body stays short. That ratio keeps the squirrel readable from the front, which matters because the acorn is held in front of the chest. Second, the tail is large and vertical rather than trailing flat behind. A squirrel crochet pattern needs that rear mass or the silhouette collapses into “small bear with ears.” Third, the muzzle is broad and pale, with distinct cheek circles that soften the face and frame the nose.
A common mistake with woodland squirrel amigurumi is making the ears too small and placing them too far out to the sides. That produces a rodent shape, but not a squirrel. In this version, the ears sit high, tilt slightly outward, and stay close enough to the beret line to keep the top view compact. The crochet squirrel with acorn also depends on tight paw placement. If the forearms sit low, the acorn drops visually below the focal line.
Project Info at a Glance
| Skill Level | Time | Finished Size | Hook | Best For |
|---|---|---|---|---|
| Intermediate | 6–8 hours | 18–20 cm | 2.5–3.0 mm | Fall decor, shelf display, gift topper |
Size and hook range are aligned to published squirrel pattern references that place small DK builds around 6–20 cm and larger display squirrels around 21 cm, depending on yarn and gauge.
Materials and Tools
Yarn
- Light tan — DK cotton — about 35 g — Paintbox Cotton DK or similar
- Cream — DK cotton — about 15 g — matching smooth cotton
- Medium brown — DK cotton — about 20 g — for stripes, beret, and acorn body
- Dark brown — DK cotton — about 10 g — for acorn cap, nose, stem details
Tools
- Hook 2.5 mm to 3.0 mm
- Safety eyes 10 mm for the photo scale
- Polyester stuffing
- Yarn needle
- Stitch markers
- Strong sewing needle for whiskers
- Optional floral wire only if you want a firmer tail curve
Published squirrel patterns commonly use DK/light worsted cotton with 2.5 mm hooks for small detailed builds, while larger display squirrels move to 3.5 mm and beyond. Eye sizes in published references span 4 mm to 10.5 mm; the photographed toy reads closest to 10 mm or slightly larger.
Abbreviations
MR / sc / inc / dec / sl st / ch / BLO / hdc
Invisible decrease: work through the front loops of the next two stitches so the shaping line stays flatter on the outside surface.
Pattern — Step by Step
Continuous spiral unless noted. The pattern below is an original photo-based draft using standard amigurumi stitch math, not a transcription of any published squirrel pattern.
Head (Make 1)
Yarn: light tan and cream — Source: standard amigurumi math plus photo proportions
R1: 6 sc in MR (6)
R2: inc x6 (12)
R3: (sc, inc) x6 (18)
R4: (2 sc, inc) x6 (24)
R5: (3 sc, inc) x6 (30)
R6: (4 sc, inc) x6 (36)
R7–12: sc around (36)
R13: 10 sc in tan, 8 sc in cream, 18 sc in tan (36)
R14: 9 sc in tan, 10 sc in cream, 17 sc in tan (36)
R15: 8 sc in tan, 12 sc in cream, 16 sc in tan (36)
R16: (4 sc, dec) x6 (30)
R17: (3 sc, dec) x6 (24)
Insert eyes between R11 and R12, 8 stitches apart. Stuff firmly before the next round.
R18: (2 sc, dec) x6 (18)
R19: (sc, dec) x6 (12)
R20: dec x6 (6)
Close the opening. Leave a 20 cm tail for sewing.
Body (Make 1)
Yarn: light tan and cream — Source: standard amigurumi math plus photo proportions
R1: 6 sc in MR (6)
R2: inc x6 (12)
R3: (sc, inc) x6 (18)
R4: (2 sc, inc) x6 (24)
R5: (3 sc, inc) x6 (30)
R6–10: sc around (30)
R11: 8 sc in tan, 6 sc in cream, 16 sc in tan (30)
R12: 7 sc in tan, 8 sc in cream, 15 sc in tan (30)
R13: 6 sc in tan, 10 sc in cream, 14 sc in tan (30)
R14: sc around (30)
R15: (3 sc, dec) x6 (24)
R16: sc around (24)
R17: (2 sc, dec) x6 (18)
Stuff the lower body firmly and keep the upper body slightly softer for sewing.
R18: (sc, dec) x6 (12)
R19: sc around (12)
Fasten off. Leave a 25 cm tail.
Front Arms (Make 2)
Yarn: light tan
R1: 6 sc in MR (6)
R2: (sc, inc) x3 (9)
R3–6: sc around (9)
R7: flatten and sc through both sides across 4 stitches (4)
Lightly stuff only the paw end.
Fasten off. Leave a 20 cm tail.
Back Legs (Make 2)
Yarn: light tan
R1: 6 sc in MR (6)
R2: inc x6 (12)
R3: (sc, inc) x6 (18)
R4: sc around (18)
R5: (sc, dec) x6 (12)
R6: sc around (12)
R7: flatten and sc through both sides across 6 stitches (6)
Fasten off. Leave a 20 cm tail.
Ears (Make 2)
Yarn: light tan outer, cream inner
R1: 6 sc in MR (6)
R2: (sc, inc) x3 (9)
R3: sc around (9)
R4: (2 sc, inc) x3 (12)
Fasten off. Fold slightly at the base.
For the inner ear, embroider or sew a small cream half-circle centered inside each ear.
Tail (Make 1)
Yarn: medium brown with light tan stripe option
R1: 6 sc in MR (6)
R2: inc x6 (12)
R3: (sc, inc) x6 (18)
R4: (2 sc, inc) x6 (24)
R5: (3 sc, inc) x6 (30)
R6–9: sc around (30)
R10: (3 sc, dec) x6 (24)
R11–13: sc around (24)
R14: (2 sc, dec) x6 (18)
R15–16: sc around (18)
R17: (sc, dec) x6 (12)
R18: sc around (12)
Stuff the first two thirds only. Flatten the base. A loose curve reads better than a rigid curl.
Fasten off. Leave a 30 cm tail.
Muzzle / Snout (Make 1)
Yarn: cream
R1: 6 sc in MR (6)
R2: inc x6 (12)
R3: (sc, inc) x6 (18)
R4: sc around (18)
Fasten off. Leave a 20 cm tail.
Cheek Patches (Make 2)
Yarn: cream
R1: 6 sc in MR (6)
R2: inc x6 (12)
Fasten off. Leave a 12 cm tail.
Belly Patch (Make 1)
Yarn: cream
Ch 7
R1: starting in second ch from hook, 5 sc, 3 sc in last ch, working on opposite side 4 sc, inc in final ch (14)
R2: inc, 4 sc, inc x3, 4 sc, inc x2 (20)
R3: sc around (20)
Fasten off. Leave a 25 cm tail.
Acorn Beret Base (Make 1)
Yarn: dark brown
R1: 6 sc in MR (6)
R2: inc x6 (12)
R3: (sc, inc) x6 (18)
R4: (2 sc, inc) x6 (24)
R5: (3 sc, inc) x6 (30)
R6: BLO sc around (30)
R7: sc around (30)
R8: (3 sc, dec) x6 (24)
R9: sc around (24)
Fasten off. Leave a 25 cm tail.
Beret Stem (Make 1)
Yarn: dark brown
R1: 4 sc in MR (4)
R2–3: sc around (4)
Fasten off. Sew centered on the beret top.
Acorn Body Accessory (Make 1)
Yarn: medium brown
R1: 6 sc in MR (6)
R2: inc x6 (12)
R3: (sc, inc) x6 (18)
R4: (2 sc, inc) x6 (24)
R5–8: sc around (24)
R9: (2 sc, dec) x6 (18)
R10: sc around (18)
R11: (sc, dec) x6 (12)
Stuff firmly.
R12: dec x6 (6)
Fasten off. Leave a 20 cm tail.
Acorn Cap (Make 1)
Yarn: dark brown
R1: 6 sc in MR (6)
R2: inc x6 (12)
R3: (sc, inc) x6 (18)
R4: BLO sc around (18)
R5: sc around (18)
Fasten off. Sew to the top of the acorn body.
Acorn Stem (Make 1)
Yarn: dark brown
R1: 4 sc in MR (4)
R2–3: sc around (4)
Fasten off. Sew centered on the cap.
Whiskers (Make 6 strands)
Yarn: white or nylon thread
Cut 3 strands per side at about 6 cm each. Thread through the muzzle after assembly and trim.
Assembly
- Sew the muzzle to the lower half of the head, centered under the eyes.
- Embroider the nose in dark brown and stitch a split smile under it.
- Attach the cheek patches to each side of the muzzle line, slightly overlapping the lower eye area.
- Sew the ears between head rounds 4 and 7, angled outward but not flat.
- Sew the belly patch to the front of the body.
- Attach the head to the body with the face pitched slightly downward.
- Sew the back legs to the lower sides so the squirrel sits with the feet turned forward.
- Sew the front arms high on the torso, then tack the paws around the acorn body.
- Attach the tail to the back low on the body and curve it upward so it frames one side of the head.
- Sew the beret to the head slightly off-center, then add whiskers and place the acorn in the paws.
The piece is complete when the squirrel can sit unsupported and the acorn stays visually centered between both front paws.
7 Technical Tips
- Use a stitch marker from round one on the head. Losing the start point shifts the cream face panel and the muzzle will sit off-center by a full stitch column.
- Pack the lower body more firmly than the neck area. A hard lower half helps the seated pose; a softer upper half makes head sewing cleaner.
- Work invisible decreases on every visible shaping line. Standard decreases leave small notches that show clearly on smooth cotton yarn.
- Insert the eyes before the last two decrease rounds of the head. Waiting too long makes 10 mm eyes hard to lock through tightly packed stitches.
- Pin the paws around the acorn before sewing either arm down. Even a 5 mm mismatch makes the accessory look dropped rather than held.
- Do not overstuff the tail tip. Extra fill there straightens the curve and removes the squirrel silhouette from side view.
- Weave tail ends back through stuffed sections for at least 4 cm. Short anchors can creep loose at the beret edge, tail base, or paw join after handling.
Conclusion
This squirrel amigurumi crochet pattern works because the proportions stay disciplined: broad head, short body, high-set arms, and a tail large enough to counter the acorn. Keep the face panel centered, place the eyes before the final closing rounds, and pin the accessory before sewing the paws. That order matters more than speed. For the next step, test the pattern once in plain colors before adding the beret stripes and whiskers. Share the finished squirrel on Pinterest and Instagram with one front view and one side view so the tail curve is visible. #AcornBeretSquirrel What tail angle gave your squirrel the cleanest seated balance?









