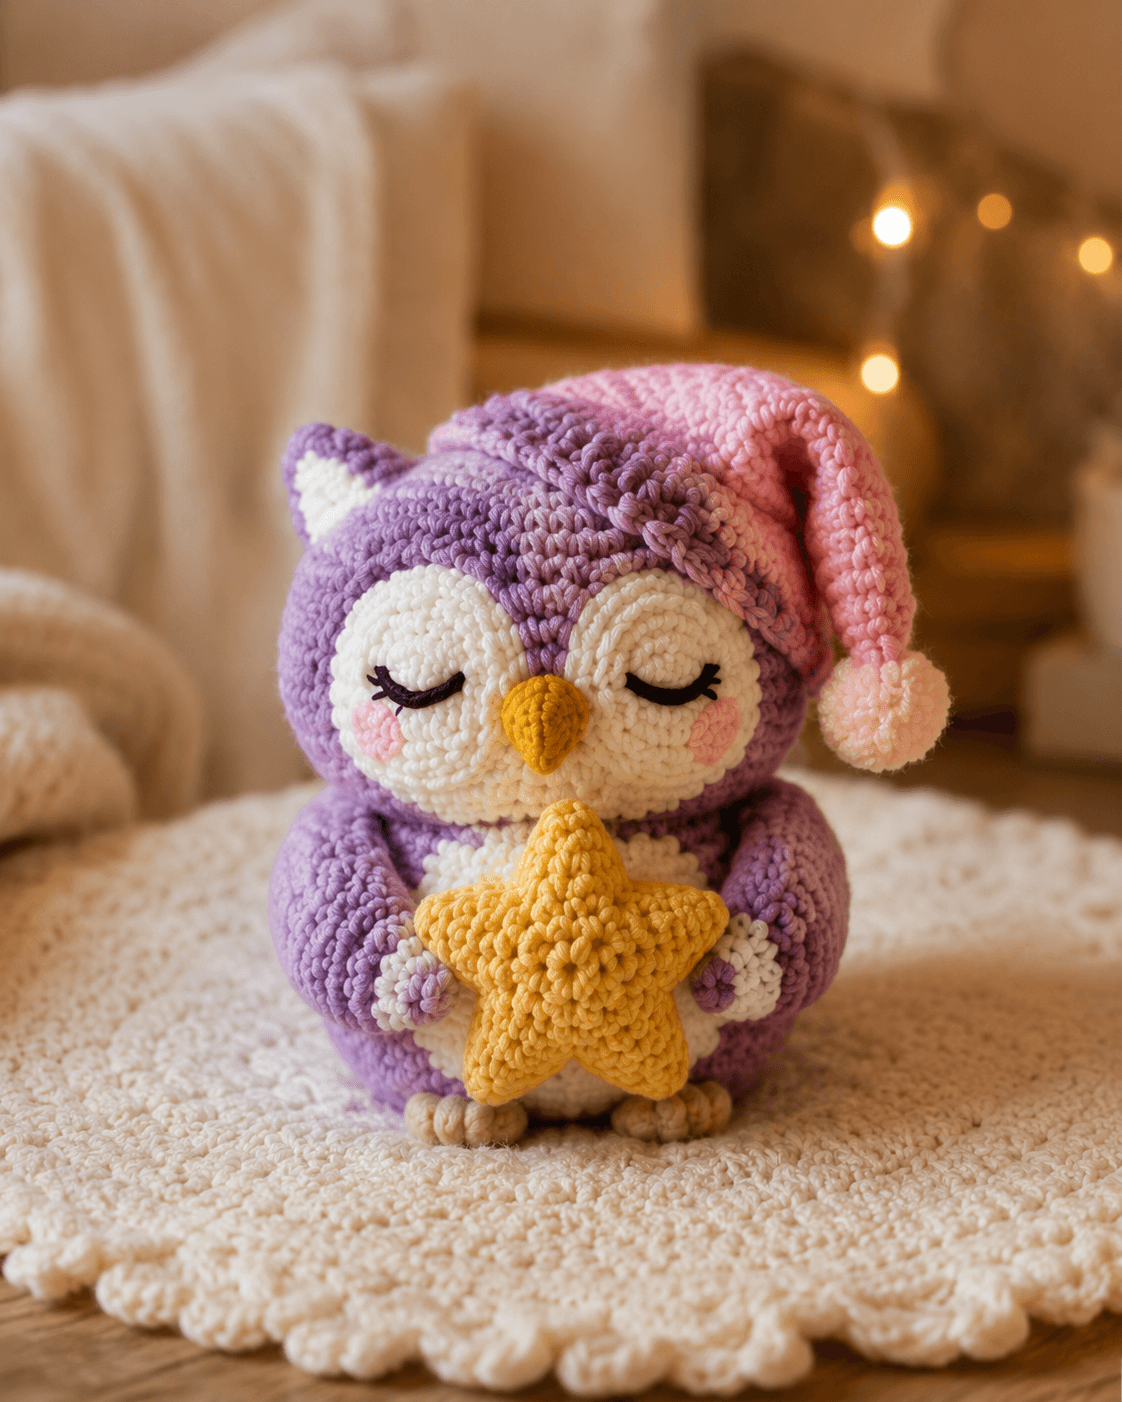
Owls wear their expression in the brow line, not the beak. This owl amigurumi crochet pattern is built for sport-weight yarn, a 2.5 mm hook, and a finished height close to 15 cm in comparable owl builds. It suits an intermediate maker. The practical use is simple: it works as nursery shelf décor without needing a stand.
The Design: What Makes This Owl Different
A sleepy owl is mostly a face problem. The white mask has to sit low and wide, because a narrow mask makes the beak look long and pushes the embroidered lashes too high. Proportion matters more here than texture. The second structural choice is the hat. A nightcap needs soft collapse, so the top section should taper gradually, then extend in a tube long enough to fold without springing back. Third comes the star grip. The wings are not placed as side fins; they swing forward so the owl plush crochet pose reads as “holding” rather than “flapping.” One common mistake in a sleepy owl crochet pattern is placing the cheeks too far out on the mask. That widens the face and weakens the closed-eye expression. In most owl amigurumi free pattern results, accessories are added late, but this design depends on face spacing before assembly.
Project Info at a Glance
| Skill Level | Time | Finished Size | Hook | Best For |
|---|---|---|---|---|
| Intermediate | 6–8 hours | 15 cm | 2.5 mm | Nursery shelf, gift topper, bedtime room décor |
Materials and Tools
Yarn
- Lavender purple — sport-weight cotton — 40 g — Yarn and Colors Must Have or similar
- Pink — sport-weight cotton — 10 g — same yarn family
- Yellow/gold — sport-weight cotton — 10 g — same yarn family
- White — sport-weight cotton — 8 g — same yarn family
- Blush pink — small scrap amount — for cheek patches
- Beige — small scrap amount — for feet and pom-pom tie-off
Tools
- Hook 2.5 mm
- Embroidery floss, dark purple or black for lashes
- Stuffing
- Tapestry needle
- Stitch markers
- Pins
- Scissors
Abbreviations
MR / sc / inc / dec / sl st / ch / BLO / FLO
Invisible decrease keeps the front loops cleaner on rounded parts, which matters on the face and on the hat fold line.
Pattern — Step by Step
Continuous spiral unless noted.
Head (Make 1)
Yarn: lavender
R1: 6 sc in MR (6)
R2: inc x6 (12)
R3: (sc, inc) x6 (18)
R4: (2 sc, inc) x6 (24)
R5: (3 sc, inc) x6 (30)
R6: (4 sc, inc) x6 (36)
R7: sc around (36)
R8: sc around (36)
R9: sc around (36)
R10: sc around (36)
R11: sc around (36)
R12: sc around (36)
R13: (4 sc, dec) x6 (30)
R14: (3 sc, dec) x6 (24)
Begin stuffing firmly.
R15: (2 sc, dec) x6 (18)
R16: (sc, dec) x6 (12)
R17: dec x6 (6)
Do not overstuff the lower front face. The white mask must sit on a slightly flat plane.
Fasten off. Leave 20 cm tail.
Body (Make 1)
Yarn: lavender with white belly overlay
R1: 6 sc in MR (6)
R2: inc x6 (12)
R3: (sc, inc) x6 (18)
R4: (2 sc, inc) x6 (24)
R5: (3 sc, inc) x6 (30)
R6: (4 sc, inc) x6 (36)
R7: sc around (36)
R8: sc around (36)
R9: sc around (36)
R10: sc around (36)
R11: sc around (36)
R12: sc around (36)
R13: (4 sc, dec) x6 (30)
R14: (3 sc, dec) x6 (24)
Stuff the base first, then the shoulder area lightly.
R15: (2 sc, dec) x6 (18)
R16: (sc, dec) x6 (12)
Fasten off. Leave 20 cm tail for sewing to head.
Face Mask / Eye Patches (Make 2)
Yarn: white
R1: 6 sc in MR (6)
R2: inc x6 (12)
R3: (sc, inc) x6 (18)
R4: (2 sc, inc) x6 (24)
R5: (3 sc, inc) x6 (30)
Fasten off. Leave 18 cm tail.
Belly Patch (Make 1)
Yarn: white
R1: 6 sc in MR (6)
R2: inc x6 (12)
R3: (sc, inc) x6 (18)
R4: (2 sc, inc) x6 (24)
R5: (3 sc, inc) x6 (30)
Flatten slightly into an oval while sewing.
Fasten off. Leave 18 cm tail.
Wings / Front Arms (Make 2)
Yarn: lavender with white cuff and tiny flower center optional
R1: 6 sc in MR (6)
R2: inc x6 (12)
R3: (sc, inc) x6 (18)
R4: sc around (18)
R5: sc around (18)
R6: (sc, dec) x6 (12)
R7: sc around (12)
Flatten. Add 4 white surface stitches or embroider a cuff at the hand end.
Stuff only the top half. The lower end should stay pinchable so it can grip the star.
Fasten off. Leave 20 cm tail.
Feet / Back Base Toes (Make 2)
Yarn: beige
R1: 6 sc in MR (6)
R2: (sc, inc) x3 (9)
R3: sc around (9)
R4: (sc, dec) x3 (6)
Flatten lightly.
Fasten off. Leave 15 cm tail.
Ears (Make 2)
Yarn: lavender with white inner triangle
R1: 6 sc in MR (6)
R2: inc x6 (12)
R3: (sc, inc) x6 (18)
R4: sc around (18)
Flatten into a triangle before sewing. Add a small white felted or crocheted inner insert if desired.
Fasten off. Leave 18 cm tail.
Beak / Special Feature (Make 1)
Yarn: yellow
R1: 6 sc in MR (6)
R2: (sc, inc) x3 (9)
R3: sc around (9)
R4: (2 sc, inc) x3 (12)
Fold into a shallow cone. Stuff very lightly.
Fasten off. Leave 15 cm tail.
Cheek Patches (Make 2)
Yarn: blush pink
R1: 6 sc in MR (6)
R2: inc x6 (12)
Flatten into circles.
Fasten off. Leave 12 cm tail.
Sleep Hat (Make 1)
Yarn: pink with lavender band
With lavender:
R1: 6 sc in MR (6)
R2: inc x6 (12)
R3: (sc, inc) x6 (18)
R4: (2 sc, inc) x6 (24)
R5: (3 sc, inc) x6 (30)
R6: (4 sc, inc) x6 (36)
Change to pink:
R7: BLO sc around (36)
R8: sc around (36)
R9: (4 sc, dec) x6 (30)
R10: sc around (30)
R11: (3 sc, dec) x6 (24)
R12: sc around (24)
R13: (2 sc, dec) x6 (18)
R14: sc around (18)
R15: (sc, dec) x6 (12)
R16: sc around (12)
R17: sc around (12)
R18: sc around (12)
For the folded droop, steam is not required. A light stuffing nub at the hat bend is enough.
Fasten off. Leave 25 cm tail.
Pom-Pom (Make 1)
Yarn: pale peach
R1: 6 sc in MR (6)
R2: inc x6 (12)
R3: (sc, dec) x4 (8)
Stuff lightly.
Fasten off. Leave 15 cm tail.
Star Accessory (Make 2, then join)
Yarn: yellow
Each side:
R1: 5 sc in MR (5)
R2: inc x5 (10)
R3: sc around (10)
Now make 5 points around the edge with one point sequence in every 2 stitches:
Point sequence: ch 3, sl st in 2nd ch from hook, sc in next ch, sl st in same base stitch, sl st in next stitch.
Repeat point sequence 5 times around.
Make a second identical star. Place wrong sides together and sc around the perimeter, working 1 sc in each edge stitch and 2 sc at each point tip as needed for shape.
Add a little stuffing before the final side closes.
Fasten off. Leave 20 cm tail.
Assembly
- Sew the head to the body with the head tilted slightly forward.
- Pin the two white face patches so they touch near the beak line and sit low on the front of the head.
- Stitch the beak between the lower inner edges of the face patches.
- Embroider closed lashes on each white patch, one round lower than visual center.
- Sew the cheek patches below and slightly outside each lash line.
- Attach the belly patch to the center front of the body.
- Sew the wings high on the body sides, then angle the lower ends inward so both can rest on the star.
- Sew the feet to the lower front base with a narrow gap between them.
- Attach the ears near the top sides of the head, then sew the hat over the crown and tack the drooped tip to one side before attaching the pom-pom.
- Place the star between the wings and secure through the back of the star into both wing tips and the body front.
The finished owl should stand on its lower body and feet with the star acting only as a visual prop, not a weight-bearing base.
7 Technical Tips
- Mark round 1 on both face patches. Misaligned start points twist the mask and one embroidered eye will sit higher than the other.
- Stuff the head firmly at the crown, lightly at the face. Overpacking the front pushes the beak outward and flattens the sleepy expression.
- Use invisible decrease on rounds 13–17 of the head. Standard decreases leave a rough seam ridge that shows through light-colored face areas.
- Place lash embroidery before sewing cheeks. If the cheeks go on first, the eye line tends to drift upward by 2 to 3 stitches.
- Pin the hat fold before tacking it down. A free fold often lands too far back, and the owl reads as wearing a cone instead of a nightcap.
- Keep wing stuffing out of the final 3 cm near the hand end. A rigid tip cannot wrap the edge of the star cleanly.
- Weave tails back through at least 4 cm of internal stitches. Short tail burying fails first at the ears, hat point, and star tips because those parts get handled most.
Conclusion
This build works because the face spacing, hat taper, and forward wing placement all serve the same read: a drowsy owl holding a bedtime star. The owl amigurumi crochet pattern above is not difficult in stitch vocabulary, but it is strict about placement. Start with the face patches first, then test the hat fold before permanent sewing. When the piece is finished, photograph it from the front and from a slight side angle for Pinterest. Post the same set on Instagram with #SleepyOwlPattern. One useful check remains: did your beak land low enough that the lashes still read as closed owl eyes rather than eyebrows?









