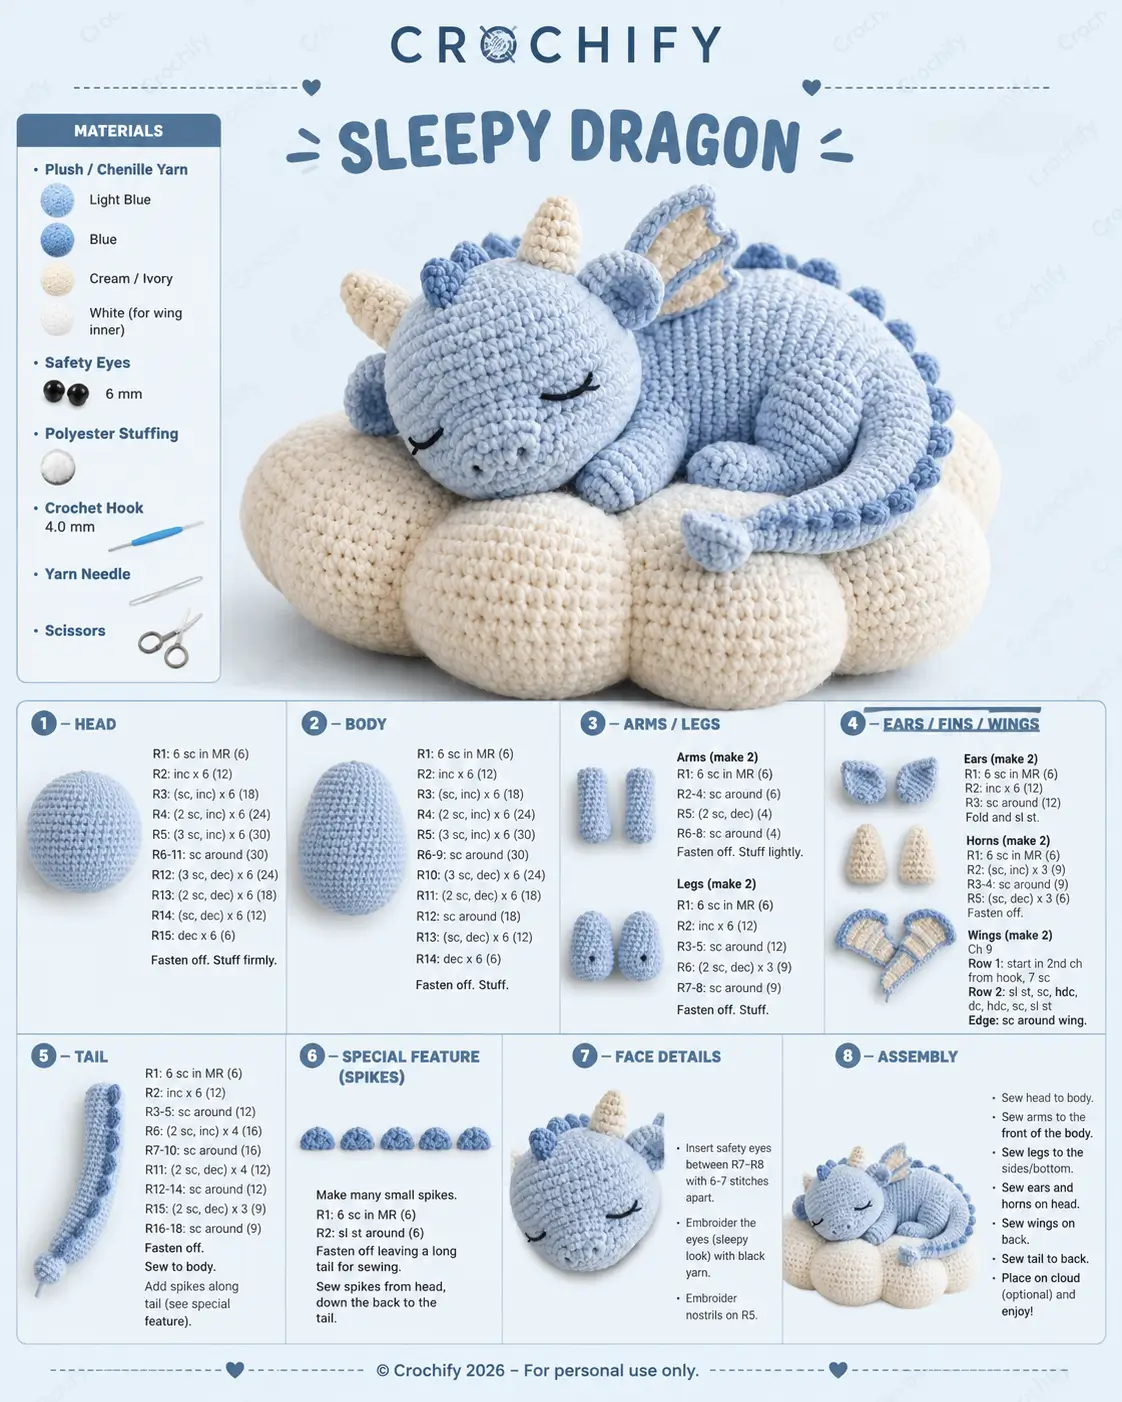
A sleeping dragon still needs two horn angles and a tail coil that clears its own wings. This sleepy dragon amigurumi crochet pattern uses plush chenille yarn, a 4.0 mm hook, and a medium 36-stitch body scale to build a compact dragon about 16 cm long. The project suits an intermediate maker who wants a nursery prop, shelf plush, or photo-styling piece with a stable curled silhouette.
The Design: What Makes This Dragon Different
This dragon works because the head is larger than the body, but not spherical all the way through. The extra width sits at rounds 6 through 11, giving the face enough room for a blunt snout, closed eyes, and paired horns without making the neck collapse. A second structural choice is the body taper. It peaks at 30 stitches, then narrows in stages, which keeps the curl compact and stops the back from looking tubular.
Wing scale matters too. Oversized wings would fight the sleeping pose, so this version uses narrow layered wings that sit behind the shoulders instead of flaring outward. Many sleeping dragon crochet pattern tutorials miss that proportion issue. The most common mistake is attaching the tail before testing the curl. That shifts the balance line and makes the dragon twist off the cloud rather than rest on it. Smaller chenille dragon amigurumi pieces need pinning before sewing for that reason.
Project Info at a Glance
| Skill Level | Time | Finished Size | Hook | Best For |
|---|---|---|---|---|
| Intermediate | 5–7 hours | Approx. 16 cm | 4.0 mm | Shelf decor, baby-room prop, gift topper |
Materials and Tools
Yarn
- Light blue — plush chenille — approx. 90 g — Himalaya Dolphin Baby or similar
- Blue — plush chenille — approx. 10 g — same yarn line for spikes and trim
- Cream / ivory — plush chenille — approx. 10 g — horns
- White — plush chenille — approx. 5 g — wing inner panels
- Black embroidery yarn — small length — for closed eyes and nostrils
Tools
- Hook 4.0 mm
- 6 mm safety eyes if you prefer open eyes, though the photographed sample uses embroidery
- Polyester stuffing
- Yarn needle
- Scissors
- Stitch markers
- Pins for assembly
Abbreviations
MR = magic ring; sc = single crochet; inc = increase; dec = decrease; sl st = slip stitch; ch = chain; BLO = back loop only; hdc = half double crochet; dc = double crochet. Invisible decrease keeps the front loops aligned and reduces corner dents on chenille fabric.
Pattern — Step by Step
Continuous spiral unless noted. Counts are in brackets.
Head (Make 1)
Yarn: light blue
R1: 6 sc in MR (6)
R2: inc x6 (12)
R3: (sc, inc) x6 (18)
R4: (2 sc, inc) x6 (24)
R5: (3 sc, inc) x6 (30)
R6: sc around (30)
R7: sc around (30)
R8: sc around (30)
R9: sc around (30)
R10: sc around (30)
R11: sc around (30)
R12: (3 sc, dec) x6 (24)
R13: (2 sc, dec) x6 (18)
R14: (sc, dec) x6 (12)
R15: dec x6 (6)
Insert embroidered sleepy eyes on the outer face line. Embroider nostrils low on the snout. Stuff firmly before the final two rounds.
Fasten off. Leave a 20 cm tail.
Body (Make 1)
Yarn: light blue
R1: 6 sc in MR (6)
R2: inc x6 (12)
R3: (sc, inc) x6 (18)
R4: (2 sc, inc) x6 (24)
R5: (3 sc, inc) x6 (30)
R6: sc around (30)
R7: sc around (30)
R8: sc around (30)
R9: sc around (30)
R10: (3 sc, dec) x6 (24)
R11: (2 sc, dec) x6 (18)
R12: sc around (18)
R13: (sc, dec) x6 (12)
R14: dec x6 (6)
Stuff the front half more firmly than the rear. That bias helps the dragon fold into a resting pose instead of sagging flat.
Fasten off. Leave a 25 cm tail.
Arms / Front Legs (Make 2)
Yarn: light blue
R1: 6 sc in MR (6)
R2: sc around (6)
R3: sc around (6)
R4: sc around (6)
R5: (2 sc, dec) x1 (4)
R6: sc around (4)
R7: sc around (4)
R8: sc around (4)
Stuff lightly only in the paw end.
Fasten off. Leave a 15 cm tail.
Back Legs (Make 2)
Yarn: light blue
R1: 6 sc in MR (6)
R2: inc x6 (12)
R3: sc around (12)
R4: sc around (12)
R5: sc around (12)
R6: (2 sc, dec) x3 (9)
R7: sc around (9)
R8: sc around (9)
Add a little stuffing, then flatten the top opening before sewing.
Fasten off. Leave a 15 cm tail.
Ears (Make 2)
Yarn: light blue
R1: 6 sc in MR (6)
R2: inc x6 (12)
R3: sc around (12)
Fold flat and sl st across the opening.
Fasten off. Leave a 12 cm tail.
Horns (Make 2)
Yarn: cream / ivory
R1: 6 sc in MR (6)
R2: (sc, inc) x3 (9)
R3: sc around (9)
R4: (sc, dec) x3 (6)
Do not overstuff. A soft horn sits cleaner against a rounded head.
Fasten off. Leave a 12 cm tail.
Wings (Make 2)
Yarn: cream / ivory with blue edging
Ch 9.
Row 1: start in 2nd ch from hook, 7 sc, turn (7)
Row 2: sl st, sc, hdc, dc, hdc, dc, sc, sl st across
Edge: sc evenly around the wing; switch to blue for the outer trim if desired.
Pin both wings before sewing. The top edge should angle slightly backward, not straight up.
Fasten off. Leave a 15 cm tail.
Tail (Make 1)
Yarn: light blue
R1: 6 sc in MR (6)
R2: inc x6 (12)
R3: sc around (12)
R4: sc around (12)
R5: sc around (12)
R6: (2 sc, inc) x4 (16)
R7: sc around (16)
R8: sc around (16)
R9: sc around (16)
R10: sc around (16)
R11: (2 sc, dec) x4 (12)
R12: sc around (12)
R13: sc around (12)
R14: sc around (12)
R15: (2 sc, dec) x3 (9)
R16: sc around (9)
R17: sc around (9)
R18: sc around (9)
Stuff lightly in the first half only. Leave the last section softer so it can curl inward without springing back.
Fasten off. Leave a 20 cm tail.
Back Spikes (Make as many as needed)
Yarn: blue
R1: 6 sc in MR (6)
R2: sl st around (6)
Make 8 to 10 small spikes depending on your spacing.
Fasten off, leaving long tails for sewing.
Snout Detail / Nostrils (Make 1 embroidered feature)
Yarn: black embroidery yarn
Embroider two short vertical nostrils centered on the lower face between rounds 5 and 6 of the head.
Cheek Patches (Make 2, optional)
Yarn: white or very pale blue
R1: 6 sc in MR (6)
R2: inc x6 (12)
These are optional flat circles for a softer face style. The photographed sample does not show visible cheek patches.
Fasten off. Leave a short tail.
Cloud Nest Cushion (Make 1)
Yarn: cream / ivory
Make 5 puff segments separately.
For each segment:
R1: 6 sc in MR (6)
R2: inc x6 (12)
R3: (sc, inc) x6 (18)
R4: (2 sc, inc) x6 (24)
R5: (3 sc, inc) x6 (30)
R6: sc around (30)
R7: sc around (30)
R8: (3 sc, dec) x6 (24)
R9: (2 sc, dec) x6 (18)
Stuff firmly. Fasten off with a long joining tail.
Join the five stuffed puffs side by side in a ring or crescent, depending on the pose you want.
Assembly
- Sew the head to the front third of the body, angled slightly downward.
- Test the sleeping line by pressing the chin toward the future cloud before locking the final stitches.
- Attach the front legs under the head, close together, so the paws tuck inward.
- Sew the back legs to the lower sides of the body at the widest point.
- Pin and sew the ears first, then place the horns just inside or slightly forward of them.
- Stitch the wings to the upper back with a backward tilt.
- Sew the tail to the rear body, then bend it around the side to confirm the curl.
- Attach the back spikes from crown to tail, keeping spacing even as the body curves.
- Embroider the closed eyes and nostrils, then add cheek patches only if you want a softer stylized face.
- Join the cloud nest segments, set the dragon on top, and tack the belly or tail down in two or three hidden points if permanent display is needed.
The piece is complete when the tail curve, wing angle, and head drop all sit on the same resting line.
7 Technical Tips
- Mark the first stitch of every round. Losing the round start on chenille yarn shifts decreases, and the head seam line will drift off center by round 12.
- Keep head stuffing firmer than body stuffing. A loose head collapses under the horn base and makes the embroidered eyes wrinkle.
- Use invisible decreases on all visible shaping rounds. Standard decreases leave small ridges that show clearly on the snout and body taper.
- Place eye embroidery before full closure. Once the head is reduced to 12 stitches, pulling a needle through chenille fabric gets harder and can strip fibers.
- Do not overstuff the tail beyond round 10. A stiff tail will not hold the inward curl and tends to lift the rear leg off the cushion.
- Pin both wings at least twice before sewing. On this body size, even a 5 mm difference in wing height is visible from the front.
- Weave tails through at least three direction changes. Chenille sheds under tension, and a single straight pass can slip out after handling.
Conclusion
The main advantage of this sleepy dragon amigurumi crochet pattern is control. The stitch counts stay compact, the body taper supports the curl, and the cloud base gives the finished plush a defined display setting instead of an improvised one. Next, crochet the head and one body section first, then test your yarn density before committing to all appendages. Share the result on Pinterest and Instagram with a top view and side profile so the curl reads clearly. Use #SleepyDragonPattern. Did you keep the tail free, or did you tack it to the cloud to lock the sleeping pose?









