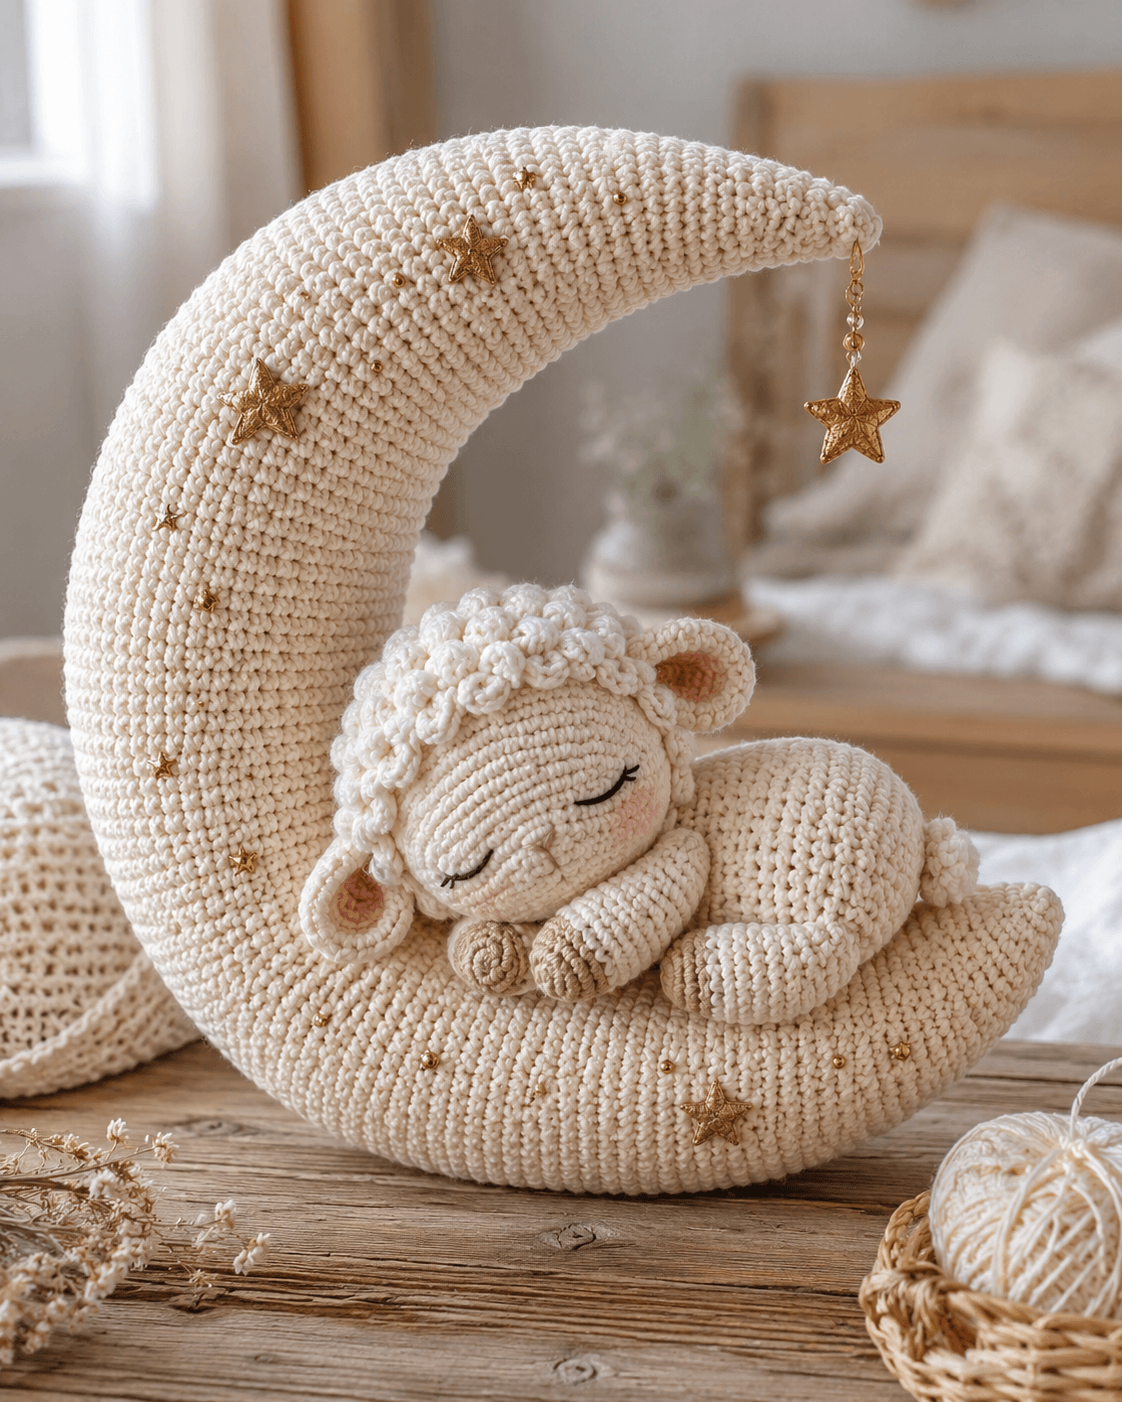
A lamb’s face looks wrong the moment the muzzle sits too high. This lamb amigurumi crochet pattern fixes that first, then builds the crescent moon support around a reclining body. Use worsted or DK-style cotton, a 4.0–4.5 mm hook, and basic shaping skills to make a nursery prop that stays upright and reads clearly as a sleeping lamb rather than a generic sheep.
The Design: What Makes This Lamb Different
This design depends on proportion more than texture. The head is wider than the neck, but the muzzle line drops low so the embroidered lashes sit on the lower front quadrant instead of the centerline. That keeps the face infant-like. The body stays short and rounded because a long torso slides visually off the moon. Another choice matters just as much: the back legs are larger than the front pair, which lets the lamb look folded rather than perched.
A common mistake with any crochet sheep amigurumi is overbuilding the wool. Too many bobbles on the face erase the calm profile. Here, the curls sit as a cap around the crown only. That leaves a smooth face panel for closed-eye embroidery and blush placement. In most sleeping lamb crochet pattern tutorials, the support piece is treated as an afterthought. In this version, the moon is structural, not decorative.
Project Info at a Glance
| Skill Level | Time | Finished Size | Hook | Best For |
|---|---|---|---|---|
| Intermediate | 8–10 hours | Lamb 14–16 cm reclined; moon 30–35 cm tall | 4.0 mm lamb / 4.5–5.0 mm moon | Nursery shelf decor, baby gift, photo prop |
The lamb size above is calibrated from comparable 14–19 cm lamb references and scaled to the photographed reclining pose; common lamb baselines online sit around 18–19 cm with DK or bulky yarn, while moon pillows range widely by yarn choice.
Materials and Tools
Yarn
- Cream / ivory — DK or light worsted — 100 g for lamb + 180 g for moon — Paintbox Cotton DK or similar
- Light beige — DK or light worsted — 20 g — for hooves and bell tab
- Blush pink — DK cotton — 10 g — for inner ears and cheek patches
- Black embroidery floss — small amount — for lashes
- Metallic gold thread or ready-made charms — optional — for stars and moon embellishment
Tools
- Hook 4.0 mm for lamb
- Hook 4.5 or 5.0 mm for moon
- Safety eyes 8–9 mm optional for an awake variation; the photographed style uses embroidery instead
- Polyester stuffing
- Yarn needle
- Stitch markers
- Pins
- Optional jewelry chain and star charm
The 4 mm DK baseline matches a compact lamb format used in Ravelry listings, while larger moons are commonly worked with a slightly bigger hook or bulkier yarn.
Abbreviations
MR = magic ring
sc = single crochet
inc = increase
dec = invisible decrease
sl st = slip stitch
ch = chain
BLO = back loop only
FO = fasten off
Invisible decrease reduces bulk on visible shaping lines and keeps the muzzle and crown cleaner than a standard decrease.
Pattern — Step by Step
Continuous spiral unless noted.
Head (Make 1)
Yarn: cream — Original stitch map based on standard amigurumi math and verified size range
R1: 6 sc in MR (6)
R2: inc x6 (12)
R3: (sc 1, inc) x6 (18)
R4: (sc 2, inc) x6 (24)
R5: (sc 3, inc) x6 (30)
R6: (sc 4, inc) x6 (36)
R7–R13: sc around (36)
R14: (sc 4, dec) x6 (30)
R15: (sc 3, dec) x6 (24)
Embroider closed eyes between R10 and R11, about 8 stitches apart. Add cheek patches after assembly.
R16: (sc 2, dec) x6 (18)
Begin stuffing firmly.
R17: (sc 1, dec) x6 (12)
R18: dec x6 (6)
Fasten off. Leave a 25 cm tail.
Body (Make 1)
Yarn: cream — Original stitch map based on standard amigurumi math and reclining proportion
R1: 6 sc in MR (6)
R2: inc x6 (12)
R3: (sc 1, inc) x6 (18)
R4: (sc 2, inc) x6 (24)
R5: (sc 3, inc) x6 (30)
R6: (sc 4, inc) x6 (36)
R7–R10: sc around (36)
R11: (sc 4, dec) x6 (30)
R12–R13: sc around (30)
R14: (sc 3, dec) x6 (24)
R15: sc around (24)
R16: (sc 2, dec) x6 (18)
Stuff more firmly at the belly than the back.
R17: (sc 1, dec) x6 (12)
R18: dec x6 (6)
Fasten off. Leave a 25 cm tail.
Front Legs (Make 2)
Yarn: beige, then cream — Original
R1: 6 sc in MR (6)
R2: inc x6 (12)
R3–R4: sc around (12)
Change to cream.
R5: BLO sc around (12)
R6–R10: sc around (12)
Stuff hoof only. Flatten opening.
Fasten off. Leave a 20 cm tail.
Back Legs (Make 2)
Yarn: beige, then cream — Original
R1: 6 sc in MR (6)
R2: inc x6 (12)
R3: (sc 1, inc) x6 (18)
R4–R5: sc around (18)
Change to cream.
R6: BLO sc around (18)
R7–R10: sc around (18)
Stuff hoof and lower leg lightly. Flatten opening.
Fasten off. Leave a 22 cm tail.
Ears (Make 2)
Yarn: cream — Ear size guided by comparable lamb tutorials that keep ears short and soft.
R1: 6 sc in MR (6)
R2: inc x6 (12)
R3: (sc 1, inc) x6 (18)
R4: sc around (18)
R5: (sc 1, dec) x6 (12)
Flatten lightly. Do not stuff.
Fasten off. Leave an 18 cm tail.
Inner Ears (Make 2)
Yarn: blush pink — Original
R1: 6 sc in MR (6)
R2: inc x6 (12)
R3: sc around (12)
Fasten off. Leave a 12 cm tail and stitch to ear centers.
Curly Wool Cap (Make 1)
Yarn: cream — Original textured crown
R1: 6 sc in MR (6)
R2: inc x6 (12)
R3: (sc 1, inc) x6 (18)
R4: (sc 2, inc) x6 (24)
R5: (sc 3, inc) x6 (30)
R6: (sc 4, inc) x6 (36)
R7: BLO sc around (36)
R8: (ch 4, sl st in 2nd ch from hook, sl st in next 2 ch, sl st in next head st) repeat around for 36 corkscrew loops
Fasten off. Leave a 30 cm tail.
Tail (Make 1)
Yarn: cream — Original
R1: 6 sc in MR (6)
R2: inc x6 (12)
R3: sc around (12)
R4: dec x6 (6)
Lightly stuff. Fasten off. Leave a 12 cm tail.
Cheek Patches (Make 2)
Yarn: blush pink — Original
R1: 6 sc in MR (6)
R2: inc x6 (12)
Fasten off. Leave a 10 cm tail.
Bell / Neck Charm Tab (Make 1)
Yarn: beige — Original
R1: 6 sc in MR (6)
R2: sc around (6)
R3: sc around (6)
Fasten off. Thread through a small bell or bead if using one.
Crescent Moon Panels (Make 2)
Yarn: cream — Original support piece inspired by the large nursery moon format seen in crochet moon pillows.
Ch 36.
Row 1: sc in 2nd ch from hook and across (35)
Row 2: ch 1, turn, sc across (35)
Row 3: ch 1, turn, inc, sc 33, inc (37)
Row 4: ch 1, turn, sc across (37)
Row 5: ch 1, turn, inc, sc 35, inc (39)
Row 6: ch 1, turn, sc across (39)
Row 7: ch 1, turn, sc across (39)
Row 8: ch 1, turn, dec, sc 35, dec (37)
Row 9: ch 1, turn, sc across (37)
Row 10: ch 1, turn, dec, sc 33, dec (35)
Row 11: ch 1, turn, sc across (35)
Row 12: ch 1, turn, dec, sc 31, dec (33)
Row 13: ch 1, turn, sc across (33)
Row 14: ch 1, turn, dec, sc 29, dec (31)
Row 15: ch 1, turn, sc across (31)
Row 16: ch 1, turn, dec, sc 27, dec (29)
Row 17: ch 1, turn, sc across (29)
Row 18: ch 1, turn, dec, sc 25, dec (27)
Row 19: ch 1, turn, sc across (27)
Row 20: ch 1, turn, dec, sc 23, dec (25)
Row 21: ch 1, turn, sc across (25)
Row 22: ch 1, turn, dec, sc 21, dec (23)
Row 23: ch 1, turn, sc across (23)
Row 24: ch 1, turn, dec, sc 19, dec (21)
Row 25: ch 1, turn, sc across (21)
Fasten off on first panel.
On second panel, do not fasten off. Place panels together and sc evenly around the outer edge, stuffing as you go. Add extra stuffing at the lower belly of the moon and less at the tip so the curve stays crisp.
Leave a 30 cm tail for closing the final gap.
Star Appliqués (Make 3 small)
Yarn: metallic gold or use ready-made stars — Original
R1: 6 sc in MR (6)
R2: (ch 3, sl st in 2nd ch from hook, sl st in next ch, sl st in next stitch of ring) repeat 5 times around ring
Fasten off. Leave a 10 cm tail.
Dangling Star Charm (Make 1)
Yarn: metallic gold or use jewelry chain — Original
Ch 10.
Attach to moon tip. Sew one small star appliqué to chain end, or attach a purchased metal star charm.
Fasten off. Leave a 10 cm tail.
Assembly
- Sew the head to the front-left upper edge of the body so the muzzle angles slightly downward.
- Attach the curly wool cap to the crown, starting above one ear line and ending above the other.
- Sew the ears between R6 and R9 of the head, tilted outward and slightly down.
- Stitch the cheek patches low on the face, below the lash line, then add blush if desired.
- Embroider the lashes in a shallow downward curve, three short lash marks at the outer edge of each eye.
- Sew the front legs together at the wrists, then tack them under the muzzle.
- Attach the back legs to the lower body so the thighs sit wider than the front pair.
- Sew the tail to the back seam of the body.
- Join the moon seam fully, shape the curve by hand, then stitch the lamb onto the lower inner arc at three points: chest, belly, and rear leg.
- Add the bell tab at the neck, sew on the small stars, and attach the dangling star charm to the moon tip.
The completed piece should sit as one supported unit, with the lamb’s weight carried by the lower moon curve rather than the tip.
7 Technical Tips
- Mark the first stitch of every round on the head and body. Losing one increase round will shift the lash line and flatten the forehead.
- Stuff the head firmly, but stop before the fabric starts to show horizontal stretch lines. On a 36-st head, that usually happens when the muzzle begins to bulge past the eye line.
- Use invisible decreases on the face side of the head and on the moon tip. Standard decreases leave a ridge that reads harshly in close-up photos.
- Place embroidered eyes before final head closure. Once the head is fully stuffed, the needle path gets shorter and the curves become less even.
- Keep the moon stuffing denser at the bottom third than at the hanging tip. A soft tip droops and changes the whole crescent silhouette.
- Pin the lamb to the moon in three contact points before sewing. One-point attachment makes the body rotate and the sleeping pose starts to look like a fall.
- Weave tails back through at least 4 cm of internal stitches. Short tail burying is the first failure point when a nursery prop is lifted by the moon.
Conclusion
The hard part in this lamb amigurumi crochet pattern is not the lamb. It is the relationship between the lamb, the moon curve, and the face angle. Build those three elements in that order and the result reads clearly from a distance. Next, test the moon seam before final embellishment and add or remove stuffing where the curve softens. Post the finished piece to Pinterest and Instagram with one overhead shot and one side profile, then tag it with #SleepingLambMoon. One question remains useful while refining this design: did your lamb’s muzzle fall low enough to read as asleep without adding a nose line?









