Introduction
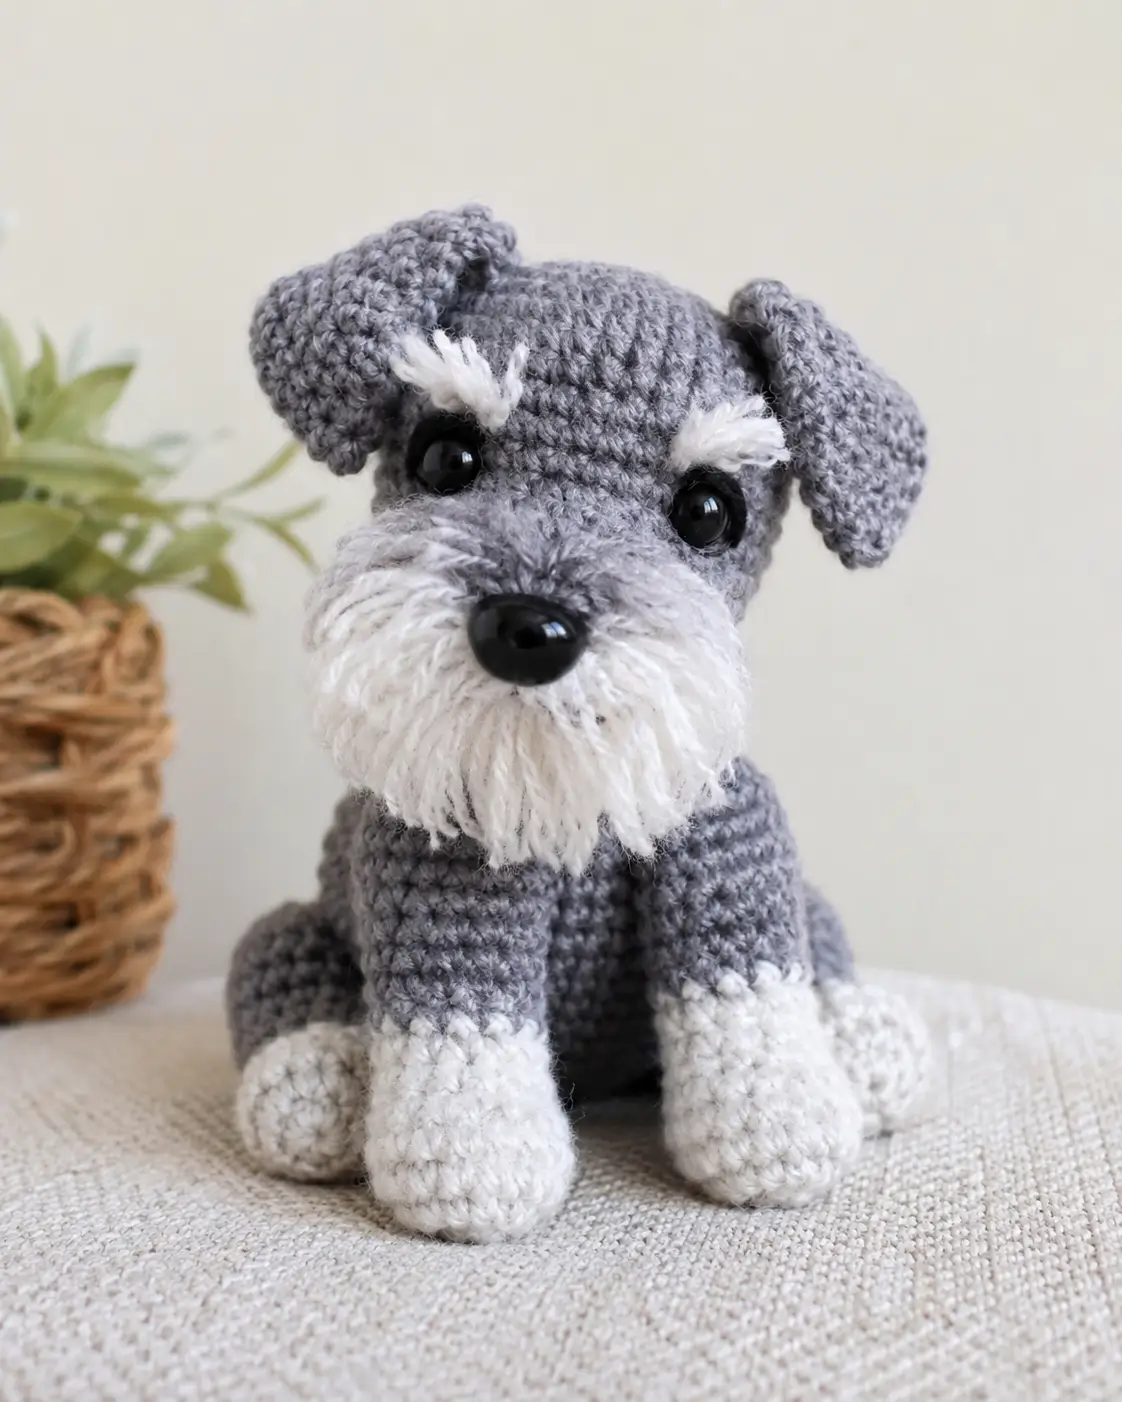
Schnauzers need eyebrows that sit above the eye line without swallowing the eyes. This schnauzer amigurumi crochet pattern uses worsted yarn, a 3.5 mm hook, and 8 mm eyes to build a compact seated dog around 13 to 15 cm tall, with intermediate shaping and brushed facial yarn. That scale works well for shelf display, pet memorial gifts, or a breed-specific market sample.
The Design: What Makes Schnauzer Different
A schnauzer reads correctly only when three structures cooperate: the eyebrow ridge, the beard mass, and the short drop ears. Remove one and the silhouette slips into generic terrier territory. This version keeps the head round, then pushes breed identity into added surface parts rather than extreme head shaping. That choice holds stitch math in a cleaner range and makes assembly less fragile.
The second decision is the seated body. A miniature schnauzer crochet pattern often looks best when the chest sits upright and the hind legs angle outward slightly, because the beard needs clear space below the muzzle. Compress the front too much and the face disappears into the paws. A third decision sits in the color blocking: pale paws and muzzle, darker upper limbs and skull. Many makers miss the eyebrow placement and attach the white tufts too low. Then the dog looks tired instead of alert. Existing published schnauzer patterns also cluster around DK-to-worsted yarn and small hooks, which supports this scale choice for a realistic schnauzer crochet project.
Project Info at a Glance
| Skill Level | Time | Finished Size | Hook | Best For |
|---|---|---|---|---|
| Intermediate | 4–6 hours | 13–15 cm sitting | 3.5 mm | Breed gifts, pet replica base, market display |
Materials and Tools
Yarn
- Heather gray worsted — worsted — about 85 g / 3 oz — Stylecraft Special DK equivalent thickness not required; worsted wool-blend or acrylic works
- White or cream worsted — worsted — about 28 g / 1 oz — same base yarn as main color
- Black worsted scrap — tiny amount — nose embroidery
Tools
- Hook 3.5 mm
- 8 mm safety eyes
- Polyfill stuffing
- Tapestry needle
- Stitch markers
- Pet slicker brush for beard and brow fuzzing
- Small scissors
Abbreviations
MR / sc / inc / dec / sl st / ch / BLO / FO
Use invisible decrease on visible shaping rounds so the forehead, muzzle edge, and leg fronts do not show open decrease gaps.
Pattern — Step by Step
Continuous spiral unless noted. This is an original image-based pattern drafted to match the reference photo proportions, while the material specs above were checked against published schnauzer pattern data.
Head (Make 1)
Yarn: heather gray — Standard amigurumi math
R1: 6 sc in MR (6)
R2: inc x6 (12)
R3: (sc, inc) x6 (18)
R4: (2 sc, inc) x6 (24)
R5: (3 sc, inc) x6 (30)
R6: (4 sc, inc) x6 (36)
R7: 36 sc (36)
R8: 36 sc (36)
R9: 36 sc (36)
R10: 36 sc (36)
R11: 36 sc (36)
R12: 36 sc (36)
Insert 8 mm eyes between R8 and R9, about 8 stitches apart.
R13: (4 sc, dec) x6 (30)
R14: 30 sc (30)
R15: (3 sc, dec) x6 (24)
R16: (2 sc, dec) x6 (18)
Stuff firmly, but keep the lower face slightly flatter than the crown.
R17: (sc, dec) x6 (12)
R18: dec x6 (6)
Fasten off. Leave a 20 cm tail.
Body (Make 1)
Yarn: heather gray — Standard amigurumi math
R1: 6 sc in MR (6)
R2: inc x6 (12)
R3: (sc, inc) x6 (18)
R4: (2 sc, inc) x6 (24)
R5: (3 sc, inc) x6 (30)
R6: 30 sc (30)
R7: 30 sc (30)
R8: 30 sc (30)
R9: 30 sc (30)
R10: 30 sc (30)
R11: (3 sc, dec) x6 (24)
R12: 24 sc (24)
R13: 24 sc (24)
R14: (2 sc, dec) x6 (18)
R15: 18 sc (18)
Stuff the lower half more densely than the upper half so the dog sits instead of tipping forward.
R16: (sc, dec) x6 (12)
R17: dec x6 (6)
Fasten off. Leave a 20 cm tail.
Front Legs (Make 2)
Yarn: white then gray — Standard amigurumi math
R1: 6 sc in MR with white (6)
R2: inc x6 (12)
R3: 12 sc (12)
R4: 12 sc (12)
Change to gray.
R5: 12 sc (12)
R6: 12 sc (12)
R7: 12 sc (12)
R8: 12 sc (12)
R9: 12 sc (12)
R10: 12 sc (12)
Flatten opening. Fasten off. Leave a 25 cm tail.
Stuff only the paw and lower half. The upper tube should stay soft for sewing.
Back Legs (Make 2)
Yarn: white then gray — Standard amigurumi math
R1: 6 sc in MR with white (6)
R2: inc x6 (12)
R3: 12 sc (12)
R4: 12 sc (12)
Change to gray.
R5: 12 sc (12)
R6: 12 sc (12)
R7: 12 sc (12)
R8: 4 sc, dec, 4 sc, dec (10)
R9: 10 sc (10)
R10: 10 sc (10)
Fasten off. Leave a 25 cm tail.
Stuff the paw and front edge only. A flatter back edge helps the seated stance.
Ears (Make 2)
Yarn: heather gray — Standard amigurumi math
Ch 7.
Row 1: sc in 2nd ch from hook and across (6)
Row 2: ch 1, inc, 4 sc, inc (8)
Row 3: ch 1, 8 sc (8)
Row 4: ch 1, 8 sc (8)
Row 5: ch 1, 8 sc (8)
Row 6: ch 1, 8 sc (8)
Row 7: ch 1, 8 sc (8)
Row 8: ch 1, dec, 4 sc, dec (6)
Row 9: ch 1, 2 sc, dec, 2 sc (5)
Row 10: ch 1, dec, sc, dec (3)
Fasten off. Leave a 20 cm tail.
Do not overstuff. Fold the top edge slightly when attaching so the ear drops forward.
Snout / Muzzle Base (Make 1)
Yarn: white or cream — Standard amigurumi math
Ch 7.
R1: starting in 2nd ch from hook, 5 sc, 3 sc in last ch, working on opposite side 4 sc, inc (14)
R2: inc, 4 sc, inc x3, 4 sc, inc x2 (20)
R3: 20 sc (20)
R4: 20 sc (20)
Fasten off. Leave a 25 cm tail.
This piece is the support under the beard. Brush after assembly, not before.
Tail (Make 1)
Yarn: heather gray — Standard amigurumi math
R1: 4 sc in MR (4)
R2: 4 sc (4)
R3: 4 sc (4)
R4: 4 sc (4)
R5: 4 sc (4)
R6: 4 sc (4)
Fasten off. Leave a 15 cm tail.
For a slight curve, insert a short pipe cleaner only if the toy is decorative.
Cheek Patches / Beard Pads (Make 2)
Yarn: white or cream — Standard amigurumi math
R1: 6 sc in MR (6)
R2: inc x6 (12)
Fasten off. Leave a 20 cm tail.
These sit low on the muzzle sides and widen the beard mass.
Eyebrow Patches (Make 2)
Yarn: white or cream — Standard amigurumi math
R1: 6 sc in MR (6)
R2: 6 sc (6)
Fasten off. Leave a 15 cm tail.
Brush the outer edge after sewing to create the heavy schnauzer brow.
Chest Patch (Make 1)
Yarn: white or cream — Standard amigurumi math
Ch 5.
Row 1: sc in 2nd ch from hook and across (4)
Row 2: ch 1, inc, 2 sc, inc (6)
Row 3: ch 1, 6 sc (6)
Row 4: ch 1, inc, 4 sc, inc (8)
Row 5: ch 1, 8 sc (8)
Fasten off. Leave a 20 cm tail.
Assembly
- Sew the head to the body with the face tilted very slightly downward.
- Attach the snout centered on the lower half of the face, spanning roughly R8 to R13.
- Sew the cheek patches to each side of the snout so they meet the lower eye line.
- Add the eyebrow patches above the eyes, angled outward slightly toward the ear base.
- Stitch or embroider the nose at the center front of the snout.
- Sew the ears to the upper sides of the head, then fold the top edge forward once before securing the inner corner.
- Attach the front legs to the body front, aligned with the chest patch and spaced so the paws sit straight.
- Sew the back legs lower and wider than the front pair so the dog holds a seated shape.
- Attach the tail at the rear center, tipped slightly upward.
- Brush the muzzle, cheek patches, and eyebrows lightly, then trim only the longest strands.
The toy is complete when it stands in a stable seated pose with the beard clearing the front paws.
7 Technical Tips
- Use one marker at the first stitch of every round and one temporary marker at each color change. On this dog, losing the start point by even one stitch pushes the brow and muzzle off center.
- Pack the head firmly, but stop before the fabric turns square at the cheeks. A diameter change of even 3 to 4 mm can make the beard sit too low.
- Work invisible decreases on the front-facing rounds only. Standard decreases leave wider holes, and those gaps become obvious above the muzzle.
- Install the eyes before the final third of the head is closed. For this scale, place them between R8 and R9 with about 8 stitches between them or the brows will crowd them.
- Keep the beard support flat before brushing. If you brush first, the yarn blooms early and the snout edge becomes hard to sew cleanly.
- Pin all four legs before sewing any of them permanently. A front-leg height mismatch of even one round makes the toy lean or twist when viewed from the front.
- Weave tails through direction changes, not straight down a tube. Straight tail weaving inside a leg can create a hard ridge that shows through the outer fabric.
Conclusion
Eyebrows carry the read. The beard confirms it. That is the core of a convincing schnauzer amigurumi crochet pattern. Start with the verified tool range, keep the head round, widen the muzzle with separate pads, and place the ears after the eyes so the whole face stays balanced. Then brush only the facial yarn, not the full body. Save the finished piece in your pet-pattern folder, post one front view and one side view to Pinterest and Instagram, and tag it with #MiniSchnauzerAmigurumiPattern. One useful final check: did your brow line sit above the eyes, or did it drift onto the eye sockets?









