Introduction
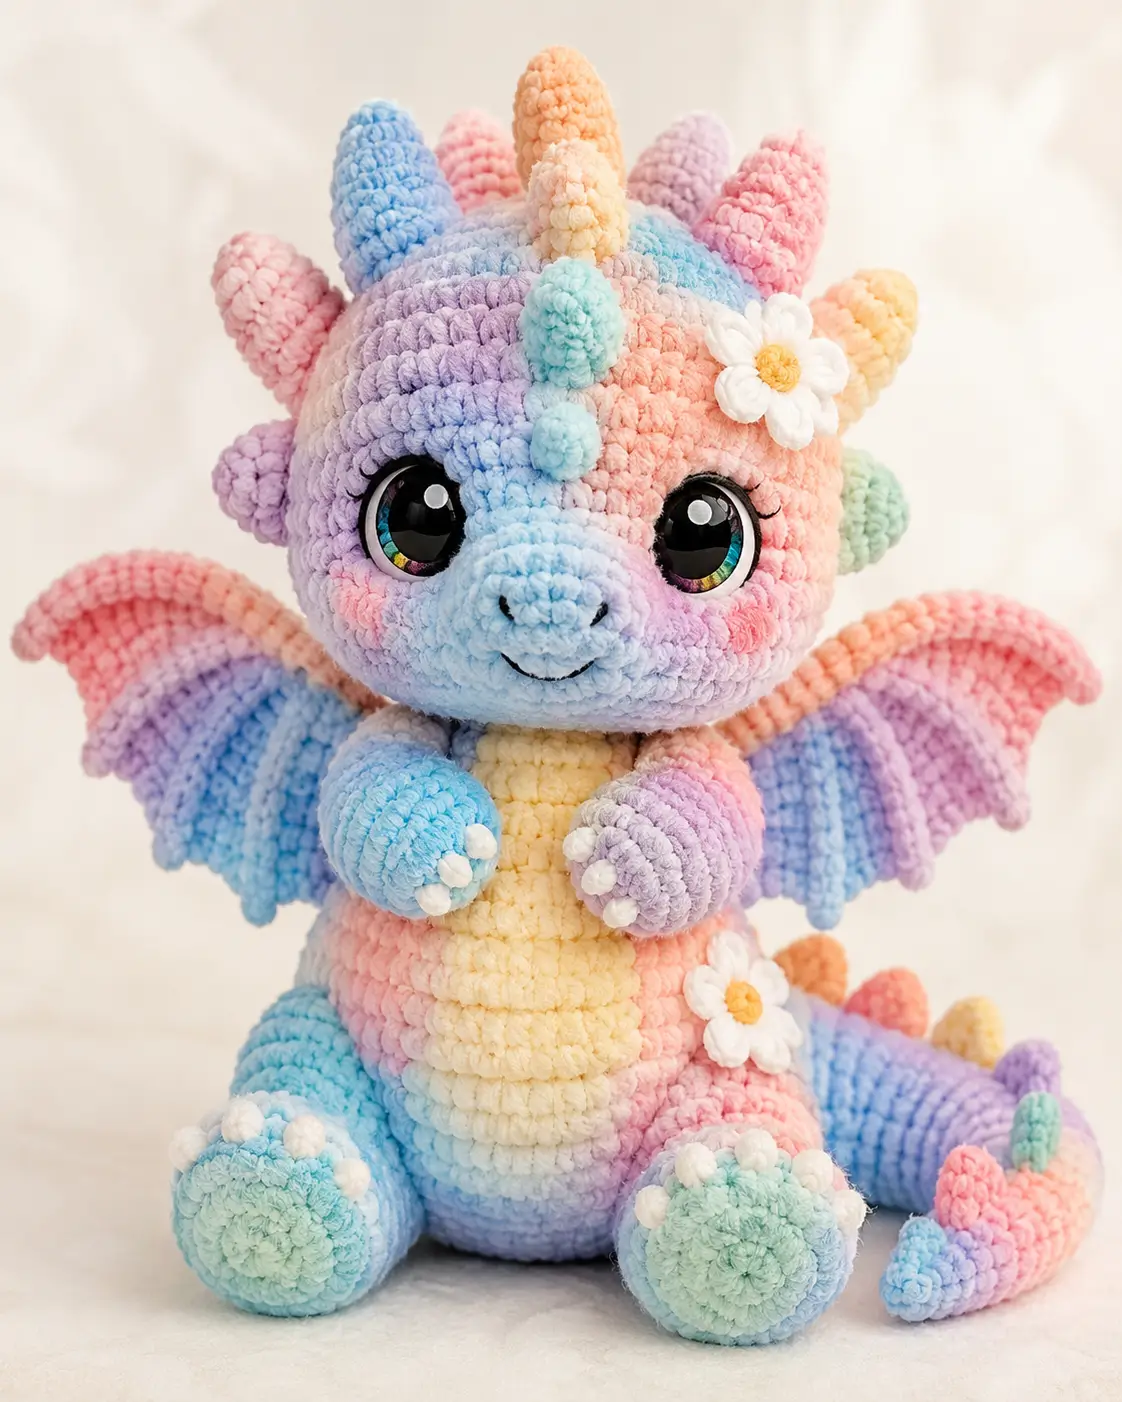
Rainbow dragon spikes create two fit problems: weight on the crown and color breaks along the tail. This pastel rainbow dragon amigurumi crochet pattern uses bulky chenille, a 4.0 mm hook, 18 mm safety eyes, and separate flat wings for a seated 30 cm plush. The skill level is intermediate. Make it when a fantasy shelf needs one high-color centerpiece.
The Design: What Makes This Dragon Different
For this pastel rainbow dragon amigurumi crochet pattern, the head carries the visual weight, so it uses a large 42-stitch plateau while the body stays narrower at 36 stitches. That keeps the baby dragon shape from turning into a dinosaur silhouette. The snout is sewn on as a separate oval tube because a flat embroidered muzzle would disappear under chenille pile. Wings are worked flat in rows, then edged, since bulky spiral wings become heavy and pull the shoulder seam down. The common mistake in a crochet dragon plushie pattern is adding spikes before testing head balance. Pin every spike first. This rainbow dragon amigurumi also needs a pale belly patch, not full body striping, so the face and wings stay readable.
Project Info at a Glance
| Skill Level | Time | Finished Size | Hook | Best For |
|---|---|---|---|---|
| Intermediate | 7–9 hours | 30 cm seated | 4.0 mm | Chenille baby dragon display plush |
Size, hook, yarn weight, and eye scale are based on bulky chenille dragon benchmarks using a 12 inch seated size, 4.0 mm hook, and 18 mm eyes.
Materials and Tools
Yarn
Amounts follow bulky chenille dragon yardage benchmarks, then adjust for the extra daisies, claws, and rainbow spikes shown in the photo.
- Pastel pink / peach chenille — bulky — 100 g — Bernat Blanket Baby, YarnArt Dolce, or similar
- Pale blue chenille — bulky — 50 g — snout, one arm, wing bands
- Lavender chenille — bulky — 50 g — head shading, one arm, wing bands
- Mint chenille — bulky — 40 g — feet, side accents, cheek color
- Butter yellow chenille — bulky — 80 g — belly and lower body accents
- White chenille — bulky — 25 g — claws and daisy petals
- Small rainbow spike colors — bulky — 10 g each — coral, peach, blue, mint, lavender, yellow
Tools
- Hook 4.0 mm
- Safety eyes 18 mm, rainbow or black gloss
- Polyester stuffing
- Yarn needle
- Locking stitch markers
- Pins
- Scissors
- Black embroidery thread for nostrils, smile, and lashes
Safety eyes can pose a choking risk for babies, so embroidered eyes are the safer choice for toys intended for children under three.
Abbreviations
MR = magic ring; sc = single crochet; inc = increase; dec = invisible decrease; sl st = slip stitch; ch = chain; BLO = back loop only; hdc = half double crochet; dc = double crochet; st = stitch; FO = fasten off. Invisible decrease uses the front loops only so closing rounds do not form raised bars across the chenille surface.
Pattern — Step by Step
Continuous spiral unless noted. Use a stitch marker at the first stitch of every round.
Head — Make 1
Yarn: pastel pink, blue, lavender, and peach chenille.
R1: 6 sc in MR (6)
R2: inc ×6 (12)
R3: (sc 1, inc) ×6 (18)
R4: (sc 2, inc) ×6 (24)
R5: (sc 3, inc) ×6 (30)
R6: (sc 4, inc) ×6 (36)
R7: (sc 5, inc) ×6 (42)
R8–R16: sc around (42)
R17: (sc 5, dec) ×6 (36)
R18: (sc 4, dec) ×6 (30)
R19: (sc 3, dec) ×6 (24)
R20: (sc 2, dec) ×6 (18)
R21: (sc 1, dec) ×6 (12)
R22: dec ×6 (6)
Place eyes between R11 and R12, 8–9 stitches apart, before R18 closes the head. Stuff firmly after R18, shaping the cheeks with thumb pressure.
Fasten off. Weave through front loops and close.
Body — Make 1
Yarn: butter yellow belly front with pastel sides.
R1: 6 sc in MR (6)
R2: inc ×6 (12)
R3: (sc 1, inc) ×6 (18)
R4: (sc 2, inc) ×6 (24)
R5: (sc 3, inc) ×6 (30)
R6: (sc 4, inc) ×6 (36)
R7–R14: sc around (36)
R15: (sc 4, dec) ×6 (30)
R16: (sc 3, dec) ×6 (24)
R17: (sc 2, dec) ×6 (18)
R18: (sc 1, dec) ×6 (12)
R19: dec ×6 (6)
Stuff the lower half firmly and the neck area slightly less so the head sits into the body instead of rocking forward.
Fasten off. Leave a 35 cm sewing tail.
Snout — Make 1
Yarn: pale blue chenille.
R1: 6 sc in MR (6)
R2: inc ×6 (12)
R3: (sc 1, inc) ×6 (18)
R4–R5: sc around (18)
Stuff lightly. Overstuffing makes the snout block the lower half of the eyes.
Fasten off. Leave a 30 cm tail. Embroider two black nostrils two stitches apart and add a small curved mouth below them.
Belly Patch — Make 1
Yarn: butter yellow chenille.
R1: 6 sc in MR (6)
R2: inc ×6 (12)
R3: (sc 1, inc) ×6 (18)
R4: (sc 2, inc) ×6 (24)
R5: (sc 3, inc) ×6 (30)
Do not stuff. Pin it vertically so the patch stretches into an oval before sewing.
Fasten off. Leave a 40 cm tail.
Front Legs / Arms — Make 2
Yarn: one pale blue, one lavender.
R1: 6 sc in MR (6)
R2: inc ×6 (12)
R3: (sc 1, inc) ×6 (18)
R4–R5: sc around (18)
R6: (sc 1, dec) ×6 (12)
R7–R10: sc around (12)
Stuff the paw section only. Add three white claw stitches across R3–R4 before sewing.
Fasten off. Flatten the top edge and leave a 25 cm tail.
Back Legs / Feet — Make 2
Yarn: mint chenille with pastel blue shading.
R1: 6 sc in MR (6)
R2: inc ×6 (12)
R3: (sc 1, inc) ×6 (18)
R4: (sc 2, inc) ×6 (24)
R5–R7: sc around (24)
R8: (sc 2, dec) ×6 (18)
R9: (sc 1, dec) ×6 (12)
R10: sc around (12)
Stuff the front half more firmly than the back half. Add four white claw stitches across R3–R4.
Fasten off. Leave a 30 cm tail.
Wings — Make 2
Yarn: rainbow pastel chenille.
Row 1: ch 2, 2 sc in 2nd ch from hook (2), ch 1, turn
Row 2: inc ×2 (4), ch 1, turn
Row 3: sc 1, inc ×2, sc 1 (6), ch 1, turn
Row 4: sc 2, inc ×2, sc 2 (8), ch 1, turn
Row 5: sc 3, inc ×2, sc 3 (10), ch 1, turn
Row 6: sc 4, inc ×2, sc 4 (12), ch 1, turn
Row 7: sc 5, inc ×2, sc 5 (14), ch 1, turn
Row 8: sc across (14)
Border: sc evenly around the two angled sides. At each lower point, ch 3, sl st into the same edge stitch to form a small scallop.
Do not stuff. Block by pinning flat overnight if the wing curls.
Fasten off. Leave a 35 cm sewing tail on each wing.
Central Horn — Make 1
Yarn: peach or butter yellow chenille.
R1: 6 sc in MR (6)
R2: sc around (6)
R3: inc ×6 (12)
R4: sc around (12)
R5: (sc 1, inc) ×6 (18)
R6: sc around (18)
Stuff only the base. The tip should stay soft and rounded.
Fasten off. Leave a 25 cm tail.
Dorsal Spikes — Make 10
Yarn: coral, peach, yellow, blue, mint, and lavender chenille.
R1: 6 sc in MR (6)
R2: sc around (6)
R3: inc ×6 (12)
R4: sc around (12)
Make two pink, two blue, two yellow, two lavender, one mint, and one peach spike for a balanced rainbow row.
Fasten off. Leave 20 cm tails.
Tail — Make 1
Yarn: pastel lavender to coral chenille.
R1: 6 sc in MR (6)
R2: inc ×6 (12)
R3–R6: sc around (12)
R7: (sc 1, inc) ×6 (18)
R8–R12: sc around (18)
R13: (sc 2, inc) ×6 (24)
R14–R20: sc around (24)
Stuff the base firmly and the tip lightly so the tail can curve to the side. Sew three small dorsal spikes along the top after attachment.
Fasten off. Leave a 40 cm tail.
Cheek Patches — Make 2
Yarn: pale pink or lavender chenille.
R1: 6 sc in MR (6)
R2: inc ×6 (12)
R3: (sc 1, inc) ×6 (18)
Do not stuff. Pull the center tight so no hole shows beside the safety eyes.
Fasten off. Leave 20 cm tails.
Daisy Flowers — Make 2
Yarn: white petals, yellow center.
Center R1: 6 sc in MR (6)
Center R2: inc ×6 (12)
Petal round: using white, work into every other stitch: sl st, ch 4, hdc in 2nd ch from hook, dc in next ch, hdc in next ch, sl st into same center stitch; repeat 6 times.
Make one flower for the head and one for the lower body. Keep the centers flat so they do not tilt off the chenille pile.
Fasten off. Leave 20 cm tails.
Assembly
- Sew the head to the body first, using the body tail and a full ring of stitches around the neck opening.
- Pin the snout centered below the eyes, then sew around R5 and add one shaping stitch under the smile.
- Attach cheek patches outside the snout, one round lower than the eye line.
- Sew the belly patch to the body front, stretching it slightly into an oval.
- Attach front legs at the upper body, angled inward so the claws face the belly.
- Sew back feet to the lower front edge and test sitting balance before knotting.
- Place the central horn at the top center of the head, then add five spikes behind it.
- Sew the wings to the upper back, with top corners level and lower points angled outward.
- Attach the tail to the back lower body and add the remaining tail spikes along the upper curve.
- Sew one daisy beside the horn and the second daisy on the lower body near the tail line.
The finished dragon sits at approximately 30 cm with the materials listed.
7 Technical Tips
- Marker drift failure: Chenille hides the first stitch after R6, so a missed marker can shift the eye line by 4–6 stitches. Move a locking marker every round, not every few rounds.
- Under-stuffed head failure: A 42-stitch head collapses at the cheeks when stuffing stops before the dec rounds. Fill until the surface springs back after a 1 cm thumb press.
- Visible decrease failure: Standard decreases leave horizontal bars across pale chenille. Use invisible dec on every closing round from R17 onward.
- Eye timing failure: Installing eyes after R18 leaves too little hand space for washers. Set the 18 mm eyes between R11 and R12 before stuffing blocks the inside.
- Velvet tension failure: Frogged chenille sheds and thins, especially around wings. Rework any section no more than twice, then cut a fresh length.
- Pinning failure: Wings that differ by more than 5 mm in height make the dragon lean visually even when the body sits flat. Pin both wings and view the back straight on before sewing.
- Tail weaving failure: Short tails pull loose through plush yarn after handling. Leave at least 20 cm on spikes and 40 cm on the tail base, then weave through three separate stitch paths.
Conclusion
Check the head balance before sewing the horn, spikes, and flower because those pieces add weight above the eye line. The next step is to make one plain test spike, pin it in three positions, and choose the crown line before making the full rainbow set. Share the finished dragon on Pinterest with a clear back-view photo so the wings and tail spikes are visible. Post the same view on Instagram with #PastelRainbowDragon. This pastel rainbow dragon amigurumi crochet pattern depends on color order more than stitch complexity. Which spike sequence will you use across the head: warm-to-cool, mirrored pairs, or a random candy row?









