Introduction
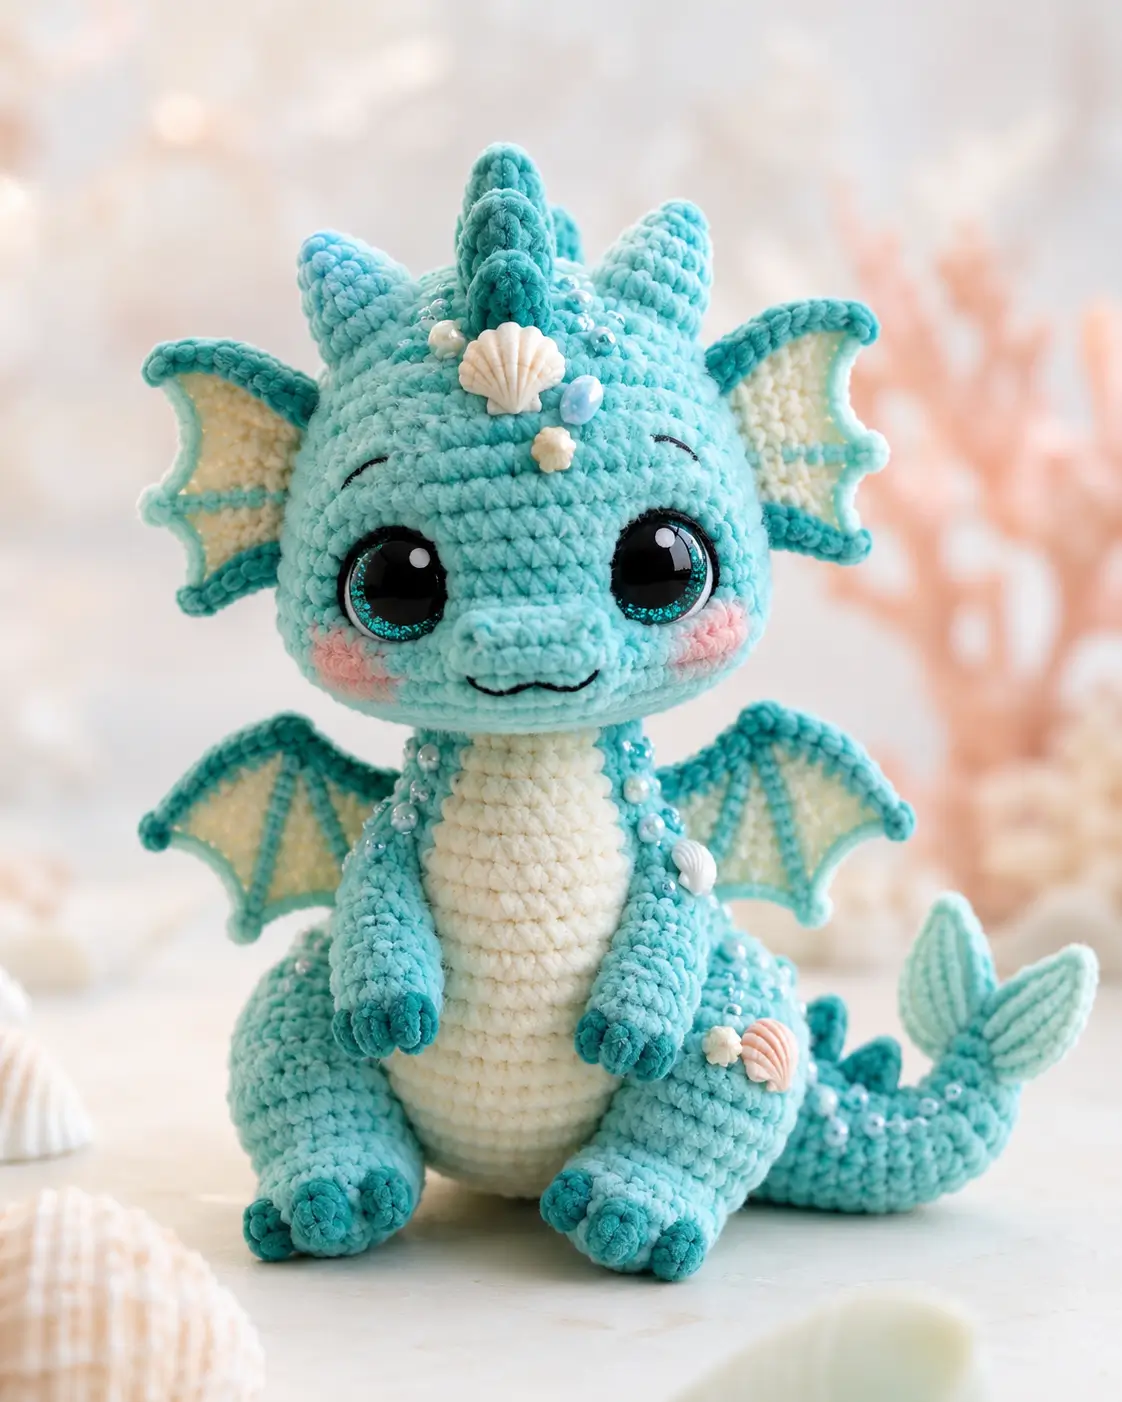
A sea dragon has horns, wings, cheek blush, and a tail fin competing for one small silhouette. This dragon amigurumi crochet pattern builds that balance with chunky velvet yarn, a 5.0 mm hook, 20 mm safety eyes, and a finished size near 23 cm. Use it as an intermediate display plush when a fantasy shelf needs height without a long horizontal tail.
The Design: What Makes Seafoam Different
This sea dragon uses a 36-stitch head plateau because the face must carry oversized eyes, a snout, cheeks, and shell details without collapsing inward. The body repeats the same medium plateau, then gains visual height from a cream belly patch instead of extra stuffing. Wings sit low on the back, while side fins replace standard ears; that keeps the profile aquatic rather than fire-dragon heavy. One common maker mistake is placing the wings too high, which hides the head spikes and makes the toy tip backward. A baby dragon crochet pattern can survive simple limbs, but a sea dragon crochet pattern needs fin spacing, tail direction, and eye timing planned before the head closes.
Project Info at a Glance
| Skill Level | Time | Finished Size | Hook | Best For |
|---|---|---|---|---|
| Intermediate | 5–6 hours | 23 cm seated | 5.0 mm | Display plush, fantasy nursery shelf, market-table sample |
Materials and Tools
Yarn
- Aqua blue — super bulky #6 velvet/chenille — 80 g — Bernat Blanket, Himalaya Dolphin Baby, or Premier Parfait Chunky
- Cream — super bulky #6 velvet/chenille — 35 g — belly, wing membranes, side fins
- Deep teal — super bulky #6 velvet/chenille — 20 g — spikes, wing borders, paw tips, fin edging
- Blush pink — super bulky #6 velvet/chenille scrap — 4 g — cheek patches
- Shell cream or peach — worsted cotton scrap — 5 g — shell appliqués
The yarn quantities are scaled for a medium chenille plush; published dragon references range from small kit amounts to larger #4 yarn builds, so this allocation sits between those data points. Source
Tools
- Hook 5.0 mm
- 20 mm glitter safety eyes
- Polyester stuffing
- Yarn needle
- Locking stitch markers
- Straight pins
- Embroidery thread in black
- Six to ten faux pearls, display-use only
- Optional: small shells or crocheted shell appliqués
A 5.0 mm hook is selected for the photo-matched chenille texture; chenille amigurumi guidance commonly places super bulky yarn at 5.0–6.0 mm for tight plush fabric. Source
Abbreviations
MR = magic ring; sc = single crochet; inc = 2 sc in same stitch; dec = invisible decrease; sl st = slip stitch; ch = chain; BLO = back loop only; st = stitch; R = round; Row = flat row.
Invisible decrease means inserting the hook through the front loops of the next 2 stitches, then completing 1 sc so the decrease line stays flat.
Pattern — Step by Step
Continuous spiral unless noted. Use a stitch marker at the first stitch of every round.
Head
Yarn: aqua blue — Source: Standard amigurumi math; comparable dragon references use 6 sc starts and 36-stitch shaping. Source
R1: 6 sc in MR (6)
R2: inc ×6 (12)
R3: (sc 1, inc) ×6 (18)
R4: (sc 2, inc) ×6 (24)
R5: (sc 3, inc) ×6 (30)
R6: (sc 4, inc) ×6 (36)
R7–R13: sc around (36)
R14: (sc 4, dec) ×6 (30)
R15: (sc 3, dec) ×6 (24)
R16: (sc 2, dec) ×6 (18)
R17: (sc 1, dec) ×6 (12)
R18: dec ×6 (6)
Place 20 mm eyes between R9 and R10, 8 stitches apart, before working R15. Stuff firmly after R15, then close through front loops.
Fasten off. Leave 15 cm tail.
Body
Yarn: aqua blue — Source: Standard amigurumi math; medium plateau selected for 23 cm seated plush.
R1: 6 sc in MR (6)
R2: inc ×6 (12)
R3: (sc 1, inc) ×6 (18)
R4: (sc 2, inc) ×6 (24)
R5: (sc 3, inc) ×6 (30)
R6: (sc 4, inc) ×6 (36)
R7–R14: sc around (36)
R15: (sc 4, dec) ×6 (30)
R16: (sc 3, dec) ×6 (24)
R17: sc around (24)
R18: (sc 2, dec) ×6 (18)
R19: (sc 1, dec) ×6 (12)
R20: dec ×6 (6)
Stuff the lower body more firmly than the neck area. Leave the top slightly compressible so the head sits flat.
Fasten off. Leave 45 cm tail for sewing.
Front Legs / Arms — Make 2
Yarn: deep teal for R1–R2, aqua blue for R3 onward — Source: Standard amigurumi math.
R1: 6 sc in MR (6)
R2: inc ×6 (12)
R3: (sc 1, inc) ×6 (18)
R4–R5: sc around (18)
R6: (sc 1, dec) ×6 (12)
R7–R10: sc around (12)
R11: dec ×6 (6)
Stuff only the paw and lower half. Leave the upper half flatter for sewing against the belly.
Fasten off. Leave 25 cm tail.
Back Legs — Make 2
Yarn: deep teal for R1–R2, aqua blue for R3 onward — Source: Standard amigurumi math.
R1: 6 sc in MR (6)
R2: inc ×6 (12)
R3: (sc 1, inc) ×6 (18)
R4: (sc 2, inc) ×6 (24)
R5–R7: sc around (24)
R8: (sc 2, dec) ×6 (18)
R9: (sc 1, dec) ×6 (12)
R10–R12: sc around (12)
R13: dec ×6 (6)
Stuff the foot firmly and the thigh lightly. Flatten the last round before sewing.
Fasten off. Leave 30 cm tail.
Toe Bumps — Make 12
Yarn: deep teal — Source: Standard amigurumi math.
R1: 6 sc in MR (6)
Pull the ring tight and do not stuff. Use three toe bumps per foot.
Fasten off. Leave 12 cm tail on each bump.
Side Fins / Ears — Make 2
Yarn: cream center, deep teal border — Source: Flat-row fin build; sea-dragon tail-fin and wing styling appears in mermaid dragon references. Source
Row1: ch 4, sc in second ch from hook and next 2 ch (3)
Row2: inc, sc 1, inc (5)
Row3: sc across (5)
Row4: inc, sc 3, inc (7)
Row5: sc across (7)
Border R1: with deep teal, work 18 sc evenly around the fin edge (18)
Fold the base inward by 1 cm so each fin cups forward.
Fasten off. Leave 25 cm tail.
Wings — Make 2
Yarn: cream membrane, deep teal border — Source: Flat-row wing build; public dragon references show separate wing structures and tail/wing styling. Source
Row1: ch 5, sc in second ch from hook and next 3 ch (4)
Row2: inc, sc 2, inc (6)
Row3: sc across (6)
Row4: inc, sc 4, inc (8)
Row5: sc across (8)
Row6: inc, sc 6, inc (10)
Row7: sc across (10)
Row8: sc across (10)
Border R1: with deep teal, work 24 sc evenly around outer edge (24)
Border R2: sc 5, ch 2, sl st in next st, sc 6, ch 2, sl st in next st, sc 6, ch 2, sl st in next st, sc 4 (24)
Do not stuff. Surface stitch two teal rib lines from the top edge to the lower scallops.
Fasten off. Leave 35 cm tail.
Head Spikes / Horns — Make 3
Yarn: deep teal — Source: Standard amigurumi math.
R1: 6 sc in MR (6)
R2: sc around (6)
R3: inc ×6 (12)
R4: sc around (12)
Stuff lightly. Pin one spike on the center top and two behind it before sewing.
Fasten off. Leave 20 cm tail.
Snout
Yarn: aqua blue — Source: Standard amigurumi math.
R1: 6 sc in MR (6)
R2: inc ×6 (12)
R3: sc around (12)
Stuff with a very small amount only. Flatten the lower edge before sewing so the snout sits wider than tall.
Fasten off. Leave 25 cm tail.
Cheek Patches — Make 2
Yarn: blush pink — Source: Standard amigurumi math.
R1: 6 sc in MR (6)
R2: inc ×6 (12)
Do not stuff. Flatten each circle and sew below the eye line.
Fasten off. Leave 18 cm tail.
Belly Patch
Yarn: cream — Source: Standard amigurumi math.
R1: 6 sc in MR (6)
R2: inc ×6 (12)
R3: (sc 1, inc) ×6 (18)
R4: (sc 2, inc) ×6 (24)
R5: (sc 3, inc) ×6 (30)
R6: sc around (30)
Block into a vertical oval with pins before sewing. Stretch gently from top to bottom, not side to side.
Fasten off. Leave 45 cm tail.
Tail
Yarn: aqua blue — Source: Standard amigurumi math; tail-fin concept informed by mermaid-dragon search data. Source
R1: 6 sc in MR (6)
R2: inc ×6 (12)
R3: (sc 1, inc) ×6 (18)
R4: (sc 2, inc) ×6 (24)
R5–R8: sc around (24)
R9: (sc 2, dec) ×6 (18)
R10–R15: sc around (18)
R16: (sc 1, dec) ×6 (12)
R17–R23: sc around (12)
R24: dec ×6 (6)
R25–R27: sc around (6)
Stuff the base firmly and the last 7 rounds lightly so the tail can curve rightward.
Fasten off. Leave 35 cm tail.
Tail Fin — Make 2
Yarn: aqua blue, deep teal border — Source: Flat-row fin build.
Row1: ch 4, sc in second ch from hook and next 2 ch (3)
Row2: inc, sc 1, inc (5)
Row3: inc, sc 3, inc (7)
Row4: sc across (7)
Row5: sc 2, dec, sc 3 (6)
Border R1: with deep teal, work 16 sc evenly around edge (16)
Place one fin on each side of the narrow tail tip.
Fasten off. Leave 20 cm tail.
Shell Appliqués — Make 3
Yarn: shell cream or peach cotton — Source: Standard amigurumi math.
R1: 6 sc in MR (6)
R2: inc ×6 (12)
R3: BLO sc around (12)
Flatten into a fan shape. Embroider 4 short vertical ridges from top center to lower edge.
Fasten off. Leave 20 cm tail.
Pearl Trim
Material: faux pearls — Source: photo-matched accessory detail.
Attach 6–10 faux pearls with doubled sewing thread: 2 near the head spikes, 2 along the upper body, and 2–6 along the tail curve. Skip pearls for child-handled toys.
Assembly
- Sew the head to the body with the body tail, passing through both pieces twice around the neck opening.
- Pin the snout centered between the eyes, with its top edge sitting 1 round below the eye line.
- Sew the cheek patches under the eyes, leaving 2 stitches between each patch and the snout.
- Attach the belly patch from body R5 to R16, keeping it centered over the front vertical line.
- Sew the front legs along the lower sides of the belly patch, angled inward by 10–15 degrees.
- Attach the back legs at the body base so the feet project forward and support the sitting pose.
- Sew the side fins to the head sides between R8 and R12, with the cream faces pointing forward.
- Attach the wings to the back of the body between R7 and R13, then tack the lower wing corners to stop sagging.
- Sew the tail to the lower back, curve it to the right, and add the two tail fins at the narrow tip.
- Add horns, toe bumps, shell appliqués, pearl trim, and embroidered mouth lines last.
The finished sea dragon sits with wings visible from the front and the tail wrapping to one side.
7 Technical Tips
- Stitch marker drift: A skipped first stitch shifts the snout line by 1–2 stitches before the face is closed. Move the marker into the first stitch of every round, not the turning gap between stitches.
- Stuffing firmness: A loose head caves around 20 mm eyes and makes the cheeks wrinkle. Pack the forehead until it compresses no more than 1 cm under thumb pressure.
- Invisible decrease: A normal decrease leaves bars across R14–R18 of the head. Work front-loop invisible decreases on every head and body decrease round.
- Eye placement timing: Late eye placement is the highest-risk failure on this build because the head closes quickly after R15. Insert the eyes between R9 and R10, 8 stitches apart, and check the snout width before locking washers.
- Velvet tension: Chenille gaps appear when the hook pulls loops taller than 6 mm. Tighten the working loop after every 6 stitches and use a 5.0 mm hook for this yarn weight.
- Wing pinning: Wings sewn only at the top edge fold backward within a day. Pin the upper corner, center back edge, and lower corner before sewing, with both wings mirrored at the same body rounds.
- Tail weaving: A tail attached with one surface pass can pull loose under the body weight. Weave the 35 cm tail through the body fabric, cross under the belly patch, and bury the final 12 cm inside stuffing.
Conclusion
This sea dragon build works because the large head, 36-stitch body, fin ears, shell appliqués, and side-curved tail are planned as one structure rather than added as separate decorations. Make the head first, then pin every feature before sewing the body parts in place. The next concrete step is to crochet the head through R14, place the eyes, and test the snout width before closing. Share the finished dragon on Pinterest and Instagram with the exact yarn, hook, and eye size so makers can compare scale. Use hashtag #SeaDragonAmigurumi. For this dragon amigurumi crochet pattern, would you place the center shell on the forehead or move it to the tail curve?









