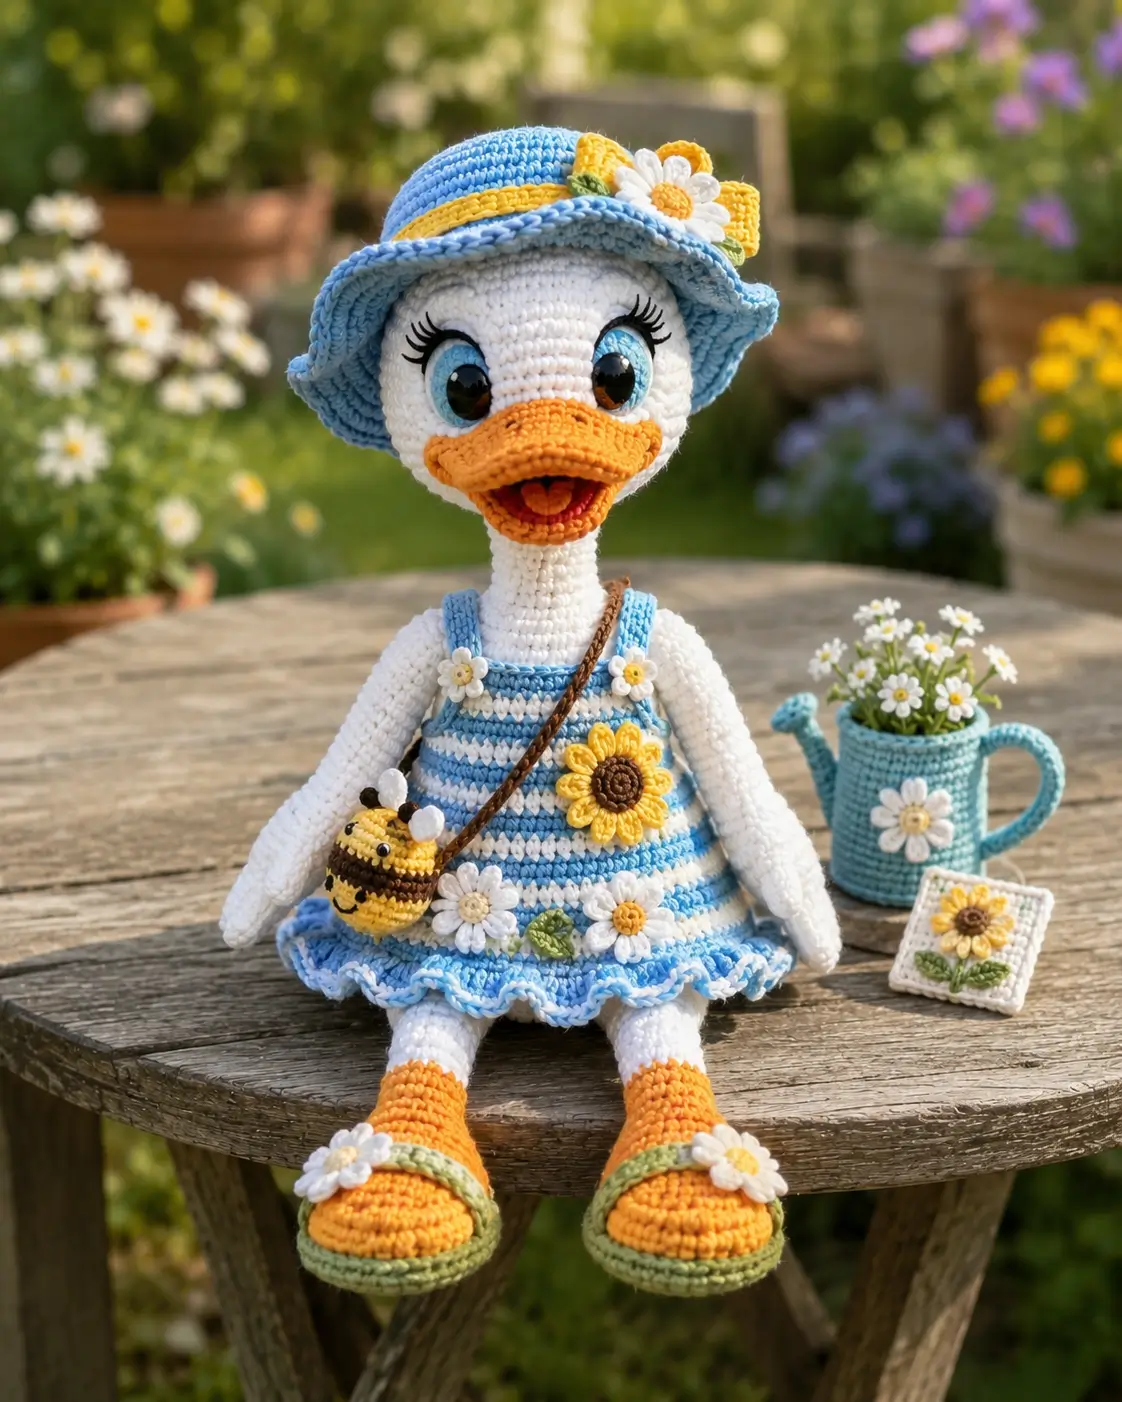
Ducks carry their faces on wide bills, so the bill has to steer the whole doll. This duck amigurumi crochet pattern builds a 24 cm garden duck with worsted yarn, a 3.5 mm hook, blue outfit pieces, and 10 mm safety eyes. Work it as an advanced-beginner project for display, shelf styling, or a spring market sample with clear parts.
The Design: What Makes This Garden Duck Different
The photo reads as a dressed character duck, not a simple round duckling. That changes the structure. The head needs a 42-stitch plateau so the eye discs, lashes, cheek patches, and wide bill have enough face width. The neck stays separate and firm because the hat adds weight above the head. A one-piece head-body build would collapse too easily here. The body is plain white under a removable blue-striped dress, which keeps the crochet duck amigurumi clean if the outfit shifts. The beak is split into upper bill, lower bill, and tongue so the open-mouth shape stays visible. A common mistake in a duck crochet pattern is making the bill too narrow; the face then looks like a chick instead of a duck.
Project Info at a Glance
| Skill Level | Time | Finished Size | Hook | Best For |
|---|---|---|---|---|
| Advanced beginner | 9–12 hours | 24 cm | 3.5 mm | Spring display, market table, garden-themed nursery shelf |
Materials and Tools
Yarn
- White — worsted weight — 85–100 g — Paintbox Simply Aran, Stylecraft Special Aran, or similar
- Orange — worsted weight — 20–25 g — bill, feet, cheek patches
- Sky blue — worsted weight — 35 g — dress, hat, eye discs, watering can
- Yellow — worsted weight — 10 g — flowers, bee body, hat accent
- Green — worsted weight — 8 g — sandal soles, leaves
- Brown — worsted weight — 5 g — bee strap and sunflower center
- Black — worsted weight or embroidery thread — 2 g — bee stripes, lashes
- Red — worsted weight scrap — tongue
Tools
- Hook 3.5 mm
- 10 mm black safety eyes
- Polyester stuffing
- Tapestry needle
- Stitch markers
- Straight pins
- Scissors
- Black embroidery thread for eyelashes
Abbreviations
MR = magic ring
sc = single crochet
inc = 2 sc in next stitch
dec = invisible single crochet decrease
sl st = slip stitch
ch = chain
BLO = back loop only
FLO = front loop only
R = round or row
Work invisible decrease through the front loops of the next two stitches to reduce bulk at the bill and head closures.
Pattern — Step by Step
Continuous spiral unless noted.
Blue Eye Discs — Make 2
Yarn: sky blue
R1: 6 sc in MR (6)
R2: inc ×6 (12)
R3: (sc, inc) ×6 (18)
Sl st to finish. Fasten off. Leave 12 cm tail.
Head — Make 1
Yarn: white
R1: 6 sc in MR (6)
R2: inc ×6 (12)
R3: (sc, inc) ×6 (18)
R4: (2 sc, inc) ×6 (24)
R5: (3 sc, inc) ×6 (30)
R6: (4 sc, inc) ×6 (36)
R7: (5 sc, inc) ×6 (42)
R8–R14: sc around (42)
R15: (5 sc, dec) ×6 (36)
R16: sc around (36)
R17: (4 sc, dec) ×6 (30)
R18: sc around (30)
R19: (3 sc, dec) ×6 (24)
R20: sc around (24)
Place blue eye discs between R10 and R13. Insert 10 mm safety eyes through the disc centers and head between R11 and R12, 8 stitches apart. Embroider lashes before attaching washers.
R21: (2 sc, dec) ×6 (18)
R22: (sc, dec) ×6 (12)
R23: dec ×6 (6)
Stuff firmly. Fasten off. Close the final hole and hide the tail.
Body — Make 1
Yarn: white
R1: 6 sc in MR (6)
R2: inc ×6 (12)
R3: (sc, inc) ×6 (18)
R4: (2 sc, inc) ×6 (24)
R5: (3 sc, inc) ×6 (30)
R6: (4 sc, inc) ×6 (36)
R7: (5 sc, inc) ×6 (42)
R8–R13: sc around (42)
R14: (5 sc, dec) ×6 (36)
R15: sc around (36)
R16: (4 sc, dec) ×6 (30)
R17: sc around (30)
R18: (3 sc, dec) ×6 (24)
R19: sc around (24)
R20: (2 sc, dec) ×6 (18)
R21: (sc, dec) ×6 (12)
R22: dec ×6 (6)
Stuff firmly. Fasten off and close.
Neck — Make 1
Yarn: white
R1: 6 sc in MR (6)
R2: inc ×6 (12)
R3: (sc, inc) ×6 (18)
R4–R13: sc around (18)
Stuff very firmly. Fasten off. Leave 30 cm tail.
Arms / Side Wings — Make 2
Yarn: white
R1: 6 sc in MR (6)
R2: inc ×6 (12)
R3: (sc, inc) ×6 (18)
R4–R12: sc around (18)
R13: (sc, dec) ×6 (12)
R14–R19: sc around (12)
R20: dec ×6 (6)
Stuff lightly at the top only. Fasten off. Leave 25 cm tail.
Back Legs and Orange Feet — Make 2
Yarn: orange, then white
R1: With orange, 6 sc in MR (6)
R2: inc ×6 (12)
R3: (sc, inc) ×6 (18)
R4: (2 sc, inc) ×6 (24)
R5–R7: sc around (24)
R8: (2 sc, dec) ×6 (18)
R9: sc around (18)
R10: (sc, dec) ×6 (12)
R11: Change to white, BLO sc around (12)
R12–R18: sc around (12)
R19: dec ×6 (6)
Stuff foot firmly and leg lightly. Fasten off. Leave 25 cm tail.
Upper Bill — Make 1
Yarn: orange
R1: 6 sc in MR (6)
R2: inc ×6 (12)
R3: (sc, inc) ×6 (18)
R4: (2 sc, inc) ×6 (24)
R5–R7: sc around (24)
R8: (2 sc, dec) ×6 (18)
R9: sc around (18)
Stuff lightly. Flatten into a wide oval. Fasten off. Leave 30 cm tail.
Lower Bill — Make 1
Yarn: orange
R1: 6 sc in MR (6)
R2: inc ×6 (12)
R3: (sc, inc) ×6 (18)
R4–R5: sc around (18)
R6: (sc, dec) ×6 (12)
Stuff lightly. Flatten. Fasten off. Leave 25 cm tail.
Tongue — Make 1
Yarn: red
R1: 6 sc in MR (6)
R2: inc ×6 (12)
R3: sc around (12)
Flatten into a small oval. Fasten off. Leave 10 cm tail.
Cheek Patches — Make 2
Yarn: orange
R1: 6 sc in MR (6)
R2: inc ×6 (12)
R3: (sc, inc) ×6 (18)
Sl st to finish. Fasten off. Leave 15 cm tail.
Dress Bodice — Make 1
Yarn: sky blue and white
R1: With sky blue, ch 42, join without twisting, sc around (42)
R2: sc around (42)
R3: Change to white, sc around (42)
R4: Change to sky blue, sc around (42)
R5: Change to white, sc around (42)
R6: Change to sky blue, sc around (42)
R7: sc around (42)
Fasten off. Weave in ends.
Dress Skirt and Ruffle — Make 1
Yarn: sky blue and white
Attach sky blue yarn to the lower edge of the bodice.
R1: (6 sc, inc) ×6 (48)
R2: sc around (48)
R3: (7 sc, inc) ×6 (54)
R4: Change to white, sc around (54)
R5: Change to sky blue, (8 sc, inc) ×6 (60)
R6: sc around (60)
R7: Change to white, sc around (60)
R8: Change to sky blue, (9 sc, inc) ×6 (66)
R9: (sl st, ch 2, sl st in next st) ×33 (66 base sts)
Fasten off. Weave in ends.
Dress Straps — Make 2
Yarn: sky blue
Row 1: ch 25, sc in 2nd ch from hook and across (24)
Row 2: ch 1, turn, sc across (24)
Fasten off. Leave 20 cm tail for sewing.
Sunhat Crown and Brim — Make 1
Yarn: sky blue
R1: 6 sc in MR (6)
R2: inc ×6 (12)
R3: (sc, inc) ×6 (18)
R4: (2 sc, inc) ×6 (24)
R5: (3 sc, inc) ×6 (30)
R6: (4 sc, inc) ×6 (36)
R7: (5 sc, inc) ×6 (42)
R8–R11: sc around (42)
R12: BLO, (6 sc, inc) ×6 (48)
R13: (7 sc, inc) ×6 (54)
R14: (8 sc, inc) ×6 (60)
R15: (9 sc, inc) ×6 (66)
R16: sc around (66)
R17: (sl st, ch 2, sl st in next st) ×33 (66 base sts)
Fasten off. Shape brim flat with pins before sewing flowers.
Hat Band — Make 1
Yarn: yellow
Row 1: ch 49, sc in 2nd ch from hook and across (48)
Row 2: ch 1, turn, sc across (48)
Fasten off. Sew around the hat crown above the brim.
Daisy Appliqués — Make 7
Yarn: yellow center, white petals
R1: With yellow, 6 sc in MR (6)
R2: Change to white, (sl st, ch 3, sl st in same st) ×6 (6 petal bases)
Fasten off. Make two for hat, three for dress, and one for each sandal.
Sunflower Appliqué — Make 1
Yarn: brown center, yellow petals
R1: With brown, 6 sc in MR (6)
R2: inc ×6 (12)
R3: Change to yellow, (sl st, ch 3, sl st in next st) ×6 (12 base sts)
Fasten off. Sew to the front right side of the dress.
Leaves — Make 3
Yarn: green
Row 1: ch 7, sc in 2nd ch from hook, hdc, dc, hdc, sc, sl st (6)
Fasten off. Leave 12 cm tail.
Bee Purse Body — Make 1
Yarn: yellow and black
R1: With yellow, 6 sc in MR (6)
R2: inc ×6 (12)
R3: (sc, inc) ×6 (18)
R4: Change to black, sc around (18)
R5: Change to yellow, sc around (18)
R6: Change to black, sc around (18)
R7: Change to yellow, (sc, dec) ×6 (12)
R8: dec ×6 (6)
Stuff lightly. Fasten off and close.
Bee Wings — Make 2
Yarn: white
R1: 6 sc in MR (6)
R2: inc ×6 (12)
Flatten. Fasten off. Leave 10 cm tail.
Bee Purse Strap — Make 1
Yarn: brown
Row 1: ch 61, sc in 2nd ch from hook and across (60)
Fasten off. Sew each end to the bee purse body.
Sandal Soles and Straps — Make 2 Sets
Yarn: green
Sole R1: 6 sc in MR (6)
Sole R2: inc ×6 (12)
Sole R3: (sc, inc) ×6 (18)
Sole R4: (2 sc, inc) ×6 (24)
Sole R5: sc around (24)
Fasten off. Leave 20 cm tail.
Strap Row 1: ch 17, sc in 2nd ch from hook and across (16)
Fasten off. Sew strap over orange foot. Add one daisy to each strap.
Optional Watering Can Prop — Make 1
Yarn: sky blue
Can R1: 6 sc in MR (6)
Can R2: inc ×6 (12)
Can R3: (sc, inc) ×6 (18)
Can R4: (2 sc, inc) ×6 (24)
Can R5–R8: sc around (24)
Can R9: (2 sc, dec) ×6 (18)
Can R10: (sc, dec) ×6 (12)
Can R11: dec ×6 (6)
Stuff lightly. Fasten off and close.
Spout R1: 6 sc in MR (6)
Spout R2–R8: sc around (6)
Do not stuff. Fasten off. Curve the tube before sewing.
Handle Row 1: ch 25, sc in 2nd ch from hook and across (24)
Sew handle to side of can and spout to opposite side.
Assembly
- Sew the stuffed neck to the top center of the body, using a full circle of whipstitches through R13 of the neck.
- Sew the head onto the neck, keeping the eyes centered over the front of the body.
- Sew the upper bill between the eyes across R12–R15 of the head.
- Sew the lower bill under the upper bill, then stitch the red tongue inside the open gap.
- Sew cheek patches beside the bill, with each patch touching the outer lower edge of the eye disc.
- Sew arms to the body at R15–R18, angled downward so the dress straps remain visible.
- Sew legs to the lower front body with 6 stitches between the inner ankles.
- Slide the dress onto the body, sew straps over the shoulders, and tack the skirt at the back only.
- Place the hat on the head, then sew through the lower crown at four points so the brim keeps its curve.
- Add flowers, leaves, sandals, bee purse, and optional watering can after pinning every piece for symmetry.
The finished doll is a seated white garden duck with removable-looking outfit structure and sewn decorative accessories.
7 Technical Tips
- Spiral drift: If the bill begins one stitch off center, the whole face turns sideways. Mark the center front on R1 of the head and keep a second marker between the eyes until the bill is sewn.
- Neck wobble: A loose neck will bend under the hat weight. Pack the neck to firm resistance and sew two full passes around both ends.
- Eye placement timing: Safety eyes must be added before R21 of the head closes. Set the posts between R11 and R12, 8 stitches apart, with the blue discs under the washers.
- Bill flattening: Overstuffing the bill makes a round muzzle instead of a duck bill. Use only a thin layer of stuffing, then flatten the upper bill to about 6 cm wide before sewing.
- Dress bulk: Thick seam stacks under the arms can push the wings outward. Keep dress tacks to four anchor points: center back, side left, side right, and front under the sunflower.
- Brim curl: A hat brim can wave unevenly if R12 is worked too tightly. Work the BLO brim round at normal tension and pin the brim to a flat 11–12 cm circle before adding flowers.
- Tail weaving: Short accessory tails can pull out during handling. Weave every flower and bee strap tail through at least 4 cm of nearby stitches before trimming.
Conclusion
This garden duck is built around three points: a wide open bill, a stable stuffed neck, and a fitted blue outfit that does not distort the body. Check the face before final assembly because the bill, cheek patches, and eye discs decide the character more than the dress does. Next, make one test daisy and one test sandal strap, then confirm the scale against the finished foot before sewing all appliqués. Save the project to Pinterest and share the finished duck on Instagram with the hashtag #GardenDuckAmigurumi. For the final pass on this duck amigurumi crochet pattern, would you keep the bee purse or replace it with a tiny flower basket?









