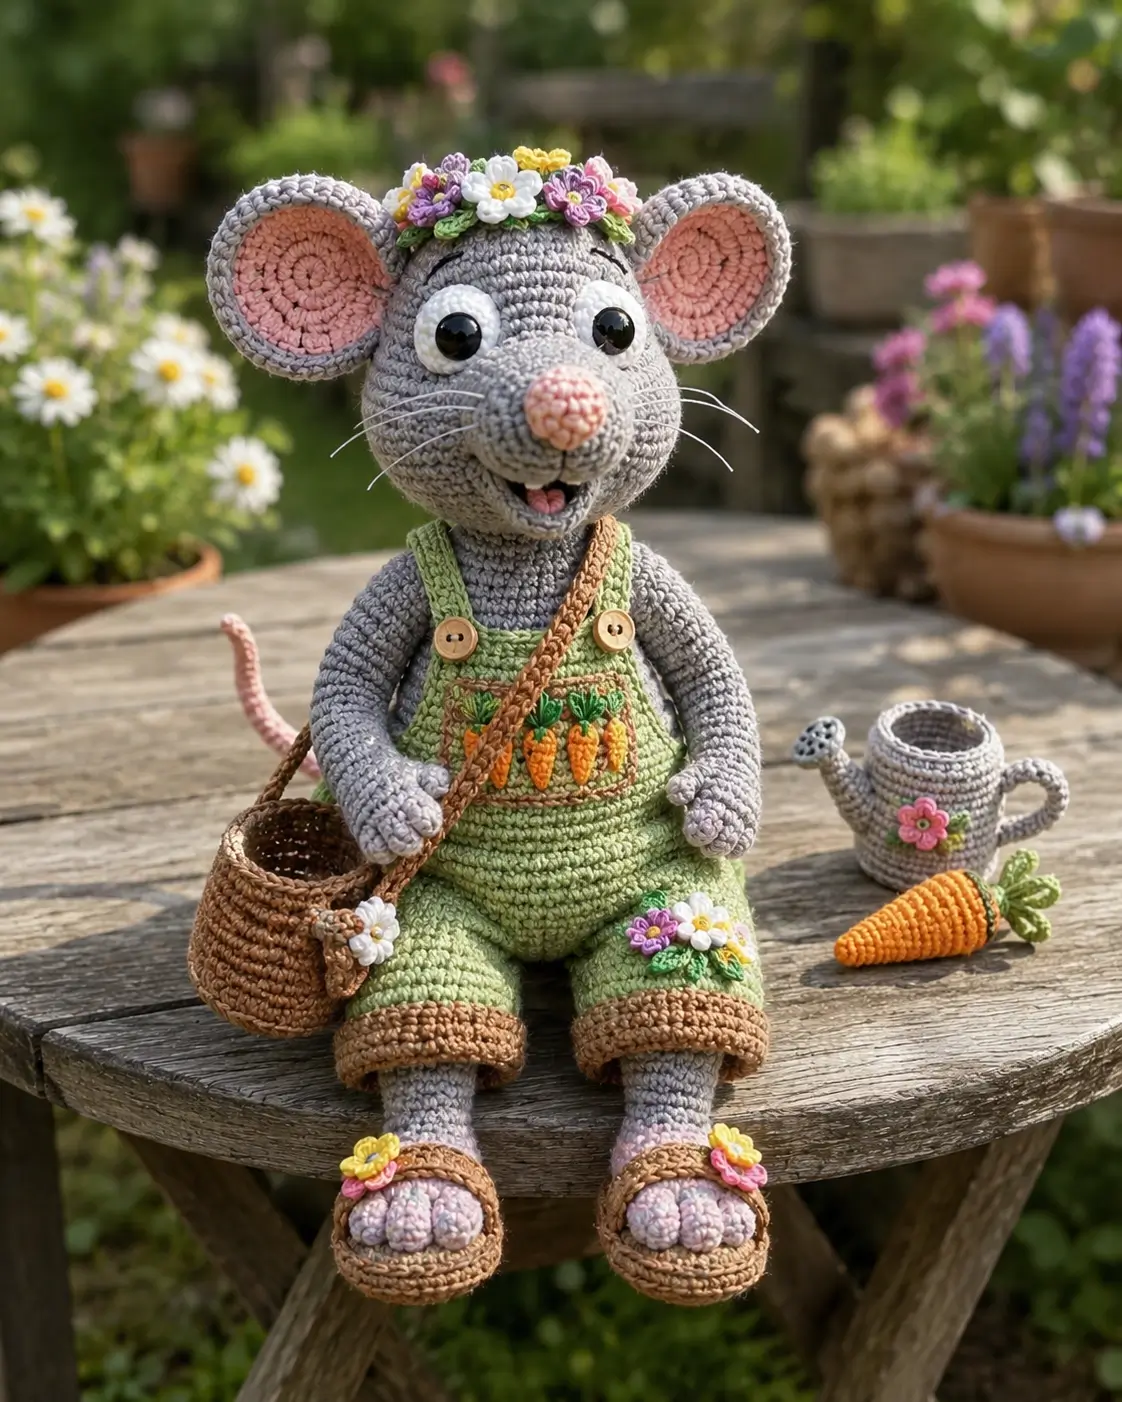
A mouse fails fast when the ears sit too low; the whole head turns into a bear. This mouse amigurumi crochet pattern solves that with a forward snout, high ear placement, and a seated 23 cm build using a 2.75 mm hook, cotton-style yarn, and intermediate shaping. It suits shelf display, spring market tables, or garden-themed nursery decor built around one character instead of a generic animal.
The Design: What Makes This Mouse Different
This mouse is not built like a rounded mini plush. The photographed doll uses a long face axis, wide circular ears, and a weighted seated lower half. Those three choices matter. The snout projects enough to separate mouse from bear. The ears sit high and wide, which keeps the silhouette readable even under a flower crown. The hips and thighs widen before the ankles narrow, giving the figure a planted seated pose instead of a tube body.
A common mistake with a crochet mouse doll pattern is overstuffing the muzzle and under-sizing the ears. That flattens the face and shortens the species cue. Another miss: attaching eyes too low on the snout line. In most successful gardener mouse amigurumi designs, the eyes sit above the snout mass, not inside it.
Project Info at a Glance
| Skill Level | Time | Finished Size | Hook | Best For |
|---|---|---|---|---|
| Intermediate | 10–14 hours | about 23–26 cm seated | 2.75 mm | display dolls, seasonal decor, gift makes |
Materials and Tools
Yarn
- Light gray — aran/light worsted cotton — about 50 g — DROPS Paris or similar reference class
- Blush pink — same weight — about 11 g for ears, nose, feet accents, and mouth details
- White — scrap amount — eye whites and flowers
- Sage green — 35–40 g — overalls
- Tan — 20 g — cuffs and sandals
- Brown — 20 g — basket strap and basket
- Orange — scrap amount — carrots
- Yellow / lilac / rose — scrap amounts — flowers
Tools
- Hook 2.75 mm
- Safety eyes 9 mm
- Polyester stuffing
- Tapestry needle
- Stitch markers
- Thin floral wire or monofilament for whiskers, optional
Abbreviations
MR / sc / inc / dec / sl st / ch / BLO / FLO / hdc / dc
Invisible decrease joins the front loops only, reducing bulk on the face and limbs where standard decreases leave a visible ridge.
Pattern — Step by Step
Continuous spiral unless noted.
Head (Make 1)
Yarn: light gray
R1: 6 sc in MR (6)
R2: inc x6 (12)
R3: (1 sc, inc) x6 (18)
R4: (2 sc, inc) x6 (24)
R5: (3 sc, inc) x6 (30)
R6: (4 sc, inc) x6 (36)
R7–12: sc around (36)
R13: (4 sc, dec) x6 (30)
R14: (3 sc, dec) x6 (24)
Insert safety eyes between R9 and R10, about 8 sts apart. Begin stuffing firmly.
R15: (2 sc, dec) x6 (18)
R16: (1 sc, dec) x6 (12)
R17: dec x6 (6)
Fasten off. Leave 15 cm tail.
Snout (Make 1)
Yarn: light gray
R1: 6 sc in MR (6)
R2: inc x6 (12)
R3: (1 sc, inc) x6 (18)
R4–5: sc around (18)
R6: (1 sc, dec) x6 (12)
Lightly stuff before closing to keep the muzzle rounded, not blunt.
Fasten off. Leave 20 cm tail.
Nose (Make 1)
Yarn: blush pink
R1: 6 sc in MR (6)
R2: (2 sc, inc) x2 (8)
R3: sc around (8)
Fasten off. Leave 12 cm tail.
Body (Make 1)
Yarn: light gray
R1: 6 sc in MR (6)
R2: inc x6 (12)
R3: (1 sc, inc) x6 (18)
R4: (2 sc, inc) x6 (24)
R5: (3 sc, inc) x6 (30)
R6: (4 sc, inc) x6 (36)
R7–10: sc around (36)
R11: (4 sc, dec) x6 (30)
R12: sc around (30)
R13: (3 sc, dec) x6 (24)
R14: sc around (24)
R15: (2 sc, dec) x6 (18)
Stuff the lower body firmly to stabilize the seated shape.
R16: sc around (18)
Fasten off. Leave 20 cm tail.
Arms / Front Legs (Make 2)
Yarn: blush pink, then light gray
R1: 6 sc in MR (6)
R2: (1 sc, inc) x3 (9)
R3: BLO sc around in blush pink (9)
Change to light gray.
R4–12: sc around (9)
R13: flatten opening, 4 sc through both layers (4)
Fasten off. Leave 18 cm tail.
Back Legs (Make 2)
Yarn: blush pink, then light gray
R1: 6 sc in MR (6)
R2: inc x6 (12)
R3: BLO sc around (12)
Change to light gray.
R4–8: sc around (12)
R9: (4 sc, dec) x2 (10)
R10–13: sc around (10)
Stuff foot firmly and leg lightly.
Flatten opening, 5 sc through both layers (5)
Fasten off. Leave 20 cm tail.
Ears (Make 2)
Yarn: light gray outer, blush pink inner
Outer ear:
R1: 6 sc in MR (6)
R2: inc x6 (12)
R3: (1 sc, inc) x6 (18)
R4: (2 sc, inc) x6 (24)
Fasten off.
Inner ear:
R1: 6 sc in MR (6)
R2: inc x6 (12)
R3: (1 sc, inc) x6 (18)
Fasten off.
Sew pink circle centered onto gray circle. Fold slightly at base when attaching.
Tail (Make 1)
Yarn: blush pink
Row 1: ch 19
Row 2: starting in 2nd ch from hook, 18 sc (18)
Fasten off. Leave 20 cm tail.
Mouth Insert / Tongue (Make 1)
Yarn: blush pink
R1: 4 sc in MR (4)
R2: inc x4 (8)
Fasten off. Fold slightly when sewing inside the mouth opening.
Cheek Patches (Make 2)
Yarn: white
R1: 6 sc in MR (6)
R2: inc x6 (12)
R3: (1 sc, inc) x6 (18)
Fasten off. Leave 12 cm tail.
Overalls Bib and Trousers (Make 1 set)
Yarn: sage green
Waist foundation: ch 26, join carefully.
Rnd 1–8: sc around (26)
Rnd 9: (11 sc, dec) x2 (24)
Rnd 10–13: sc around (24)
Bib panel, worked flat on front 10 sts:
Row 1–6: 10 sc, ch 1, turn (10)
Straps (2): attach yarn to upper bib corners, ch 18 each, sl st back along each strap.
Leg openings: divide body garment opening in half and work 12 sc around each leg opening for 3 rounds.
Cuffs: change to tan, 1 round sc in BLO, 1 round sc.
Fasten off.
Carrot Pocket Applique (Make 3)
Yarn: orange and green
R1: 4 sc in MR (4)
R2: (1 sc, inc) x2 (6)
R3: sc around (6)
R4: (1 sc, dec) x2 (4)
Fasten off orange.
Top leaves: join green, ch 3, sl st in same st, repeat twice.
Sew onto bib pocket area.
Flower Crown Flowers (Make 5–7 small flowers)
Yarn: white, yellow, lilac, rose
With flower color: MR, *(ch 2, 2 dc, ch 2, sl st)* x5 into ring.
Center: embroider yellow knot.
Leaf: ch 4, sl st back.
Sew flowers around a thin crocheted band sized to the head.
Basket (Make 1)
Yarn: brown
R1: 6 sc in MR (6)
R2: inc x6 (12)
R3: (1 sc, inc) x6 (18)
R4: BLO sc around (18)
R5–10: sc around (18)
Strap: ch 40, sl st back along chain.
Fasten off. Sew strap to basket.
Watering Can (Make 1)
Yarn: gray, tiny pink flower applique optional
Base R1: 6 sc in MR (6)
R2: inc x6 (12)
R3: (1 sc, inc) x6 (18)
R4–8: sc around (18)
R9: BLO sc around (18)
Handle: ch 14, attach both ends.
Spout: ch 8, sc back 7, sew angled to body.
Fasten off.
Carrot Accessory (Make 1)
Yarn: orange and green
R1: 4 sc in MR (4)
R2: (1 sc, inc) x2 (6)
R3: sc around (6)
R4: (2 sc, inc) x2 (8)
R5–8: sc around (8)
R9: (2 sc, dec) x2 (6)
Stuff lightly.
Top leaves: attach green, ch 5, sl st back x3.
Fasten off.
Sandals (Make 2)
Yarn: tan
Sole:
ch 7
Rnd 1: inc in 2nd ch, 4 sc, 3 sc in last ch, work opposite side 4 sc, inc in last (14)
Rnd 2: inc, 5 sc, inc x3, 5 sc, inc x2 (20)
Upper strap: attach across front third, ch 10, sew opposite side.
Ankle strap: ch 12, sew around heel edge.
Flower trim: add one tiny flower to each.
Assembly
- Sew the snout centered on the lower front of the head.
- Attach the nose to the front of the snout and embroider a short vertical mouth split.
- Sew the cheek patches beneath and slightly outside the eyes.
- Insert and secure whiskers on both sides of the snout.
- Sew ears high on the head, angled outward, with the lower edges roughly aligned to the eye tops.
- Join head to body with the chin pitched slightly forward.
- Sew arms at the upper sides of the body and back legs low and forward for the seated pose.
- Attach the tail at the rear center, just below the trouser line.
- Dress the mouse in the overalls, then add bib carrots, floral appliques, sandals, basket strap, and flower crown.
- Place the watering can and carrot as separate props or tack them lightly to the hands for display.
The build is complete when the doll sits without rolling backward and the ear line remains visible above the flower crown.
7 Technical Tips
- Mark the first stitch of every round on the head through R14. Losing one stitch before the plateau throws the eye spacing off-center by 1–2 stitches.
- Stuff the snout to medium firmness only. Overfilling pushes the nose upward and collapses the mouth opening below it.
- Work invisible decreases on the face and ankles. Standard decreases leave a seam ridge that reads clearly under cotton yarn.
- Insert eyes before the head drops below 24 stitches. Waiting until 18 stitches makes the washers hard to place cleanly.
- Pin both ears before sewing and check the distance from each eye. A 1-stitch difference is visible on a mouse because the ears are oversized.
- Keep the lower body firmer than the chest. Soft stuffing in the hips makes the seated doll slump and pushes the overalls out of shape.
- Weave every accessory tail at least 3 direction changes. Basket straps, sandal flowers, and bib appliques loosen first because they sit on high-contact edges.
Conclusion
This mouse amigurumi crochet pattern works because the species markers are handled first: high ears, a projecting snout, and a slim tail. After that, the garden styling does the rest. Build the head and body, check the seated balance, then add the overalls and props in layers instead of rushing the finish. Pin one front view and one side view to Pinterest, then post the finished mouse on Instagram with the clothing details called out in the caption. Use #GardenMouseAmigurumi. One useful next test remains: did you place the ears high enough that the flower crown still leaves their full curve visible?









