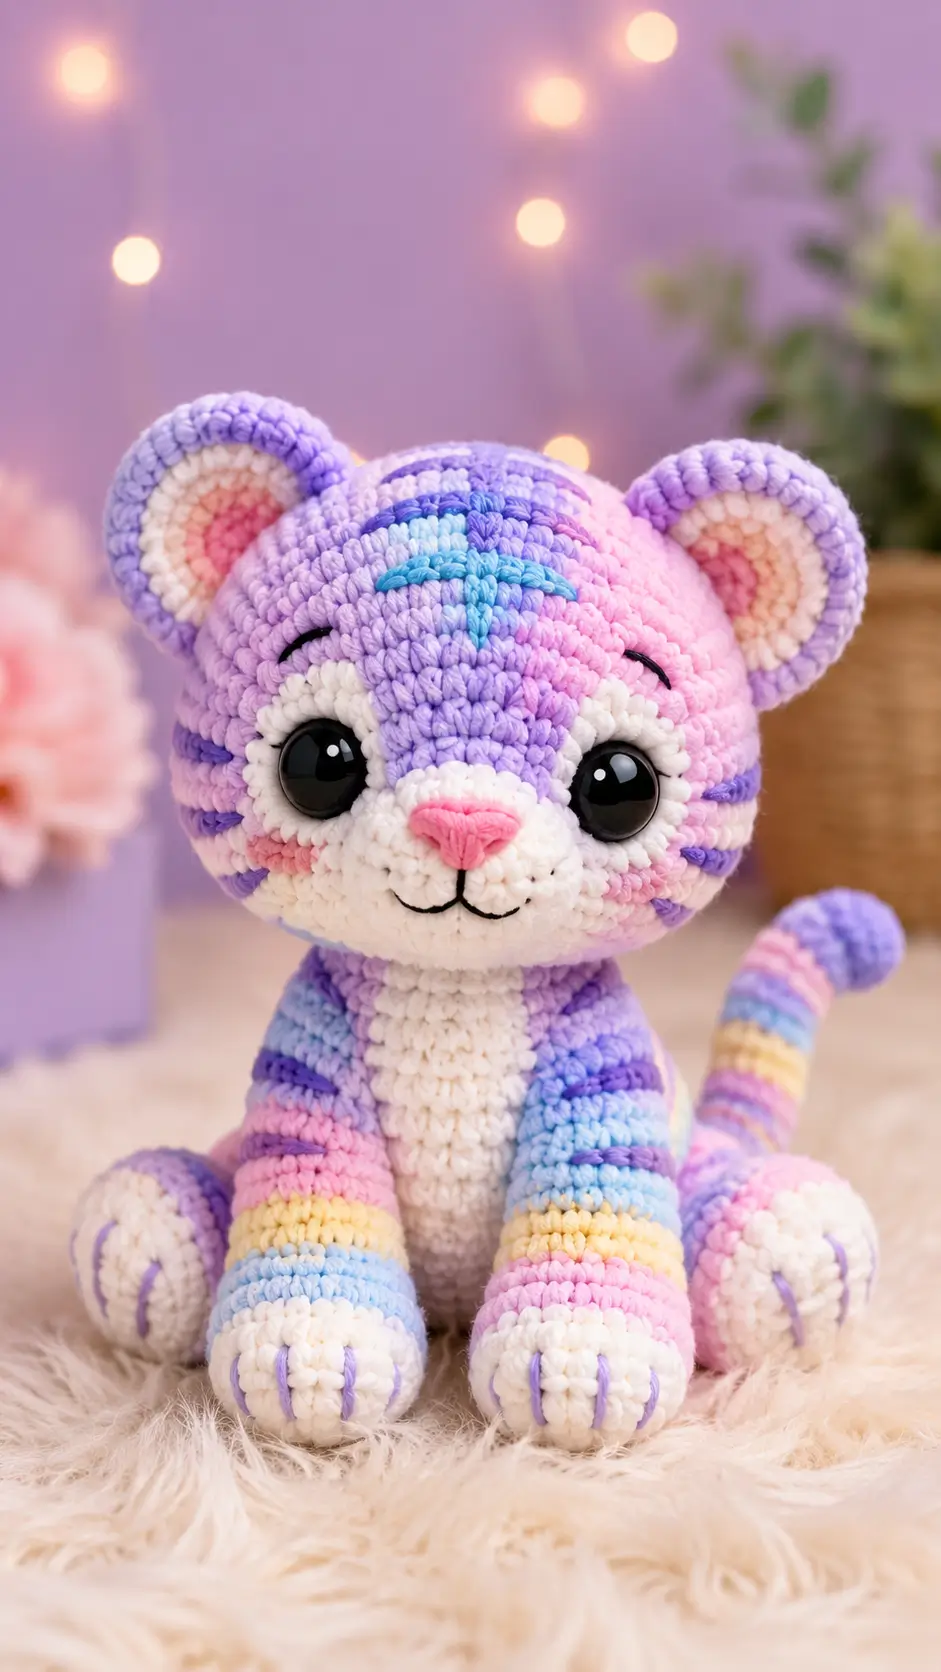
A tiger without orange still needs stripe logic before it reads as a tiger. This tiger amigurumi crochet pattern builds a 17 cm pastel plush cub with velvet yarn, a 4 mm hook, 12 mm eyes, and intermediate-level shaping. You will make a seated toy with cheek patches, rounded ears, a striped tail, and a stable body that works well for nursery shelves, market tables, or photo props.
The Design: What Makes This Pastel Tiger Different
Pastel yarn changes the usual tiger structure. The stripes cannot depend on black contrast alone, so this pastel tiger crochet pattern uses embroidered lavender and blue marks over a variegated body. That keeps the face readable without cutting the head into hard color blocks. The muzzle is sewn on as a raised oval because a flat embroidered nose sinks into velvet stitches. Proportion matters, too. The head is wider than the body, but the body keeps the same 36-stitch plateau so the toy sits instead of tipping forward. The maker adds back legs as separate rounded pads, then uses tail placement as a rear support point. A common mistake in a rainbow tiger amigurumi is making all stripes equal. Real tiger markings need uneven spacing. Small marks. Longer face lines. A broken forehead cluster.
Project Info at a Glance
| Skill Level | Time | Finished Size | Hook | Best For |
|---|---|---|---|---|
| Advanced beginner to intermediate | 1–2 days | About 17 cm seated | 4.0 mm | Plush tiger cub crochet with embroidered markings |
Comparable plush tiger cub patterns use 3.5–4 mm hooks, 12 mm safety eyes, and about 50 g of main plush yarn; larger or finer-yarn tiger patterns report different final sizes.
Materials and Tools
Yarn
- Pastel rainbow velvet yarn — chunky/chenille — 50 g — Himalaya Dolphin Baby, YarnArt Dolce, or similar plush yarn.
- White velvet yarn — chunky/chenille — 18–25 g — for muzzle, belly, paw fronts, and inner face patches.
- Pink velvet or worsted scrap — 2 g — for nose and cheek circles.
- Lavender, blue, and yellow scraps — 3–5 g total — for embroidered stripes and forehead marks.
- Black embroidery cotton — 1 m — for brows and mouth.
Tools
- Hook 4.0 mm
- 12 mm safety eyes
- Polyester stuffing
- Yarn needle
- Stitch markers
- Pins
- Scissors
- Embroidery needle
Safety eyes are not suitable for toys intended for babies or children who may chew small parts; embroidered eyes are the safer substitute in that use case.
Abbreviations
- MR = magic ring
- sc = single crochet
- inc = increase, 2 sc in one stitch
- dec = invisible decrease
- sl st = slip stitch
- ch = chain
- BLO = back loop only
Invisible decrease works through the front loops of the next two stitches before the final pull-through; it reduces visible holes on closing rounds.
Pattern — Step by Step
Continuous spiral unless noted. Counts are shown at the end of every round.
Head
Yarn: pastel rainbow velvet
R1: 6 sc in MR (6)
R2: inc ×6 (12)
R3: (sc, inc) ×6 (18)
R4: (2 sc, inc) ×6 (24)
R5: (3 sc, inc) ×6 (30)
R6: (4 sc, inc) ×6 (36)
R7–R12: sc around (36)
R13: (4 sc, dec) ×6 (30)
R14: sc around (30)
R15: (3 sc, dec) ×6 (24)
R16: sc around (24)
R17: (2 sc, dec) ×6 (18)
Insert 12 mm eyes between R10 and R11, 8 stitches apart. Check the muzzle position before pressing washers on.
R18: (sc, dec) ×6 (12)
Stuff firmly through the lower opening. Add small amounts at the cheeks so the eyes do not sink.
R19: dec ×6 (6)
Fasten off. Leave 20 cm tail and close the final hole.
Body
Yarn: pastel rainbow velvet
R1: 6 sc in MR (6)
R2: inc ×6 (12)
R3: (sc, inc) ×6 (18)
R4: (2 sc, inc) ×6 (24)
R5: (3 sc, inc) ×6 (30)
R6: (4 sc, inc) ×6 (36)
R7–R10: sc around (36)
R11: (4 sc, dec) ×6 (30)
R12–R13: sc around (30)
R14: (3 sc, dec) ×6 (24)
R15: sc around (24)
R16: (2 sc, dec) ×6 (18)
R17: (sc, dec) ×6 (12)
Stuff the lower body more firmly than the neck. A dense base keeps the oversized head upright.
R18: dec ×6 (6)
Fasten off. Leave 25 cm tail.
White Belly Patch
Yarn: white velvet
R1: 6 sc in MR (6)
R2: inc ×6 (12)
R3: (sc, inc) ×6 (18)
R4: (2 sc, inc) ×6 (24)
R5: sc around (24)
Fasten off. Leave 30 cm tail. Flatten into an oval while sewing.
Muzzle
Yarn: white velvet
R1: 6 sc in MR (6)
R2: inc ×6 (12)
R3: (sc, inc) ×6 (18)
R4–R5: sc around (18)
Add a thin layer of stuffing only in the center. The edges should sit flat against the head.
Fasten off. Leave 35 cm tail.
Cheek Patches
Yarn: pale pink
R1: 6 sc in MR (6)
R2: inc ×6 (12)
Sl st to first stitch.
Fasten off. Leave 20 cm tail. Make 2.
Ears
Yarn: pastel rainbow velvet for outer ears; white or pale pink for inner ears
Outer ear, make 2:
R1: 6 sc in MR (6)
R2: inc ×6 (12)
R3: (sc, inc) ×6 (18)
R4: (2 sc, inc) ×6 (24)
R5: sc around (24)
R6: (2 sc, dec) ×6 (18)
Do not stuff. Flatten the lower edge before sewing.
Fasten off. Leave 30 cm tail.
Inner ear, make 2:
R1: 6 sc in MR (6)
R2: inc ×6 (12)
R3: (sc, inc) ×6 (18)
Fasten off. Sew one inner circle to each outer ear.
Front Legs
Yarn: white for paw rounds, then pastel rainbow velvet
Make 2.
R1: 6 sc in MR with white (6)
R2: inc ×6 (12)
R3: (sc, inc) ×6 (18)
R4: BLO sc around (18)
R5–R6: sc around (18)
R7: (sc, dec) ×6 (12)
Change to pastel rainbow yarn.
R8–R14: sc around (12)
Stuff the paw firmly and the upper leg lightly. Embroider two lavender claw lines over R2–R4 after assembly.
Fasten off. Leave 30 cm tail.
Back Legs
Yarn: white for paw rounds, then pastel rainbow velvet
Make 2.
R1: 6 sc in MR with white (6)
R2: inc ×6 (12)
R3: (sc, inc) ×6 (18)
R4: (2 sc, inc) ×6 (24)
R5: BLO sc around (24)
R6–R7: sc around (24)
R8: (2 sc, dec) ×6 (18)
R9: sc around (18)
R10: (sc, dec) ×6 (12)
R11: sc around (12)
Stuff the front half of each foot firmly. Leave the upper back edge soft so it sits against the body.
Fasten off. Leave 35 cm tail.
Tail
Yarn: pastel rainbow velvet with lavender, blue, pink, and yellow stripe changes
R1: 6 sc in MR (6)
R2: inc ×6 (12)
R3–R4: sc around in pale tip color (12)
R5–R6: sc around in pastel lavender (12)
R7–R8: sc around in pale pink (12)
R9–R10: sc around in blue (12)
R11–R12: sc around in yellow (12)
R13–R14: sc around in pastel lavender (12)
R15–R20: sc around in main pastel yarn (12)
Stuff lightly every 4 rounds. Do not overfill; a hard tail pulls the body backward.
Fasten off. Leave 40 cm tail for sewing.
Nose and Mouth Embroidery
Yarn: pink for nose, black for mouth
Place the pink nose across the center of the muzzle, 5 stitches wide and 2 rounds tall. Work horizontal satin stitches first, then one vertical stitch down the center. With black thread, bring the mouth down 2 rounds from the nose point, then split into two short curves. Keep both curves within the lower half of the muzzle.
Forehead Stripes, Cheek Stripes, and Brows
Yarn: blue, lavender, and black embroidery scraps
Add one blue vertical forehead line from head R7 to R10. Add two shorter diagonal blue lines on each side over R8–R10. Place lavender cheek stripes on both sides of the head, starting behind each eye and angling toward R13. Add black curved brows above the eyes between R8 and R9. Each brow should span about 4 stitches.
Assembly
- Pin the head to the closed top of the body with the face centered over the belly side.
- Sew the head to the body using the body yarn tail, passing through both pieces twice for neck strength.
- Pin the white belly patch to the front of the body from R6 to R15.
- Sew the muzzle between the eyes, with its top edge just below the eye line.
- Add the pink nose, black mouth, cheek patches, forehead stripes, side stripes, and brows.
- Sew the ears to the head between R5 and R9, with inner ears facing forward.
- Attach the front legs to the body sides from R8 to R13.
- Attach the back legs low on the body so the white paws point forward.
- Sew the tail to the back of the body between R9 and R12, curving it to one side.
- Add paw claw stitches, weave in all tails, and trim only after tug-testing each seam.
The finished tiger sits with the tail acting as a rear balance point.
7 Technical Tips
- Eye placement failure mode: uneven face. Place the 12 mm eyes between R10 and R11, exactly 8 stitches apart, before locking the washers.
- Stuffing failure mode: collapsed cheeks. Add pea-sized stuffing pieces behind each eye socket before closing R19 so the muzzle does not flatten the face.
- Stitch-marker failure mode: drifting stripes. Move the marker at the end of every round, especially on the head, or the forehead line will lean.
- Invisible decrease failure mode: visible holes. On R17–R19 of the head, work through front loops only and pull the decrease snug before the next stitch.
- Velvet tension failure mode: loose gaps. Use a 4.0 mm hook with chunky velvet and keep each sc compact; loose loops expose stuffing faster on pastel yarn.
- Pinning failure mode: twisted sitting pose. Pin both back legs at four points before sewing: top, bottom, inner side, and outer side.
- Tail weaving failure mode: weak rear support. Leave a 40 cm tail yarn end and anchor through the body three times so the curved tail does not pull loose.
Conclusion
Block the ears, check the eye line, then photograph the tiger from a low front angle so the forehead stripes stay visible. This tiger amigurumi crochet pattern works best when the pastel yarn is treated as the base color and the tiger identity comes from controlled embroidery. The next step is to make a small yarn card with the exact stripe colors before starting a second cub. Share the finished toy on Pinterest and Instagram with the hashtag #PastelTigerAmigurumi. Which marking makes this cub read most clearly as a tiger: the blue forehead cluster, the cheek stripes, or the curved tail bands?









