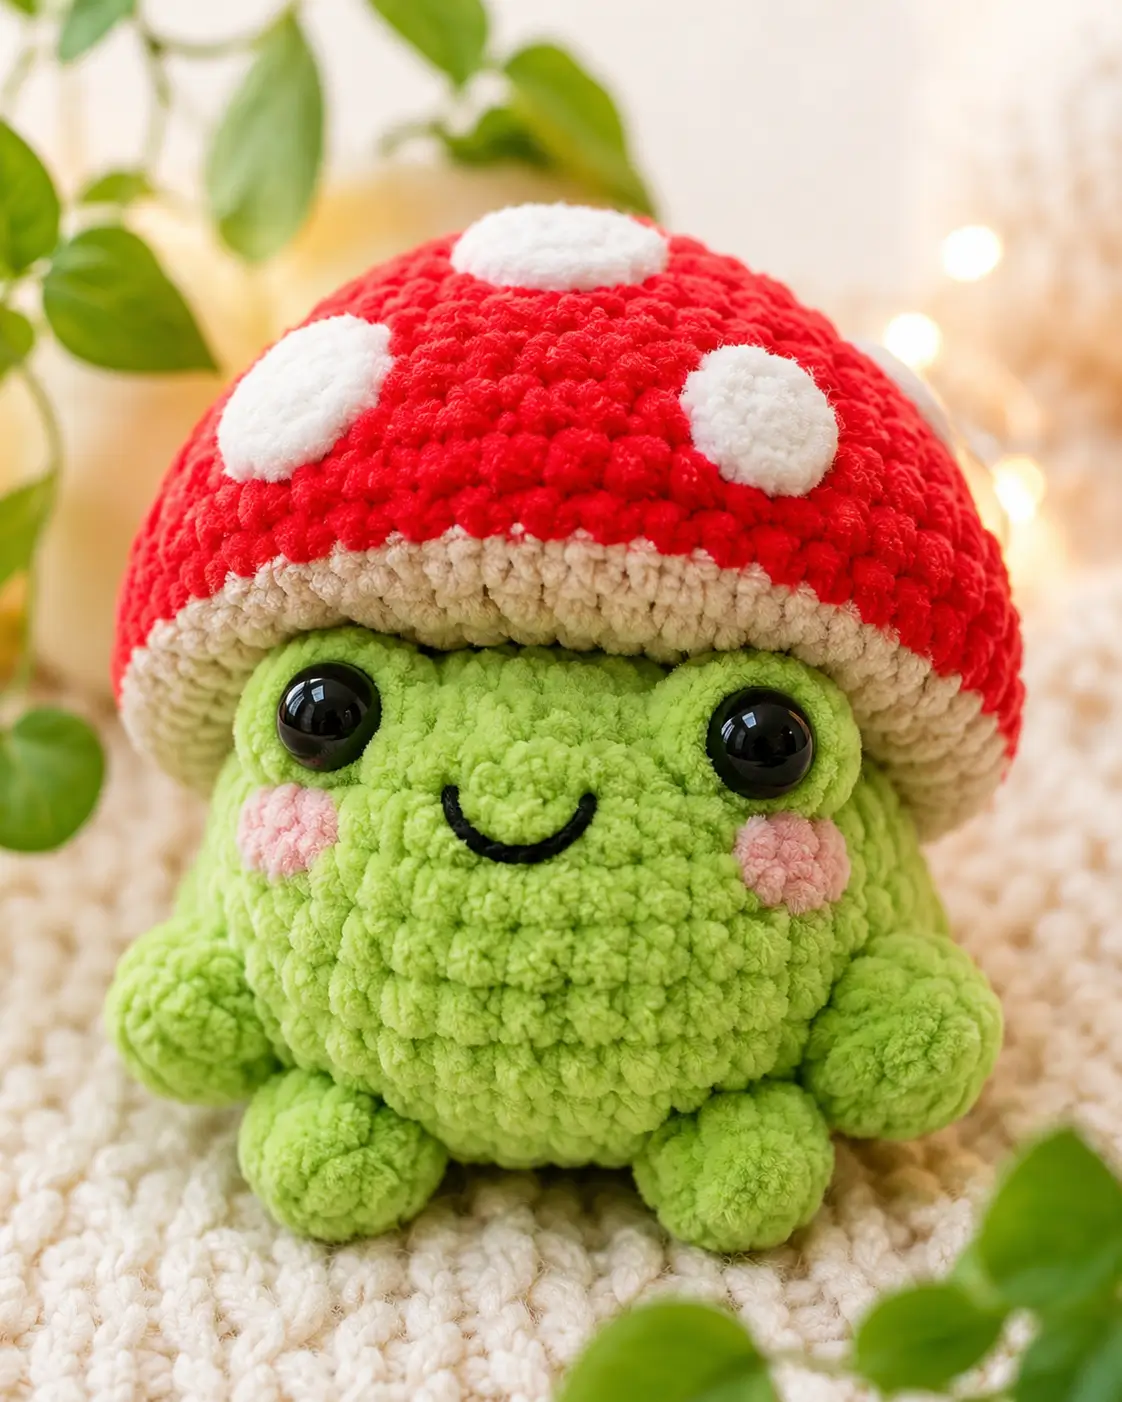
The mushroom cap must overhang the frog’s eyes without hiding them. This mushroom frog amigurumi pattern uses super bulky chenille, a 5 mm hook, and 10 mm safety eyes to make an 11 cm seated plush at easy-to-intermediate level. Make it for market-table woodland stock because the red cap, cream brim, and green body read clearly from one shelf away.
The Design: What Makes This Mushroom Frog Different
This design uses a separate head and body rather than a single pear shape, because the photo shows a broad face tucked under a cap and a smaller round base below it. The head holds the eyes, cheeks, and smile; the body only carries balance. The hat is built as a shallow red dome with a cream brim. That brim hides the join line and gives the cap enough width to look like a toadstool instead of a beanie. Cheek patches are sewn as flat circles, not embroidered dots, because chenille swallows small stitches. A common mistake in a frog with mushroom hat crochet pattern is placing the eyes too low; the cap then turns the face into a strip. The maker should pin the hat first. This chunky frog crochet pattern keeps eye centers one round below the brim.
Project Info at a Glance
| Skill Level | Time | Finished Size | Hook | Best For |
|---|---|---|---|---|
| Easy to intermediate | 4–5 hours | 11 cm | 5 mm | Woodland plush stock and shelf display |
The 11 cm size and 5 mm hook match the Ravelry super bulky mushroom frog data; the 4–5 hour timing aligns with a larger mushroom-frog listing rather than the smallest no-sew versions.
Materials and Tools
Yarn
- Lime green — super bulky chenille — 1 × 100 g skein supply, about 55 g used — Himalaya Dolphin Baby or YarnArt Dolce.
- Red — super bulky chenille — 1 × 100 g skein supply, about 35 g used — Himalaya Dolphin Baby or YarnArt Dolce.
- Cream — super bulky chenille — 1 × 100 g skein supply, about 22 g used — for the mushroom brim.
- White — super bulky chenille — about 10 g — for cap spots.
- Pale pink — super bulky chenille — about 4 g — for cheek patches.
- Black — sport cotton or embroidery thread — small length — for the smile.
Tools
- Hook 5 mm
- 10 mm safety eyes, one pair
- Polyester stuffing
- Yarn needle
- Stitch markers
- Sewing pins
- Scissors
- Black embroidery needle
Abbreviations
MR = magic ring; sc = single crochet; inc = increase; dec = decrease; sl st = slip stitch; ch = chain; BLO = back loop only; FLO = front loop only; st = stitch; R = round.
For invisible decrease, insert the hook through the front loops of the next two stitches, yarn over, pull through both front loops, yarn over, and finish the single crochet.
Pattern — Step by Step
Continuous spiral unless noted. Count every round before moving on.
Head
Yarn: lime green.
R1: 6 sc in MR (6)
R2: inc ×6 (12)
R3: (sc, inc) ×6 (18)
R4: (2 sc, inc) ×6 (24)
R5: (3 sc, inc) ×6 (30)
R6: (4 sc, inc) ×6 (36)
R7: sc around (36)
R8: sc around (36)
R9: sc around (36)
R10: sc around (36)
R11: sc around (36)
R12: sc around (36)
R13: (4 sc, dec) ×6 (30)
R14: (3 sc, dec) ×6 (24)
R15: (2 sc, dec) ×6 (18)
Insert safety eyes between R9 and R10, about 8 stitches apart. Stuff firmly before the final decrease rounds.
R16: (sc, dec) ×6 (12)
R17: dec ×6 (6)
Fasten off. Leave 20 cm tail.
Body
Yarn: lime green.
R1: 6 sc in MR (6)
R2: inc ×6 (12)
R3: (sc, inc) ×6 (18)
R4: (2 sc, inc) ×6 (24)
R5: (3 sc, inc) ×6 (30)
R6: sc around (30)
R7: sc around (30)
R8: sc around (30)
R9: (3 sc, dec) ×6 (24)
R10: (2 sc, dec) ×6 (18)
Stuff the lower body firmly enough to sit flat.
R11: (sc, dec) ×6 (12)
R12: dec ×6 (6)
Fasten off. Leave 25 cm tail.
Eye Domes / Frog Ear-Position Bumps — Make 2
Yarn: lime green.
R1: 6 sc in MR (6)
R2: inc ×6 (12)
R3: sc around (12)
R4: (sc, dec) ×4 (8)
Do not overstuff. The dome should sit behind the safety eye without lifting the cap brim.
Fasten off. Leave 18 cm tail.
Arms / Front Legs — Make 2
Yarn: lime green.
R1: 6 sc in MR (6)
R2: inc ×6 (12)
R3: sc around (12)
R4: sc around (12)
R5: sc around (12)
R6: dec ×6 (6)
Stuff only the paw end. Flatten the open edge before sewing.
Fasten off. Leave 18 cm tail.
Back Legs — Make 2
Yarn: lime green.
R1: 6 sc in MR (6)
R2: inc ×6 (12)
R3: (sc, inc) ×6 (18)
R4: sc around (18)
R5: sc around (18)
R6: (sc, dec) ×6 (12)
R7: dec ×6 (6)
Stuff lightly. Shape each leg as a low oval so the frog sits instead of tipping forward.
Fasten off. Leave 20 cm tail.
Cream Mushroom Brim / Underside
Yarn: cream.
R1: 6 sc in MR (6)
R2: inc ×6 (12)
R3: (sc, inc) ×6 (18)
R4: (2 sc, inc) ×6 (24)
R5: (3 sc, inc) ×6 (30)
R6: (4 sc, inc) ×6 (36)
R7: sc BLO around (36)
R8: (5 sc, inc) ×6 (42)
Keep this piece flat. It should extend beyond the head by about 1 cm on each side.
Fasten off. Leave 30 cm tail.
Red Mushroom Cap
Yarn: red.
R1: 6 sc in MR (6)
R2: inc ×6 (12)
R3: sc around (12)
R4: (sc, inc) ×6 (18)
R5: sc around (18)
R6: (2 sc, inc) ×6 (24)
R7: sc around (24)
R8: (3 sc, inc) ×6 (30)
R9: sc around (30)
R10: (4 sc, inc) ×6 (36)
R11: sc around (36)
R12: (5 sc, inc) ×6 (42)
R13: sc around (42)
R14: sc around (42)
Place the red cap over the cream brim with wrong sides together. Add a shallow layer of stuffing between pieces.
R15: sc through both red cap and cream brim around (42)
Fasten off. Leave 35 cm tail for sewing the hat to the head.
White Cap Spots — Make 4
Yarn: white.
Large spots, make 2:
R1: 6 sc in MR (6)
R2: inc ×6 (12)
Fasten off. Leave 15 cm tail.
Small spots, make 2:
R1: 6 sc in MR (6)
Fasten off. Leave 15 cm tail.
Place one large spot near the top center, one large spot toward the left front, and two small spots offset on the right and back curve.
Cheek Patches — Make 2
Yarn: pale pink.
R1: 6 sc in MR (6)
R2: inc ×6 (12)
Do not stuff. Sew as flat circles two rounds below the eyes.
Fasten off. Leave 15 cm tail.
Smile Embroidery
Yarn: black sport cotton or embroidery thread.
Bring the needle up between R11 and R12 of the head, centered between the eyes. Make a shallow U-shaped smile about 5 stitches wide. Anchor the bottom point one round lower. Knot inside the head if still open, or bury the knot through the back of the head with a long needle.
Assembly
- Sew the head to the body with the body opening centered under the head closing ring.
- Pin the mushroom brim to the head before sewing anything else.
- Sew the mushroom cap to the head around the cream brim, keeping the front edge just above the eye line.
- Attach the eye domes behind the safety eyes if the face needs extra lift.
- Sew the cheek patches two rounds below the eyes and slightly outside the smile ends.
- Embroider the smile after the cheeks are pinned, not before.
- Sew the front legs to the lower sides of the head-body join.
- Sew the back legs to the front lower body so they form a stable sitting base.
- Sew the white cap spots to the red cap, spacing them unevenly for a fly agaric look.
- Weave all tails through stuffed sections and trim only after the seams have been tension-tested.
The finished plush is a seated frog under a fixed toadstool cap.
7 Technical Tips
- Eye placement failure mode: hidden eyes. Keep the eye centers one round below the cream brim; lower placement makes the face look compressed.
- Stuffing failure mode: tilted body. Pack the body base firmer than the head, especially across R6–R8 where the sitting shape forms.
- Invisible decrease failure mode: visible gaps. On chenille, loose decreases create dark holes, so tighten each dec before starting the next stitch.
- Stitch marker failure mode: drifting cap spots. Move the marker every round on the red cap; a one-stitch drift at R12 shifts the top spot off center.
- Velvet tension failure mode: worming loops. Hold chenille with shorter yarn travel, and avoid pulling old rounds after the stitch is complete.
- Pinning failure mode: crooked brim. Use at least eight pins around the cream brim before sewing; four pins are not enough for a 42-st circle.
- Tail weaving failure mode: loose limbs. Weave each limb tail through the body twice over a 2 cm path before trimming.
Conclusion
Keep the cap wide, the face high, and the limbs small. Those three controls make this mushroom frog read as a toadstool character rather than a plain frog in a hat. Block the cream brim with pins before the final seam, then photograph the plush at eye level so the white spots stay visible. The next step is to make a second cap in brown, pink, or blue and compare how the spot size changes the silhouette. Save the mushroom frog amigurumi pattern to Pinterest and post the finished frog on Instagram with #MushroomFrog. Which cap spot layout looks most like a real fly agaric: one large center spot or three offset spots?









