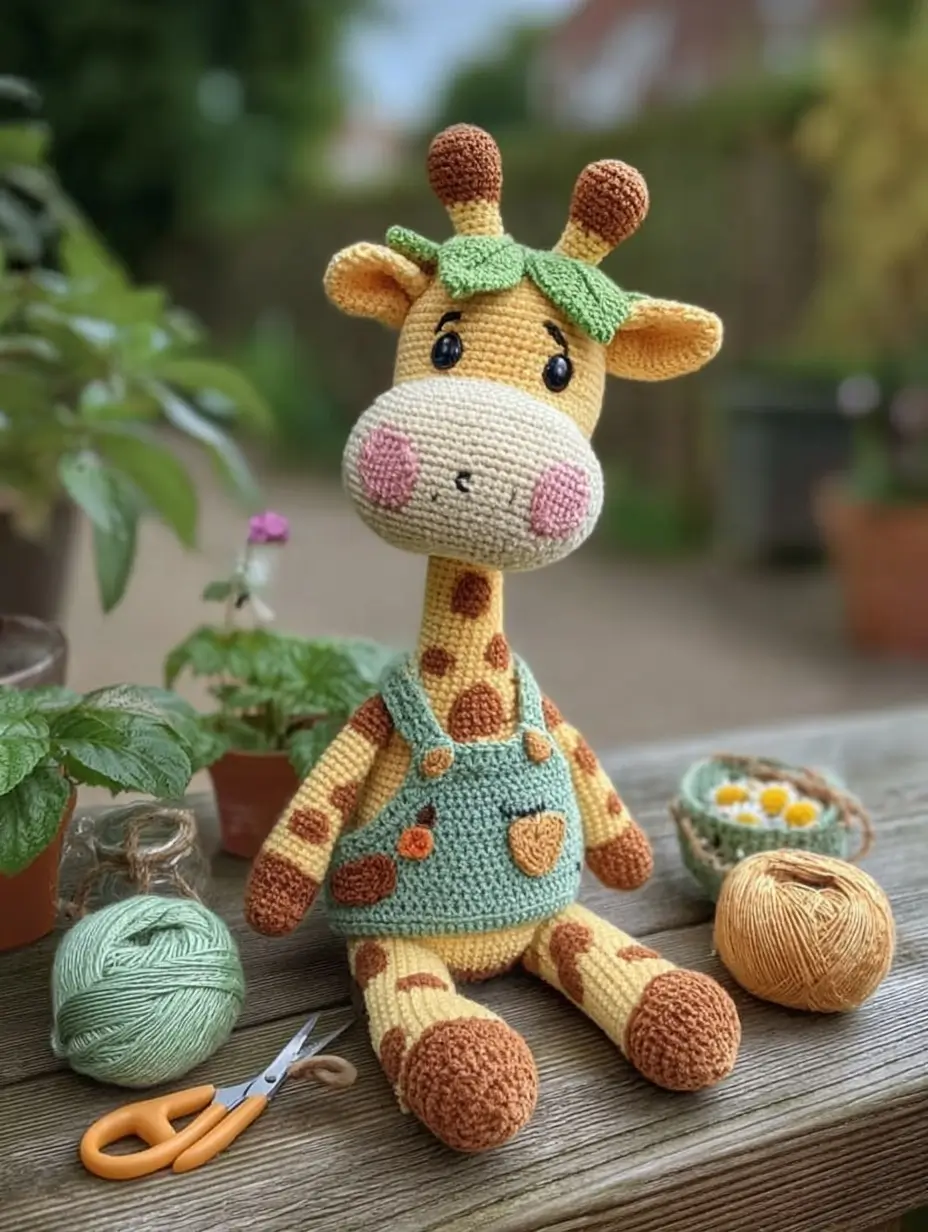
A giraffe’s ossicones create two weight levers before the ears even enter the pattern. This giraffe amigurumi crochet pattern uses cotton DK yarn, a 2.5 mm hook, 12 mm safety eyes, and a seated target size of 27 cm. Work it at intermediate level because the long neck, protruding muzzle, overalls, and leaf cap all need controlled stuffing. Make it when a safari toy needs visible structure.
The Design: What Makes This Giraffe Different
The long neck is not a tube on its own; it narrows from the upper body and is sewn deep into the head so the muzzle does not pull the face forward. Published giraffe patterns often land between 19 and 27 cm seated, so this version uses a 36-stitch body and a 42-stitch head for the same upright silhouette. The muzzle is worked as a shallow oval plate, not a ball, because a giraffe face needs width without extra front weight.
You will add the ears after the ossicones. The maker then checks both from the side, because horns that lean backward make the leaf cap sit too high. A common mistake in crochet giraffe amigurumi is using the same neck firmness as a teddy bear; this toy needs tighter packing in the lower neck and softer shaping under the chin.
Project Info at a Glance
| Skill Level | Time | Finished Size | Hook | Best For |
|---|---|---|---|---|
| Intermediate | Few hours for base toy; longer with clothing | 27 cm seated | 2.5 mm | Safari display, nursery shelf, toy-photography prop |
Materials and Tools
Yarn
- Warm yellow — DK/light sport cotton-acrylic — 100 g allowance — YarnArt Jeans 35 or Paintbox Cotton DK
- Cream — DK/light sport cotton-acrylic — 20–50 g allowance — YarnArt Jeans 01
- Rust brown — DK/light sport cotton-acrylic — 30–50 g allowance — YarnArt Jeans 40
- Mint blue — DK/light sport cotton-acrylic — 35 g allowance — Paintbox Cotton DK or similar
- Leaf green — DK/light sport cotton-acrylic — 10 g allowance — YarnArt Jeans or similar
- Soft pink — DK/light sport cotton-acrylic — 5 g allowance — scrap yarn
- Black embroidery thread — scrap length for brows, nostrils, and mouth
Tools
- Hook 2.5 mm
- 12 mm safety eyes
- Polyester stuffing
- Yarn needle
- Stitch markers
- Pins with large heads
- Sharp scissors
Abbreviations
MR = magic ring; sc = single crochet; inc = 2 sc in one stitch; dec = invisible single-crochet decrease; sl st = slip stitch; ch = chain; BLO = back loop only; FLO = front loop only; hdc = half double crochet; dc = double crochet.
Invisible decrease uses the front loops of the next two stitches to reduce visible gaps.
Pattern — Step by Step
Continuous spiral unless noted.
Head
Yarn: warm yellow
R1: 6 sc in MR (6)
R2: inc ×6 (12)
R3: (sc, inc) ×6 (18)
R4: (2 sc, inc) ×6 (24)
R5: (3 sc, inc) ×6 (30)
R6: (4 sc, inc) ×6 (36)
R7: (5 sc, inc) ×6 (42)
R8–R15: sc around (42)
R16: (5 sc, dec) ×6 (36)
R17: (4 sc, dec) ×6 (30)
R18: (3 sc, dec) ×6 (24)
R19: (2 sc, dec) ×6 (18)
Insert safety eyes between R11 and R12, about 8 stitches apart. Stuff the back of the head first, then shape the cheeks with smaller stuffing pieces.
R20: (sc, dec) ×6 (12)
R21: dec ×6 (6)
Fasten off. Close the opening and hide the tail.
Muzzle
Yarn: cream
R1: 6 sc in MR (6)
R2: inc ×6 (12)
R3: (sc, inc) ×6 (18)
R4: (2 sc, inc) ×6 (24)
R5–R7: sc around (24)
R8: (2 sc, dec) ×6 (18)
Fasten off. Leave a 45 cm tail. Lightly stuff, flatten into a wide oval, and sew to the lower front of the head between R10 and R17. Embroider two 2-stitch nostrils in rust brown and one small black mouth curve.
Body and Neck
Yarn: warm yellow
R1: 6 sc in MR (6)
R2: inc ×6 (12)
R3: (sc, inc) ×6 (18)
R4: (2 sc, inc) ×6 (24)
R5: (3 sc, inc) ×6 (30)
R6: (4 sc, inc) ×6 (36)
R7–R12: sc around (36)
R13: (4 sc, dec) ×6 (30)
R14–R15: sc around (30)
R16: (3 sc, dec) ×6 (24)
R17–R23: sc around (24)
Stuff the belly firmly. Pack the lower neck tighter than the upper neck so the head sits level.
R24: (2 sc, dec) ×6 (18)
R25: sc around (18)
R26: (sc, dec) ×6 (12)
R27: dec ×6 (6)
Fasten off. Close the top. Leave a 60 cm tail for sewing the body to the head.
Arms / Front Legs
Yarn: rust brown, then warm yellow
Make 2.
R1: 6 sc in MR with rust brown (6)
R2: inc ×6 (12)
R3: (sc, inc) ×6 (18)
R4–R5: sc around (18)
R6: (sc, dec) ×6 (12)
Change to warm yellow. Stuff hoof only, then continue with lighter stuffing in the upper arm.
R7–R17: sc around (12)
R18: dec ×6 (6)
Fasten off. Leave a 35 cm tail. Do not overfill the final 2 cm; a flat shoulder seam sits cleaner under the overall straps.
Back Legs
Yarn: rust brown, then warm yellow
Make 2.
R1: 6 sc in MR with rust brown (6)
R2: inc ×6 (12)
R3: (sc, inc) ×6 (18)
R4: (2 sc, inc) ×6 (24)
R5–R7: sc around (24)
R8: (2 sc, dec) ×6 (18)
R9: sc around (18)
Change to warm yellow. Stuff the hoof firmly before narrowing.
R10: (sc, dec) ×6 (12)
R11–R22: sc around (12)
R23: dec ×6 (6)
Fasten off. Leave a 45 cm tail. Close the end and shape the foot forward with a few stitches through the underside.
Ears
Yarn: warm yellow with optional cream inner stitches
Make 2.
R1: 6 sc in MR (6)
R2: inc ×6 (12)
R3: (sc, inc) ×6 (18)
R4–R7: sc around (18)
R8: (sc, dec) ×6 (12)
R9: sc around (12)
Fasten off. Leave a 35 cm tail. Flatten each ear, fold the base in half, and tack the fold with 2 stitches before sewing.
Ossicones
Yarn: rust brown, then warm yellow
Make 2.
R1: 6 sc in MR with rust brown (6)
R2: inc ×6 (12)
R3–R5: sc around (12)
R6: dec ×6 (6)
Change to warm yellow. Stuff the brown knob only.
R7–R11: sc around (6)
Fasten off. Leave a 35 cm tail. Keep the yellow stem firm enough to stand, but not wide enough to push the leaf cap upward.
Cheek Patches
Yarn: soft pink
Make 2.
R1: 6 sc in MR (6)
R2: inc ×6 (12)
R3: (sc, inc) ×6 (18)
Sl st to finish.
Fasten off. Leave a 25 cm tail. Sew one cheek to each side of the muzzle, centered just below the eyes.
Tail
Yarn: rust brown, then warm yellow
R1: 6 sc in MR with rust brown (6)
R2: inc ×6 (12)
R3: sc around (12)
R4: dec ×6 with warm yellow (6)
R5–R13: sc around (6)
Fasten off. Leave a 30 cm tail. Add three short rust-brown strands to the tip, knot them inside the tuft, and trim evenly.
Body Spots
Yarn: rust brown
Make 6 small spots.
R1: 6 sc in MR (6)
R2: inc ×6 (12)
Sl st to finish.
Make 4 large spots.
R1: 6 sc in MR (6)
R2: inc ×6 (12)
R3: (sc, inc) ×6 (18)
Sl st to finish.
Fasten off each spot with a 20 cm tail. Place larger spots on the torso and legs; use small spots on the neck and arms.
Overalls Body Band
Yarn: mint blue
Work in rows.
Ch 37.
Row 1: sc in 2nd ch from hook and across (36)
Rows 2–8: ch 1, turn, sc across (36)
Fasten off with a 40 cm tail. Wrap the band around the body from lower belly to mid-torso. Sew the short edges together at the back.
Overall Bib
Yarn: mint blue
Row 1: attach yarn to center front of the body band, sc 14 across (14)
Rows 2–7: ch 1, turn, sc across (14)
Row 8: ch 1, turn, dec, 10 sc, dec (12)
Row 9: ch 1, turn, sc across (12)
Fasten off. Leave a 25 cm tail and tack the top corners after the straps are placed.
Overall Straps and Buttons
Yarn: mint blue and rust brown
Make 2 straps.
Ch 25.
Row 1: sc in 2nd ch from hook and across (24)
Row 2: ch 1, turn, sc across (24)
Fasten off each strap with a 20 cm tail.
Make 2 buttons.
R1: 6 sc in MR with rust brown (6)
Sl st to finish.
Sew straps from the bib top over the shoulders to the back body band. Sew one button at each front strap base.
Front Pocket and Overall Patches
Yarn: warm yellow and rust brown
Pocket, make 1 in warm yellow.
Ch 8.
Row 1: sc in 2nd ch from hook and across (7)
Row 2: ch 1, turn, sc across (7)
Row 3: ch 1, turn, dec, 3 sc, dec (5)
Row 4: ch 1, turn, sc across (5)
Fasten off. Leave a 20 cm tail and sew to the center of the bib.
Small brown patch, make 1.
R1: 6 sc in MR (6)
R2: inc ×6 (12)
Sl st to finish.
Sew the patch to one lower corner of the overalls. Add one orange straight stitch or French knot if you want the small flower mark shown in the photo.
Leaf Cap
Yarn: leaf green
Crown disk, make 1.
R1: 6 sc in MR (6)
R2: inc ×6 (12)
R3: (sc, inc) ×6 (18)
R4: (2 sc, inc) ×6 (24)
Sl st to finish.
Leaves, make 5.
Ch 8.
Row 1: sc in 2nd ch from hook, hdc, dc, dc, hdc, sc, sl st (7)
Row 2: work along the unused side of the chain: sl st, sc, hdc, dc, dc, hdc, sc (14)
Fasten off each leaf with a 20 cm tail. Sew the leaves around the crown disk so they overlap like a small leafy fringe. Attach the cap between the ossicones and ears.
Assembly
- Sew the body-neck unit to the lower head, placing the neck under the head center rather than behind it.
- Pin the muzzle across the lower face, check that both cheeks remain visible, then sew it down.
- Add the pink cheek patches after the muzzle seam is finished, not before.
- Sew the ossicones to the top of the head, spacing them 5–6 stitches apart.
- Fold and sew the ears slightly below and outside the ossicones, angled outward.
- Place the arms at the upper body sides so the ends touch the top edge of the overalls.
- Sew the back legs to the lower front body with the hooves pointing forward.
- Attach the tail at the back body center, just above the overall band.
- Sew the overalls, straps, buttons, pocket, and patch in place after all limbs are stable.
- Attach the leaf cap last, tacking each leaf tip so it does not cover the eyes.
The completed toy is a seated giraffe with a long supported neck, wide muzzle, mint overalls, and a green leaf cap.
7 Technical Tips
- Stitch marker drift: On the 42-stitch head, marker drift can move the eye line by 2–3 stitches. Reset the marker after R10 if the face center shifts toward one cheek.
- Neck collapse: A soft lower neck makes the head tilt forward under the muzzle weight. Pack the lower 4 cm of the neck firmly, then use lighter stuffing near the top seam.
- Eye placement timing: Attach safety eyes before closing the head, between R11 and R12. A late eye change can stretch the fabric and leave a permanent hole.
- Invisible decrease gaps: Standard decrease holes show most clearly on the cream muzzle and brown hooves. Work dec through front loops only and pull the working yarn tight after the second loop is closed.
- Velvet tension mismatch: Velvet yarn can make the overalls grow wider than the body by one full row. Swatch 12 sc across and reduce the band to 34 stitches if the fabric stretches more than 1 cm.
- Pinning symmetry: Horns that are even from the front can still lean backward from the side. Pin the ossicones, ears, and leaf cap together before sewing any one of them permanently.
- Tail weaving failure: A tail sewn only through the surface stitches can pull loose during posing. Weave the tail yarn through at least 6 body stitches inside the back seam before trimming.
Conclusion
Finish the giraffe by checking three points: the head does not tip forward, the overalls sit below the arms, and the leaf cap leaves both eyes clear. Then photograph it from the front and side so the neck angle, muzzle width, and ossicone spacing are visible. For the next pass, adjust only one feature: spot count, strap length, or leaf size. Save this giraffe amigurumi crochet pattern to Pinterest, then post the finished toy on Instagram with a front-view and side-view comparison. Use hashtag #LeafCapGiraffe. Which detail should stay most prominent on this giraffe: the leaf cap, the cream muzzle, or the mint overalls?









