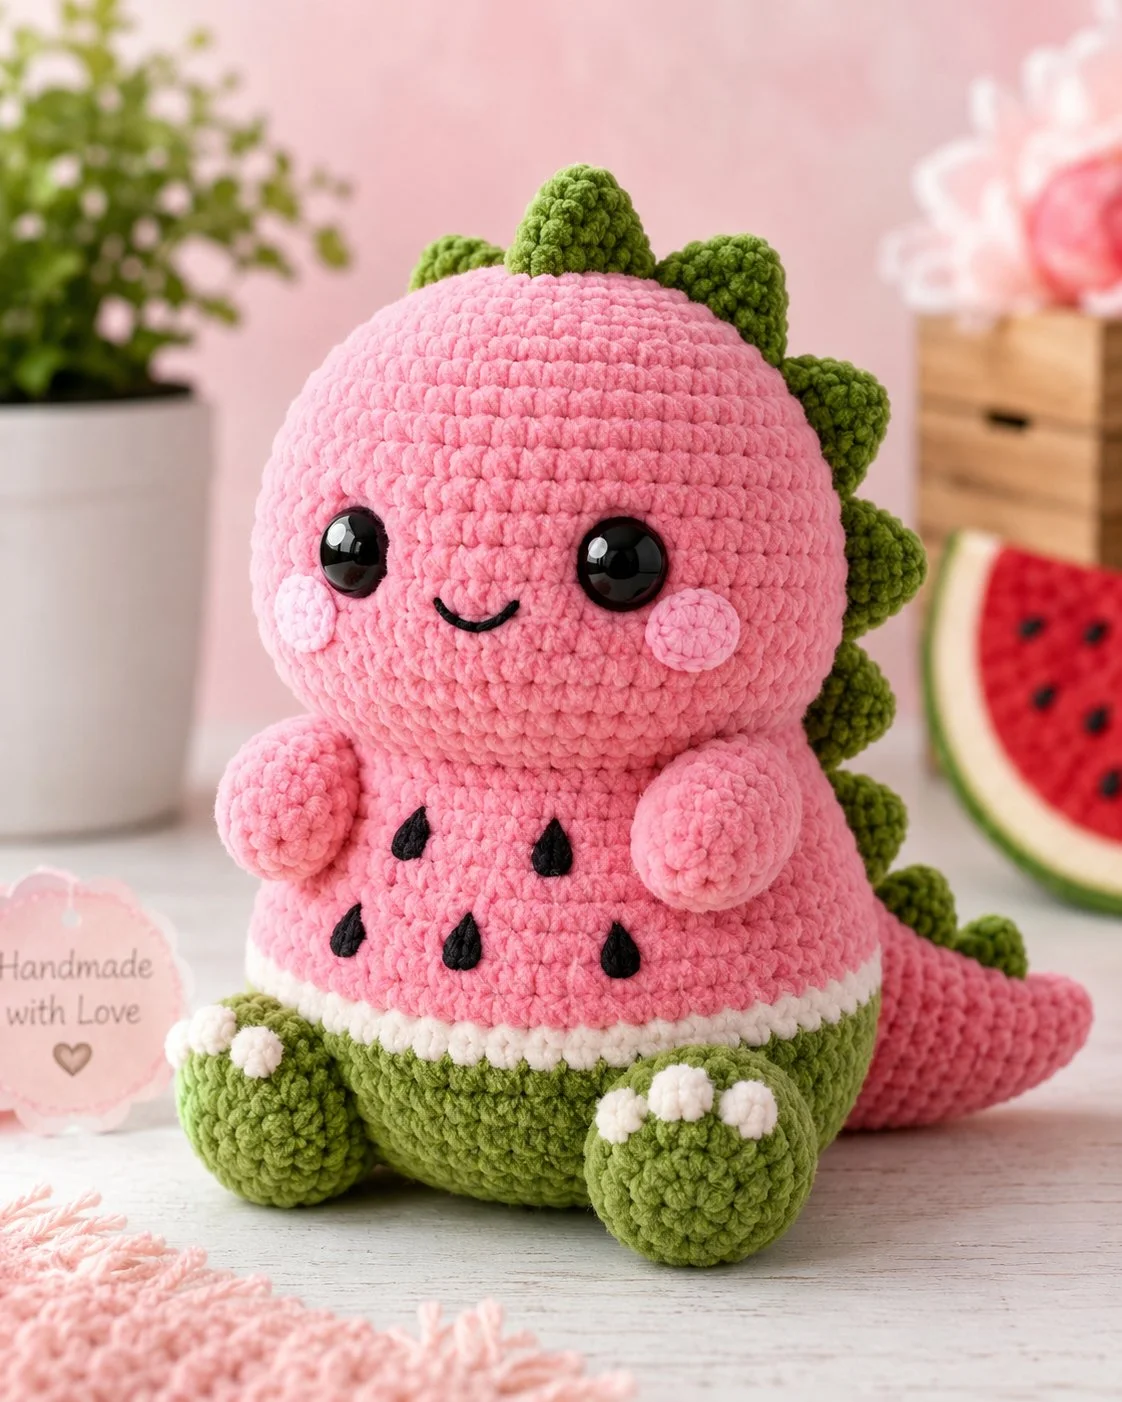
Cinnamon Roll TurtleWatermelon seeds only read correctly on a dinosaur if the rind line sits low and the belly stays broad. This watermelon dinosaur crochet pattern is built around that constraint, with plush yarn, a rounded 15–18 cm reference size, and intermediate shaping that keeps the stegosaurus profile stable in a seated pose. It works well for summer shop stock because the color story is obvious even from a shelf distance.
The Design: What Makes Watermelon Dino Different
A standard pastel dinosaur will tolerate vague color blocking. A watermelon stegosaurus will not. The white stripe has to separate pink flesh from green rind at a point that still leaves space for black seed appliqués, otherwise the body reads as a striped plush instead of fruit anatomy. The second structural choice is the back plate line. Plates must begin high on the crown and continue down the tail to keep the silhouette recognizably stegosaurus rather than dragon. Third, the feet need more volume than the arms. That weight keeps the toy upright after stuffing compresses.
One common maker mistake is placing the eyes too low. On this character, low eyes push the seed panel upward and crowd the smile. In most successful watermelon dinosaur amigurumi examples, the face stays high and open while the rind section remains clearly separated below. That same proportion also supports search intent around a crochet stegosaurus pattern and fruit dinosaur crochet design.
Project Info at a Glance
Skill LevelTimeFinished SizeHookBest ForIntermediate5–7 hours15–18 cm3.0–3.5 mm referenceSummer markets, nursery shelf décor, fruit-themed plush lines
Public pattern listings for watermelon stegosaurus designs show a finished size around 15–18 cm and a 3.0–3.5 mm hook, while the older DK Melonosaurus reference uses 2.5 mm and 6 mm eyes.
Materials and Tools
Yarn
- Pink chenille/plush yarn — chunky visual match to the photo — approx. 90–110 g — generic velvet or chenille plush yarn
- Light green chenille/plush yarn — chunky — approx. 35–45 g — for feet and rind
- Dark green chenille/plush yarn — chunky — approx. 20–30 g — for plates and tail accents
- White chenille/plush yarn — chunky — approx. 10–15 g — for rind stripe and claw nubs
- Black cotton or acrylic — small amount — for seed appliqués and smile
Tools
- Hook 4.5 mm for chunky yarn photo match
- Safety eyes 18–20 mm for the photographed scale
- Stuffing
- Tapestry needle
- Stitch markers
- Scissors
- Black embroidery thread if you prefer stitched seeds
Market references for public watermelon dinosaur patterns range from DK with a 2.5 mm hook and 6 mm eyes to plush variants with 14 mm eyes; the larger tools above are chosen to match the photographed chenille toy rather than the smaller published references.
Abbreviations
MR / sc / inc / dec / sl st / ch / BLO / FO
Invisible decrease joins two front loops into one stitch and keeps the face and belly smoother than a standard decrease.
Pattern — Step by Step
Continuous spiral unless noted. Counts below are editor-built with standard amigurumi math to match the photographed plush form.
Head (Make 1)
Yarn: pink — Standard amigurumi math
R1: 6 sc in MR (6)
R2: inc x6 (12)
R3: (sc, inc) x6 (18)
R4: (2 sc, inc) x6 (24)
R5: (3 sc, inc) x6 (30)
R6: (4 sc, inc) x6 (36)
R7: (5 sc, inc) x6 (42)
R8-R14: sc around (42)
R15: (5 sc, dec) x6 (36)
R16: (4 sc, dec) x6 (30)
R17: (3 sc, dec) x6 (24)
Insert eyes between R11 and R12, about 8 sts apart. Add smile centered two rounds lower. Stuff firmly before closing to hold the round face.
R18: (2 sc, dec) x6 (18)
R19: (sc, dec) x6 (12)
R20: dec x6 (6)
Fasten off. Close opening. Leave 12 cm tail.
Body (Make 1)
Yarn: light green, white, then pink — Standard amigurumi math
R1: 6 sc in MR (6)
R2: inc x6 (12)
R3: (sc, inc) x6 (18)
R4: (2 sc, inc) x6 (24)
R5: (3 sc, inc) x6 (30)
R6: (4 sc, inc) x6 (36)
R7-R9: sc around in light green (36)
R10: BLO sc around in white (36)
R11: sc around in white (36)
R12-R18: sc around in pink (36)
R19: (4 sc, dec) x6 (30)
R20: (3 sc, dec) x6 (24)
Stuff lower body firmly, but keep the neck edge slightly softer for easier head attachment.
Fasten off. Leave 20 cm tail.
Arms / Front Legs (Make 2)
Yarn: pink — Standard amigurumi math
R1: 6 sc in MR (6)
R2: inc x6 (12)
R3-R5: sc around (12)
R6: (sc, dec) x4 (8)
R7-R8: sc around (8)
Light stuffing only in the hand end.
Fasten off. Leave 15 cm tail.
Back Legs / Feet (Make 2)
Yarn: light green, white optional nubs — Standard amigurumi math
R1: 6 sc in MR (6)
R2: inc x6 (12)
R3: (sc, inc) x6 (18)
R4-R6: sc around (18)
R7: (sc, dec) x6 (12)
Stuff firmly so the toy sits without rolling. Add three small white French knots or 3-st nub claws after assembly.
Fasten off. Leave 18 cm tail.
Back Plates / Spikes (Make 7)
Yarn: dark green — Standard amigurumi math
R1: 4 sc in MR (4)
R2: inc x4 (8)
R3: sc around (8)
R4: (sc, dec) x2, sc x2 (6)
Flatten. Do not stuff.
Fasten off. Leave 12 cm tail.
Tail (Make 1)
Yarn: pink — Standard amigurumi math
R1: 6 sc in MR (6)
R2: sc around (6)
R3: (2 sc, inc) x2 (8)
R4-R6: sc around (8)
R7: (3 sc, inc) x2 (10)
R8-R10: sc around (10)
R11: (4 sc, inc) x2 (12)
R12-R16: sc around (12)
Stuff lightly. The tail should taper, not balloon.
Fasten off. Leave 18 cm tail.
Cheek Patches (Make 2)
Yarn: light pink or pink one shade lighter — Standard amigurumi math
R1: 6 sc in MR (6)
R2: inc x6 (12)
Fasten off. Leave 10 cm tail.
Seed Appliqués (Make 6)
Yarn: black — Standard amigurumi math
R1: ch 3
R2: starting in second ch from hook, sc, 3 sc in next ch, rotate and sc on opposite side (5)
Pull into a teardrop shape when sewing.
Fasten off. Leave 8 cm tail.
Belly Rind Nubs / Toes (Make 6 optional)
Yarn: white — Standard amigurumi math
R1: 5 sc in MR (5)
Fasten off. Leave 8 cm tail.
Assembly
- Sew the head to the body, centering it over the narrowed neck edge.
- Attach the arms to the upper pink body, one on each side, about 6 stitches apart.
- Sew the back legs low on the green rind section so the body tilts slightly backward when seated.
- Attach the tail to the back center, aligned with the white rind stripe.
- Place the cheek patches one stitch lower than the eye line and slightly outside each eye.
- Sew the six seed appliqués to the front body in two staggered rows.
- Attach the back plates from the crown to the tail base, largest at the top center.
- Add any extra dark green mini plates along the top of the tail if you want the silhouette to run longer.
- Stitch or knot the white toe nubs onto the front of each green foot.
- Weave in all ends inside the body cavity and reshape the face and belly by hand.
The completed toy should sit upright with the head centered over the widest part of the body.
7 Technical Tips
- Mark the eye row before stuffing. On a round chenille head, one misplaced eye by even one round makes the smile look off-center.
- Keep the head firmer than the body. Loose stuffing in a 42-stitch head creates side collapse around the eyes.
- Use invisible decreases on the face side only. Standard decreases show small ridges that become obvious in plush pink yarn.
- Install eyes before the final neck decreases. Trying to force washers through dense chenille after full stuffing can distort 3–4 surrounding stitches.
- Do not overstuff the tail. A rigid tail pushes the toy forward and steals visual weight from the belly seeds.
- Pin all seven plates first. Uneven spacing is the fastest way to lose the stegosaurus profile from front view.
- Weave black seed tails horizontally inside the body wall. Vertical weaving can shadow through pale pink chenille and show as dark dots.
Conclusion
This watermelon dinosaur crochet pattern works because every major shape supports the fruit read: broad pink belly, low white rind stripe, green feet, and a clean line of plates down the back. Follow the stitch counts first, then spend extra time on seed spacing and eye height. That order matters more than decorative extras. For publishing, pin a full-body front photo and a back view to Pinterest, then post one assembly close-up on Instagram with #WatermelonDinosaurPattern. Before you finish your own version, check one detail: did you place the top back plate high enough to keep the dinosaur silhouette visible above the round head? Amigurumi Pattern
A cinnamon roll turtle features two distinct shapes: a low-lying turtle body paired with a raised, spiral pastry shell. This amigurumi pattern combines playful aesthetics with practical crocheting techniques to deliver a charming plush. The finished toy stands approximately 25 cm tall, perfect for children and as decorative items in a child’s room. Designed for a beginner plus skill level, this pattern requires basic amigurumi skills and approximately 5 to 6 hours of dedicated crocheting time. Use your freshly made plush as a cuddly companion or a unique accent in your living space.
The Design: What Makes Cinnamon Roll Turtle Different
The primary shape of the cinnamon roll turtle integrates elements of both realism and whimsy. The rounded body mimics a classic turtle silhouette, while the circular, spiral shell adds a delightful twist. This particular design ensures that the turtle sits well and is stable due to its broader base, which lowers its center of gravity. The head is proportionately sized to the body, enhancing the visual appeal and relativity in the form. The shell, unmatched in its detail, boasts a raised spiral for texture, inspiring both cuddly playfulness and artistic charm.
Utilizing super bulky yarn contributes to the plush’s substantiality and size, making it cuddly while maintaining a tactile appeal. One common mistake that many crocheters face is using overly tight stitches, which can distort the plush dimensions and make it difficult to stuff the turtle adequately. Avoid this by keeping your stitches firm yet loose enough to allow for proper filling without stressing the nylon fibers. This design proves effective as a handmade amigurumi toy due to its balanced proportions and the tactile nature of the yarn used.
As you progress in your craft, embroidery and placement of the shell details can elevate the overall appearance. Use this crochet project to enhance your skills while creating a cheerful and striking plush representation of this unique character.
Project Info at a Glance
| Skill Level | Time | Finished Size | Hook | Yarn | |————-|————|—————|——-|————-| | Beginner Plus | 5–6 hours | 25 cm | 4.5 mm | Super Bulky |
Materials and Tools
Choosing the right materials is essential for bringing the cinnamon roll turtle to life. The blend of soft textures and vibrant colors creates visual interest while ensuring a huggable finish. Use the following materials for this project:
Yarn
- Main color super bulky yarn — 150 g for head, body, and limbs.
- Accent color super bulky yarn — 80 g for the shell and special details.
- Detail color yarn — 30 g for shell highlights and facial features.
Color selection should reflect not only the playful spirit of the design but also allow for substitutions as desired. Feel free to experiment with similar shades or textures to achieve a unique look while retaining the essence of your cinnamon roll turtle.
Tools
- 4.5 mm crochet hook
- 18 mm safety eyes
- Polyester fiberfill
- Yarn needle
- Locking stitch marker
- Pins
- Scissors
- Embroidery thread
The inclusion of locking stitch markers helps maintain stitch counts, particularly in the spiral rounds, while pins are valuable for positioning and securing limbs before sewing. This step can be crucial in ensuring your plush is balanced, helping to avoid any unintended tilting or skewed proportions in the finished product.
Abbreviations
MR = magic ring
sc = single crochet
inc = increase
dec = invisible decrease
sl st = slip stitch
ch = chain
BLO = back loop only
FO = fasten off
Invisible decrease means working through the front loops of the next two stitches before completing one single crochet.
Pattern Notes
The pattern will be worked in a continuous spiral, ensuring the dimensions remain consistent throughout. Always use a stitch marker to mark the beginning of your rounds and avoid confusion in tight corners. When stuffing the turtle, do so firmly to maintain shape but refrain from stretching the stitches, as this can risk distortion.
If you prefer, place safety eyes before closing the head; however, securing them later allows for better placement flexibility. Use pins to attach all limbs and shell details for an accurate fit before sewing. Keep in mind that working with super bulky yarn may obscure stitch visibility, so ensure you double-check your rounds before advancing. The exact finished size can be influenced by your stitches’ tension, so aim for a consistent gauge to maintain proportions across all components.
Maintaining balance is essential for a stable plush; the heavier shell balances well with the turtle body while keeping everything proportionate. The cinnamon roll design offers a whimsical twist that makes this character a fun and rewarding project.
Pattern — Step by Step
Head Make 1
R1: 6 sc in MR (6)
R2: inc ×6 (12)
R3: [sc, inc] ×6 (18)
R4: [2 sc, inc] ×6 (24)
R5: [3 sc, inc] ×6 (30)
R6: [4 sc, inc] ×6 (36)
R7: [5 sc, inc] ×6 (42)
R8-9: sc ×42 (42)
R10: [5 sc, dec] ×6 (36)
R11: [4 sc, dec] ×6 (30)
R12: [3 sc, dec] ×6 (24)
R13: [2 sc, dec] ×6 (18)
R14: [sc, dec] ×6 (12)
R15: dec ×6 (6)
Fasten off, leaving a tail for sewing.
Practical Notes:
Ensure the head is stuffed firmly enough to maintain its shape but not so tightly that stitches stretch. Place the safety eyes at a distance of about 10-12 stitches apart from the center point for an appealing expression. The head should taper slightly as it merges into the neck for a more natural appearance.
Body Make 1
R1: 6 sc in MR (6)
R2: inc ×6 (12)
R3: [sc, inc] ×6 (18)
R4: [2 sc, inc] ×6 (24)
R5: [3 sc, inc] ×6 (30)
R6: [4 sc, inc] ×6 (36)
R7-10: sc ×36 (36)
R11: [4 sc, dec] ×6 (30)
R12: [3 sc, dec] ×6 (24)
R13: [2 sc, dec] ×6 (18)
R14: [sc, dec] ×6 (12)
R15: dec ×6 (6)
Fasten off, leaving a tail for assembly.
Practical Notes:
As this is the primary structure, it should be stuffed adequately without distortion. The neck area requires careful placement against the head to maintain the character’s profile. Ensure the bottom of the body is flat to facilitate sitting.
Front Legs Make 2
R1: 6 sc in MR (6)
R2: inc ×6 (12)
R3: [sc, inc] ×6 (18)
R4-5: sc ×18 (18)
R6: [sc, dec] ×6 (12)
R7: dec ×6 (6)
Fasten off, leaving a tail for sewing.
Placement Notes:
Attach the legs near the front of the body, ideally aligned with the upper curve to provide balance as they support the plush when seated.
Back Legs Make 2
R1: 6 sc in MR (6)
R2: inc ×6 (12)
R3: [sc, inc] ×6 (18)
R4-5: sc ×18 (18)
R6: [sc, dec] ×6 (12)
R7: dec ×6 (6)
Fasten off, leaving a tail for sewing.
Placement Notes:
Position these legs towards the back, flush against the body for an aesthetically pleasing finish and to enhance stability when the plush sits upright.
Shell Make 1
R1: 12 sc in MR (12)
R2: inc ×6 (18)
R3: [1 sc, inc] ×6 (24)
R4: inc ×12 (36)
R5-6: sc ×36 (36)
R7: [sc, dec] ×6 (30)
R8: [2 sc, dec] ×6 (24)
R9: [3 sc, dec] ×6 (18)
R10: [4 sc, dec] ×6 (12)
R11: dec ×6 (6)
Fasten off, leaving a tail for sewing.
Special Feature Sewing Notes:
Attach the shell securely to the back of the body, ensuring the spiral is facing outward for the most visually appealing presentation. Sew firmly, so it remains fixed while allowing for some movement during use.
Cheek Patches Make 2
R1: 6 sc in MR (6)
R2: inc ×6 (12)
sl st to close.
FO, leaving a tail for sewing.
Placement Notes:
Position the cheek patches on either side of the head, slightly forward of the safety eyes, to enhance the friendly expression of the turtle.
Tail Make 1
R1: 6 sc in MR (6)
R2: inc ×6 (12)
R3: [1 sc, inc] ×6 (18)
R4: sc ×18 (18)
R5: dec ×6 (12)
R6: dec ×6 (6)
Fasten off, leaving a tail for sewing.
Optional Notes:
If you prefer a more defined tail, ensure it is attached at the rear of the body to provide a counterbalance to the shell while retaining a smooth silhouette.
Face Embroidery
To complete the face of the cinnamon roll turtle, begin by positioning the eyes approximately 10-12 stitches apart for a perfect playful look. The nose should be small and positioned directly beneath the eyes to maintain proportion, while a simple, curved stitch forms the mouth centered below the nose, giving the turtle a cute smile.
When adding the cheeks, consider their position to accentuate the charm: placing them directly beneath the eyes but slightly inward can provide a whimsical, cheerful expression. To avoid a crooked expression during embroidery, keep tension consistent, and ensure your tail ends are securely tucked within the plush to prevent any unsightly knots or scratches on surface contact.
Assembly
- Begin by securely attaching the head to the body, ensuring the neck has a smooth transition.
- Next, attach the largest feature, the shell, at the back—this should fit snugly against the body to allow for a harmonious silhouette.
- Proceed to attach the front legs, placing them evenly spaced and angled for a natural-looking posture.
- Follow with the back legs, aligning them to complement the front for a balanced stance.
- Add any smaller features, such as the cheek patches, ensuring they are positioned correctly for the intended expression.
- If safety eyes were not yet attached, secure them at this step for enhanced durability.
- Using your embroidery thread, add the nose and mouth to bring personality to your plush.
- Sew the cheek patches in place, employing a neat finish to complete the face.
- After assembling, check the overall plush for balance, looking at it from the front, side, and back.
- Finally, weave in any loose ends from sewing and adjust the shape of the plush to your satisfaction, ensuring all components are held firmly.
Once assembled, you’ll find your cinnamon roll turtle ready for display or snuggles, showcasing both your creativity and skill.
7 Technical Tips
- Stitch Marker Drift: When crocheting in rounds, stitch markers help identify the beginning of each round. If your marker drifts, it can alter the dimensions of your plush. Reposition as necessary to maintain accuracy throughout the project.
- Stuffing Firmness: Strive for a well-stuffed plush, ensuring it retains its shape without stretching the stitches. If you notice sagging, it’s likely due to inadequate stuffing. Pay attention while filling the components, especially around the head and body connection.
- Invisible Decrease Gaps: Incorrectly executed invisible decreases can lead to gaps, affecting the plush’s integrity. Ensure you insert your hook into the front loops of the stitches and pull them together tightly. Always double-check the area for uniformity before moving on.
- Eye Placement Timing: For optimal positioning, place safety eyes at the head construction phase. This allows you to adjust their alignment while still working on the head. Achieving good placement early prevents misalignment that can alter the overall look.
- Plush Yarn Tension: Using super bulky yarn can obscure stitches, affecting visibility during detailing. Maintain an even tension so that all rounds are consistent; this helps prevent markings or uneven shapes in your plush. Adjust your hook size if necessary to ease work.
- Pinning Before Sewing: Pinning all components will facilitate accurate sewing, preventing any parts from shifting out of place. This is particularly important for limbs and large features like the shell. Ensure everything is secure to achieve the desired overall balance and structure.
- Tail Weaving: Weave in the beginning and ending tails thoroughly, ensuring they’re tucked away inside as you finish. Loose ends can lead to fraying or unraveling. Take care to hide them securely to maintain a clean look and structural integrity.
Related Patterns
- Plush Axolotl — This vibrant and unique design features soft textures and adorable charms, mirroring the creativity found in the cinnamon roll turtle project. [INTERNAL LINK NEEDED: topic]
- Cupcake Bunny — Detailed with fun accents and unique shapes, this pattern offers an equally playful crochet experience that fits right alongside the turtle. [INTERNAL LINK NEEDED: topic]
- Strawberry Dragon — Inspiring a whimsical look and impressive detail, this pattern enhances your skill set while providing a delightful contrast to the turtle design. [INTERNAL LINK NEEDED: topic]
- Galaxy Cat — This character allows for a harness of color and texture variety that complements the fun spirit seen in the cinnamon roll turtle, making for a delightful collection. [INTERNAL LINK NEEDED: topic]
Conclusion
Creating the cinnamon roll turtle amigurumi pattern combines creativity with technical skills, resulting in a unique plush that appeals to many. Your finished product, as an example of this [C] amigurumi pattern, will showcase your crocheting prowess and add fun to your collection. Share your completed turtle on social media and save this pattern inspiration on Pinterest for your future creations. Use #CinnamonRollTurtle to connect with fellow creators. What’s your favorite way to customize your amigurumi projects?









