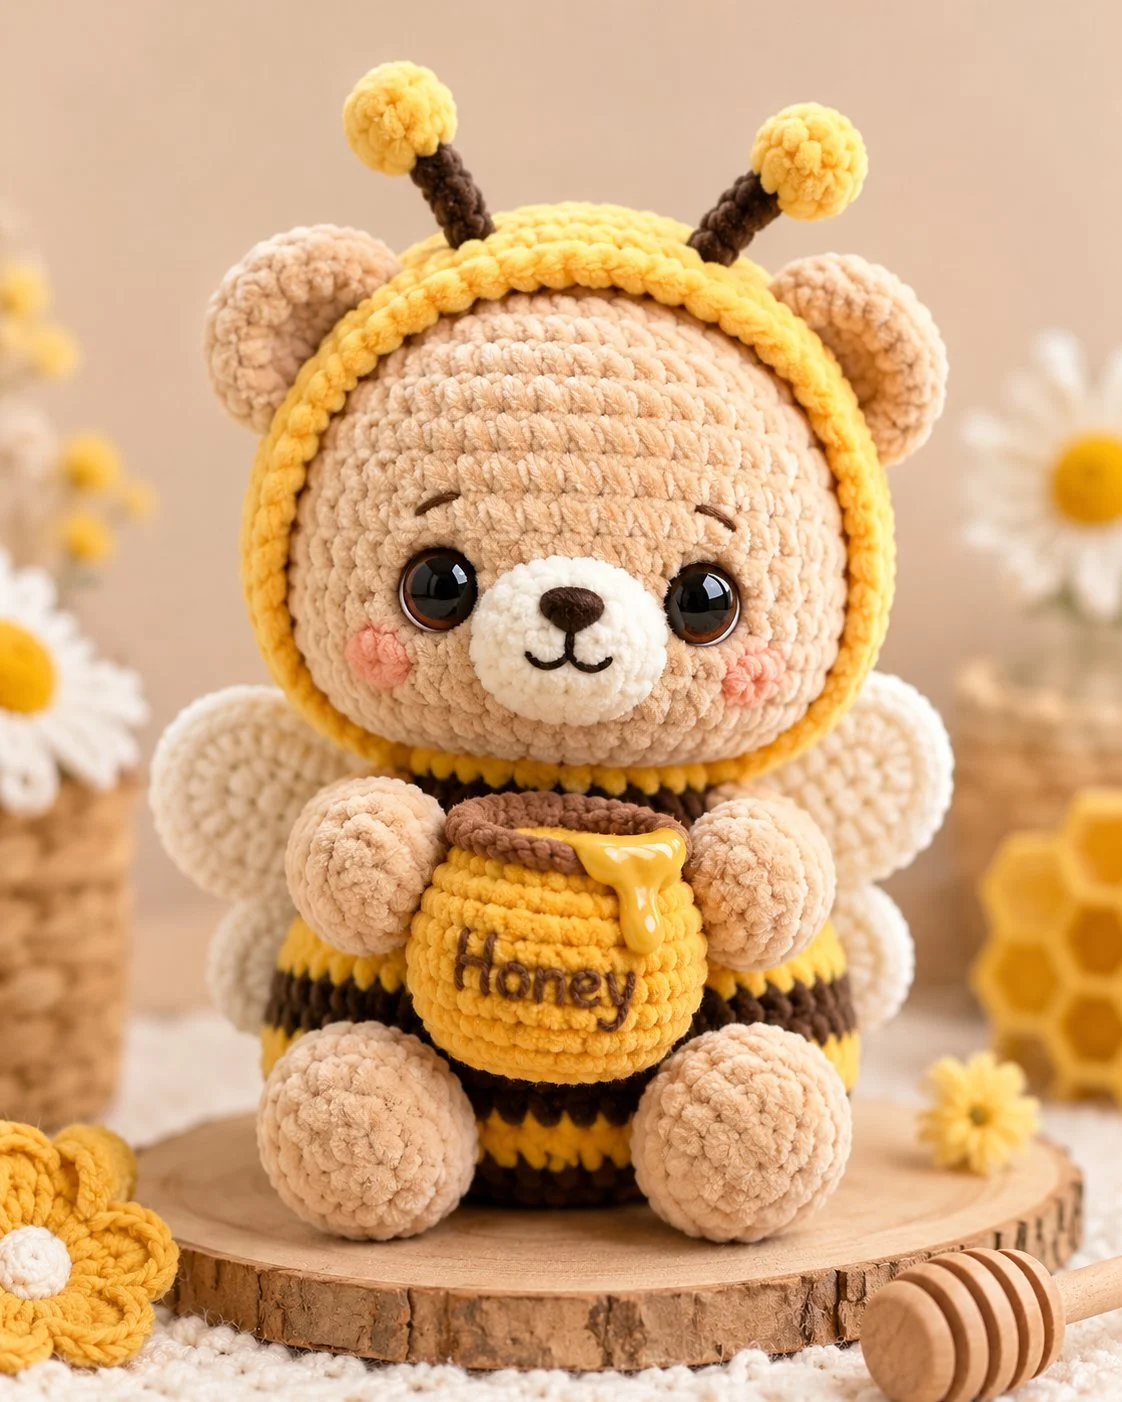
A bear wearing a bee hood fails at the neckline before anything else. This bee-bear amigurumi crochet pattern solves that fit problem with a separate muzzle, outer ears, wings, and a stable sitting body in plush yarn. Expect a medium-size project, about 22 cm when seated, built with super bulky velvet yarn, a 5 mm hook, and intermediate shaping. The honey pot adds a display prop that turns a shelf toy into themed decor.
The Design: What Makes Bee Bear Different
This character depends on proportion more than stitch novelty. The head must read as bare first, so the muzzle projects forward and the ears stay visible outside the hood instead of being buried under yellow shaping. You need that separation. Otherwise, the face turns flat, and the costume reads as a cap rather than a bee hood.
The body also works harder than it looks. A striped torso can make plush stitches buckle, so the widest round is kept lower, then reduced early to form a neck that supports the oversized head. In a honey bee bear crochet pattern, that transition matters more than the wings. The same is true in a bear in bee costume crochet design: makers often overstuff the hood, not the head, and the brim starts to flare away from the face. Keep the hood shallow and the muzzle full.
Project Info at a Glance
Skill LevelTimeFinished SizeHookBest ForIntermediate5–7 hours21–22 cm seated5 mm Shelf decor, nursery display, gift plush
Time is a practical estimate for a plush build at the 21–22 cm class using super bulky yarn and separate accessories.
Materials and Tools
Yarn
- Light beige plush yarn—super bulky—about 80 g—Hobbii Honey Bunny or Baby Snuggle class yarn
- Yellow plush yarn—super bulky—about 35 g—Hobbii Honey Bunny or Baby Snuggle class yarn
- Dark brown plush yarn—super bulky—about 12 g—for stripes, antenna stems, pot rim
- Cream plush yarn — super bulky — about 15 g — muzzle and wings
- Pink cotton or plush scrap—small amount—cheek patches
- Black or brown embroidery yarn—small amount—brows, mouth, label
Tools
- Hook 5 mm
- Safety eyes 18 mm
- Polyfill stuffing
- Yarn needle
- Stitch markers
- Pins
- Scissors
Abbreviations
MR = magic ring
sc = single crochet
inc = increase
dec = invisible decrease
sl st = slip stitch
ch = chain
BLO = back loop only
hdc = half double crochet
Invisible decrease reduces bulk at the face and neck, which matters more in plush yarn because exposed front loops can show through the pile.
Pattern—Step by Step
Continuous spiral unless noted.
Head (Make 1)
Yarn: light beige—Source: Standard amigurumi math adapted from the photo, scaled from common bee-bear reference heads with 42-stitch plateau.
R1: 6 sc in MR (6)
R2: inc x6 (12)
R3: (1 sc, inc) x6 (18)
R4: (2 sc, inc) x6 (24)
R5: (3 sc, inc) x6 (30)
R6: (4 sc, inc) x6 (36)
R7: (5 sc, inc) x6 (42)
R8–R14: sc around (42)
R15: (5 sc, dec) x6 (36)
R16: (4 sc, dec) x6 (30)
Insert eyes between R11 and R12, spaced 8 stitches apart.
R17: (3 sc, dec) x6 (24)
R18: (2 sc, dec) x6 (18)
Stuff firmly.
R19: (1 sc, dec) x6 (12)
R20: dec x6 (6)
Fasten off. Leave a 20 cm tail.
Muzzle (Make 1)
Yarn: cream — Source: Standard amigurumi math adapted from the photo.
R1: 6 sc in MR (6)
R2: inc x6 (12)
R3: (1 sc, inc) x6 (18)
R4–R5: sc around (18)
Fasten off. Leave a 20 cm tail.
Embroider the nose in dark brown and the mouth in black before sewing.
Cheek Patches (Make 2)
Yarn: pink — Source: Standard amigurumi math adapted from the photo.
R1: 6 sc in MR (6)
R2: inc x6 (12)
Fasten off. Leave a 12 cm tail.
Ears (Make 2)
Yarn: light beige—Source: Standard amigurumi math adapted from the photo.
R1: 6 sc in MR (6)
R2: inc x6 (12)
R3–R4: sc around (12)
Flatten lightly.
Fasten off. Leave a 15 cm tail.
Body (Make 1)
Yarn: light beige, dark brown, yellow — Source: Standard amigurumi math adapted from the photo and striped bee body references.
R1: 6 sc in MR with dark brown (6)
R2: inc x6 (12)
R3: (1 sc, inc) x6 (18)
R4: (2 sc, inc) x6 (24)
R5: (3 sc, inc) x6 (30)
R6: sc around in dark brown (30)
R7: sc around in yellow (30)
R8: sc around in yellow (30)
R9: sc around in dark brown (30)
R10: (3 sc, dec) x6 (24)
R11: sc around in yellow (24)
R12: sc around in yellow (24)
R13: sc around in dark brown (24)
R14: (2 sc, dec) x6 (18)
R15: sc around in yellow (18)
Stuff very firmly at the base and medium-firm at the neck.
Fasten off. Leave a 25 cm tail.
Arms / Front Legs (Make 2)
Yarn: light beige—Source: Standard amigurumi math adapted from the photo.
R1: 6 sc in MR (6)
R2: inc x6 (12)
R3–R5: sc around (12)
R6: (1 sc, dec) x4 (8)
R7: sc around (8)
Stuff the front half only.
Fasten off. Leave a 20 cm tail.
Back Legs (Make 2)
Yarn: light beige—Source: Standard amigurumi math adapted from the photo.
R1: 6 sc in MR (6)
R2: inc x6 (12)
R3: (1 sc, inc) x6 (18)
R4–R5: sc around (18)
R6: (1 sc, dec) x6 (12)
Stuff firmly for a round foot.
Fasten off. Leave a 20 cm tail.
Wings (Make 2)
Yarn: cream — Source: free bee-bear wing idea adapted to fuller plush shaping.
R1: 6 sc in MR (6)
R2: inc x6 (12)
R3: sc around (12)
Flatten into a half-moon.
Fasten off. Leave a 15 cm tail.
Do not overstuff.
Hood Cap (Make 1)
Yarn: yellow — Source: Standard amigurumi math adapted from the photo.
R1: 6 sc in MR (6)
R2: inc x6 (12)
R3: (1 sc, inc) x6 (18)
R4: (2 sc, inc) x6 (24)
R5: (3 sc, inc) x6 (30)
R6: (4 sc, inc) x6 (36)
R7–R10: sc around (36)
Fasten off. Leave a 30 cm tail.
Hood Brim (Make 1)
Yarn: yellow — Source: Standard amigurumi math adapted from the photo.
Ch. 34.
R1: Starting in 2nd ch from hook, 33 sc (33)
R2: ch 1, turn, 33 sc (33)
R3: ch 1, turn, [sl st, 2 sc in next st] across to create a soft scallop
Fasten off. Leave a 25 cm tail.
Antenna Stems (Make 2)
Yarn: dark brown — Source: free bee-bear antenna concept adapted from the photo.
Ch. 6.
R1: Starting in 2nd ch from hook, 5 sc (5)
R2: ch 1, turn, 5 sc (5)
Roll into a narrow tube and seam closed.
Fasten off. Leave a 12 cm tail.
Antenna Pom-Poms (Make 2)
Yarn: yellow — Source: Standard amigurumi math adapted from the photo.
R1: 6 sc in MR (6)
R2: inc x6 (12)
R3: sc around (12)
R4: dec x6 (6)
Stuff lightly before closing.
Fasten off. Leave a 12 cm tail.
Honey Pot (Make 1)
Yarn: yellow body, dark brown rim—Source: Standard amigurumi math adapted from the photo.
R1: 6 sc in MR with yellow (6)
R2: inc x6 (12)
R3: (1 sc, inc) x6 (18)
R4–R7: sc around (18)
R8: BLO sc around (18)
R9: sc around (18)
R10: (1 sc, dec) x6 (12)
Stuff firmly.
Fasten off. Leave a 20 cm tail.
For the rim: join dark brown in the front loop of R8, and sc around (18). Fasten off.
Honey Drip Appliqué (Make 1)
Yarn: yellow — Source: Standard amigurumi math adapted from the photo.
Ch. 7.
Working back along the chain: sl st in 2nd ch, 2 sc, 1 hdc, 2 dc, sl st to base.
Fasten off. Leave a 15 cm tail.
Honey Label (Optional)
Yarn: dark brown embroidery thread — Source: Photo adaptation.
Embroider “Honey” across the pot front after stuffing and closing.
Assembly
- Sew the muzzle centered between the eyes, spanning roughly R11 to R16 on the head.
- Add the cheek patches one round below eye level, slightly outside the muzzle edges.
- Embroider the brows in short curved lines above each eye.
- Sew the ears to the upper sides of the head, then test the hood placement around them.
- Attach the hood cap to the crown and upper sides only, leaving the front face open.
- Sew the brim around the face opening so it frames the forehead and cheeks.
- Attach the antenna stems to the top of the hood and sew one pom-pom to each stem.
- Sew the head to the body with the body centered under the muzzle.
- Attach the arms high on the body, the back legs low and forward for a seated pose, and the wings on the back just below the hood line.
- Position the honeypot between the arms, tack it to both paws and the upper belly, then attach the honey drip to the rim.
The piece is complete when it sits without rocking and the pot stays centered between both paws.
7 Technical Tips
- Place a stitch marker at the first stitch of every round on the head. Plush pile hides round rounds, and losing one increase round will distort the eyeline by 6 stitches.
- Stuff the body base harder than the upper body. A soft base makes the finished bear roll backward once the head and honey pot are attached.
- Use invisible decreases on the head, muzzle, and neck rounds only. Regular decreases leave small ridges that show through short-pile velvet at close range.
- Insert the 18 mm eyes before the head drops below 30 stitches. After R17, the opening is too tight for clean washer placement in plush fabric.
- Keep wing stuffing at zero or near zero. Even 2–3 grams of fiberfill can make small wings push the bear forward in profile.
- Pin the hood brim in four anchor points first: top center, chin line left, chin line right, and temple area. That stops the scallop edge from drifting upward on one side.
- Weave limb tails back through the same seam line twice. Plush yarn can loosen under handling, especially where the honey pot adds forward weight.
Conclusion
This version of the bee bear amigurumi crochet pattern works because the costume details stay secondary to the bear structure. The muzzle projects, the hood frames the face instead of swallowing it, and the honey pot gives the hands a fixed job during assembly. Start with the head and body tonight, then build the hood and prop after the silhouette is sitting correctly. Save a finished photo for Pinterest, post one front view and one side view on Instagram, and tag it with #BeeBearHoneyPot. Did you keep the ears fully outside the hood, or did you let the brim overlap them for a softer look?









