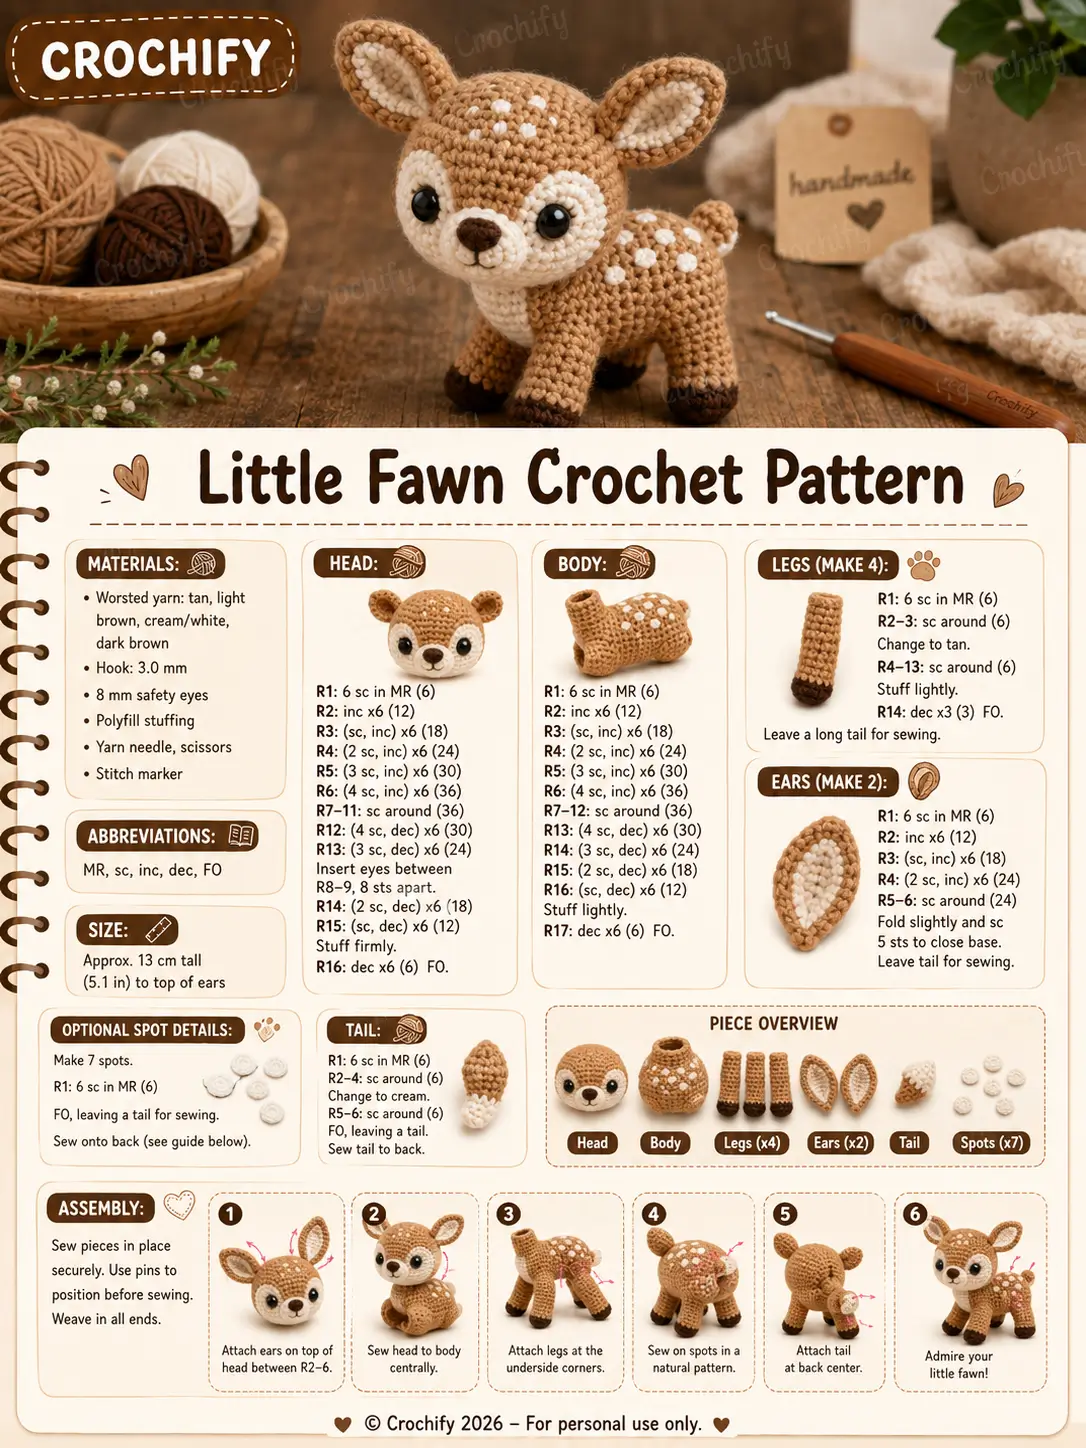
A fawn’s white back spots must read as camouflage, not polka dots. This fawn amigurumi crochet pattern uses worsted yarn, a 3.0 mm hook, 8 mm safety eyes, and compact limb shaping for a 13 cm standing toy. The skill level is intermediate because the ears, face patches, hooves, and spot placement need controlled assembly. Make it when you need a woodland display piece that stands without wire.
The Design: What Makes This Fawn Different
This design is built around three visual decisions: a round 36-stitch head, a horizontal body, and narrow legs with dark hoof tips. The head stays larger than the body because young deer have oversized facial proportions; reducing the head would make the crochet fawn pattern look like an adult deer. The body stays firm and slightly oval so the four legs can carry weight without internal wire. White spots are sewn as flat discs, not embroidered dashes, because the photo shows raised cream dots across the back. For this fawn amigurumi crochet pattern, the common maker mistake is ear placement. Ears sewn too low make the face look like a puppy. Place them high, angled outward, and symmetrical to keep the deer amigurumi pattern readable from the front.
Project Info at a Glance
| Skill Level | Time | Finished Size | Hook | Best For |
|---|---|---|---|---|
| Intermediate | 4–5 hours | 13 cm to ear tips | 3.0 mm | Woodland displays, nursery shelves, market samples |
The 13 cm scale is supported by a Ravelry fawn listing at approximately the same height, while comparable deer and fawn patterns confirm the 2.5–3.5 mm hook range for compact amigurumi fabric. Source: Ravelry
Materials and Tools
Yarn
- Tan / light brown — worsted — 25–30 g actual use, 50 g ball recommended — Paintbox Simply Aran, Stylecraft Special Aran, or similar
- Cream — worsted — 8–10 g — for muzzle, cheek patches, inner ears, and tail tip
- White — worsted — 3–5 g — for back spots and head dots
- Dark brown — worsted — 5 g — for hooves and embroidered nose
- Black — embroidery thread or fine yarn — under 1 g — for mouth detail, optional
Comparable deer patterns list 50 g yarn balls, worsted or DK yarn, and small accent amounts depending on scale. Source: Etsy
Tools
- Hook 3.0 mm
- 8 mm safety eyes, 2
- Polyfill stuffing
- Yarn needle
- Embroidery needle
- Stitch markers
- Pins
- Scissors
Abbreviations
MR = magic ring; sc = single crochet; inc = increase; dec = decrease; sl st = slip stitch; ch = chain; BLO = back loop only; FO = fasten off.
An invisible decrease works through the front loops of the next two stitches before completing one single crochet, which reduces holes on rounded amigurumi closures.
Pattern — Step by Step
Work in a continuous spiral unless noted. The head and body use 6-stitch amigurumi math: each full increase round adds 6 stitches, and each full decrease round removes 6 stitches.
Head
Yarn: tan — Source: Standard amigurumi math
R1: 6 sc in MR (6)
R2: inc ×6 (12)
R3: (sc, inc) ×6 (18)
R4: (2 sc, inc) ×6 (24)
R5: (3 sc, inc) ×6 (30)
R6: (4 sc, inc) ×6 (36)
R7–11: sc around (36)
R12: (4 sc, dec) ×6 (30)
R13: (3 sc, dec) ×6 (24)
R14: (2 sc, dec) ×6 (18)
Insert 8 mm safety eyes between R8 and R9, about 7–8 stitches apart. Start stuffing before the opening becomes narrow.
R15: (sc, dec) ×6 (12)
R16: dec ×6 (6)
Fasten off. Leave a 20 cm tail and close the final hole.
Body
Yarn: tan — Source: Standard amigurumi math
R1: 6 sc in MR (6)
R2: inc ×6 (12)
R3: (sc, inc) ×6 (18)
R4: (2 sc, inc) ×6 (24)
R5: (3 sc, inc) ×6 (30)
R6: (4 sc, inc) ×6 (36)
R7–13: sc around (36)
R14: (4 sc, dec) ×6 (30)
R15: (3 sc, dec) ×6 (24)
R16: (2 sc, dec) ×6 (18)
Stuff firmly through the center. Keep the underside flat by pressing the body against the table before the final rounds.
R17: (sc, dec) ×6 (12)
R18: dec ×6 (6)
Fasten off. Leave a 25 cm tail for sewing the head if you prefer one continuous seam.
Front Legs — Make 2
Yarn: dark brown, then tan — Source: Standard amigurumi math
R1: With dark brown, 6 sc in MR (6)
R2: sc around (6)
R3: sc around (6)
R4: Change to tan, BLO sc around (6)
R5–12: sc around (6)
Stuff only the upper half. A hard hoof makes the leg kick outward.
Fasten off. Leave a 25 cm tail for sewing.
Back Legs — Make 2
Yarn: dark brown, then tan — Source: Standard amigurumi math
R1: With dark brown, 6 sc in MR (6)
R2: inc ×6 (12)
R3: sc around (12)
R4: Change to tan, BLO sc around (12)
R5–9: sc around (12)
Stuff lightly. Flatten the final edge so each back leg sits against the underside of the body.
Fasten off. Leave a 25 cm tail for sewing.
Ears — Make 2 Outer Ears and 2 Inner Patches
Yarn: tan outer, cream inner — Source: Standard amigurumi math
Outer ear:
R1: With tan, 6 sc in MR (6)
R2: inc ×6 (12)
R3: (sc, inc) ×6 (18)
R4: (2 sc, inc) ×6 (24)
R5–6: sc around (24)
Flatten the ear into an oval. Pinch the base before sewing.
Fasten off. Leave a 20 cm tail.
Inner patch:
R1: With cream, 6 sc in MR (6)
R2: inc ×6 (12)
R3: (sc, inc) ×6 (18)
Fasten off. Leave a 15 cm tail and sew one patch inside each outer ear.
Muzzle
Yarn: cream — Source: Standard amigurumi math
R1: 6 sc in MR (6)
R2: inc ×6 (12)
R3: (sc, inc) ×6 (18)
R4: sc around (18)
Do not overstuff. The muzzle should project by about 1 cm from the face.
Fasten off. Leave a 20 cm tail. Embroider the nose in dark brown after the muzzle is sewn down.
Cheek Patches — Make 2
Yarn: cream — Source: Standard amigurumi math
R1: 6 sc in MR (6)
R2: inc ×6 (12)
Fasten off. Leave a 15 cm tail. These are flat circles; do not stuff.
Tail
Yarn: tan, then cream — Source: Standard amigurumi math
R1: With tan, 6 sc in MR (6)
R2: inc ×6 (12)
R3–4: sc around (12)
R5: Change to cream, sc around (12)
R6: dec ×6 (6)
Stuff lightly before R6. The cream tip faces upward on the finished fawn.
Fasten off. Leave a 20 cm tail.
Back Spots — Make 7
Yarn: white — Source: Standard amigurumi math
R1: 6 sc in MR (6)
Sl st to first sc (6)
Fasten off. Leave a 12 cm tail on each spot. Make seven spots: three for the upper back, two for the haunch, and two smaller-looking spots for the head by tightening the magic ring harder before sewing.
Nose and Mouth
Yarn: dark brown embroidery strand — Source: Photo-based detail
Work three horizontal satin stitches across the center of the muzzle. Add one short vertical stitch under the nose. Add a tiny split stitch for the mouth only if the muzzle still looks blank after the nose is in place.
Fasten off on the back of the muzzle area and bury the thread inside the head.
Assembly
- Pin the head to the front top of the body, with the muzzle angled slightly downward.
- Sew the head to the body using two passes around the neck seam.
- Sew the muzzle between the eyes, centered over R10–R13 of the head.
- Sew one cheek patch under each eye so the inner edges touch the muzzle.
- Attach the ears high on the head between R3 and R6, angled outward like a shallow V.
- Sew the front legs under the chest, spaced about 2 cm apart.
- Sew the back legs under the haunches, slightly wider than the front legs.
- Attach the tail at the center back of the body between R7 and R9.
- Sew the seven white spots in an uneven cluster across the back and rear haunch.
- Weave all tails through stuffed areas, then roll the fawn gently on a flat surface to test all four hooves.
The finished fawn measures about 13 cm from table to ear tips when gauge matches the listed materials.
7 Technical Tips
- Stitch marker drift: Move the marker at the first stitch of every round, not after the increase group. A one-stitch drift on the head shifts both eyes off center by R9.
- Stuffing firmness: Stop filling the head when it springs back but does not stretch the stitches open. If white stuffing shows between tan stitches, remove about 10 percent.
- Invisible decrease holes: Use invisible decreases on R12–R16 of the head and R14–R18 of the body. Standard decreases leave visible gaps across the cream cheek area and lower body.
- Eye placement timing: Insert safety eyes before R14 of the head closes the access hole. Place them 7–8 stitches apart; wider spacing makes the fawn look flat-faced.
- Velvet tension substitution: If changing to velvet yarn, drop to a 2.75 mm hook only if the fabric still moves without squeaking on the hook. Velvet hides stitches, so count every round aloud at 36, 30, 24, 18, 12, and 6.
- Pinning failure mode: Unpinned ears usually tilt backward during sewing. Use two pins per ear: one at the pinched base and one 1 cm above it.
- Tail weaving: Bury each yarn tail through at least 3 cm of stuffing before trimming. Shorter buried tails can work out through the body when the four legs are adjusted.
Conclusion
This standing fawn is controlled by proportion: 36 stitches for the head, a firm horizontal body, narrow front legs, wider back legs, and raised white spots placed in uneven clusters. Finish the fawn by checking the four-hoof balance before trimming the last yarn tails. The next concrete step is to pin every sewn piece in place and photograph the side view before stitching, because the head angle changes the whole animal. Save this fawn amigurumi crochet pattern to Pinterest, then post the finished deer on Instagram with #LittleFawnPattern. Which side of the back will carry the larger spot cluster?









