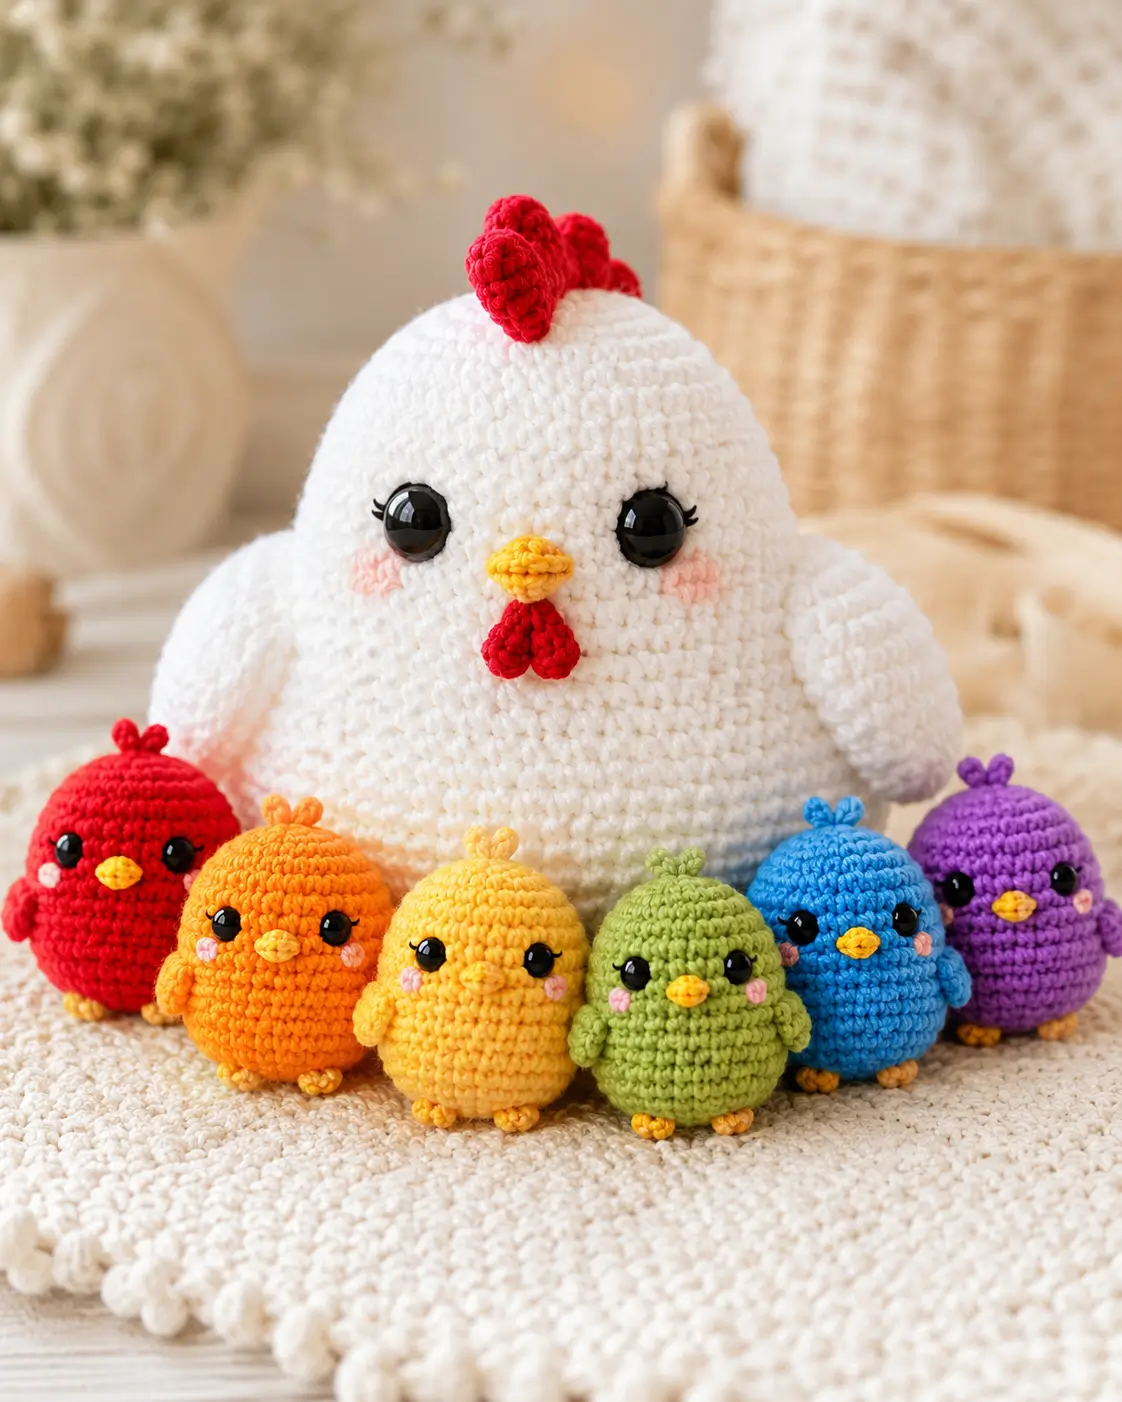
A hen’s red comb has to sit above the beak before this chicken amigurumi crochet pattern reads as poultry. This version uses worsted-weight yarn, a 3.5 mm hook, 15 mm safety eyes, and an intermediate build at about 23 cm. Make it when a nursery shelf, Easter basket, or farm-animal display needs one large white hen with removable rainbow chicks.
The Design: What Makes This Hen Different
This crochet hen pattern uses a separate head and body rather than one continuous egg shape. That gives the face more control: eyes can sit wide, the wattle can hang below the beak, and the comb can stay centered. The body uses a 42-stitch plateau so the hen sits broad enough to support side wings without tipping. The chicks use a smaller 30-stitch plateau, which keeps them round but clearly secondary. That scale difference matters in an amigurumi chicken with chicks. The common mistake is making the beak too large; a beak wider than the eye spacing turns the hen into a duck. Here, the beak is folded from a small flat circle, then stitched into a short triangle.
Project Info at a Glance
| Skill Level | Time | Finished Size | Hook | Best For |
|---|---|---|---|---|
| Intermediate | 2 hr+ for small hen/chicks; longer for large set | 23 cm hen | 3.5 mm | Farm-animal amigurumi display |
Time and size references are based on published hen/chick pattern data and the 23 cm large chicken listing used for material planning.
Materials and Tools
Yarn
- White or cream — weight 4 / worsted — 51 g — Lion Brand Basic Stitch, Lion Brand Color Theory, Paintbox Simply Aran, or another smooth acrylic.
- Red — weight 4 / worsted — 5 g — comb and wattle.
- Yellow or golden orange — weight 4 / worsted — 7 g — beak and feet.
- Pink — worsted scrap — under 2 g — cheek patches.
- Rainbow chick colors — red, orange, yellow, green, blue, purple — worsted scraps, about 8–12 g each.
Tools
- Hook 3.5 mm
- 15 mm safety eyes for the hen
- 7–8 mm safety eyes for chicks, or black embroidery for child-safe toys
- Fiberfill stuffing
- Yarn needle
- Stitch markers
- Straight pins
- Scissors
- Black embroidery thread for eyelashes
Abbreviations
- MR = magic ring
- sc = single crochet
- inc = increase, 2 sc in one stitch
- dec = invisible decrease
- sl st = slip stitch
- ch = chain
- BLO = back loop only
- st/sts = stitch/stitches
Invisible decrease works through the front loops of the next two stitches so closing rounds do not leave paired holes.
Pattern — Step by Step
Continuous spiral unless noted. Stitch counts are listed in brackets. The main hen uses a large 42-stitch plateau. The chicks use a small 30-stitch plateau.
Head — Make 1
Yarn: white/cream
R1: 6 sc in MR (6)
R2: inc ×6 (12)
R3: (sc, inc) ×6 (18)
R4: (2 sc, inc) ×6 (24)
R5: (3 sc, inc) ×6 (30)
R6: (4 sc, inc) ×6 (36)
R7: (5 sc, inc) ×6 (42)
R8–R15: sc around (42)
R16: (5 sc, dec) ×6 (36)
R17: sc around (36)
R18: (4 sc, dec) ×6 (30)
R19: (3 sc, dec) ×6 (24)
Insert 15 mm safety eyes between R11 and R12, about 10 stitches apart. Add stuffing firmly before the opening becomes narrow.
R20: (2 sc, dec) ×6 (18)
R21: (sc, dec) ×6 (12)
R22: dec ×6 (6)
Fasten off. Leave a 20 cm tail.
Body — Make 1
Yarn: white/cream
R1: 6 sc in MR (6)
R2: inc ×6 (12)
R3: (sc, inc) ×6 (18)
R4: (2 sc, inc) ×6 (24)
R5: (3 sc, inc) ×6 (30)
R6: (4 sc, inc) ×6 (36)
R7: (5 sc, inc) ×6 (42)
R8–R13: sc around (42)
R14: (5 sc, dec) ×6 (36)
R15: sc around (36)
R16: (4 sc, dec) ×6 (30)
R17: sc around (30)
R18: (3 sc, dec) ×6 (24)
Stuff until the body holds an oval base but still compresses slightly at the neck seam.
R19: (2 sc, dec) ×6 (18)
R20: (sc, dec) ×6 (12)
R21: dec ×6 (6)
Fasten off. Leave a 25 cm tail for sewing.
Wings / Front Limbs — Make 2
Yarn: white/cream
R1: 6 sc in MR (6)
R2: inc ×6 (12)
R3: (sc, inc) ×6 (18)
R4–R5: sc around (18)
R6: (sc, dec) ×6 (12)
R7: flatten and sc through both layers across (6)
Fasten off. Leave a 30 cm tail on each wing.
Feet / Back Legs — Make 2
Yarn: yellow/gold
R1: 6 sc in MR (6)
R2: inc ×6 (12)
R3: sc around (12)
R4: dec ×6 (6)
Flatten each foot. Use the yarn tail later to form three toe divisions with two vertical wraps.
Fasten off. Leave a 25 cm tail.
Comb Spikes — Make 3
Yarn: red
R1: 6 sc in MR (6)
R2–R4: sc around (6)
Do not stuff. Flatten each spike slightly before sewing.
Fasten off. Leave a 20 cm tail on each spike.
Wattle Lobes — Make 2
Yarn: red
R1: 6 sc in MR (6)
R2: sc around (6)
R3: sc around (6)
Pinch the top flat and let the bottom stay rounded.
Fasten off. Leave a 20 cm tail on each lobe.
Beak — Make 1
Yarn: yellow/gold
R1: 6 sc in MR (6)
R2: inc ×6 (12)
Fold the circle in half. Stitch the curved edge into a short triangle before attaching.
Fasten off. Leave a 25 cm tail.
Cheek Patches — Make 2
Yarn: pink
R1: 6 sc in MR (6)
R2: inc ×6, sl st to first st (12)
Keep these flat. Do not stuff.
Fasten off. Leave a 15 cm tail on each patch.
Eyelashes — Make 2 Sets
Yarn/thread: black embroidery thread
Make three short straight stitches outside each eye. Place the center stitch level with the eye center. Place the upper and lower stitches one round apart so the lashes curve outward rather than downward.
Fasten off inside the head. Leave no visible tail.
Rainbow Chick Body — Make 6
Yarn: red, orange, yellow, green, blue, purple
R1: 6 sc in MR (6)
R2: inc ×6 (12)
R3: (sc, inc) ×6 (18)
R4: (2 sc, inc) ×6 (24)
R5: (3 sc, inc) ×6 (30)
R6–R11: sc around (30)
R12: (3 sc, dec) ×6 (24)
R13: (2 sc, dec) ×6 (18)
Insert 7–8 mm safety eyes between R8 and R9, about 6 stitches apart. Stuff firmly enough for the chick to stand.
R14: (sc, dec) ×6 (12)
R15: dec ×6 (6)
Fasten off. Leave a 15 cm tail.
Chick Wings — Make 12
Yarn: matching chick body color
R1: 6 sc in MR (6)
R2: inc ×6 (12)
R3: sc around (12)
R4: flatten and sc through both layers across (6)
Fasten off. Leave a 15 cm tail on each wing.
Chick Beaks — Make 6
Yarn: yellow/gold
R1: 6 sc in MR (6)
R2: inc ×6 (12)
Fold in half and sew into a small oval triangle.
Fasten off. Leave a 15 cm tail.
Chick Cheek Patches — Make 12
Yarn: pink
R1: 6 sc in MR, sl st to first st (6)
Keep the circle tiny; large cheeks will crowd the eyes.
Fasten off. Leave a 10 cm tail.
Chick Feet — Make 12
Yarn: yellow/gold
R1: 6 sc in MR (6)
R2: sc around (6)
Flatten each foot before sewing under the chick body.
Fasten off. Leave a 12 cm tail.
Chick Top Tufts — Make 6 Sets
Yarn: matching chick body color
Attach yarn at the top center of one chick. Ch 4, sl st into the same stitch. Ch 4, sl st into the next stitch. Ch 4, sl st into the previous stitch. Pull both tails through the body and knot inside before closing fully.
Fasten off. Leave a 10 cm tail.
Assembly
- Pin the head to the body with the face angled slightly downward; sew around the neck twice.
- Add a small extra tuft of stuffing at the front neck before closing the last 2 cm of the seam.
- Sew the beak between the eyes, centered over R12–R14 of the head.
- Sew the two wattle lobes directly below the beak, touching at the top.
- Sew the cheek patches one round below each eye and two stitches away from the beak edge.
- Sew the wings to the body sides between R7 and R13, with the narrow end angled down.
- Sew the feet to the underside front of the body, spaced 5 stitches apart.
- Sew the three comb spikes along the head centerline from front to back.
- Attach eyelashes after all face pieces are secure so thread tension does not shift the eyes.
- Finish the six chicks, then place them in rainbow order in front of the hen.
The finished set is one white hen and six detachable chicks.
7 Technical Tips
- Stitch marker drift: A visible spiral seam can rotate the beak off center by 2–3 stitches. Reset the marker at the back of the head after R7 and check the eye line before installing safety eyes.
- Eye placement timing: Install the hen eyes after R15 and before R20. A 10-stitch gap works for 15 mm eyes on a 42-stitch head.
- Stuffing firmness: Understuffing the body makes the hen collapse behind the wings. Fill the lower body to about 90% firmness, then leave the neck area slightly softer for sewing.
- Invisible decrease gaps: Standard decreases can leave paired holes on white yarn. Work each decrease through front loops only, then tighten the next sc to close the ladder.
- Wing droop: Wings sewn only at the top edge will swing outward. Stitch across the top edge first, then add one hidden tack 2 rounds lower near the back of each wing.
- Comb collapse: Stuffed comb spikes look bulky and fall sideways. Leave the spikes empty and anchor each one at its base with three stitches across the centerline.
- Tail weaving failure: Short tails can pull out when the chicks are handled. Leave at least 10–15 cm on small parts and weave in three directions before trimming.
Conclusion
This chicken amigurumi crochet pattern is built around proportion: a large 42-stitch hen, small 30-stitch chicks, a restrained beak, and red features that identify the bird immediately. The next practical step is to crochet one test chick before starting the hen, because that sample will confirm yarn tension, eye size, and stuffing density. Share the finished hen-and-chicks set on Pinterest and Instagram with the full rainbow lined up in front. Use hashtag #WhiteHenRainbowChicks so the scale and color order are easy to track. Which chick color should sit closest to the hen’s red wattle: red, yellow, or blue?









