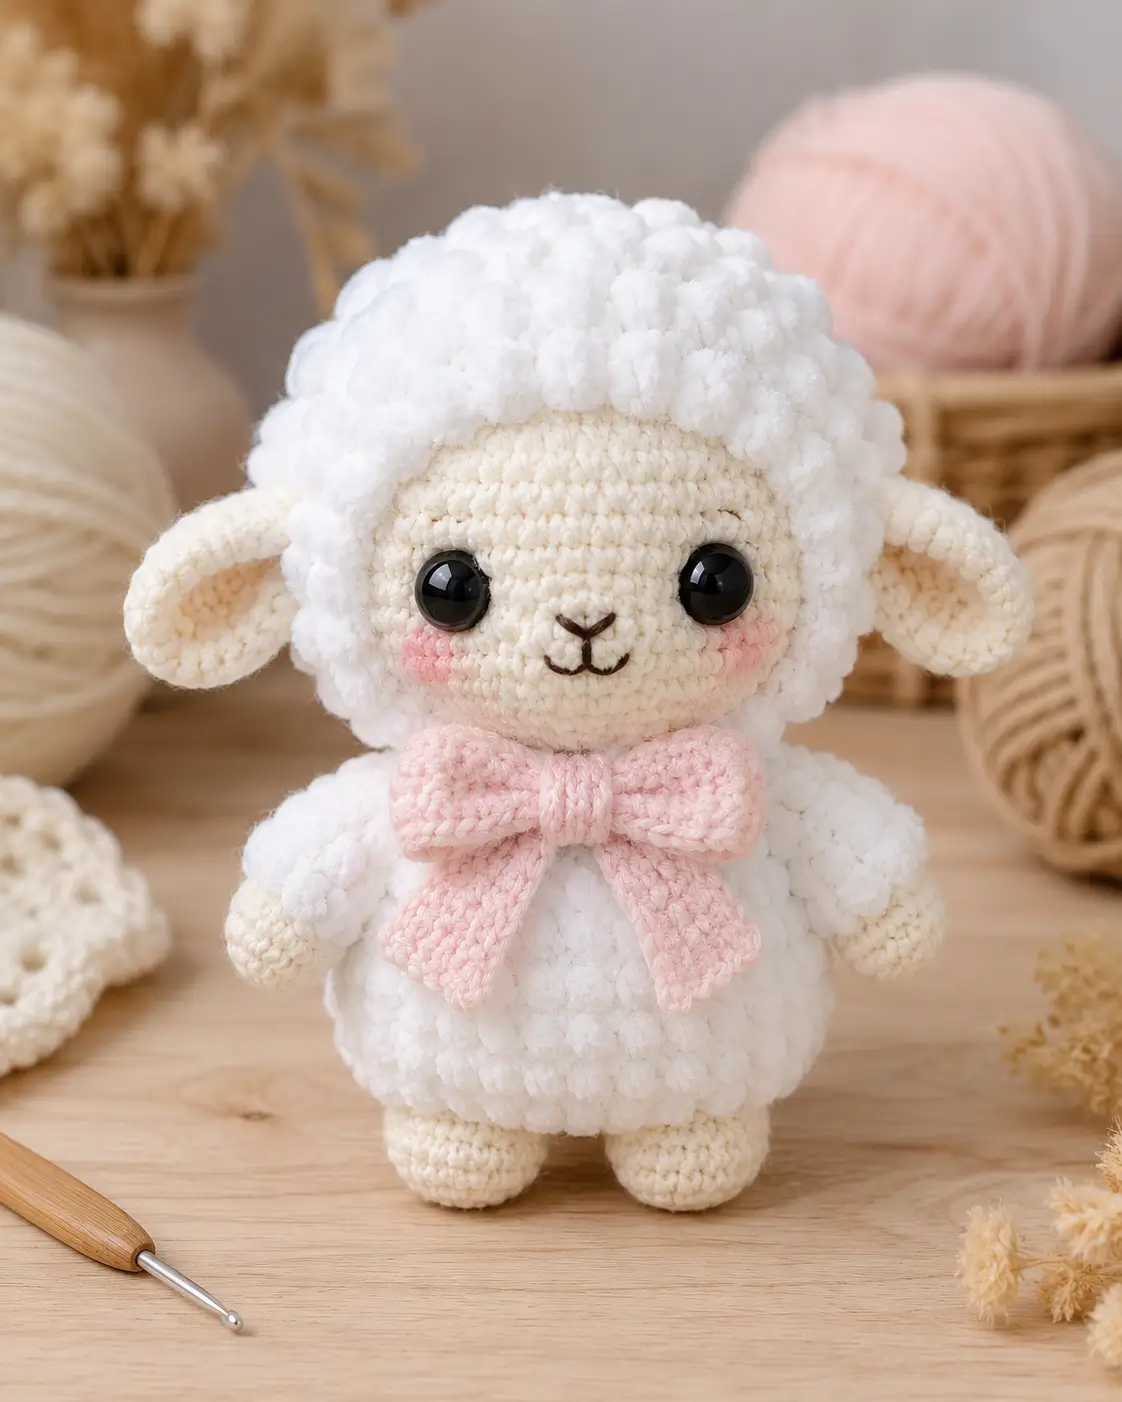
A lamb’s fleece must read wider than its cream face, or the toy becomes a bear in a hood. This fluffy sheep amigurumi crochet pattern uses chunky white fleece yarn, sport-weight cream yarn, a 3 mm hook, a 5 mm hook, and 12 mm eyes to make a 23 cm intermediate lamb. Use it for nursery display, market stock, or a photo-ready handmade gift.
The Design: What Makes This Lamb Different
This sheep uses three separate surface zones: a smooth cream face, a raised white wool cap, and a rounded bobble body. You shape the face first because the eyes need a clean fabric behind them, not fuzzy stitches that hide placement. The maker then builds the fleece as a cap and body texture, which keeps the lamb readable from the front. A sheep amigurumi pattern fails when the ears are sewn too high; high ears create a puppy outline. Here, the ears sit near eye level and angle outward, which matches lamb proportions. The bow is large on purpose. It covers the neck join, adds pink balance to the cheek patches, and gives this crochet lamb pattern a clear front view. The main competition gap: many plush sheep crochet posts skip exact cheek placement and bow math.
Project Info at a Glance
| Skill Level | Time | Finished Size | Hook | Best For |
|---|---|---|---|---|
| Intermediate | Few evenings | 23 cm seated | 3 mm and 5 mm | Nursery shelf, market table, Easter set, farm animal collection |
Size, hook, yarn, and eye data are based on comparable sheep amigurumi sources using 23 cm sizing, 3 mm/5 mm hooks, chunky fluffy yarn, sport-weight yarn, and 12 mm eyes.
Materials and Tools
Yarn
- White — bulky #5 chunky fluffy yarn — 25 g — Sirdar Snuggly Snowflake Chunky or similar
- Cream — sport #2 / 4 ply cotton-acrylic blend — 50 g ball — YarnArt Jeans 03 or similar
- Pale pink — sport #2 / 4 ply cotton-acrylic blend — 50 g ball — YarnArt Jeans 18 or similar
- Dark brown or black — embroidery yarn — small length — for nose and mouth
- Optional white smooth yarn — sport #2 — small amount — for sewing cap edges if fluffy yarn is hard to see
Tools
- Hook 3 mm for cream and pink smooth yarn
- Hook 5 mm for fluffy white yarn
- 12 mm black safety eyes
- Polyester stuffing
- Yarn needle
- Stitch markers
- Pins with large heads
- Scissors
For toys intended for children under 3, embroider the eyes instead of using plastic safety eyes.
Abbreviations
- MR = magic ring
- sc = single crochet
- inc = 2 sc in next stitch
- dec = single crochet decrease
- sl st = slip stitch
- ch = chain
- BLO = back loop only
- FLO = front loop only
- bobble = 5 dc bobble worked into one stitch, closed as one stitch
- FO = fasten off
Work invisible decreases through front loops only so closing rounds do not leave visible holes.
Pattern — Step by Step
Continuous spiral unless noted. Bobble rounds count each bobble as one stitch.
Head — Make 1
Yarn: cream
R1: 6 sc in MR (6)
R2: inc ×6 (12)
R3: (sc, inc) ×6 (18)
R4: (2 sc, inc) ×6 (24)
R5: (3 sc, inc) ×6 (30)
R6: (4 sc, inc) ×6 (36)
R7–R12: sc around (36)
R13: sc around (36)
Place 12 mm eyes between R8 and R9, 8 stitches apart. Do not add backs until symmetry is checked.
R14: sc around (36)
R15: (4 sc, dec) ×6 (30)
R16: (3 sc, dec) ×6 (24)
Stuff the forehead and cheeks firmly before the opening gets narrow.
R17: (2 sc, dec) ×6 (18)
R18: (sc, dec) ×6 (12)
R19: dec ×6 (6)
Fasten off. Leave 15 cm tail and close through front loops.
Wool Cap — Make 1
Yarn: white chunky fluffy yarn
R1: 6 sc in MR (6)
R2: inc ×6 (12)
R3: (sc, inc) ×6 (18)
R4: (2 sc, inc) ×6 (24)
R5: (3 sc, inc) ×6 (30)
R6: (4 sc, inc) ×6 (36)
R7: (bobble, sc) ×18 (36)
R8: sc around (36)
R9: (bobble, sc) ×18 (36)
R10: sc around (36)
Fasten off. Leave 45 cm tail.
Do not close the cap. It should sit like a hood over the top half of the head, leaving the cream face open.
Body — Make 1
Yarn: white chunky fluffy yarn
R1: 6 sc in MR (6)
R2: inc ×6 (12)
R3: (sc, inc) ×6 (18)
R4: (2 sc, inc) ×6 (24)
R5: (3 sc, inc) ×6 (30)
R6: (4 sc, inc) ×6 (36)
R7: (bobble, sc) ×18 (36)
R8: sc around (36)
R9: (bobble, sc) ×18 (36)
R10–R11: sc around (36)
R12: (4 sc, dec) ×6 (30)
R13: (bobble, sc) ×15 (30)
R14: sc around (30)
R15: (3 sc, dec) ×6 (24)
R16: sc around (24)
R17: (2 sc, dec) ×6 (18)
Stuff the body firmly at the base. Add smaller pieces of stuffing near the neck.
R18: (sc, dec) ×6 (12)
R19: dec ×6 (6)
Fasten off. Leave 50 cm tail for joining to the head.
Arms / Front Legs — Make 2
Yarn: cream for hoof, white for cuff
R1: with cream, 6 sc in MR (6)
R2: inc ×6 (12)
R3: BLO sc around (12)
R4–R5: sc around (12)
R6: change to white, (bobble, sc) ×6 (12)
R7–R8: sc around (12)
Stuff only the lower two-thirds. Keep the top flatter for sewing.
R9: dec ×6 (6)
Fasten off. Leave 25 cm tail.
Back Legs — Make 2
Yarn: cream for foot, white for cuff
R1: with cream, 6 sc in MR (6)
R2: inc ×6 (12)
R3: (sc, inc) ×6 (18)
R4: BLO sc around (18)
R5–R6: sc around (18)
R7: (sc, dec) ×6 (12)
R8: change to white, sc around (12)
R9: (bobble, sc) ×6 (12)
R10: dec ×6 (6)
Fasten off. Leave 30 cm tail.
Ears — Make 2
Yarn: cream
R1: 6 sc in MR (6)
R2: inc ×6 (12)
R3: (sc, inc) ×6 (18)
R4: (2 sc, inc) ×6 (24)
R5–R7: sc around (24)
R8: (2 sc, dec) ×6 (18)
R9: (sc, dec) ×6 (12)
R10: sc around (12)
Fasten off. Leave 35 cm tail.
Do not stuff. Fold the ear slightly lengthwise before sewing so the outer edge droops.
Tiny Tail — Make 1
Yarn: white chunky fluffy yarn
R1: 6 sc in MR (6)
R2: inc ×6 (12)
R3: (bobble, sc) ×6 (12)
R4: sc around (12)
R5: dec ×6 (6)
Fasten off. Leave 25 cm tail.
Cheek Patches — Make 2
Yarn: pale pink
R1: 6 sc in MR (6)
R2: inc ×6 (12)
Sl st to first stitch.
Fasten off. Leave 20 cm tail.
Keep the patches flat. Do not stuff.
Pink Bow — Make 1
Yarn: pale pink
Bow Loop Rectangle
Ch 19.
R1: sc in 2nd ch from hook and across (18)
R2–R7: ch 1, turn, sc across (18)
Fasten off. Leave 30 cm tail.
Bow Center Band
Ch 7.
R1: sc in 2nd ch from hook and across (6)
R2–R4: ch 1, turn, sc across (6)
Fasten off. Leave 20 cm tail.
Bow Tails — Make 2
Ch 9.
R1: sc in 2nd ch from hook and across (8)
R2–R5: ch 1, turn, sc across (8)
R6: sl st, sc, sc, sc, sc, sc, sl st, sl st (8)
Fasten off. Leave 20 cm tail.
Pinch the bow loop rectangle at the center. Wrap the center band around it, catching both tails behind the band before sewing.
Nose and Mouth Embroidery — Make 1
Yarn: dark brown or black embroidery strand
- Place one pin centered between the eyes, one round below them.
- Make a small vertical “Y” nose over 2 stitches.
- Add two curved mouth stitches, each 2 stitches wide.
- Tie ends inside the head and trim only after the face is checked.
Assembly
- Sew the wool cap to the head first, placing the lower cap edge 2–3 rounds above the eyes and leaving the cream face visible.
- Join the body to the underside of the head with the body seam centered at the back.
- Sew the cheek patches under the eyes, each patch starting 1 stitch outside the eye line.
- Embroider the nose and mouth after the cheeks are pinned but before the cheeks are fully sewn.
- Attach the ears at eye level, with the front edge of each ear about 3 cm from the nearest eye.
- Sew the arms to the upper sides of the body, angled slightly forward.
- Attach the back legs to the lower front of the body so the sheep sits without tipping.
- Sew the tiny tail to the lower back, centered and high enough that it does not prop the body forward.
- Sew the pink bow at the neck seam, covering the join between head and body.
- Weave in all tails for at least 5 cm through dense stitches, then trim close to the fabric.
The finished lamb has a cream face, white bobble fleece, floppy ears, cheek patches, and a fixed pink bow.
7 Technical Tips
- Failure mode: the fleece cap hides the eyes. Keep the cap edge 2–3 rounds above the eye line before sewing the first stitch.
- Failure mode: bobble rounds drift by one stitch. Place a marker in the first stitch of every round and recount after each 36-stitch bobble round.
- Failure mode: the neck collapses. Stuff the lower head to about 85% firmness and the body neck to about 90% firmness before sewing.
- Failure mode: visible holes on closing rounds. Use FLO invisible decreases on R17–R19 of the head and pull each decrease snug before the next stitch.
- Failure mode: safety eyes become uneven after backing. Place eyes between R8 and R9, 8 stitches apart, then photograph the face before locking the washers.
- Failure mode: ears look like puppy ears. Put the ear fronts near eye level and about 3 cm from each eye, then angle the tips outward before sewing.
- Failure mode: the bow twists forward. Stitch through the bow center band, both bow tails, and the body neck seam with at least three passes.
Conclusion
Block the bow first, then finish the face. That order keeps the sheep’s center line readable and stops the cheeks from sitting too low under the eyes. Use the verified 23 cm size as a reference, but check your own gauge after the body reaches 36 stitches; plush yarn changes scale quickly. Save this fluffy sheep amigurumi crochet pattern to Pinterest, then post the finished lamb on Instagram with #FluffySheepAmigurumi. For the next make, test one change only: larger ears, smaller bow, or embroidered eyes. Which detail should define this lamb most—the wide wool cap, the floppy ears, or the oversized pink bow?









