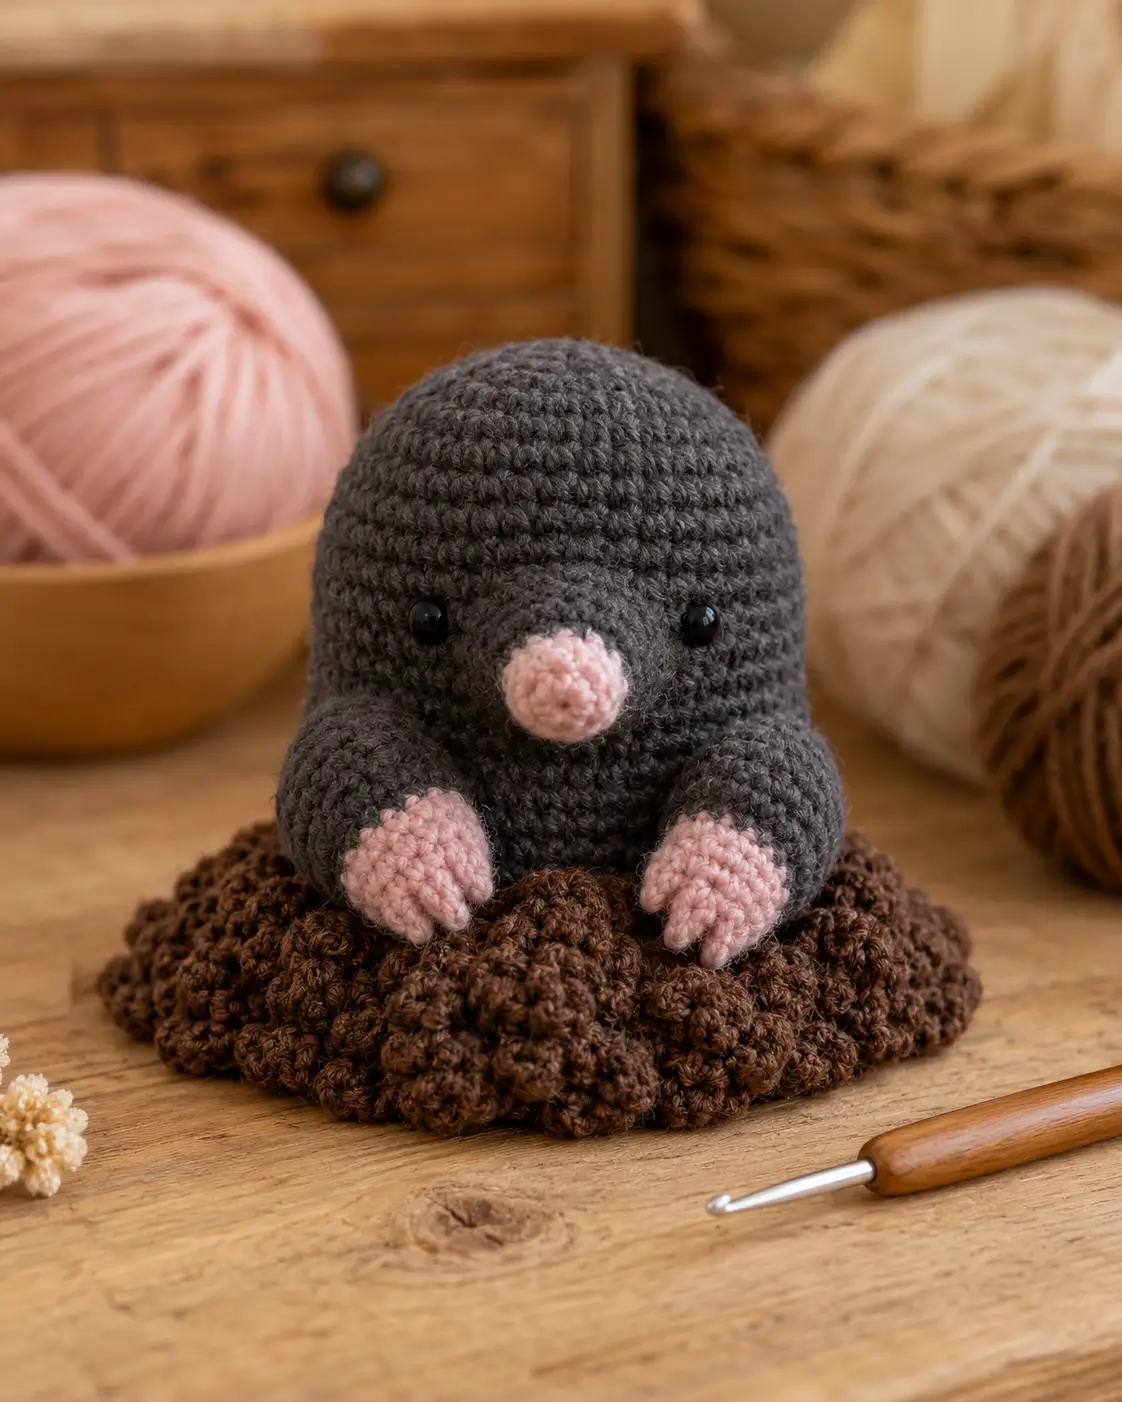
A mole’s pink snout has to arrive before its eyes make sense. This mole amigurumi crochet pattern builds a 15–18 cm seated toy with worsted or DK yarn, a 3.0–3.5 mm hook, and 10–12 mm safety eyes. Work at advanced-beginner level. The low profile fits a shelf, plant display, or craft market table without needing a tall wire frame.
The Design: What Makes This Mole Different
You shape this crochet mole toy around three visual anchors: the blunt snout, the sealed-looking head, and the digging paws. The muzzle is built as a gray cylinder first because the pink nose needs a raised base, not a flat circle stitched to the face. The body stays wider at the bottom so the mole can sit inside the soil mound instead of tipping forward. Then the maker changes to third-person checking: she pins the front paws low, keeps the eyes wide, and avoids adding tall ears. That matters. A common mistake in a mole amigurumi pattern is treating the animal like a mouse, with upright ears and tiny hands. This mole crochet pattern keeps the silhouette compact, grounded, and shovel-pawed.
Project Info at a Glance
| Skill Level | Time | Finished Size | Hook | Best For |
|---|---|---|---|---|
| Advanced beginner to intermediate | 4–5 hours | 15–18 cm seated | 3.0–3.5 mm | Woodland display, market table, plant shelf |
Materials and Tools
Yarn
- Charcoal gray — DK/worsted — 40–50 g — Paintbox Cotton DK, Stylecraft Special DK, or similar tight-twist yarn
- Pale pink — DK/worsted — scraps to 8 g — for nose, paw pads, and claw tips
- Dark brown — DK/worsted — 24–35 g — for bobbled soil mound
- Slightly darker gray — DK/worsted — scraps — for cheek pads or muzzle shadow
Tools
- Hook 3.25 mm
- 10–12 mm black safety eyes
- Polyester stuffing
- Tapestry needle
- Locking stitch markers
- Pins
- Scissors
Abbreviations
MR = magic ring; sc = single crochet; inc = 2 sc in one stitch; dec = invisible decrease over 2 stitches; sl st = slip stitch; ch = chain; BLO = back loop only; bobble = 5 dc worked together in one stitch. Invisible decrease should be worked through the front loops only to reduce holes on the face and body.
Pattern — Step by Step
Continuous spiral unless noted. Mark the first stitch of every round.
Head
Yarn: charcoal gray
R1: 6 sc in MR (6)
R2: inc ×6 (12)
R3: (1 sc, inc) ×6 (18)
R4: (2 sc, inc) ×6 (24)
R5: (3 sc, inc) ×6 (30)
R6: (4 sc, inc) ×6 (36)
R7: (5 sc, inc) ×6 (42)
R8–R15: sc in all stitches (42)
R16: (5 sc, dec) ×6 (36)
R17: sc in all stitches (36)
R18: (4 sc, dec) ×6 (30)
R19: sc in all stitches (30)
R20: (3 sc, dec) ×6 (24)
R21: (2 sc, dec) ×6 (18)
R22: (1 sc, dec) ×6 (12)
R23: dec ×6 (6)
Insert safety eyes between R11 and R12, 9 stitches apart, before R16 closes the head. Stuff firmly, especially behind the muzzle zone.
Fasten off. Leave a 20 cm tail to close the final hole.
Body
Yarn: charcoal gray
R1: 6 sc in MR (6)
R2: inc ×6 (12)
R3: (1 sc, inc) ×6 (18)
R4: (2 sc, inc) ×6 (24)
R5: (3 sc, inc) ×6 (30)
R6: (4 sc, inc) ×6 (36)
R7–R12: sc in all stitches (36)
R13: (4 sc, dec) ×6 (30)
R14–R15: sc in all stitches (30)
R16: (3 sc, dec) ×6 (24)
R17: sc in all stitches (24)
R18: (2 sc, dec) ×6 (18)
R19: sc in all stitches (18)
R20: (1 sc, dec) ×6 (12)
R21: dec ×6 (6)
Stuff the lower half harder than the top so the mole sits inside the soil base without leaning.
Fasten off. Leave a 25 cm tail for sewing to the head.
Front Legs / Arms
Make 2. Yarn: charcoal gray
R1: 6 sc in MR (6)
R2: inc ×6 (12)
R3–R8: sc in all stitches (12)
R9: sc in all stitches (12)
Stuff the paw end only. Leave the shoulder end flatter for sewing.
Fold the opening and work 6 sc through both layers. Fasten off. Leave a 22 cm tail.
Pink Paw Pads with Claws
Make 2. Yarn: pale pink
R1: 6 sc in MR (6)
R2: inc ×6 (12)
R3: sc in all stitches (12)
Claws: (ch 3, sl st in 2nd ch from hook, sl st in next ch, sl st into next stitch on pad) ×3
Place each pad on the lower front of a gray arm, with claws pointing down toward the soil.
Fasten off. Leave a 15 cm tail for sewing.
Back Legs
Make 2. Yarn: charcoal gray
R1: 6 sc in MR (6)
R2: inc ×6 (12)
R3–R5: sc in all stitches (12)
R6: sc in all stitches (12)
Do not overstuff. These act as hidden anchors under the body and behind the front paws.
Fold the opening and work 6 sc through both layers. Fasten off. Leave a 20 cm tail.
Low Ear Bumps
Make 2. Yarn: charcoal gray
R1: 6 sc in MR (6)
R2: inc ×6 (12)
R3: sc in all stitches (12)
Flatten each piece. Moles should not have tall ears, so these sit low and almost disappear into the head curve.
Fasten off. Leave a 15 cm tail.
Gray Muzzle Base
Yarn: charcoal gray
R1: 6 sc in MR (6)
R2: inc ×6 (12)
R3: (1 sc, inc) ×6 (18)
R4–R5: sc in all stitches (18)
Stuff lightly. The base should project forward but not droop.
Fasten off. Leave a 25 cm tail.
Pink Nose
Yarn: pale pink
R1: 6 sc in MR (6)
R2: inc ×6 (12)
R3: sc in all stitches (12)
Thread the tail through the front six stitches and pull gently to make the nose blunt, not pointed.
Fasten off. Leave a 20 cm tail to sew onto the muzzle base.
Cheek Patches
Make 2. Yarn: slightly darker gray or charcoal gray
R1: 6 sc in MR (6)
R2: inc ×6 (12)
Sl st to first stitch (12)
Keep these flat. They create quiet shaping beside the muzzle rather than visible blush spots.
Fasten off. Leave a 15 cm tail.
Soil Mound Accessory
Yarn: dark brown
R1: 6 sc in MR (6)
R2: inc ×6 (12)
R3: (1 sc, inc) ×6 (18)
R4: (2 sc, inc) ×6 (24)
R5: (3 sc, inc) ×6 (30)
R6: (4 sc, inc) ×6 (36)
R7: (5 sc, inc) ×6 (42)
R8: BLO sc in all stitches (42)
R9: (bobble, 1 sc) ×21 (42)
R10: sc in all stitches (42)
R11: (1 sc, bobble) ×21 (42)
R12: sc in all stitches (42)
Do not stuff the whole mound. Add a flat circle of felt or cardboard under the base if the display needs extra weight.
Fasten off. Leave a 30 cm tail for attaching the body through the center.
Assembly
- Close the head with the 20 cm tail, then run the needle through the head once to hide the end.
- Sew the body to the lower back of the head across an oval about 18 stitches wide.
- Pin the gray muzzle base between the eyes, centered between R11 and R15 of the head.
- Sew the pink nose to the front of the gray muzzle base before attaching cheek patches.
- Place cheek patches low beside the muzzle, one under each eye, then stitch only around the outer edge.
- Sew front legs to the body at a forward angle, with the pink pads facing the viewer.
- Attach back legs under the front edge of the body so they prop the mole above the soil.
- Sew low ear bumps to the side-back of the head, almost hidden in the curve.
- Stitch the soil mound to the bottom of the body using the long brown tail through R8 of the mound.
- Weave all tails through stuffed sections for at least 3 cm before trimming.
The finished mole sits as a gray, pink-nosed figure emerging from a bobbled brown soil mound.
7 Technical Tips
- Marker drift: one-stitch spiral shift. If the muzzle center moves more than 1 stitch left or right by R12, move the marker at the back of the head rather than correcting on the face.
- Stuffing failure: flat forehead. Add small pieces of stuffing behind the eyes until the head rebounds about 70% when pressed.
- Invisible decrease failure: visible bars. Work decreases through front loops only on R16–R23 of the head, because regular decreases make a ladder down the face.
- Eye placement error: too close to the snout. Set the eyes 9 stitches apart before closing R16; anything under 7 stitches makes the mole read like a mouse.
- Worsted tension problem: stuffing holes. With worsted yarn, keep the hook near 3.25 mm; holes larger than 2 mm will show white stuffing on the charcoal head.
- Pinning failure: floating paws. Pin each front paw so the lowest pink claw touches the top bobble line of the soil mound before sewing.
- Tail weaving failure: loose soil base. Leave 30 cm on the mound and pass it through the body base twice; a shorter tail can loosen after handling.
Conclusion
This build works because the mole stays low, round, and front-heavy in the right places. Finish one sample in charcoal gray first, then adjust only the soil mound diameter if your yarn changes scale. The next practical step is to pin the paws and muzzle before sewing; that single check controls the whole expression. Share the finished piece on Pinterest and Instagram with the hashtag #SoilMoundMole. For final indexing, keep the file name and post slug close to the main keyword: mole amigurumi crochet pattern. Which detail makes your mole read fastest: the blunt pink nose, the hidden ears, or the digging claws?









